Page 95 of 489
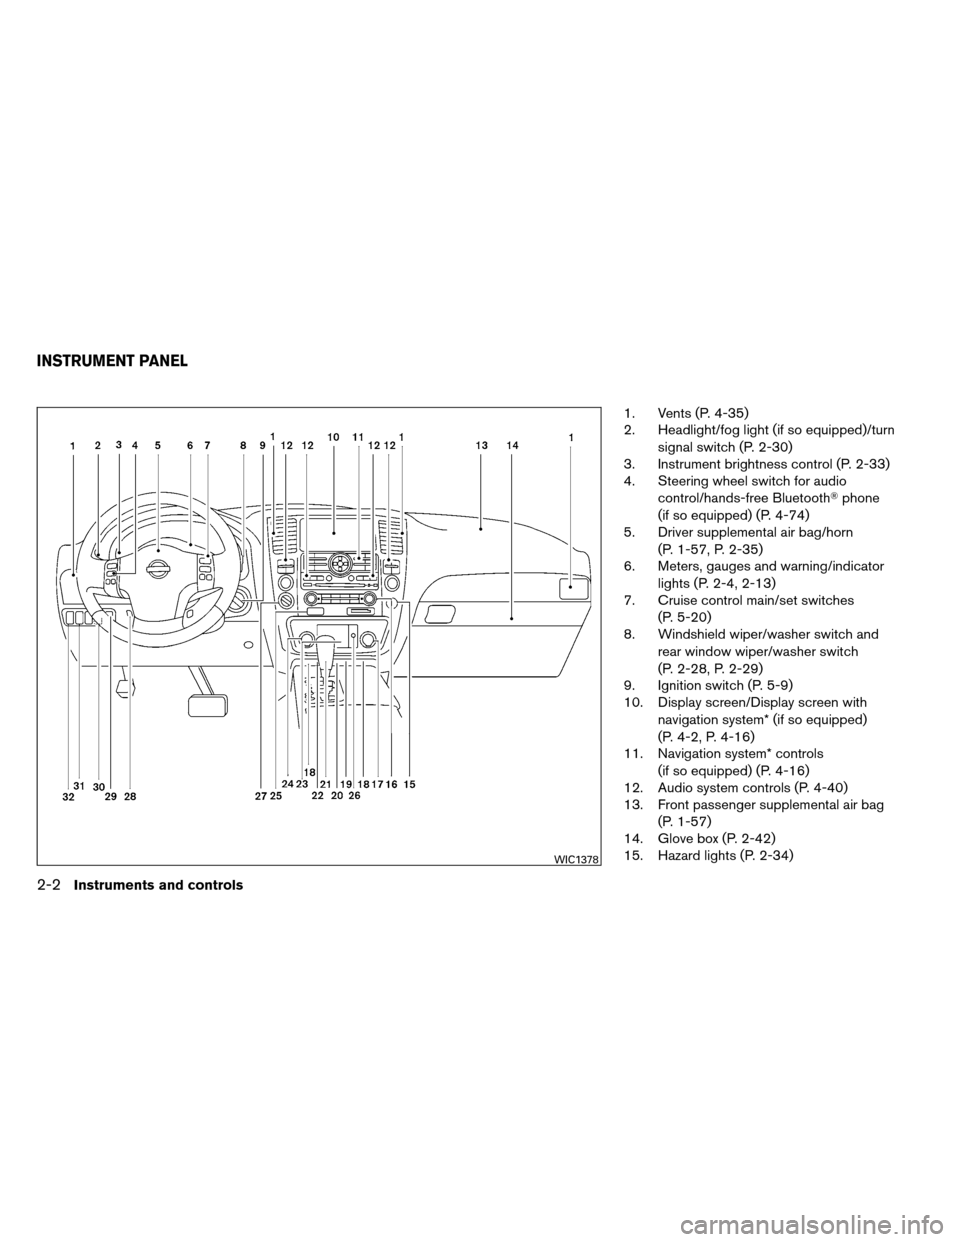
1. Vents (P. 4-35)
2. Headlight/fog light (if so equipped)/turnsignal switch (P. 2-30)
3. Instrument brightness control (P. 2-33)
4. Steering wheel switch for audio
control/hands-free Bluetooth� phone
(if so equipped) (P. 4-74)
5. Driver supplemental air bag/horn
(P. 1-57, P. 2-35)
6. Meters, gauges and warning/indicator
lights (P. 2-4, 2-13)
7. Cruise control main/set switches
(P. 5-20)
8. Windshield wiper/washer switch and
rear window wiper/washer switch
(P. 2-28, P. 2-29)
9. Ignition switch (P. 5-9)
10. Display screen/Display screen with
navigation system* (if so equipped)
(P. 4-2, P. 4-16)
11. Navigation system* controls
(if so equipped) (P. 4-16)
12. Audio system controls (P. 4-40)
13. Front passenger supplemental air bag
(P. 1-57)
14. Glove box (P. 2-42)
15. Hazard lights (P. 2-34)
WIC1378
INSTRUMENT PANEL
2-2Instruments and controls
Page 98 of 489
1. Speedometer
2. Odometer/twin trip display
3. Change button
SPEEDOMETER AND ODOMETER
Speedometer
The speedometer indicates vehicle speed.
Odometer/Twin trip odometer
The odometer/twin trip odometer is displayed
when the ignition switch is placed in the ON
position.
The odometer records the total distance the ve-
hicle has been driven.The twin trip odometer records the distance of
individual trips.
Changing the display:
Pushing the change button changes the display
as follows:
Trip
→
Trip→Odometer only
Elapsed time, driving distance and average
speed information is also available for vehicles
with navigation system (if so equipped) . Refer to
“Control panel buttons” in the “Display screen,
heater, air conditioner and audio systems” sec-
tion later in this manual.
Resetting the trip odometer:
Pushing the change button for more than 1 second
resets the currently displayed trip odometer to zero.
WIC1502WIC1245
Instruments and controls2-5
Page 114 of 489

Light reminder chime
With the ignition switch placed in the OFF posi-
tion, a chime sounds when the driver’s door is
opened if the headlights or parking lights are on.
Turn the headlight control switch off before leav-
ing the vehicle.The vehicle information display
�1is located to
the left of the speedometer. It displays such items
as:
● automatic transmission position indicator
● cruise control system information
● Intelligent Key operation information (if so
equipped)
● some indicators and warnings
● other information
For details about the Intelligent Key, see
“NISSAN Intelligent Key™” in the “Pre-driving
checks and adjustments” section.HOW TO USE THE VEHICLE
INFORMATION DISPLAY
Press the vehicle information display INFO but-
ton
�1located on the instrument panel to toggle
through the following modes.
MPG →Range →Warning
Rotate the INFO button
�2to highlight the de-
sired menu option within the selected mode.
Press the INFO button
�1to enter the high-
lighted menu.
WIC1248WIC1249
VEHICLE INFORMATION DISPLAY
Instruments and controls2-21
Page 123 of 489
To defrost the rear window glass and outside
mirrors:
Start the engine and push the rear window de-
froster switch. The rear window defroster indica-
tor light on the display screen comes on. Push the
switch again to turn the defroster off.
The rear window defroster automatically turns off
after approximately 15 minutes.
CAUTION
When cleaning the inner side of the rear
window, be careful not to scratch or dam-
age the rear window defroster.
HEADLIGHT CONTROL SWITCH
Lighting
�1When turning the switch to theposi-
tion, the front parking, tail, license plate and
instrument panel lights come on.
�2When turning the switch to theposi-
tion, the headlights come on and all the other
lights remain on.
CAUTION
Use the headlights with the engine run-
ning to avoid discharging the vehicle
battery.
LIC1173
Type A
WIC1250
Type B
WIC1186
REAR WINDOW AND OUTSIDE
MIRROR DEFROSTER SWITCH HEADLIGHT AND TURN SIGNAL
SWITCH
2-30Instruments and controls
Page 124 of 489

Autolight system
The autolight system allows the headlights to be
set so they turn on and off automatically. The
autolight system can:● Turn on the headlights, front parking, tail,
license plate and instrument panel lights au-
tomatically when it is dark.
● Turn off all the lights when it is light.
● Keep all the lights on for a period of time after
you place the ignition switch in the OFF
position and all doors are closed. NOTE:
Autolight activation sensitivity and the
time delay for autolight shutoff can be ad-
justed. See “Comfort & convenience set-
tings” in the “Monitor, climate, audio,
phone and voice recognition systems�sec-
tion later in this manual.
To turn on the autolight system:
1. Turn the headlight switch to the AUTO posi- tion
�1.
2. Turn the ignition switch to ON.
3. The autolight system automatically turns the headlights on and off.
Initially, if the ignition switch is turned OFF and a
door is opened and left open, the headlights
remain ON for a period of time. If another door is
opened while the headlights are on, then the
timer is reset.
To turn the autolight system off, turn the switch to
the OFF,
,orposition.
Type C
SIC3019WIC1251
Instruments and controls2-31
Page 125 of 489

Be sure you do not put anything on top of
the autolight sensor
�1located in the top
side of the instrument panel. The autolight
sensor controls the autolight; if it is cov-
ered, the autolight sensor reacts as if it is
dark out and the headlights will illuminate.
If this occurs while parked with the engine
off and the ignition switch placed in the ON
position, your vehicle’s battery could be-
come discharged.Headlight beam select
�1To select the high beam function, push the
lever forward. The high beam lights come on
and the
light illuminates.
�2Pull the lever back to select the low beam.
�3Pulling and releasing the lever flashes the
headlight high beams on and off.
Battery saver system
If the ignition switch is placed in the OFF position
while the headlight switch is in the
orposition, the headlights will turn off after
a period of time. After the headlights automatically turn off with the
headlight switch in the
orposition,
the headlights will illuminate again if the headlight
switch is moved to the OFF position and then
turned to the
orposition.
CAUTION
Even though the battery saver feature au-
tomatically turns off the headlights after a
period of time, you should turn the head-
light switch to the OFF position when the
engine is not running to avoid discharging
the vehicle battery.
DAYTIME RUNNING LIGHT SYSTEM
(Canada only)
The headlights automatically illuminate at a re-
duced intensity when the engine is started with
the parking brake released. The daytime running
lights operate with the headlight switch in the
OFF position or in the
position. Turn the
headlight switch to the
position for full
illumination when driving at night.
If the parking brake is applied before the engine is
started, the daytime running lights do not illumi-
nate. The daytime running lights illuminate when
the parking brake is released. The daytime run-
LIC0836WIC1252
2-32Instruments and controls
Page 126 of 489
ning lights will remain on until the ignition switch
is placed in the OFF position.
WARNING
When the daytime running light system is
active, tail lights on your vehicle are not
on. It is necessary at dusk to turn on your
headlights. Failure to do so could cause
an accident injuring yourself and others.
INSTRUMENT BRIGHTNESS
CONTROL
The instrument brightness control operates when
the headlight control switch is in
the
,or AUTO position (with auto-
lights activated) .
Turn the control to adjust the brightness of instru-
ment panel lights when driving at night.
TURN SIGNAL SWITCH
Turn signal
�1Move the lever up or down to signal the
turning direction. When the turn is com-
pleted, the turn signals cancel automatically.
Lane change signal
�2To signal a lane change, move the lever up or
down to the point where the indicator light
begins to flash, but the lever does not latch.
WIC1506WIC1253
Instruments and controls2-33
Page 133 of 489

The power outlets are for powering electrical
accessories such as cellular telephones.
The power outlets located on the driver’s side of
the instrument panel and in the luggage area are
powered directly by the vehicle’s battery.
The power outlets located on the passenger’s
side of the instrument panel and in the 2nd row
are powered only when the ignition switch is in
the ACC or ON position.
Open the cap to use a power outlet.
CAUTION
●The outlet and plug may be hot during
or immediately after use.
● Only certain power outlets are designed
for use with a cigarette lighter unit. Do
not use any other power outlet for an
accessory lighter. See your NISSAN
dealer for additional information.
● Do not use with accessories that ex-
ceed a 12 volt, 120W (10A) power draw.
Do not use double adapters or more
than one electrical accessory.
● Use power outlets with the engine run-
ning to avoid discharging the vehicle
battery.
● Avoid using power outlets when the air
conditioner, headlights or rear window
defroster is on.
● Before inserting or disconnecting a
plug, be sure the electrical accessory
being used is turned OFF.
● Push the plug in as far as it will go. If
good contact is not made, the plug may
overheat or the internal temperature
fuse may open.
● When not in use, be sure to close the
cap. Do not allow water or any other
liquids to contact the outlet.
INSTRUMENT PANEL STORAGE
TRAYS
WARNING
Do not place sharp objects in the trays to
help prevent injury in an accident or sud-
den stop.
Luggage area
LIC0551
Center stack storage
LIC1183
STORAGE
2-40Instruments and controls