Page 144 of 453

●Placing the ignition switch in the ON posi-
tion.
● Locking the doors with the remote controller.
● Switching the room light switch to the OFF
position.
Opening the trunk lid
1. Push the trunk opener request switch�Afor
more than 1 second while carrying the Intel-
ligent Key with you.
2. The trunk will unlatch. A chime will sound 4 times.
3. Raise the trunk lid to open the trunk.
Lockout protection
To prevent the Intelligent Key from being acci-
dentally locked in the trunk, lockout protection is
equipped with the Intelligent Key. When all doors are locked and the trunk lid is
closed with the Intelligent Key inside the trunk,
the outside buzzer will sound and the trunk will
open.
HOW TO USE THE REMOTE
KEYLESS ENTRY FUNCTION
The remote keyless entry function can operate all
door locks using the remote keyless function of
the Intelligent Key. The remote keyless function
can operate at a distance of 33 ft (10 m) away
from the vehicle. The operating distance de-
pends upon the conditions around the vehicle.
The remote keyless entry function will not func-
tion under the following conditions:
● When the Intelligent Key is not within the
operational range.
● When the doors or the trunk are open or not
closed securely.
● When the Intelligent Key battery is dis-
charged.
Page 146 of 453
The interior light illuminates for 15 seconds when
a door is unlocked and the room light switch is in
the DOOR position.
The light can be turned off without waiting for 15
seconds by performing one of the following op-
erations:● Placing the ignition switch in the ON posi-
tion.
● Locking the doors with the Intelligent Key.
● Switching the room light switch to the OFF
position.
Opening windows (if so equipped)
The Intelligent Key allows you to open windows
equipped with automatic operation simultane-
ously.
● To open the windows, press the
Page 149 of 453
WARNING
●Radio waves could adversely affect elec-
tric medical equipment. Those who use a
pacemaker should contact the electric
medical equipment manufacturer for the
possible influences before use.
●The Intelligent Key transmits radio waves
when the buttons are pressed. The FAA
advises the radio waves may affect air-
craft navigation and communication sys-
tems. Do not operate the Intelligent Key
while on an airplane. Make sure the but-
tons are not operated unintentionally
when the unit is stored for a flight.
The Intelligent Key can operate all the door locks
using the remote controller function. The operat-
ing environment and/or conditions may affect the
Intelligent Key operation.
Be sure to read the following before using the
Intelligent Key.
Page 152 of 453
The interior light illuminates for 15 seconds when
a door is unlocked and the room light switch is in
the DOOR position.
The light can be turned off without waiting for 15
seconds by performing one of the following op-
erations:● Placing the ignition switch in the ON posi-
tion.
● Locking the doors with the Intelligent Key.
● Switching the room light switch to the OFF
position.
Releasing the trunk lid
Press the
Page 155 of 453
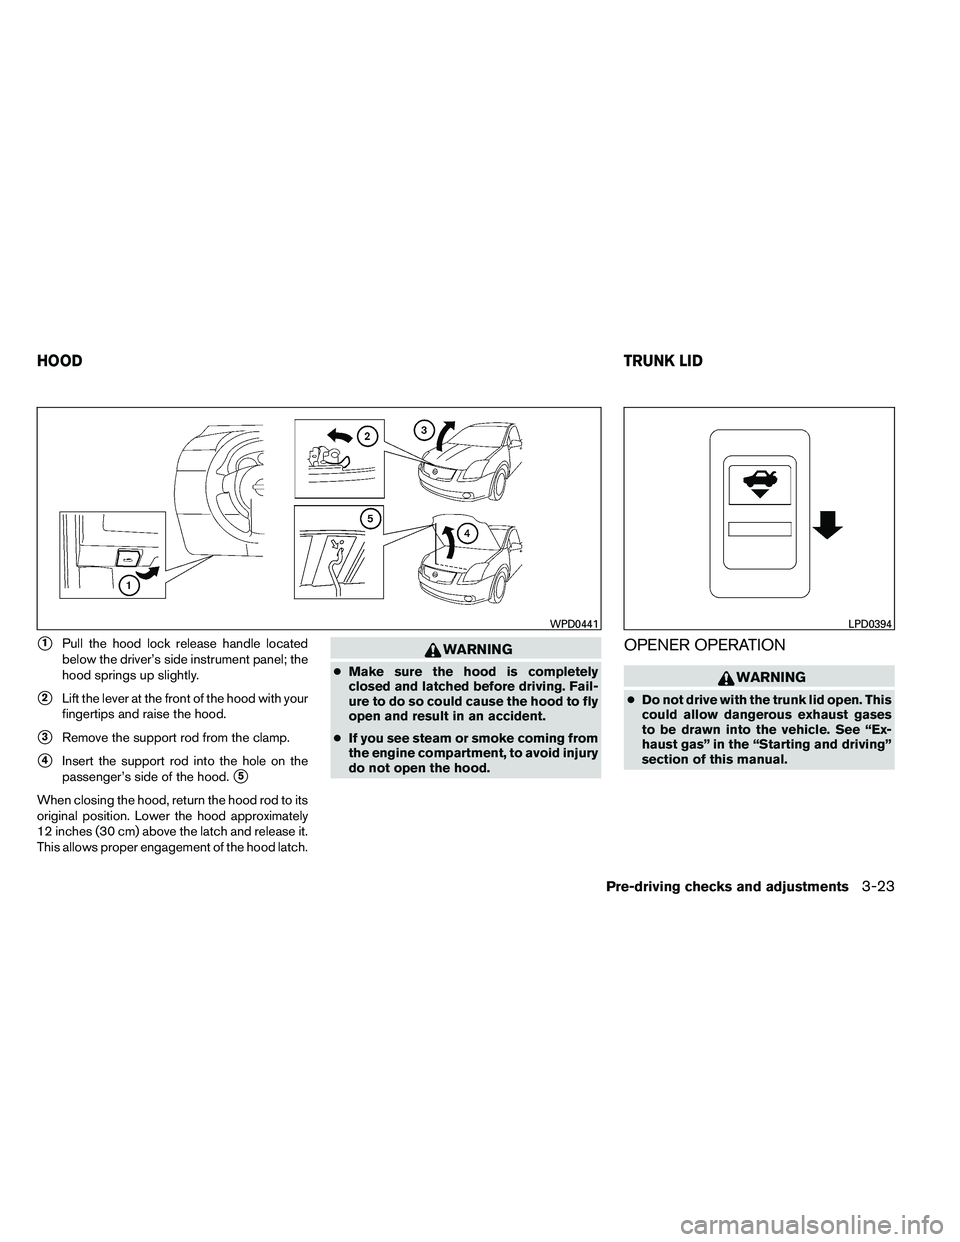
�1Pull the hood lock release handle located
below the driver’s side instrument panel; the
hood springs up slightly.
�2Lift the lever at the front of the hood with your
fingertips and raise the hood.
�3Remove the support rod from the clamp.
�4Insert the support rod into the hole on the
passenger’s side of the hood.
�5
When closing the hood, return the hood rod to its
original position. Lower the hood approximately
12 inches (30 cm) above the latch and release it.
This allows proper engagement of the hood latch.
Page 157 of 453
To open the trunk from the inside, pull the illumi-
nated release handle until the lock releases and
push up on the trunk lid. The release handle is
made of a material that glows in the dark after a
brief exposure to ambient light.
The handle is located inside the trunk compart-
ment on the interior of the trunk lid.
OPENER OPERATION
The fuel-filler door release is located on the floor
to the left of the driver’s seat. To open the fuel-
filler door, pull up the release. To lock, close the
fuel-filler door securely.
FUEL-FILLER CAP
Page 162 of 453
AUTOMATIC ANTI-GLARE
REARVIEW MIRROR (if so equipped)
The inside mirror is designed so that it automati-
cally dims during night time conditions and ac-
cording to the intensity of the headlights of the
vehicle following you. The automatic anti-glare
feature is activated when the ignition switch is in
the ON position.
The indicator light will illuminate when the auto-
matic anti-glare feature is operating.
NOTE:
Do not hang any objects over the sensors
�1or apply glass cleaner to the sensors.
Doing so will reduce the sensitivity of the
sensors, resulting in improper operation.
Type A and Type B
The indicator light�2will illuminate when the
automatic anti-glare feature is operating.
To turn off the automatic anti-glare feature, press:
● the O button for inside mirrors without
compass.
● the
Page 169 of 453

HOW TO SELECT MENUS ON THE
SCREEN
Vehicle functions are viewed on the center dis-
play screen in menus. Whenever a menu selec-
tion is made or menu item is highlighted, different
areas on the screen provide you with important
information. See the following for details.1. Header: Shows the path used to get to the current
screen (for example, press the SETTING
button > then select the “Comfort” key) . 2. Menu Selections:
Shows the options to choose within that
menu screen (for example, Auto Interior Illu-
mination, etc.) .
3. Up/Down Movement Indicator: Shows that the arrows on the touch screen
may be used to move up or down on the
screen and select more options.
4. Screen Count: Shows the number of menu selections avail-
able for the current menu, even if they are on
multiple pages (for example, 1/7) .
5. Footer/Information Line: Provides more information (if available)
about the menu selection currently high-
lighted (for example, Cabin lighting when
unlocking doors) .
HOW TO USE THE INFO BUTTON
Press the INFO button; the display screen shows
vehicle and navigation information for your con-
venience.
Where am I?
Refer to the separate Navigation System Own-
er’s Manual for information regarding this item.
Traffic Info
Refer to the separate Navigation System Own-
er’s Manual for information regarding this item.


The inside mirror is designed so that it automati-
cally dims during night time conditions and ac-
cording to the intensity of the headlights of t")