2012 NISSAN ALTIMA COUPE instrument panel
[x] Cancel search: instrument panelPage 6 of 20
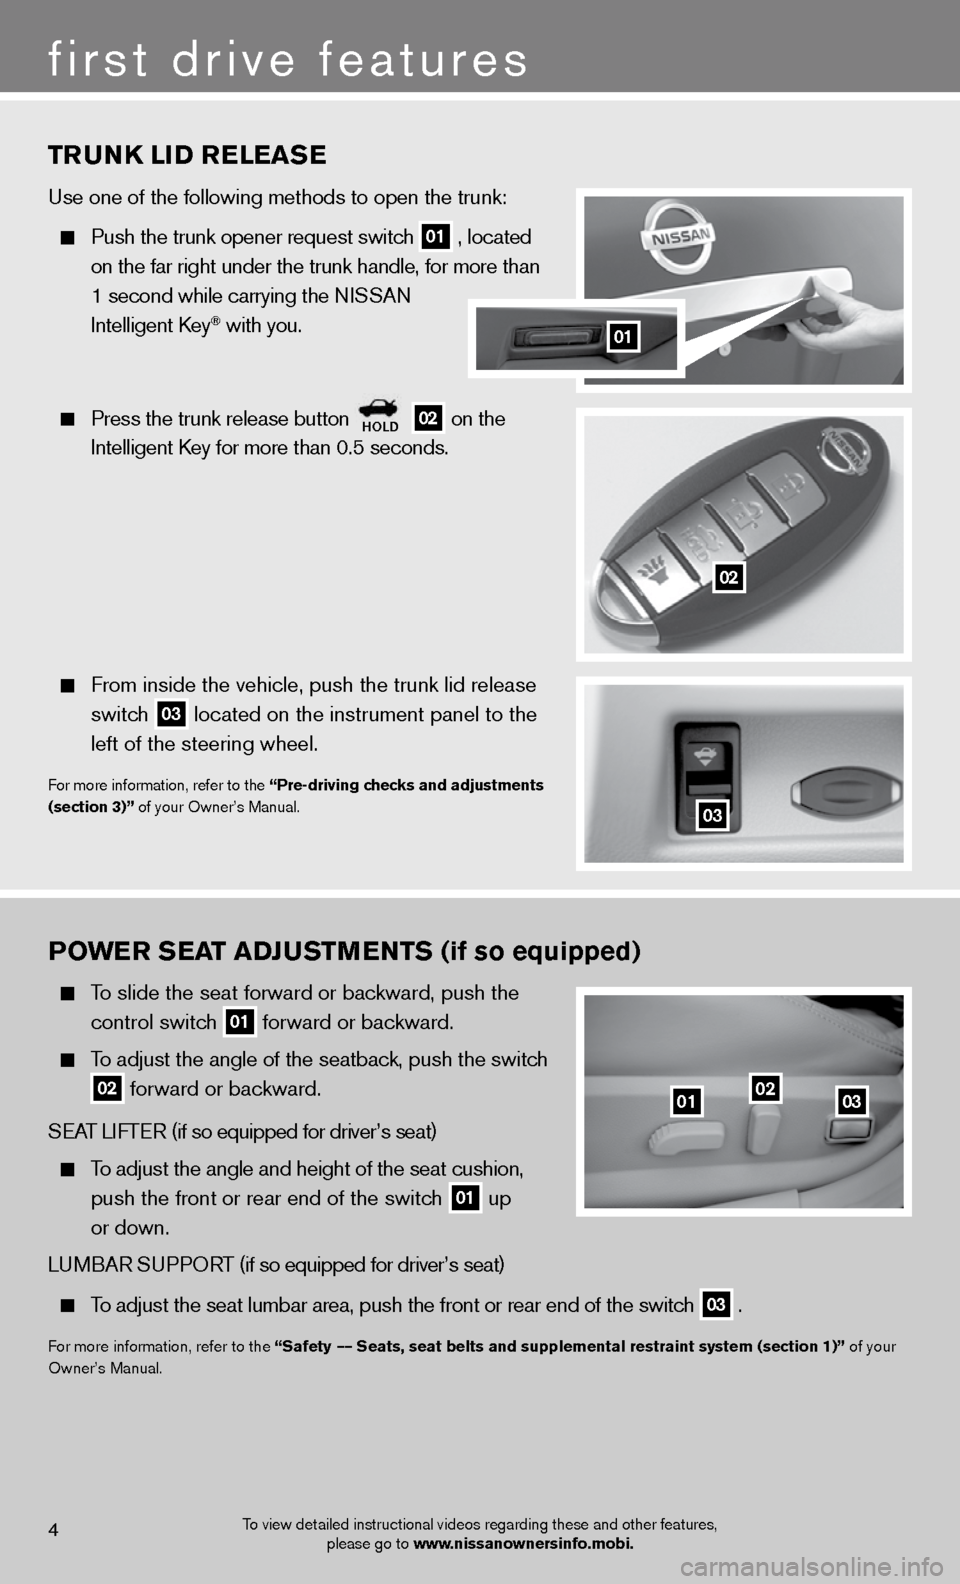
TRUNk LID RELEASE
use one of the following methods to open the trunk:
Push the trunk opener request switch
01 , located
on the far right under the trunk handle, for more than
1 second while carrying the n iSSAn
intelligent k ey
® with you.
Press the trunk release button
hOLD 02 on the
intelligent k ey for more than 0.5 seconds.
from inside the vehicle, push the trunk lid release
switch
03 located on the instrument panel to the
left of the steering wheel.
for more information, refer to the “Pre-driving checks and adjustments
(section 3)” of your Owner’s Manual.
03
POWER SEAT ADJUSTMENTS (if so equipped)
To slide the seat forward or backward, push the
control switch
01 forward or backward.
To adjust the angle of the seatback, push the switch
02 forward or backward.
SeAT LifTe R (if so equipped for driver’s seat)
To adjust the angle and height of the seat cushion,
push the front or rear end of the switch
01 up
or down.
Lu MBAR S uPPORT (if so equipped for driver’s seat)
To adjust the seat lumbar area, push the front or rear end of the switch
03 .
f
or more information, refer to the “Safety –– Seats, seat belts and supplemental restraint system (section 1)” of your
Owner’s Manual.
010203
To view detailed instructional videos regarding these and other features, please go to www.nissanownersinfo.mobi.4
first drive features
01
02
Page 8 of 20
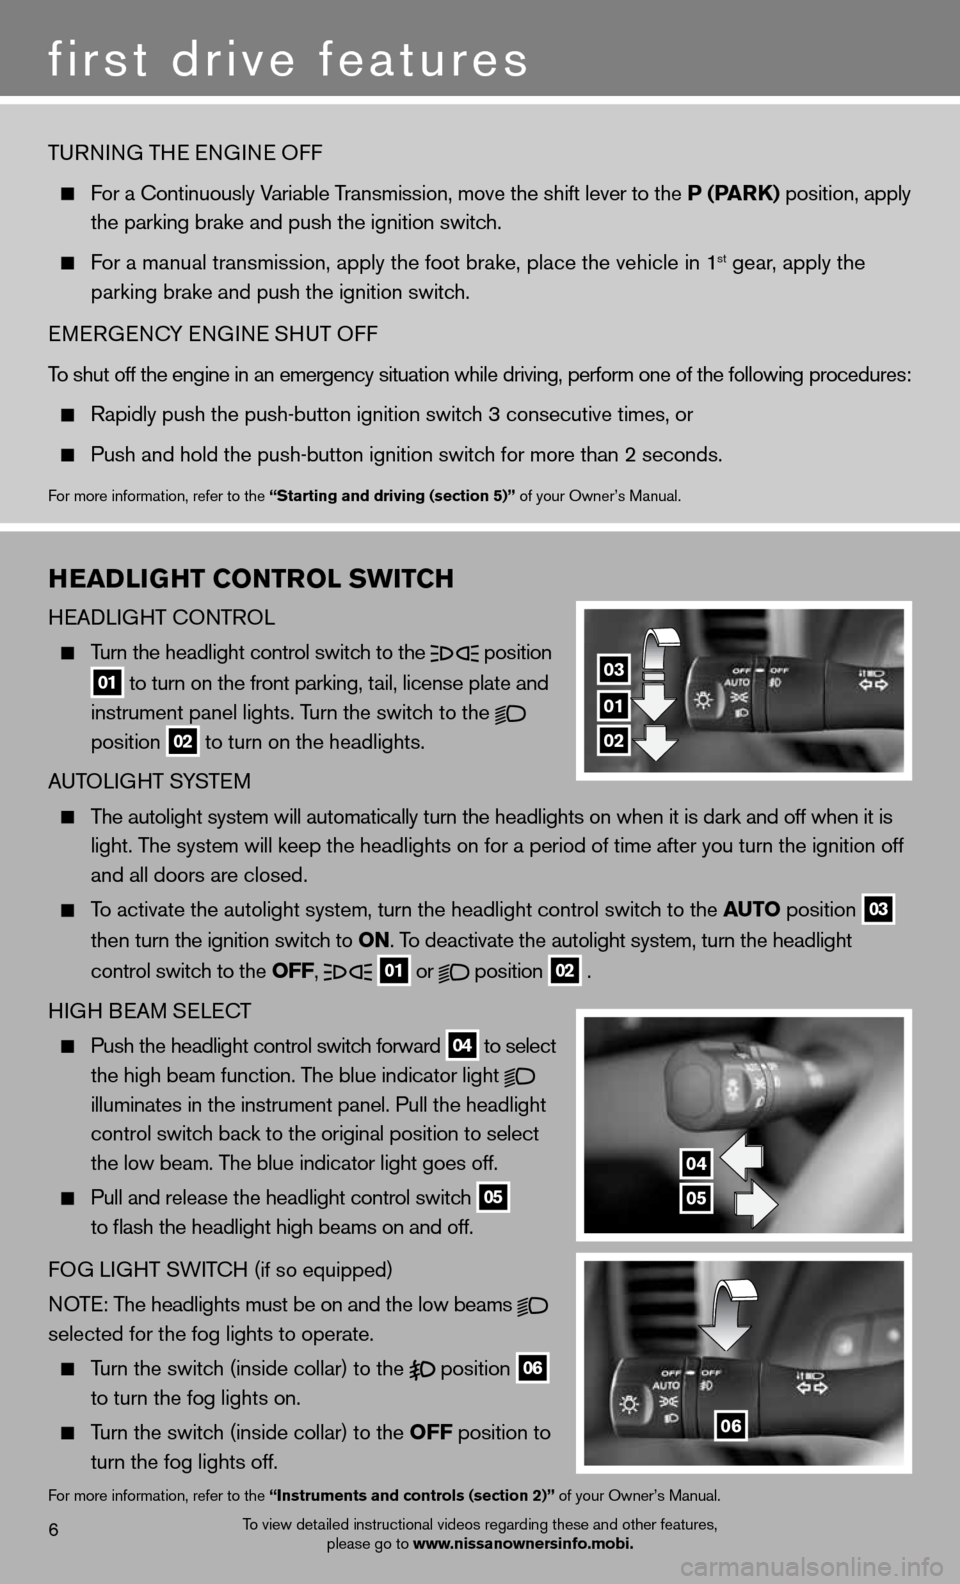
hEADLIG hT CONTROL SWITCh
H eAd LiGHT c OnTROL
Turn the headlight control switch to the
position
01 to turn on the front parking, tail, license plate and
instrument panel lights. Turn the switch to the
position
02 to turn on the headlights.
A uTOLi GHT SYSTe M
The autolight system will automatically turn the headlights on when it is\
dark and off when it is
light. The system will keep the headlights on for a period of time after you tur\
n the ignition off
and all doors are closed.
To activate the autolight system, turn the headlight control switch to the AUTO position
03
then turn the ignition switch to ON. To deactivate the autolight system, turn the headlight
control switch to the OFF,
01 or
position
02 .
H iGH B eAM S eLec T
Push the headlight control switch forward
04 to
select
the high beam function. The blue indicator light
illuminates in the instrument panel. Pull the headlight
control switch back to the original position to select
the low beam. The blue indicator light goes off.
Pull and release the headlight control switch
05
to flash the headlight high beams on and off.
fOG Li GHT SW iTc H (if so equipped)
NOTE: The headlights must be on and the low beams
selected for the fog lights to operate.
Turn the switch (inside collar) to the
position
06
to turn the fog lights on.
Turn the switch (inside collar)
to the OFF position to
turn the fog lights off.
for more information, refer to the “Instruments and controls (section 2)” of your Owner’s Manual.
To view detailed instructional videos regarding these and other features,
please go to www.nissanownersinfo.mobi.6
first drive features
TuRnin G THe enGine Off
For a Continuously Variable Transmission, move the shift lever to the P (PAR k) position, apply
the parking brake and push the ignition switch.
For a manual transmission, apply the foot brake, place the vehicle in 1st gear, apply the
parking brake and push the ignition switch.
eMeRGenc Y enGine SHuT Off
To shut off the engine in an emergency situation while driving, perform one of the following procedures:
Rapidly push the push-button ignition switch 3 consecutive times, or
Push and hold the push-button ignition switch for more than 2 seconds.
for more information, refer to the “Starting and driving (section 5)” of your Owner’s Manual.
01
03
02
04
05
06
Page 12 of 20
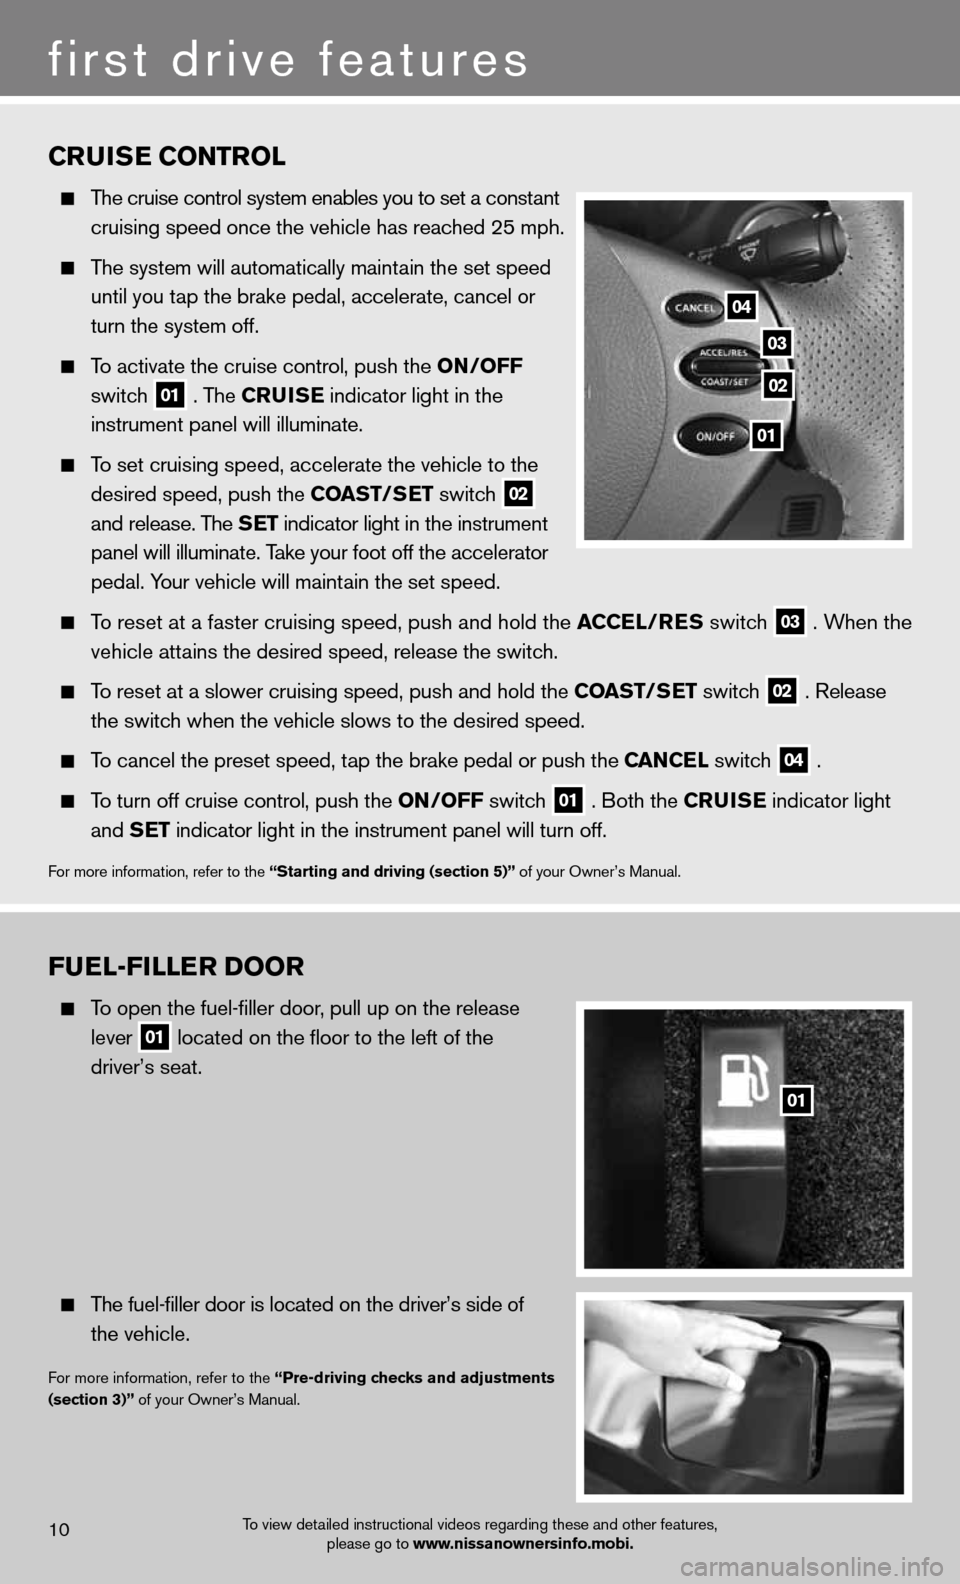
FUEL-FILLER DOOR
To open the fuel-filler door, pull up on the release
lever
01 located on the floor to the left of the
driver’s seat.
The fuel-filler door is located on the driver’s side of
the vehicle.
for more information, refer to the “Pre-driving checks and adjustments
(section 3)” of your Owner’s Manual.
CRUISE CONTROL
The cruise control system enables you to set a constant
cruising speed once the vehicle has reached 25 mph.
The system will automatically maintain the set speed
until you tap the brake pedal, accelerate, cancel or
turn the system off.
To activate the cruise control, push the ON/OFF
switch
01 . The CRUISE
indicator light in the
instrument panel will illuminate.
To set cruising speed, accelerate the vehicle to the
desired speed, push the COAST/SET switch
02
and release. The SET indicator light in the instrument
panel will illuminate. Take your foot off the accelerator
pedal. Your vehicle will maintain the set speed.
To reset at a faster cruising speed, push and hold the ACCEL/RES switch
03 . When the
vehicle attains the desired speed, release the switch.
To reset at a slower cruising speed, push and hold the COAST/SET switch
02 . Release
the switch when the vehicle slows to the desired speed.
To cancel the preset speed, tap the brake pedal or push the CANCEL switch
04 .
To turn off cruise control, push the ON/OFF switch
01 . Both the CRUISE
indicator light
and SET indicator light in the instrument panel will turn off.
for more information, refer to the “Starting and driving (section 5)” of your Owner’s Manual.
first drive features
To view detailed instructional videos regarding these and other features,
please go to www.nissanownersinfo.mobi.10
03
02
04
01
01
Page 16 of 20
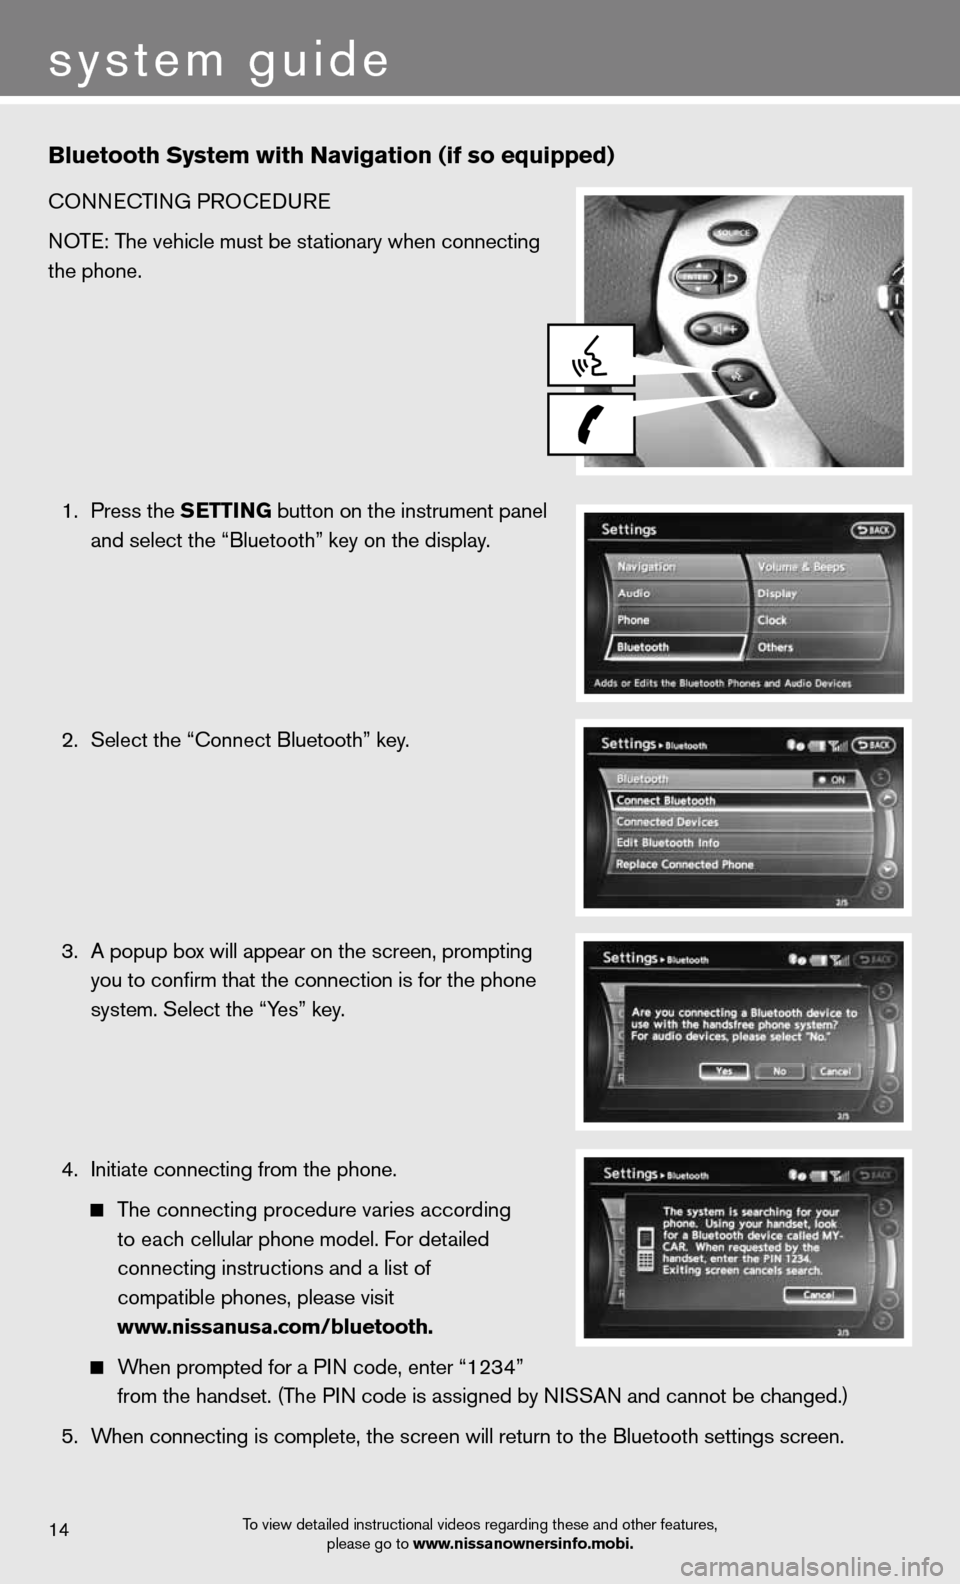
Bluetooth System with Navigation (if so equipped)
cOnnecTinG PROcedu Re
NOTE: The vehicle must be stationary when connecting
the phone.
1. Press the SETTING button on the instrument panel
and select the “Bluetooth” key on the display.
2. Select the “connect Bluetooth” key.
3. A popup box will appear on the screen, prompting
you to confirm that the connection is for the phone
system. Select the “Yes” key.
4. initiate connecting from the phone.
The connecting procedure varies according
to each cellular phone model. f or detailed
connecting instructions and a list of
compatible phones, please visit
www.nissanusa.com/bluetooth.
When prompted for a P in code, enter “1234”
from the handset. (The PIN code is assigned by NISSAN and cannot be changed.)
5. When connecting is complete, the screen will return to the Bluetooth sett\
ings screen.
system guide
To view detailed instructional videos regarding these and other features,
please go to www.nissanownersinfo.mobi.14
Page 17 of 20
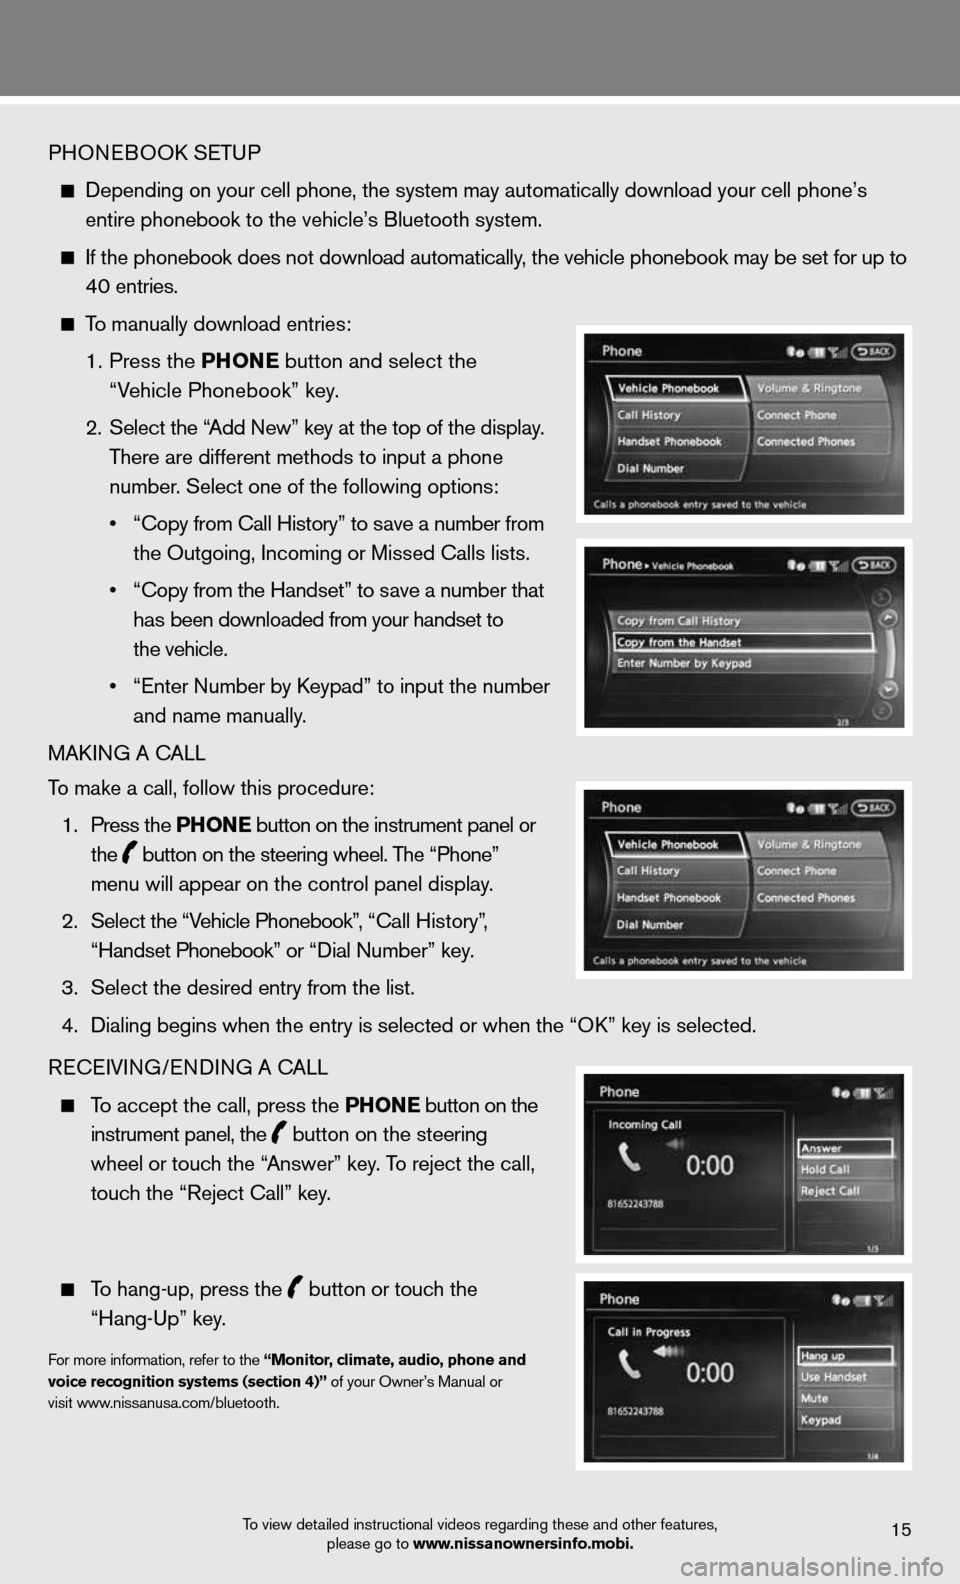
PHOneBOOk SeTu P
depending on your cell phone, the system may automatically download your \
cell phone’s
entire phonebook to the vehicle’s Bluetooth system.
If the phonebook does not download automatically, the vehicle phonebook may be set for up to
40 entries.
To manually download entries:
1. Press the Ph ONE
button and select the
“Vehicle Phonebook” key.
2. Select the “Add new” key at the top of the display.
There are different methods to input a phone
number. Select one of the following options:
• “Copy from Call History” to save a number from
the Outgoing, incoming or Missed calls lists.
• “Copy from the Handset” to save a number that
has been downloaded from your handset to
the vehicle.
• “Enter Number by Keypad” to input the number
and name manually.
MAkin G A cALL
To make a call, follow this procedure:
1. Press the Ph ONE button on the instrument panel or
the
button on the steering wheel. The “Phone”
menu will appear on the control panel display.
2. Select the “Vehicle Phonebook”, “Call History”,
“Handset Phonebook” or “Dial Number” key.
3. Select the desired entry from the list.
4. Dialing begins when the entry is selected or when the “OK” key is selected.
Recei Vin G/endin G A cALL
To accept the call, press the Ph ONE button on the
instrument panel, the
button on the steering
wheel or touch the “Answer” key. To reject the call,
touch the “Reject call” key.
To hang-up, press the
button or touch the
“Hang-up” key.
for more information, refer to the “Monitor, climate, audio, phone and
voice recognition systems (section 4)” of your Owner’s Manual or
visit www.nissanusa.com/bluetooth.
To view detailed instructional videos regarding these and other features, please go to www.nissanownersinfo.mobi.15