Page 162 of 454
TILT OPERATION
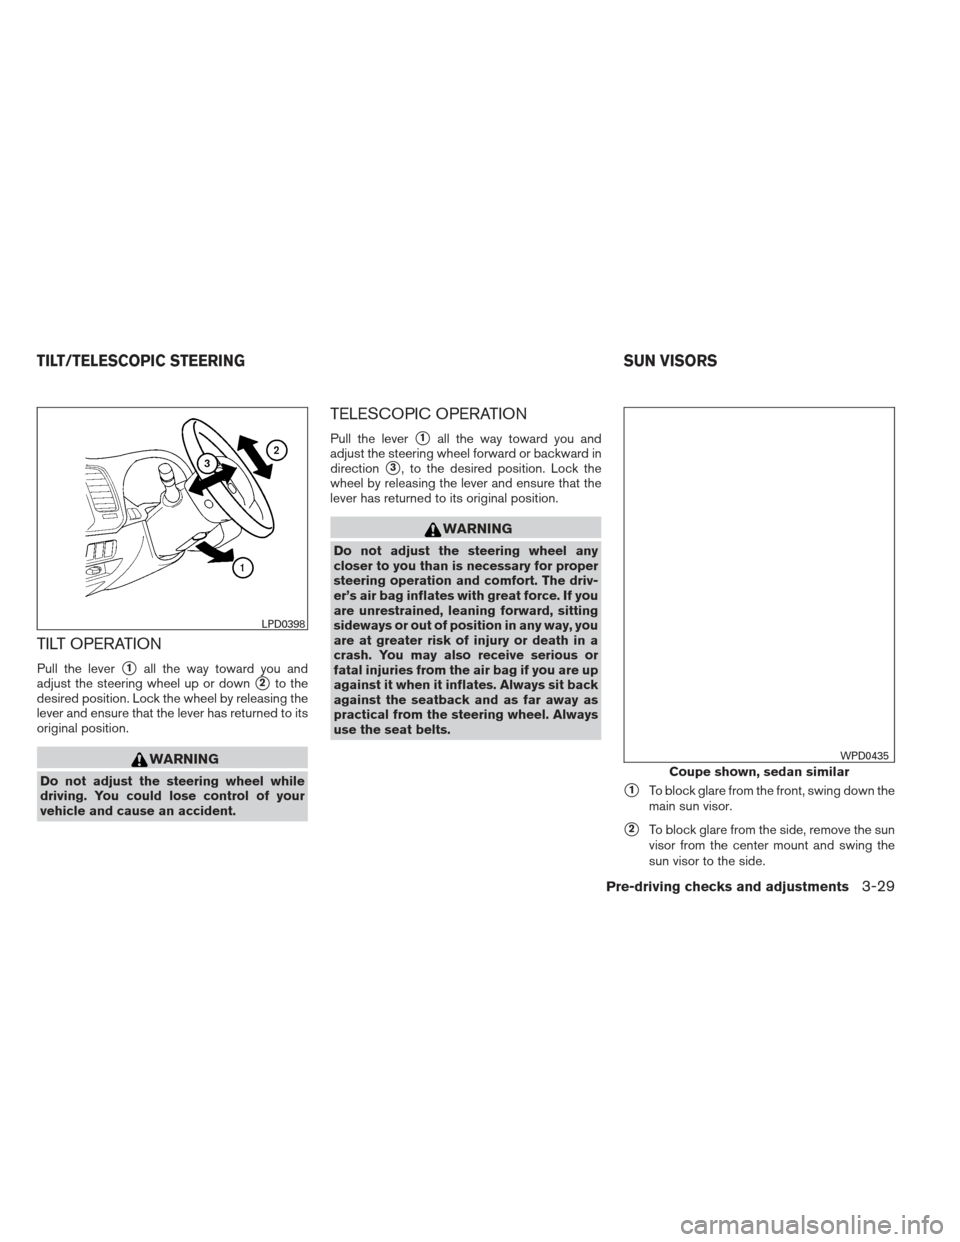
Pull the lever�1all the way toward you and
adjust the steering wheel up or down
�2to the
desired position. Lock the wheel by releasing the
lever and ensure that the lever has returned to its
original position.
WARNING
Do not adjust the steering wheel while
driving. You could lose control of your
vehicle and cause an accident.
TELESCOPIC OPERATION
Pull the lever�1all the way toward you and
adjust the steering wheel forward or backward in
direction
�3, to the desired position. Lock the
wheel by releasing the lever and ensure that the
lever has returned to its original position.
WARNING
Do not adjust the steering wheel any
closer to you than is necessary for proper
steering operation and comfort. The driv-
er’s air bag inflates with great force. If you
are unrestrained, leaning forward, sitting
sideways or out of position in any way, you
are at greater risk of injury or death in a
crash. You may also receive serious or
fatal injuries from the air bag if you are up
against it when it inflates. Always sit back
against the seatback and as far away as
practical from the steering wheel. Always
use the seat belts.
�1To block glare from the front, swing down the
main sun visor.
�2To block glare from the side, remove the sun
visor from the center mount and swing the
sun visor to the side.
LPD0398
Coupe shown, sedan similar
WPD0435
TILT/TELESCOPIC STEERING SUN VISORS
Pre-driving checks and adjustments3-29
Page 172 of 454
HOW TO SELECT MENUS ON THE
SCREEN
Vehicle functions are viewed on the center dis-
play screen in menus. Whenever a menu selec-
tion is made or menu item is highlighted, different
areas on the screen provide you with important
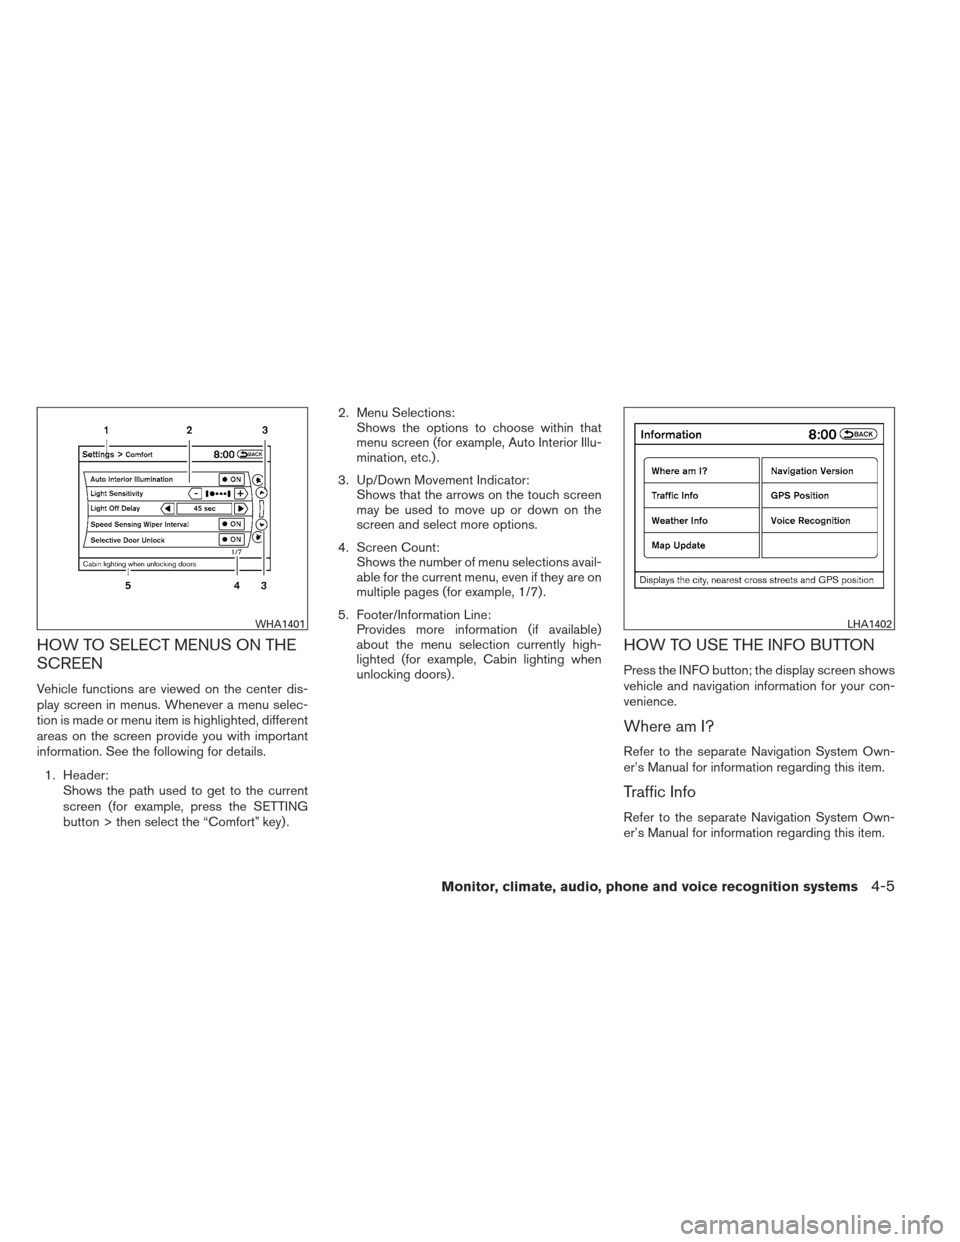
information. See the following for details.1. Header: Shows the path used to get to the current
screen (for example, press the SETTING
button > then select the “Comfort” key) . 2. Menu Selections:
Shows the options to choose within that
menu screen (for example, Auto Interior Illu-
mination, etc.) .
3. Up/Down Movement Indicator: Shows that the arrows on the touch screen
may be used to move up or down on the
screen and select more options.
4. Screen Count: Shows the number of menu selections avail-
able for the current menu, even if they are on
multiple pages (for example, 1/7) .
5. Footer/Information Line: Provides more information (if available)
about the menu selection currently high-
lighted (for example, Cabin lighting when
unlocking doors) .
HOW TO USE THE INFO BUTTON
Press the INFO button; the display screen shows
vehicle and navigation information for your con-
venience.
Where am I?
Refer to the separate Navigation System Own-
er’s Manual for information regarding this item.
Traffic Info
Refer to the separate Navigation System Own-
er’s Manual for information regarding this item.
WHA1401LHA1402
Monitor, climate, audio, phone and voice recognition systems4-5
Page 175 of 454
To turn the screen on:● Press the SETTING button and select the
“Display” key and then select the “Display
ON” key, or
● Press the
button and the message
“resuming display” will appear and the “Dis-
play ON” key will be automatically turned on
(no amber indicator) .
Background color:
Select the “Background Color” key; the display
color changes between day and night.
The new settings are automatically saved when
you exit the setting screen by selecting the
“Back” key or any other mode button. Color theme:
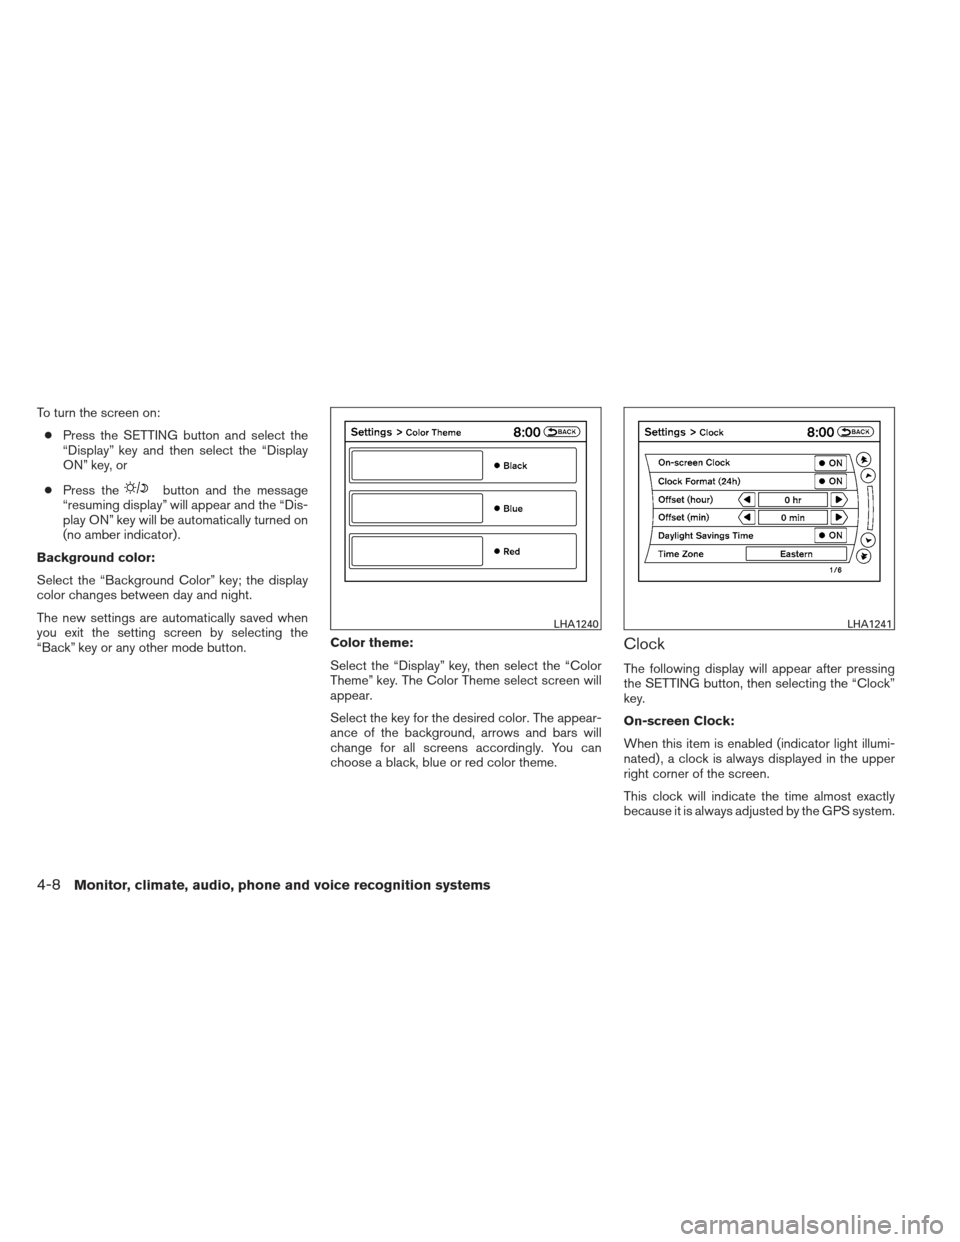
Select the “Display” key, then select the “Color
Theme” key. The Color Theme select screen will
appear.
Select the key for the desired color. The appear-
ance of the background, arrows and bars will
change for all screens accordingly. You can
choose a black, blue or red color theme.
Clock
The following display will appear after pressing
the SETTING button, then selecting the “Clock”
key.
On-screen Clock:
When this item is enabled (indicator light illumi-
nated) , a clock is always displayed in the upper
right corner of the screen.
This clock will indicate the time almost exactly
because it is always adjusted by the GPS system.
LHA1240LHA1241
4-8Monitor, climate, audio, phone and voice recognition systems
Page 176 of 454
Clock Format (24h):
When this item is enabled (indicator light illumi-
nated) , the clock format will change from the
default 12-hour display to a 24-hour display.
Offset (hour):
Adjust the time by increasing or decreasing the
hours.
Offset (minute):
Adjust the time by increasing or decreasing the
minutes.
Daylight Savings Time:
When this item is enabled (indicator light illumi-
nated) , daylight savings time is on. To turn off the
daylight savings time, touch the “ON” key; the
amber indicator light will go out.Time Zone:
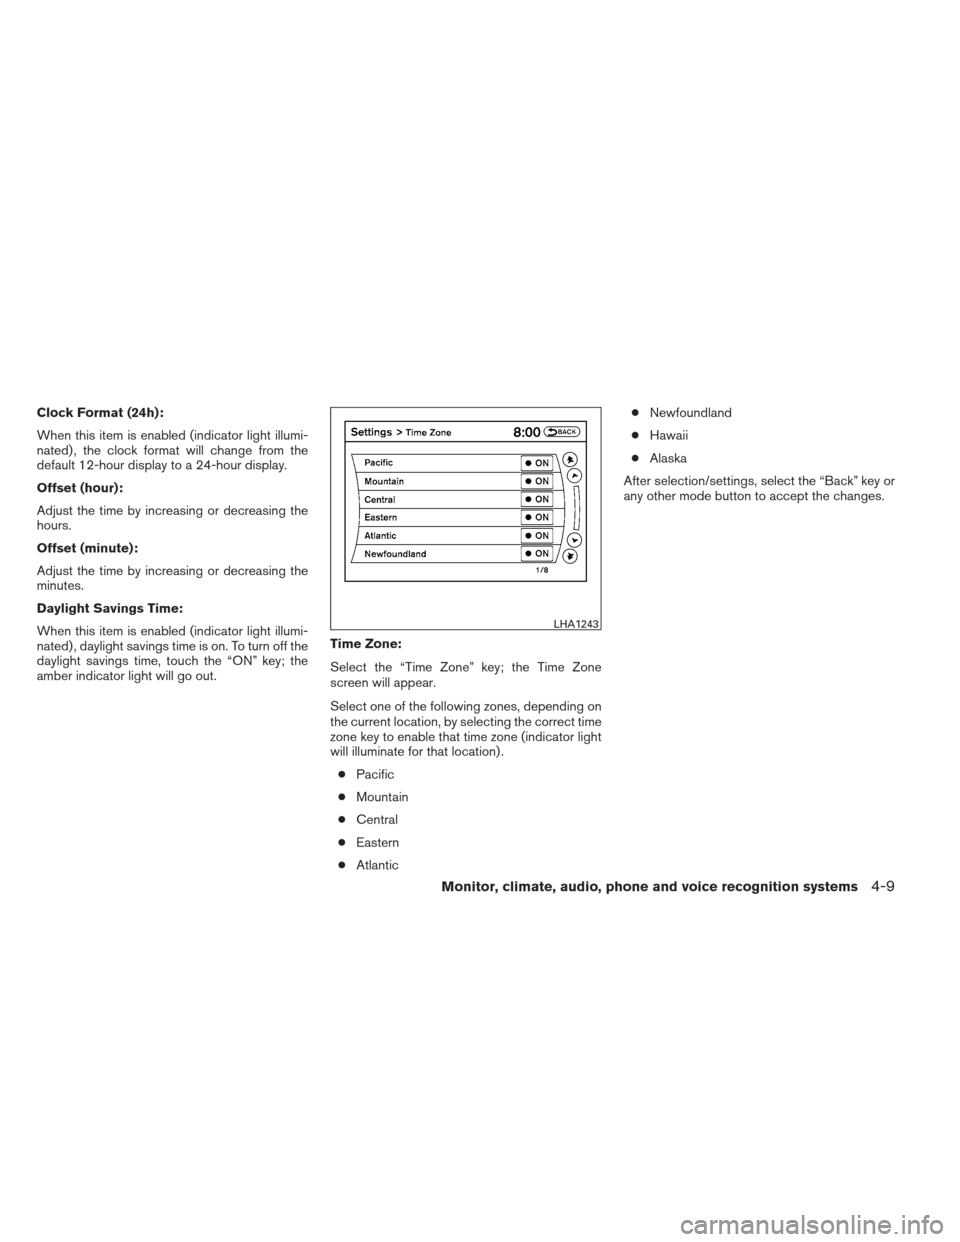
Select the “Time Zone” key; the Time Zone
screen will appear.
Select one of the following zones, depending on
the current location, by selecting the correct time
zone key to enable that time zone (indicator light
will illuminate for that location) .
● Pacific
● Mountain
● Central
● Eastern
● Atlantic ●
Newfoundland
● Hawaii
● Alaska
After selection/settings, select the “Back” key or
any other mode button to accept the changes.
LHA1243
Monitor, climate, audio, phone and voice recognition systems4-9
Page 177 of 454
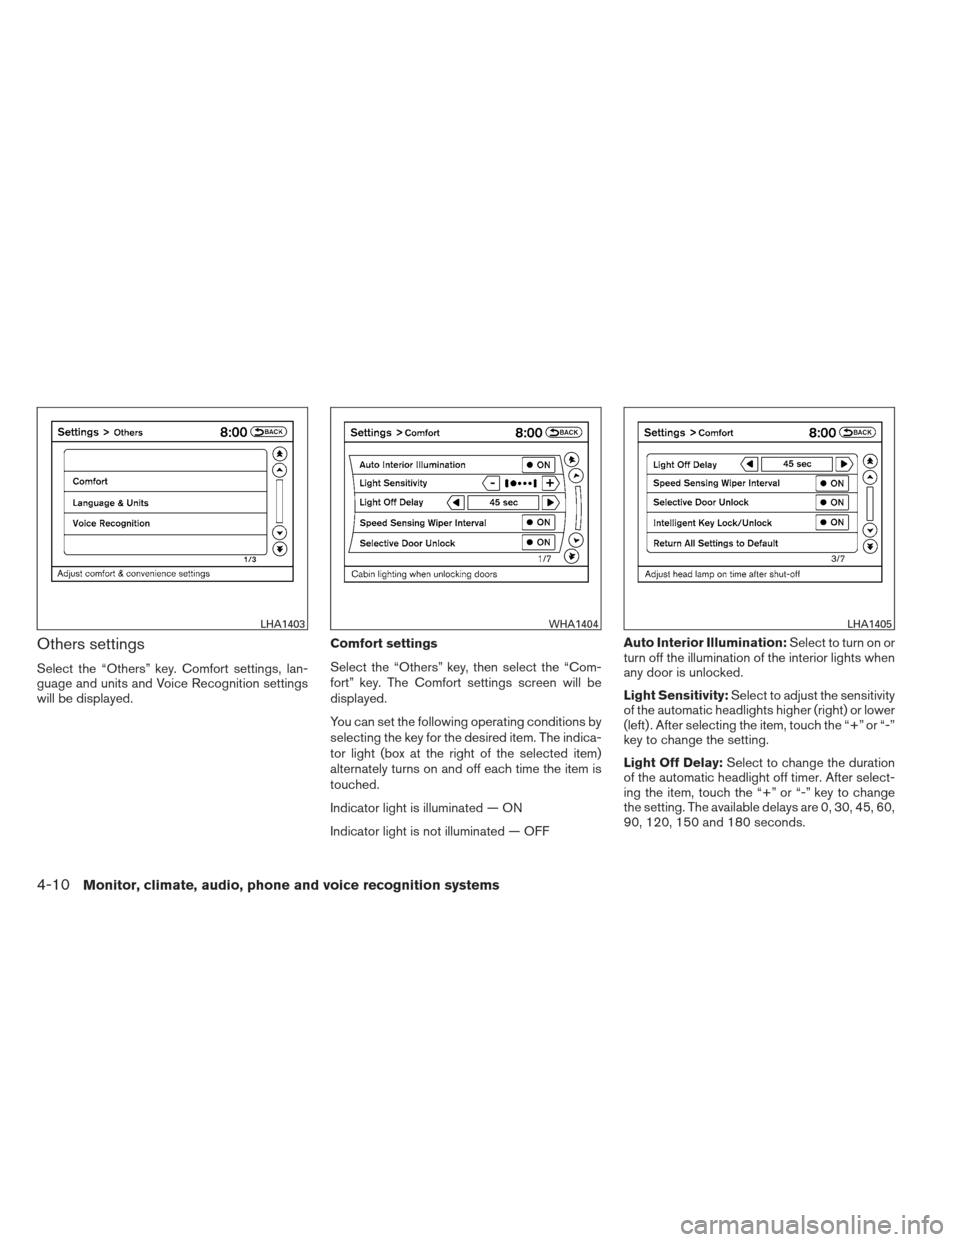
Others settings
Select the “Others” key. Comfort settings, lan-
guage and units and Voice Recognition settings
will be displayed.Comfort settings
Select the “Others” key, then select the “Com-
fort” key. The Comfort settings screen will be
displayed.
You can set the following operating conditions by
selecting the key for the desired item. The indica-
tor light (box at the right of the selected item)
alternately turns on and off each time the item is
touched.
Indicator light is illuminated — ON
Indicator light is not illuminated — OFFAuto Interior Illumination:
Select to turn on or
turn off the illumination of the interior lights when
any door is unlocked.
Light Sensitivity: Select to adjust the sensitivity
of the automatic headlights higher (right) or lower
(left) . After selecting the item, touch the “+” or “-”
key to change the setting.
Light Off Delay: Select to change the duration
of the automatic headlight off timer. After select-
ing the item, touch the “+” or “-” key to change
the setting. The available delays are 0, 30, 45, 60,
90, 120, 150 and 180 seconds.
LHA1403WHA1404LHA1405
4-10Monitor, climate, audio, phone and voice recognition systems
Page 178 of 454
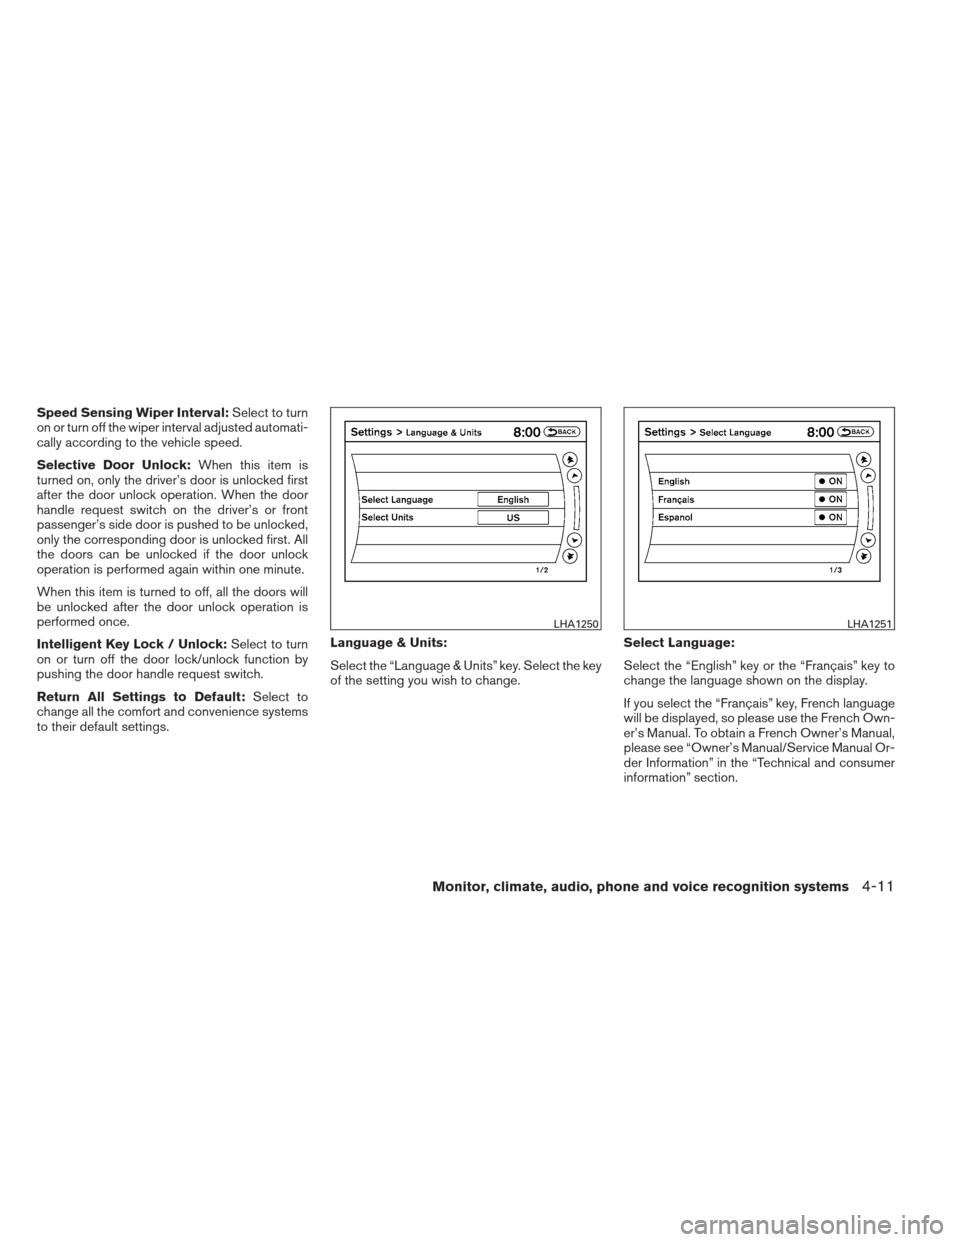
Speed Sensing Wiper Interval:Select to turn
on or turn off the wiper interval adjusted automati-
cally according to the vehicle speed.
Selective Door Unlock: When this item is
turned on, only the driver’s door is unlocked first
after the door unlock operation. When the door
handle request switch on the driver’s or front
passenger’s side door is pushed to be unlocked,
only the corresponding door is unlocked first. All
the doors can be unlocked if the door unlock
operation is performed again within one minute.
When this item is turned to off, all the doors will
be unlocked after the door unlock operation is
performed once.
Intelligent Key Lock / Unlock: Select to turn
on or turn off the door lock/unlock function by
pushing the door handle request switch.
Return All Settings to Default: Select to
change all the comfort and convenience systems
to their default settings. Language & Units:
Select the “Language & Units” key. Select the key
of the setting you wish to change.
Select Language:
Select the “English” key or the “Français” key to
change the language shown on the display.
If you select the “Français” key, French language
will be displayed, so please use the French Own-
er’s Manual. To obtain a French Owner’s Manual,
please see “Owner’s Manual/Service Manual Or-
der Information” in the “Technical and consumer
information” section.
LHA1250LHA1251
Monitor, climate, audio, phone and voice recognition systems4-11
Page 197 of 454
SATELLITE RADIO RECEPTION (if so
equipped)
When the satellite radio is used for the first time
or the battery has been replaced, the satellite
radio may not work properly. This is not a mal-
function. Wait more than 10 minutes with satellite
radio ON and the vehicle outside of any metal or
large building for satellite radio to receive all of
the necessary data.
No satellite radio reception is available and “NO
SAT” is displayed when the SAT band option is
selected unless optional satellite receiver and
antenna are installed and an XM�satellite radio
service subscription is active. Satellite radio is
not available in Alaska, Hawaii and Guam.
Satellite radio performance may be affected if
cargo carried on the roof blocks the satellite radio
signal.
If possible, do not put cargo over the satellite
antenna.
A build up of ice on the satellite radio antenna can
affect satellite radio performance. Remove the
ice to restore satellite radio reception.
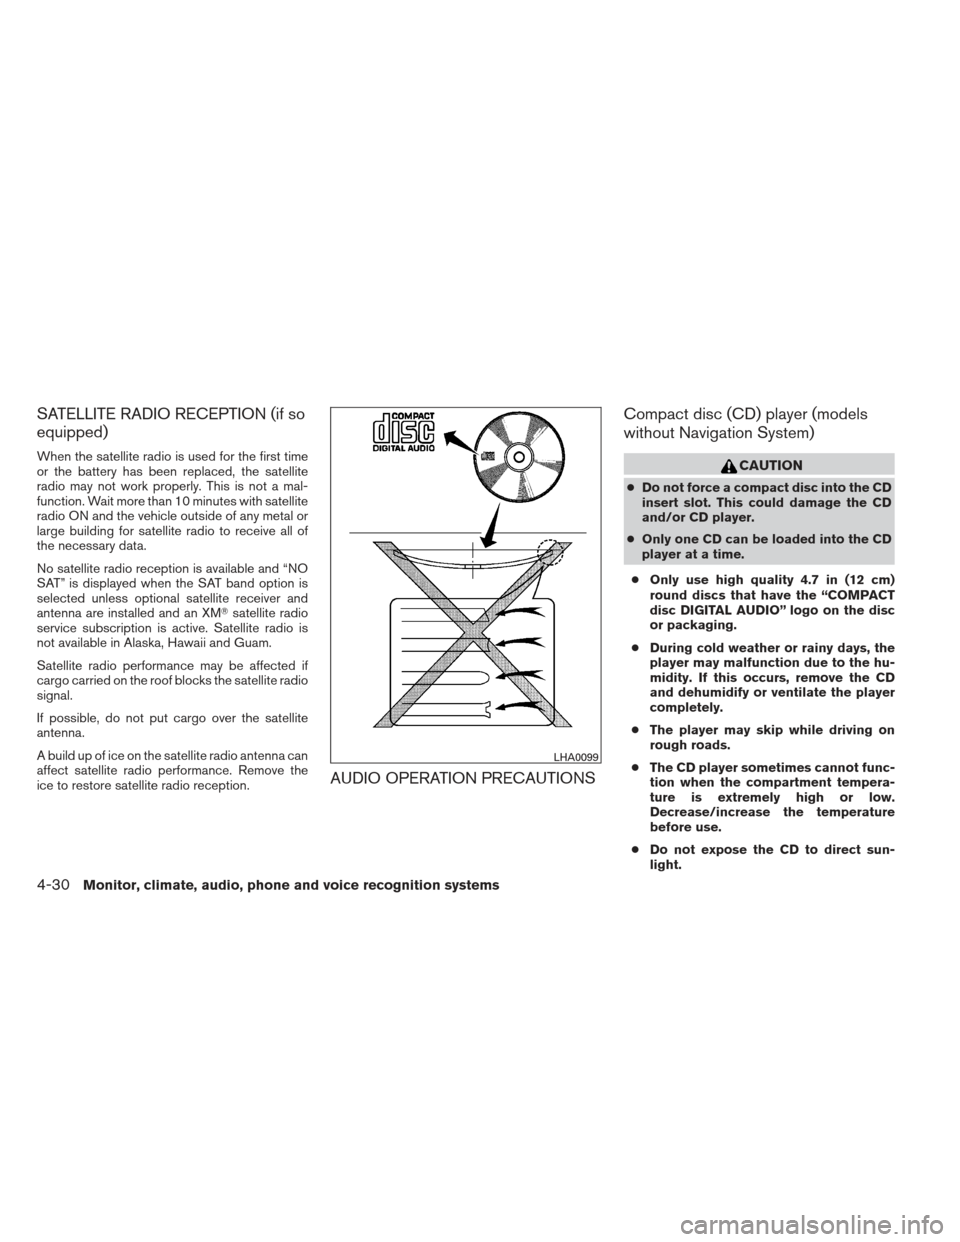
AUDIO OPERATION PRECAUTIONS Compact disc (CD) player (models
without Navigation System)
CAUTION
●
Do not force a compact disc into the CD
insert slot. This could damage the CD
and/or CD player.
● Only one CD can be loaded into the CD
player at a time.
● Only use high quality 4.7 in (12 cm)
round discs that have the “COMPACT
disc DIGITAL AUDIO” logo on the disc
or packaging.
● During cold weather or rainy days, the
player may malfunction due to the hu-
midity. If this occurs, remove the CD
and dehumidify or ventilate the player
completely.
● The player may skip while driving on
rough roads.
● The CD player sometimes cannot func-
tion when the compartment tempera-
ture is extremely high or low.
Decrease/increase the temperature
before use.
● Do not expose the CD to direct sun-
light.
LHA0099
4-30Monitor, climate, audio, phone and voice recognition systems
Page 211 of 454
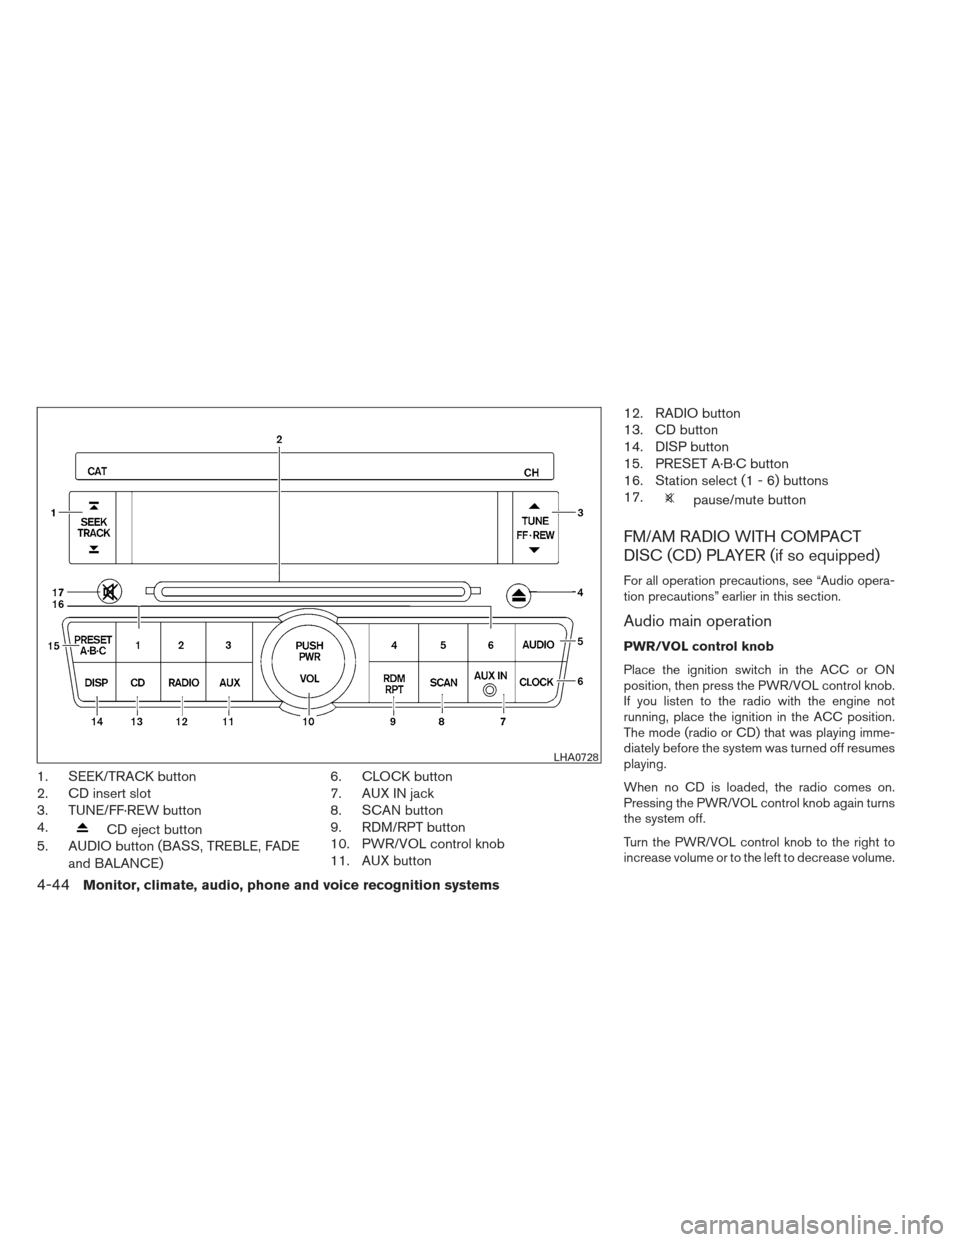
1. SEEK/TRACK button
2. CD insert slot
3. TUNE/FF·REW button
4.
CD eject button
5. AUDIO button (BASS, TREBLE, FADE
and BALANCE) 6. CLOCK button
7. AUX IN jack
8. SCAN button
9. RDM/RPT button
10. PWR/VOL control knob
11. AUX button 12. RADIO button
13. CD button
14. DISP button
15. PRESET A·B·C button
16. Station select (1 - 6) buttons
17.
pause/mute button
FM/AM RADIO WITH COMPACT
DISC (CD) PLAYER (if so equipped)
For all operation precautions, see “Audio opera-
tion precautions” earlier in this section.
Audio main operation
PWR/VOL control knob
Place the ignition switch in the ACC or ON
position, then press the PWR/VOL control knob.
If you listen to the radio with the engine not
running, place the ignition in the ACC position.
The mode (radio or CD) that was playing imme-
diately before the system was turned off resumes
playing.
When no CD is loaded, the radio comes on.
Pressing the PWR/VOL control knob again turns
the system off.
Turn the PWR/VOL control knob to the right to
increase volume or to the left to decrease volume.
LHA0728
4-44Monitor, climate, audio, phone and voice recognition systems