Page 157 of 454

�1Pull the hood lock release handle located
below the driver’s side instrument panel; the
hood springs up slightly.
�2Lift the lever at the front of the hood with your
fingertips and raise the hood.
�3Remove the support rod from the clamp.
�4Insert the support rod into the hole on the
passenger’s side of the hood.
�5
When closing the hood, return the hood rod to its
original position. Lower the hood approximately
12 inches (30 cm) above the latch and release it.
This allows proper engagement of the hood latch.
WARNING
● Make sure the hood is completely
closed and latched before driving. Fail-
ure to do so could cause the hood to fly
open and result in an accident.
● If you see steam or smoke coming from
the engine compartment, to avoid injury
do not open the hood.
OPENER OPERATION
WARNING
● Do not drive with the trunk lid open. This
could allow dangerous exhaust gases
to be drawn into the vehicle. See “Ex-
haust gas” in the “Starting and driving”
section of this manual.
WPD0441LPD0394
HOOD TRUNK LID
3-24Pre-driving checks and adjustments
Page 159 of 454

To open the trunk from the inside, pull the illumi-
nated release handle until the lock releases and
push up on the trunk lid. The release handle is
made of a material that glows in the dark after a
brief exposure to ambient light.
The handle is located inside the trunk compart-
ment on the interior of the trunk lid.
OPENER OPERATION
The fuel-filler door release is located on the floor
to the left of the driver’s seat. To open the fuel-
filler door, pull up the release. To lock, close the
fuel-filler door securely.
FUEL-FILLER CAP
WARNING
●Gasoline is extremely flammable and
highly explosive under certain condi-
tions. You could be burned or seriously
injured if it is misused or mishandled.
Always stop the engine and do not
smoke or allow open flames or sparks
near the vehicle when refueling.
● Do not attempt to top off the fuel tank
after the fuel pump nozzle shuts off
automatically. Continued refueling may
cause fuel overflow, resulting in fuel
spray and possibly a fire.
● Use only an original equipment type
fuel-filler cap as a replacement. It has a
built-in safety valve needed for proper
operation of the fuel system and emis-
sion control system. An incorrect cap
can result in a serious malfunction and
possible injury. It could also cause
the
Malfunction Indicator Light
(MIL) to come on.
● Never pour fuel into the throttle body to
attempt to start your vehicle.
LPD0397
FUEL-FILLER DOOR
3-26Pre-driving checks and adjustments
Page 160 of 454

●Do not fill a portable fuel container in
the vehicle or trailer. Static electricity
can cause an explosion of flammable
liquid, vapor or gas in any vehicle or
trailer. To reduce the risk of serious
injury or death when filling portable fuel
containers:
– Always place the container on the ground when filling.
– Do not use electronic devices when filling.
– Keep the pump nozzle in contact with the container while you are fill-
ing it.
– Use only approved portable fuel con- tainers for flammable liquid.
CAUTION
●The LOOSE FUEL CAP warning will ap-
pear if the fuel-filler cap is not properly
tightened. It may take a few driving trips
for the message to be displayed. Failure
to tighten the fuel-filler cap properly
after the LOOSE FUEL CAP warning ap-
pears may cause the
Malfunc-
tion Indicator Light (MIL) to illuminate. ●
Failure to tighten the fuel-filler cap
properly may cause the
Mal-
function Indicator Light (MIL) to illumi-
nate. If the
light illuminates be-
cause the fuel-filler cap is loose or
missing, tighten or install the cap and
continue to drive the vehicle.
The
light should turn off after a
few driving trips. If the
light
does not turn off after a few driving
trips, have the vehicle inspected by a
NISSAN dealer.
● For additional information, see the
“Malfunction Indicator Light (MIL)” in
the “Instruments and Controls” section
in this manual.
● If fuel is spilled on the vehicle body,
flush it away with water to avoid paint
damage. To remove the fuel-filler cap:
1. Turn the fuel-filler cap counterclockwise to remove.
2. Put the fuel-filler cap on the cap holder
�1
while refueling.
To install the fuel-filler cap: 1. Insert the fuel-filler cap straight into the fuel- filler tube.
2. Turn the fuel-filler cap clockwise until a single click is heard.
Coupe
LPD0448
Pre-driving checks and adjustments3-27
Page 163 of 454
�3Slide the extension sun visor (if so equipped)
in or out as needed.
CAUTION
Do not store the sun visor before returning
the extension to its original position.
VANITY MIRRORS (if so equipped)
To access the vanity mirror, pull the sun visor
down and flip open the mirror cover. Some vanity
mirrors are illuminated and turn on when the
mirror cover is open.
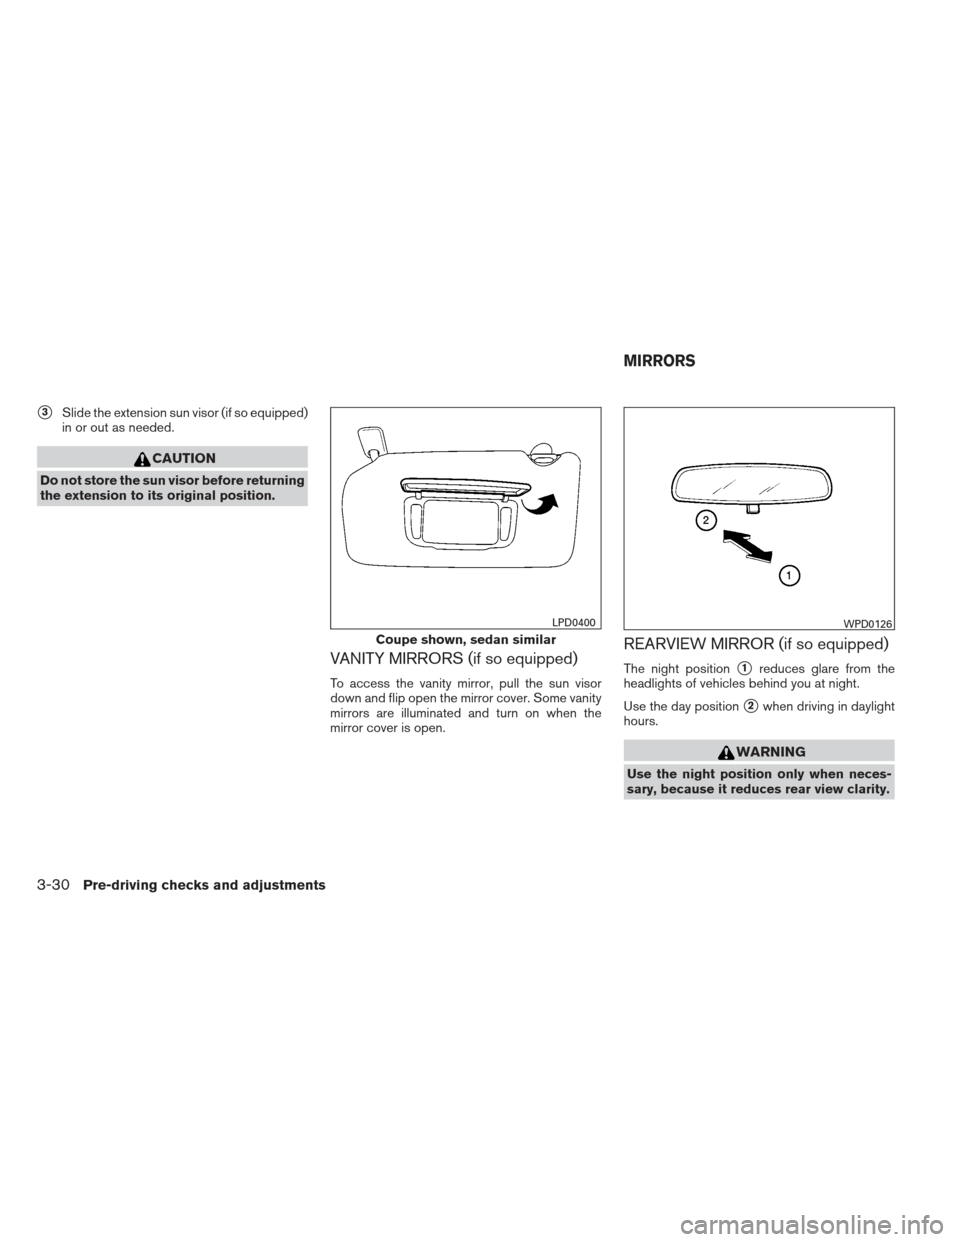
REARVIEW MIRROR (if so equipped)
The night position�1reduces glare from the
headlights of vehicles behind you at night.
Use the day position
�2when driving in daylight
hours.
WARNING
Use the night position only when neces-
sary, because it reduces rear view clarity.
Coupe shown, sedan similar
LPD0400WPD0126
MIRRORS
3-30Pre-driving checks and adjustments
Page 164 of 454

The inside mirror is designed so that it automati-
cally dims during night time conditions and ac-
cording to the intensity of the headlights of t")
AUTOMATIC ANTI-GLARE
REARVIEW MIRROR (if so equipped)
The inside mirror is designed so that it automati-
cally dims during night time conditions and ac-
cording to the intensity of the headlights of the
vehicle following you. The automatic anti-glare
feature is activated when the ignition switch is in
the ON position.
The indicator light will illuminate when the auto-
matic anti-glare feature is operating.
NOTE:
Do not hang any objects over the sensors
�1or apply glass cleaner to the sensors.
Doing so will reduce the sensitivity of the
sensors, resulting in improper operation.
Type A and Type B
The indicator light�2will illuminate when the
automatic anti-glare feature is operating.
To turn off the automatic anti-glare feature, press:
● the O button for inside mirrors without
compass.
● the
button for inside mirrors with
compass.
The indicator light will turn off.
To turn on the automatic anti-glare feature again,
press: ●
the | button for inside mirrors without
compass.
● the
button for inside mirrors with
compass.
The indicator light will turn on.
For information on HomeLink� Universal Trans-
ceiver operation, see the “HomeLink� Universal
Transceiver” in the “Instruments and controls”
section of this manual.
For information on the compass display (if so
equipped) , see “Compass display” in the “Instru-
ments and controls” section of this manual.
Type A-Without compass
LPD0469
Type B-With compass
LPD0470
Pre-driving checks and adjustments3-31
Page 172 of 454

HOW TO SELECT MENUS ON THE
SCREEN
Vehicle functions are viewed on the center dis-
play screen in menus. Whenever a menu selec-
tion is made or menu item is highlighted, different
areas on the screen provide you with important
information. See the following for details.1. Header: Shows the path used to get to the current
screen (for example, press the SETTING
button > then select the “Comfort” key) . 2. Menu Selections:
Shows the options to choose within that
menu screen (for example, Auto Interior Illu-
mination, etc.) .
3. Up/Down Movement Indicator: Shows that the arrows on the touch screen
may be used to move up or down on the
screen and select more options.
4. Screen Count: Shows the number of menu selections avail-
able for the current menu, even if they are on
multiple pages (for example, 1/7) .
5. Footer/Information Line: Provides more information (if available)
about the menu selection currently high-
lighted (for example, Cabin lighting when
unlocking doors) .
HOW TO USE THE INFO BUTTON
Press the INFO button; the display screen shows
vehicle and navigation information for your con-
venience.
Where am I?
Refer to the separate Navigation System Own-
er’s Manual for information regarding this item.
Traffic Info
Refer to the separate Navigation System Own-
er’s Manual for information regarding this item.
WHA1401LHA1402
Monitor, climate, audio, phone and voice recognition systems4-5
Page 175 of 454

To turn the screen on:● Press the SETTING button and select the
“Display” key and then select the “Display
ON” key, or
● Press the
button and the message
“resuming display” will appear and the “Dis-
play ON” key will be automatically turned on
(no amber indicator) .
Background color:
Select the “Background Color” key; the display
color changes between day and night.
The new settings are automatically saved when
you exit the setting screen by selecting the
“Back” key or any other mode button. Color theme:
Select the “Display” key, then select the “Color
Theme” key. The Color Theme select screen will
appear.
Select the key for the desired color. The appear-
ance of the background, arrows and bars will
change for all screens accordingly. You can
choose a black, blue or red color theme.
Clock
The following display will appear after pressing
the SETTING button, then selecting the “Clock”
key.
On-screen Clock:
When this item is enabled (indicator light illumi-
nated) , a clock is always displayed in the upper
right corner of the screen.
This clock will indicate the time almost exactly
because it is always adjusted by the GPS system.
LHA1240LHA1241
4-8Monitor, climate, audio, phone and voice recognition systems
Page 176 of 454
:
When this item is enabled (indicator light illumi-
nated) , the clock format will change from the
default 12-hour display to a 24-hour display.
Offset (hour):
Adjust the time by in")
Clock Format (24h):
When this item is enabled (indicator light illumi-
nated) , the clock format will change from the
default 12-hour display to a 24-hour display.
Offset (hour):
Adjust the time by increasing or decreasing the
hours.
Offset (minute):
Adjust the time by increasing or decreasing the
minutes.
Daylight Savings Time:
When this item is enabled (indicator light illumi-
nated) , daylight savings time is on. To turn off the
daylight savings time, touch the “ON” key; the
amber indicator light will go out.Time Zone:
Select the “Time Zone” key; the Time Zone
screen will appear.
Select one of the following zones, depending on
the current location, by selecting the correct time
zone key to enable that time zone (indicator light
will illuminate for that location) .
● Pacific
● Mountain
● Central
● Eastern
● Atlantic ●
Newfoundland
● Hawaii
● Alaska
After selection/settings, select the “Back” key or
any other mode button to accept the changes.
LHA1243
Monitor, climate, audio, phone and voice recognition systems4-9