2012 NISSAN 370Z COUPE engine
[x] Cancel search: enginePage 95 of 427
SIC3980
Type A
SIC3979
Type B
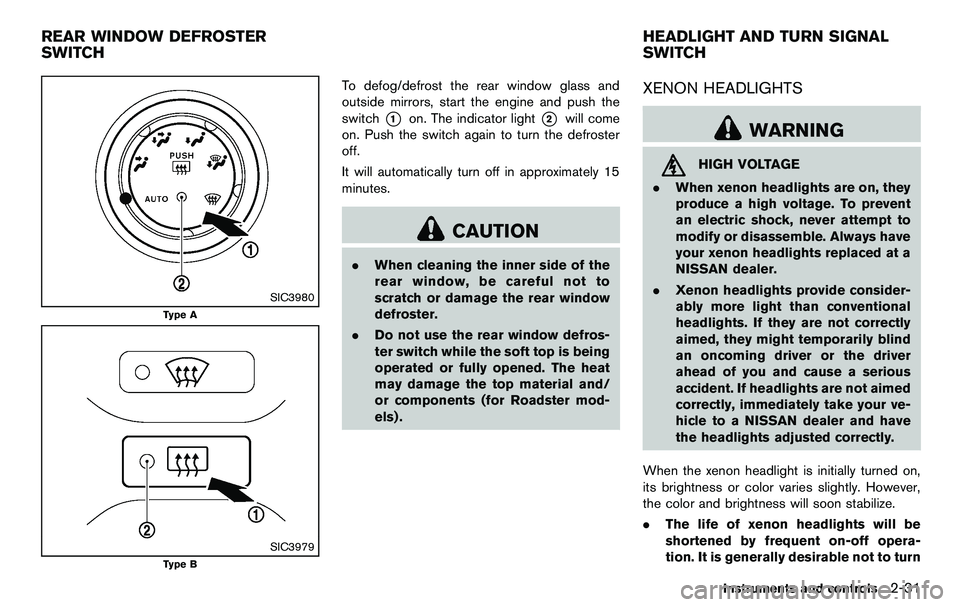
To defog/defrost the rear window glass and
outside mirrors, start the engine and push the
switch
*1on. The indicator light*2will come
on. Push the switch again to turn the defroster
off.
It will automatically turn off in approximately 15
minutes.
CAUTION
. When cleaning the inner side of the
rear window, be careful not to
scratch or damage the rear window
defroster.
. Do not use the rear window defros-
ter switch while the soft top is being
operated or fully opened. The heat
may damage the top material and/
or components (for Roadster mod-
els) .
XENON HEADLIGHTS
WARNING
HIGH VOLTAGE
. When xenon headlights are on, they
produce a high voltage. To prevent
an electric shock, never attempt to
modify or disassemble. Always have
your xenon headlights replaced at a
NISSAN dealer.
. Xenon headlights provide consider-
ably more light than conventional
headlights. If they are not correctly
aimed, they might temporarily blind
an oncoming driver or the driver
ahead of you and cause a serious
accident. If headlights are not aimed
correctly, immediately take your ve-
hicle to a NISSAN dealer and have
the headlights adjusted correctly.
When the xenon headlight is initially turned on,
its brightness or color varies slightly. However,
the color and brightness will soon stabilize.
. The life of xenon headlights will be
shortened by frequent on-off opera-
tion. It is generally desirable not to turn
Instruments and controls2-31
REAR WINDOW DEFROSTER
SWITCH HEADLIGHT AND TURN SIGNAL
SWITCH
Page 98 of 427
2-34Instruments and controls
Battery saver system
A chime will sound when the driver side door is
opened with the light switch in the
or
position and the ignition switch in the ACC, OFF
or LOCK position.
When the headlight switch is in the
or
position while the ignition switch is in the ON
position, the lights will automatically turn off 5
minutes after the ignition switch has been
pushed to the OFF position.
When the headlight switch remains in the
orposition after the lights automatically turn
off, the lights will turn on when the ignition
switch is pushed to the ON position.
CAUTION
. When you turn on the headlight
switch again after the lights auto-
matically turn off, the lights will not
turn off automatically. Be sure to
turn the light switch to the OFF
position when you leave the vehicle
for extended periods of time, other-
wise the battery will be discharged.
. Never leave the light switch on
when the engine is not running for
extended periods of time even if the headlights turn off automatically.
Daytime running light system (Canada
only)
The daytime running lights automatically illumi-
nate when the engine is started with the parking
brake released. The daytime running lights
operate with the headlight switch in the OFF
position or in the
position. Turn the head-
light switch to the
position for full illumina-
tion when driving at night.
If the parking brake is applied before the engine
is started, the daytime running lights do not
illuminate. The daytime running lights illuminate
once the parking brake is released. The daytime
running lights will remain on until the ignition
switch is pushed to the OFF position.
WARNING
It is necessary at dusk to turn on your
headlights. Failure to do so could cause
an accident injuring yourself and
others.
SIC3981
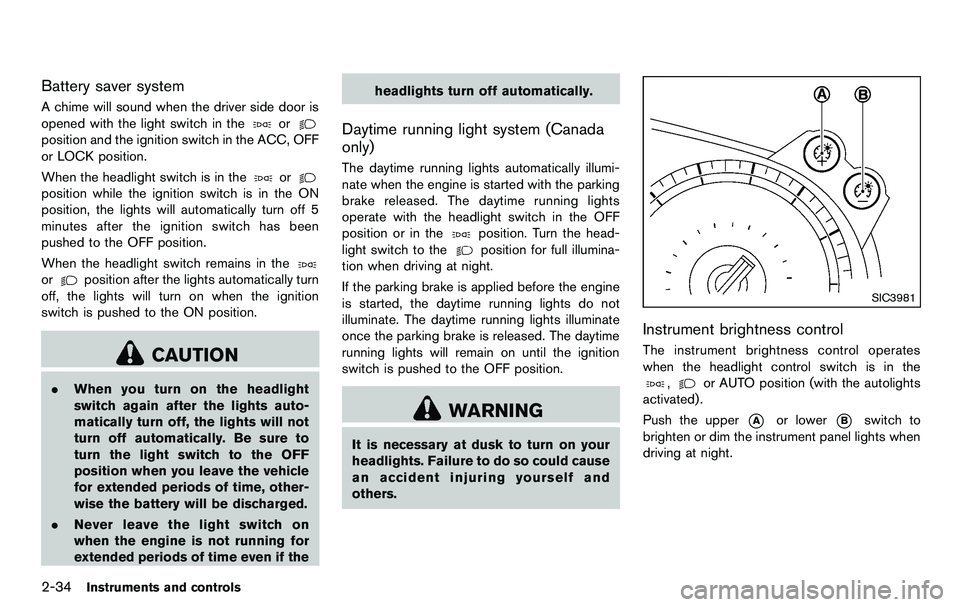
Instrument brightness control
The instrument brightness control operates
when the headlight control switch is in the
,or AUTO position (with the autolights
activated) .
Push the upper
*Aor lower*Bswitch to
brighten or dim the instrument panel lights when
driving at night.
Page 100 of 427
2-36Instruments and controls
.Turn signals do not work when the
hazard warning flasher lights are
on.
The flasher can be actuated with the ignition
switch in any position.
Some state laws may prohibit the use of
the hazard warning flasher switch while
driving.
SIC3982
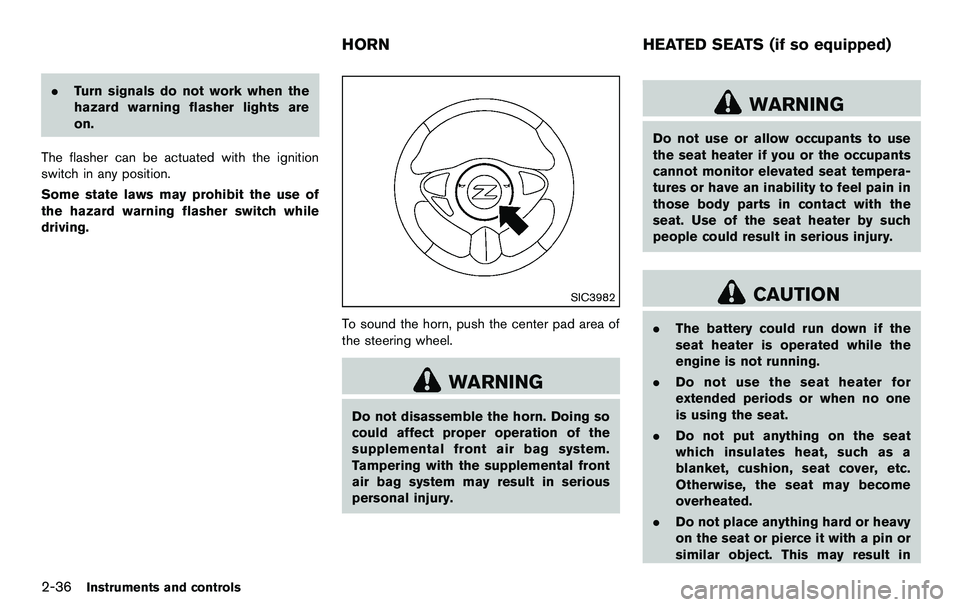
To sound the horn, push the center pad area of
the steering wheel.
WARNING
Do not disassemble the horn. Doing so
could affect proper operation of the
supplemental front air bag system.
Tampering with the supplemental front
air bag system may result in serious
personal injury.
WARNING
Do not use or allow occupants to use
the seat heater if you or the occupants
cannot monitor elevated seat tempera-
tures or have an inability to feel pain in
those body parts in contact with the
seat. Use of the seat heater by such
people could result in serious injury.
CAUTION
. The battery could run down if the
seat heater is operated while the
engine is not running.
. Do not use the seat heater for
extended periods or when no one
is using the seat.
. Do not put anything on the seat
which insulates heat, such as a
blanket, cushion, seat cover, etc.
Otherwise, the seat may become
overheated.
. Do not place anything hard or heavy
on the seat or pierce it with a pin or
similar object. This may result in
HORN HEATED SEATS (if so equipped)
Page 101 of 427
damage to the heater.
. Any liquid spilled on the heated seat
should be removed immediately
with a dry cloth.
. When cleaning the seat, never use
gasoline, thinner, or any similar
materials.
. If any abnormalities are found or the
heated seat does not operate, turn
the switch off and have the system
checked by a NISSAN dealer.
SIC2770
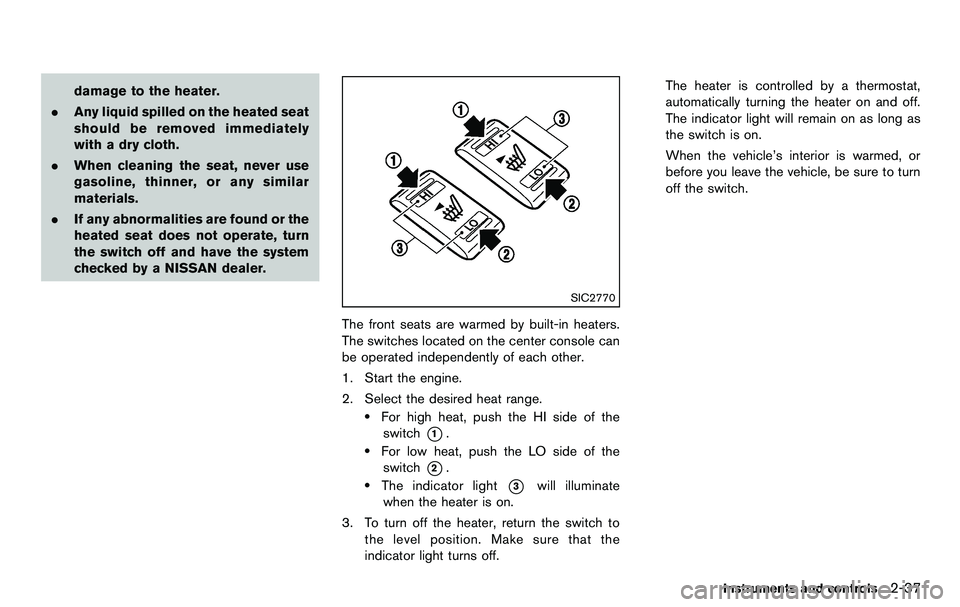
The front seats are warmed by built-in heaters.
The switches located on the center console can
be operated independently of each other.
1. Start the engine.
2. Select the desired heat range.
.For high heat, push the HI side of the
switch
*1..For low heat, push the LO side of theswitch
*2..The indicator light*3will illuminate
when the heater is on.
3. To turn off the heater, return the switch to the level position. Make sure that the
indicator light turns off. The heater is controlled by a thermostat,
automatically turning the heater on and off.
The indicator light will remain on as long as
the switch is on.
When the vehicle’s interior is warmed, or
before you leave the vehicle, be sure to turn
off the switch.
Instruments and controls2-37
Page 102 of 427
2-38Instruments and controls
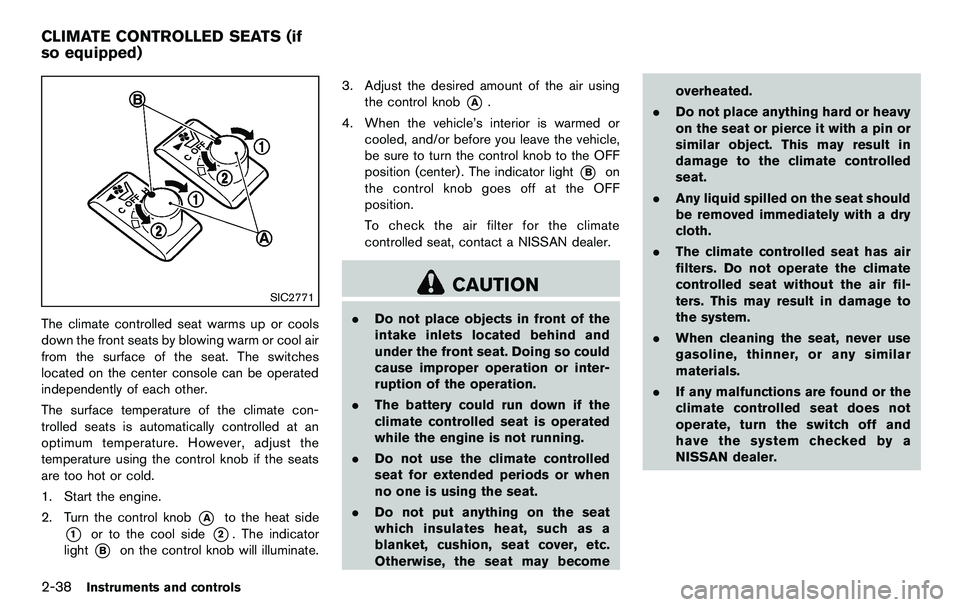
SIC2771
The climate controlled seat warms up or cools
down the front seats by blowing warm or cool air
from the surface of the seat. The switches
located on the center console can be operated
independently of each other.
The surface temperature of the climate con-
trolled seats is automatically controlled at an
optimum temperature. However, adjust the
temperature using the control knob if the seats
are too hot or cold.
1. Start the engine.
2. Turn the control knob
*Ato the heat side
*1or to the cool side*2. The indicator
light
*Bon the control knob will illuminate. 3. Adjust the desired amount of the air using
the control knob
*A.
4. When the vehicle’s interior is warmed or cooled, and/or before you leave the vehicle,
be sure to turn the control knob to the OFF
position (center) . The indicator light
*Bon
the control knob goes off at the OFF
position.
To check the air filter for the climate
controlled seat, contact a NISSAN dealer.
CAUTION
. Do not place objects in front of the
intake inlets located behind and
under the front seat. Doing so could
cause improper operation or inter-
ruption of the operation.
. The battery could run down if the
climate controlled seat is operated
while the engine is not running.
. Do not use the climate controlled
seat for extended periods or when
no one is using the seat.
. Do not put anything on the seat
which insulates heat, such as a
blanket, cushion, seat cover, etc.
Otherwise, the seat may become overheated.
. Do not place anything hard or heavy
on the seat or pierce it with a pin or
similar object. This may result in
damage to the climate controlled
seat.
. Any liquid spilled on the seat should
be removed immediately with a dry
cloth.
. The climate controlled seat has air
filters. Do not operate the climate
controlled seat without the air fil-
ters. This may result in damage to
the system.
. When cleaning the seat, never use
gasoline, thinner, or any similar
materials.
. If any malfunctions are found or the
climate controlled seat does not
operate, turn the switch off and
have the system checked by a
NISSAN dealer.
CLIMATE CONTROLLED SEATS (if
so equipped)
Page 103 of 427
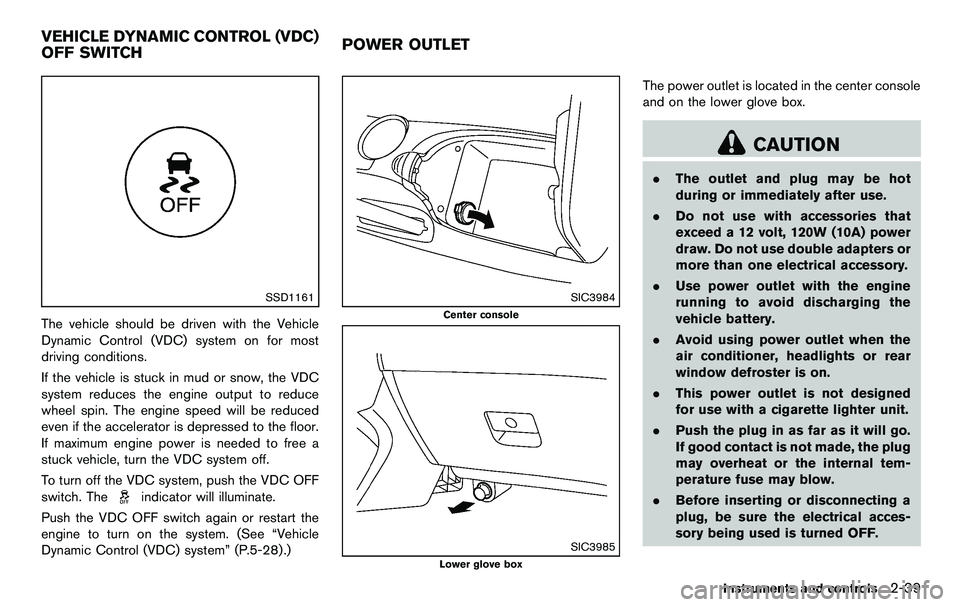
SSD1161
The vehicle should be driven with the Vehicle
Dynamic Control (VDC) system on for most
driving conditions.
If the vehicle is stuck in mud or snow, the VDC
system reduces the engine output to reduce
wheel spin. The engine speed will be reduced
even if the accelerator is depressed to the floor.
If maximum engine power is needed to free a
stuck vehicle, turn the VDC system off.
To turn off the VDC system, push the VDC OFF
switch. The
indicator will illuminate.
Push the VDC OFF switch again or restart the
engine to turn on the system. (See “Vehicle
Dynamic Control (VDC) system” (P.5-28) .)
SIC3984
Center console
SIC3985
Lower glove box
The power outlet is located in the center console
and on the lower glove box.
CAUTION
. The outlet and plug may be hot
during or immediately after use.
. Do not use with accessories that
exceed a 12 volt, 120W (10A) power
draw. Do not use double adapters or
more than one electrical accessory.
. Use power outlet with the engine
running to avoid discharging the
vehicle battery.
. Avoid using power outlet when the
air conditioner, headlights or rear
window defroster is on.
. This power outlet is not designed
for use with a cigarette lighter unit.
. Push the plug in as far as it will go.
If good contact is not made, the plug
may overheat or the internal tem-
perature fuse may blow.
. Before inserting or disconnecting a
plug, be sure the electrical acces-
sory being used is turned OFF.
Instruments and controls2-39
VEHICLE DYNAMIC CONTROL (VDC)
OFF SWITCH POWER OUTLET
Page 111 of 427
SIC4239
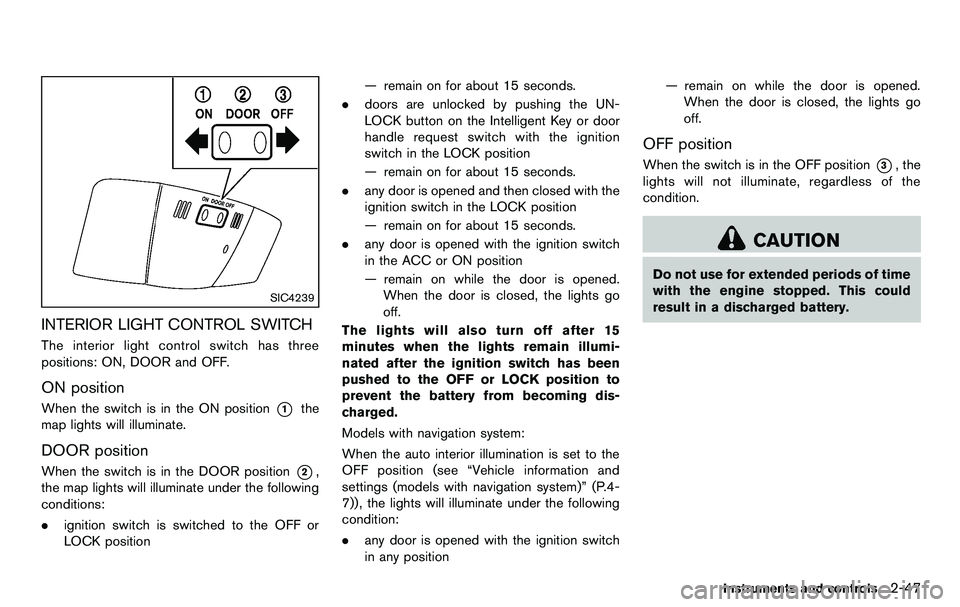
INTERIOR LIGHT CONTROL SWITCH
The interior light control switch has three
positions: ON, DOOR and OFF.
ON position
When the switch is in the ON position*1the
map lights will illuminate.
DOOR position
When the switch is in the DOOR position*2,
the map lights will illuminate under the following
conditions:
. ignition switch is switched to the OFF or
LOCK position — remain on for about 15 seconds.
. doors are unlocked by pushing the UN-
LOCK button on the Intelligent Key or door
handle request switch with the ignition
switch in the LOCK position
— remain on for about 15 seconds.
. any door is opened and then closed with the
ignition switch in the LOCK position
— remain on for about 15 seconds.
. any door is opened with the ignition switch
in the ACC or ON position
— remain on while the door is opened.
When the door is closed, the lights go
off.
The lights will also turn off after 15
minutes when the lights remain illumi-
nated after the ignition switch has been
pushed to the OFF or LOCK position to
prevent the battery from becoming dis-
charged.
Models with navigation system:
When the auto interior illumination is set to the
OFF position (see “Vehicle information and
settings (models with navigation system)” (P.4-
7)), the lights will illuminate under the following
condition:
. any door is opened with the ignition switch
in any position — remain on while the door is opened.
When the door is closed, the lights go
off.
OFF position
When the switch is in the OFF position*3, the
lights will not illuminate, regardless of the
condition.
CAUTION
Do not use for extended periods of time
with the engine stopped. This could
result in a discharged battery.
Instruments and controls2-47
Page 113 of 427
The light illuminates when the trunk lid is
opened. When the trunk lid is closed, the light
turns off.HomeLink®Universal Transceiver provides a
convenient way to consolidate the functions of
up to three individual hand-held transmitters into
one built-in device.
HomeLink
®Universal Transceiver:
. Will operate most Radio Frequency (RF)
devices such as garage doors, gates, home
and office lighting, entry door locks and
security systems.
. Is powered by your vehicle’s battery. No
separate batteries are required. If the
vehicle’s battery is discharged or is dis-
connected, HomeLink
®will retain all pro-
gramming.
Once HomeLink
®Universal Transceiver is
programmed, retain the original transmit-
ter for future programming procedures
(Example: new vehicle purchases) . Upon
sale of the vehicle, the programmed
HomeLink
®Universal Transceiver buttons
should be erased for security purposes.
For additional information, see “Program-
ming HomeLink
®” (P.2-50) .
WARNING
. Do not use HomeLink®Universal
Transceiver with any garage door
opener that lacks safety stop and reverse features as required by
federal safety standards. (These
standards became effective for
opener models manufactured after
April 1, 1982.) A garage door opener
which cannot detect an object in the
path of a closing garage door and
then automatically stop and reverse,
does not meet current federal safety
standards. Using a garage door
opener without these features in-
creases the risk of serious injury or
death.
. During programming procedure,
your garage door or security gate
may open or close. Make sure that
people and objects are clear of the
garage door, gate, etc. that you are
programming.
. Your vehicle’s engine should be
turned off while programming
HomeLink
®Universal Transceiver.
Instruments and controls2-49
TRUNK LIGHT (Roadster models) HomeLink®UNIVERSAL
TRANSCEIVER (if so equipped)