2012 NISSAN 370Z COUPE start stop button
[x] Cancel search: start stop buttonPage 218 of 427
4-62Center display, heater, air conditioner, audio, phone and voice recognition systems
Operation keys:
To operate the USB memory, select the desired
key displayed on the operation screen using the
multi-function controller.
Pause
Select the “
” key to pause the movie file. To
resume playing the movie file, select the “
”
key.
Play
Select the “
” key to start playing a movie file,
for example, after pausing a movie file.
STOP
Select the “
” key to stop playing a movie file.
Skip (Next chapter)
Select the “
” key to skip the chapter(s) of
the disc forward. The chapters will advance the
number of times the ENTER button is pushed.
Skip (Previous chapter)
Select the “
” key to skip the chapter(s) of
the disc backward. The chapters will go back
the number of times the “
” key is selected. List:
Select the “List” key on the movie file operation
screen to display the file list.
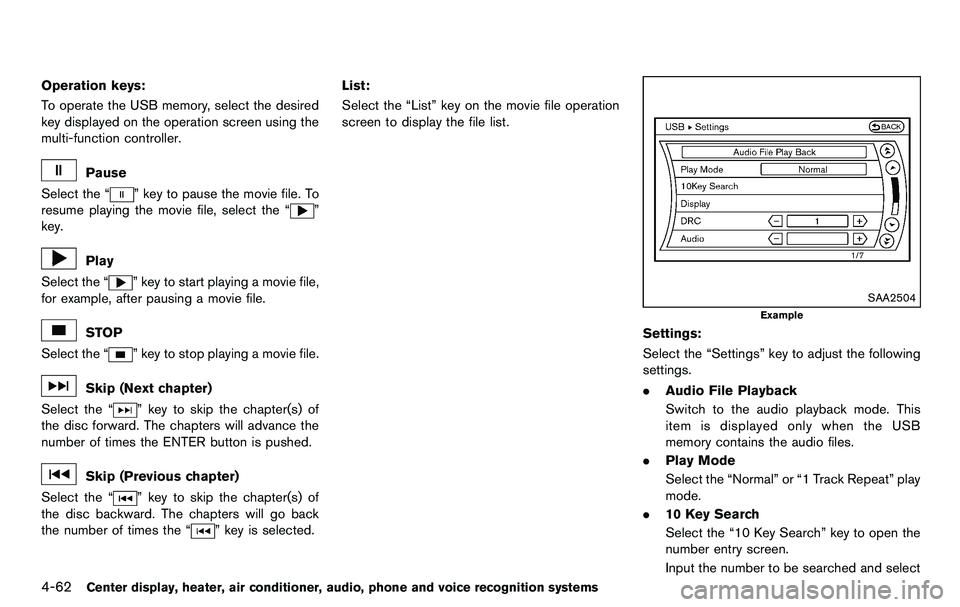
SAA2504
Example
Settings:
Select the “Settings” key to adjust the following
settings.
. Audio File Playback
Switch to the audio playback mode. This
item is displayed only when the USB
memory contains the audio files.
. Play Mode
Select the “Normal” or “1 Track Repeat” play
mode.
. 10 Key Search
Select the “10 Key Search” key to open the
number entry screen.
Input the number to be searched and select
Page 226 of 427
4-70Center display, heater, air conditioner, audio, phone and voice recognition systems
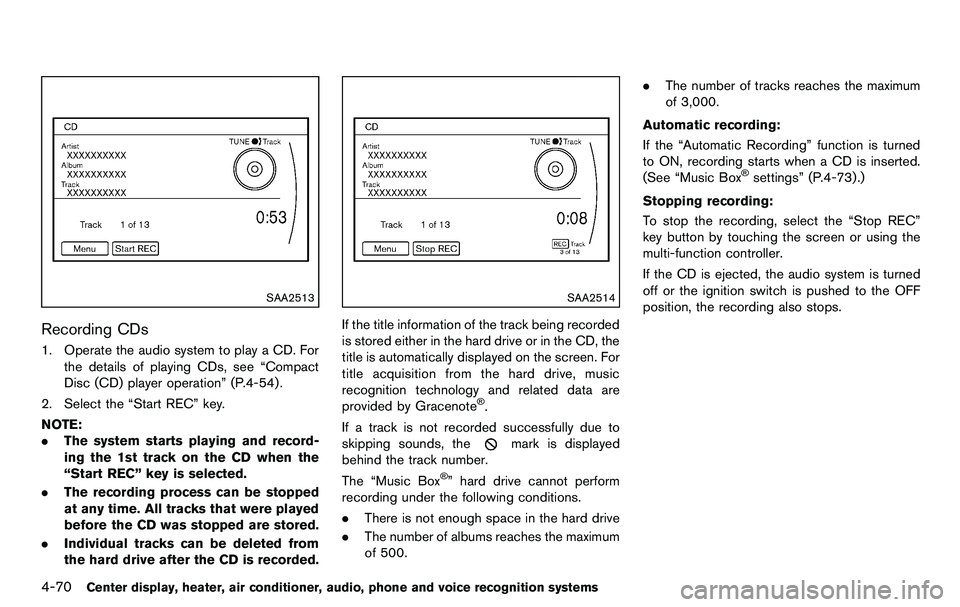
SAA2513
Recording CDs
1. Operate the audio system to play a CD. Forthe details of playing CDs, see “Compact
Disc (CD) player operation” (P.4-54).
2. Select the “Start REC” key.
NOTE:
. The system starts playing and record-
ing the 1st track on the CD when the
“Start REC” key is selected.
. The recording process can be stopped
at any time. All tracks that were played
before the CD was stopped are stored.
. Individual tracks can be deleted from
the hard drive after the CD is recorded.
SAA2514
If the title information of the track being recorded
is stored either in the hard drive or in the CD, the
title is automatically displayed on the screen. For
title acquisition from the hard drive, music
recognition technology and related data are
provided by Gracenote
®.
If a track is not recorded successfully due to
skipping sounds, the
mark is displayed
behind the track number.
The “Music Box
®” hard drive cannot perform
recording under the following conditions.
. There is not enough space in the hard drive
. The number of albums reaches the maximum
of 500. .
The number of tracks reaches the maximum
of 3,000.
Automatic recording:
If the “Automatic Recording” function is turned
to ON, recording starts when a CD is inserted.
(See “Music Box
®settings” (P.4-73).)
Stopping recording:
To stop the recording, select the “Stop REC”
key button by touching the screen or using the
multi-function controller.
If the CD is ejected, the audio system is turned
off or the ignition switch is pushed to the OFF
position, the recording also stops.
Page 227 of 427
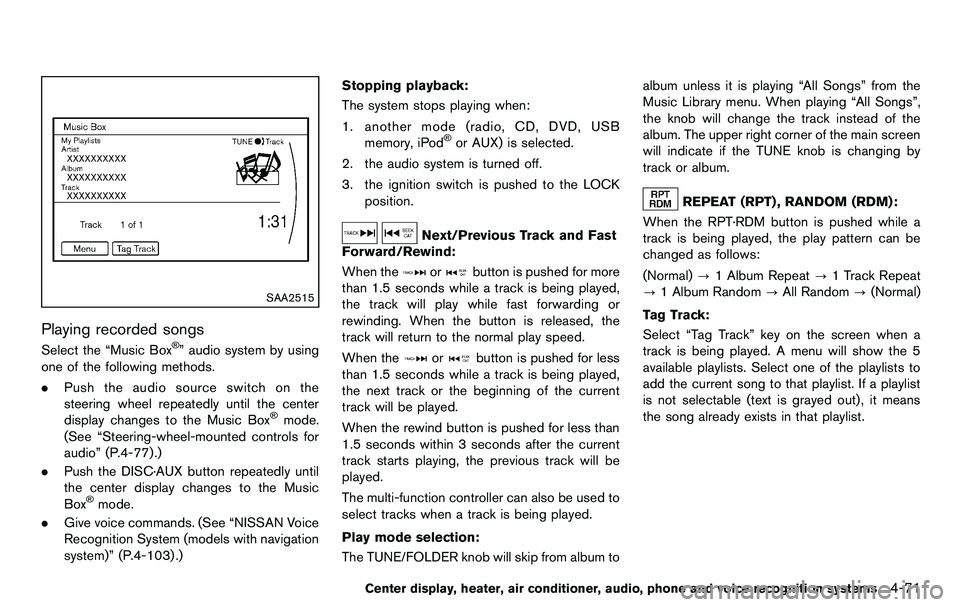
SAA2515
Playing recorded songs
Select the “Music Box®” audio system by using
one of the following methods.
. Push the audio source switch on the
steering wheel repeatedly until the center
display changes to the Music Box
®mode.
(See “Steering-wheel-mounted controls for
audio” (P.4-77).)
. Push the DISC·AUX button repeatedly until
the center display changes to the Music
Box
®mode.
. Give voice commands. (See “NISSAN Voice
Recognition System (models with navigation
system)” (P.4-103) .) Stopping playback:
The system stops playing when:
1. another mode (radio, CD, DVD, USB memory, iPod
®or AUX) is selected.
2. the audio system is turned off.
3. the ignition switch is pushed to the LOCK position.
Next/Previous Track and Fast
Forward/Rewind:
When the
orbutton is pushed for more
than 1.5 seconds while a track is being played,
the track will play while fast forwarding or
rewinding. When the button is released, the
track will return to the normal play speed.
When the
orbutton is pushed for less
than 1.5 seconds while a track is being played,
the next track or the beginning of the current
track will be played.
When the rewind button is pushed for less than
1.5 seconds within 3 seconds after the current
track starts playing, the previous track will be
played.
The multi-function controller can also be used to
select tracks when a track is being played.
Play mode selection:
The TUNE/FOLDER knob will skip from album to album unless it is playing “All Songs” from the
Music Library menu. When playing “All Songs”,
the knob will change the track instead of the
album. The upper right corner of the main screen
will indicate if the TUNE knob is changing by
track or album.
REPEAT (RPT) , RANDOM (RDM):
When the RPT·RDM button is pushed while a
track is being played, the play pattern can be
changed as follows:
(Normal) ?1 Album Repeat ?1 Track Repeat
? 1 Album Random ?All Random ?(Normal)
Tag Track: Select “Tag Track” key on the screen when a
track is being played. A menu will show the 5
available playlists. Select one of the playlists to
add the current song to that playlist. If a playlist
is not selectable (text is grayed out), it means
the song already exists in that playlist.
Center display, heater, air conditioner, audio, phone and voice recognition systems4-71
Page 229 of 427
.Edit Information of Current Song
Edit the “Track”, “Artist” and “Genre” in-
formation of the current track using the
keypad displayed on the screen. (See “How
to use touch screen” (P.4-4) .)
Edit the “Mode” information by selecting
from the list.
. Edit Information by Album
Edit the displayed name and of a selected
album and the track information in the album.
. Update Gracenote from USB Device
Update the in-vehicle Gracenote Database
using a USB memory. Search the title from a
information acquired on the Internet. Visit
www.nissanusa.com/gracenote/ for details.
. Transfer Missing Titles to USB
Transfer the information of an album re-
corded without titles to a USB memory. Visit
www.nissanusa.com/gracenote/ for details.
. Update Gracenote from HDD
Search the title using the database in the
hard drive.
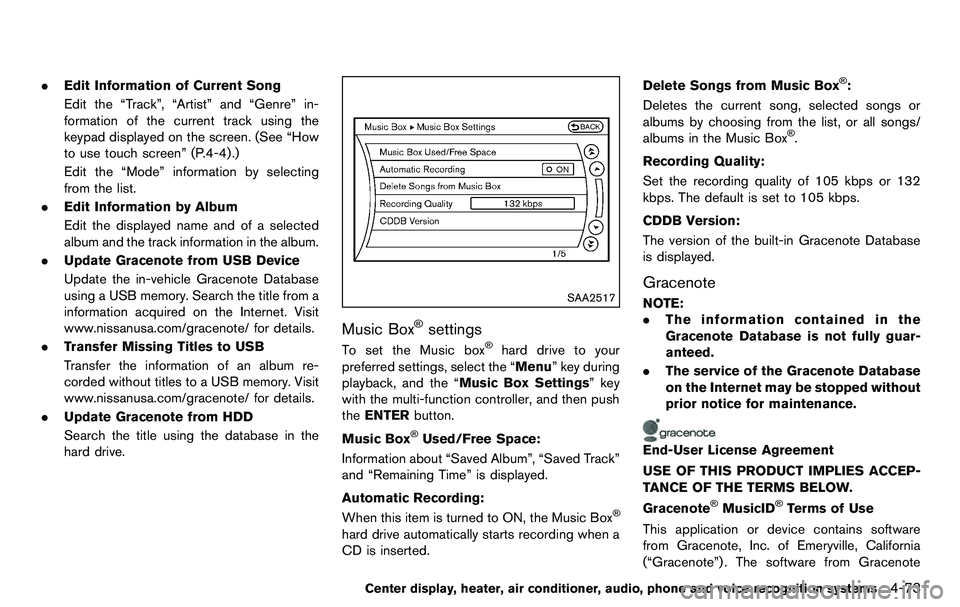
SAA2517
Music Box®settings
To set the Music box®hard drive to your
preferred settings, select the “Menu” key during
playback, and the “Music Box Settings” key
with the multi-function controller, and then push
the ENTER button.
Music Box
®Used/Free Space:
Information about “Saved Album”, “Saved Track”
and “Remaining Time” is displayed.
Automatic Recording:
When this item is turned to ON, the Music Box
®
hard drive automatically starts recording when a
CD is inserted. Delete Songs from Music Box
®:
Deletes the current song, selected songs or
albums by choosing from the list, or all songs/
albums in the Music Box
®.
Recording Quality:
Set the recording quality of 105 kbps or 132
kbps. The default is set to 105 kbps.
CDDB Version:
The version of the built-in Gracenote Database
is displayed.
Gracenote
NOTE:
. The information contained in the
Gracenote Database is not fully guar-
anteed.
. The service of the Gracenote Database
on the Internet may be stopped without
prior notice for maintenance.
End-User License Agreement
USE OF THIS PRODUCT IMPLIES ACCEP-
TANCE OF THE TERMS BELOW.
Gracenote
®MusicID®Terms of Use
This application or device contains software
from Gracenote, Inc. of Emeryville, California
(“Gracenote”) . The software from Gracenote
Center display, heater, air conditioner, audio, phone and voice recognition systems4-73
Page 247 of 427
WARNING
.Use a phone after stopping your
vehicle in a safe location. If you
have to use a phone while driving,
exercise extreme caution at all
times so full attention may be given
to vehicle operation.
. If you find yourself unable to devote
full attention to vehicle operation
while talking on the phone, pull off
the road to a safe location and stop
your vehicle before doing so.
CAUTION
To avoid draining the vehicle battery,
use a phone after starting the engine.
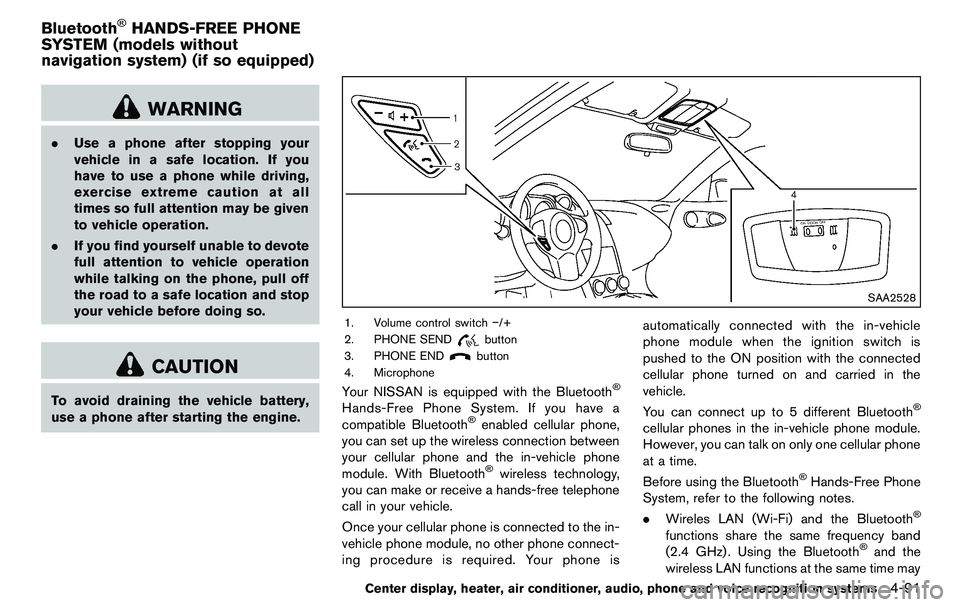
SAA2528
1. Volume control switch −/+
2. PHONE SEND
button
3. PHONE END
button
4. Microphone
Your NISSAN is equipped with the Bluetooth®
Hands-Free Phone System. If you have a
compatible Bluetooth®enabled cellular phone,
you can set up the wireless connection between
your cellular phone and the in-vehicle phone
module. With Bluetooth
®wireless technology,
you can make or receive a hands-free telephone
call in your vehicle.
Once your cellular phone is connected to the in-
vehicle phone module, no other phone connect-
ing procedure is required. Your phone is automatically connected with the in-vehicle
phone module when the ignition switch is
pushed to the ON position with the connected
cellular phone turned on and carried in the
vehicle.
You can connect up to 5 different Bluetooth
®
cellular phones in the in-vehicle phone module.
However, you can talk on only one cellular phone
at a time.
Before using the Bluetooth
®Hands-Free Phone
System, refer to the following notes.
. Wireles LAN (Wi-Fi) and the Bluetooth
®
functions share the same frequency band
(2.4 GHz) . Using the Bluetooth®and the
wireless LAN functions at the same time may
Center display, heater, air conditioner, audio, phone and voice recognition systems4-91
Bluetooth®HANDS-FREE PHONE
SYSTEM (models without
navigation system) (if so equipped)
Page 292 of 427
5-8Starting and driving
WARNING
Do not operate the push-button ignition
switch while driving the vehicle except
in an emergency. (The engine will stop
when the ignition switch is pushed 3
consecutive times or the ignition switch
is pushed and held for more than 2
seconds.) If the engine stops while the
vehicle is being driven, this could lead
to a crash and serious injury.
Before operating the push-button ignition
switch, be sure to move the selector lever to
the P (Park) position (for automatic transmission
model) or the shift lever to the N (Neutral)
position (for manual transmission model) .
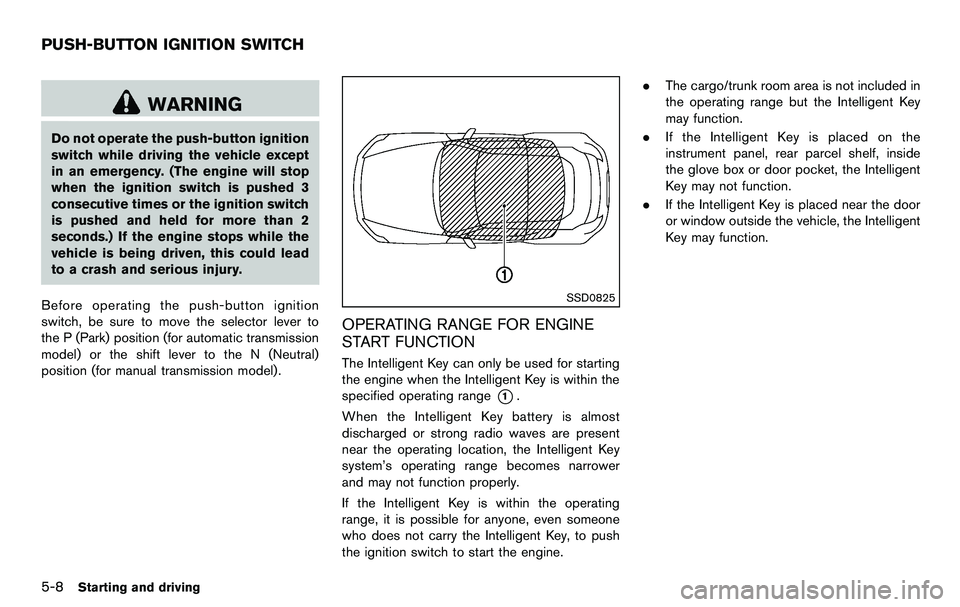
SSD0825
OPERATING RANGE FOR ENGINE
START FUNCTION
The Intelligent Key can only be used for starting
the engine when the Intelligent Key is within the
specified operating range
*1.
When the Intelligent Key battery is almost
discharged or strong radio waves are present
near the operating location, the Intelligent Key
system’s operating range becomes narrower
and may not function properly.
If the Intelligent Key is within the operating
range, it is possible for anyone, even someone
who does not carry the Intelligent Key, to push
the ignition switch to start the engine. .
The cargo/trunk room area is not included in
the operating range but the Intelligent Key
may function.
. If the Intelligent Key is placed on the
instrument panel, rear parcel shelf, inside
the glove box or door pocket, the Intelligent
Key may not function.
. If the Intelligent Key is placed near the door
or window outside the vehicle, the Intelligent
Key may function.
PUSH-BUTTON IGNITION SWITCH
Page 295 of 427
.Make sure the area around the vehicle is
clear.
. Check fluid levels such as engine oil, cool-
ant, brake fluid and window washer fluid as
frequently as possible, or at least whenever
you refuel.
. Check that all windows and lights are clean.
. Visually inspect tires for their appearance
and condition. Also check tires for proper
inflation.
. Lock all doors.
. Position seat and adjust head restraints.
. Adjust inside and outside mirrors.
. Fasten seat belts and ask all passengers to
do likewise.
. Check the operation of warning lights when
the ignition switch is pushed to the ON
position. (See “Warning/indicator lights and
audible reminders” (P.2-9) .) 1. Apply the parking brake.
2.
Automatic Transmission (AT) model:
Move the selector lever to the P (Park) or N
(Neutral) position. (P is recommended.)
The starter is designed not to operate unless
the selector lever is in either of the above
positions.
Manual Transmission (MT) model:
Move the shift lever to the N (Neutral)
position. Depress the clutch pedal fully to
the floor.
The starter is designed not to operate unless
the clutch pedal is fully depressed.
The Intelligent Key must be carried
when operating the ignition switch.
3. Push the ignition switch to the ON position. Depress the brake pedal (AT model) or the
clutch pedal (MT model) and push the
ignition switch to start the engine.
To start the engine immediately, push and
release the ignition switch while depressing
the brake pedal with the ignition switch in
any position.
.If the engine is very hard to start inextremely cold weather or when restart-
ing, depress the accelerator pedal a little
(approximately 1/3 to the floor) and while
holding, crank the engine. Release the accelerator pedal when the engine starts.
.If the engine is very hard to start because
it is flooded, depress the accelerator
pedal all the way to the floor and hold it.
Push the ignition switch to the ON
position to start cranking the engine.
After 5 or 6 seconds, stop cranking by
pushing the ignition switch to OFF. After
cranking the engine, release the accel-
erator pedal. Crank the engine with your
foot off the accelerator pedal by
depressing the brake pedal and pushing
the push-button ignition switch to start
the engine. If the engine starts, but fails
to run, repeat the above procedure.
CAUTION
Do not operate the starter for more
than 15 seconds at a time. If the engine
does not start, push the ignition switch
to OFF and wait 10 seconds before
cranking again, otherwise the starter
could be damaged.
4. Warm-up
Allow the engine to idle for at least 30
seconds after starting. Do not race the
engine while warming it up. Drive at
Starting and driving5-11
BEFORE STARTING THE ENGINE STARTING THE ENGINE
Page 296 of 427
5-12Starting and driving
moderate speed for a short distance first,
especially in cold weather. In cold weather,
keep the engine running for a minimum of 2 -
3 minutes before shutting it off. Starting and
stopping the engine over a short period of
time may make the vehicle more difficult to
start.
When racing the engine up to 4,500 rpm or
more under no load condition, the engine
will enter the fuel cut mode.
5. To stop the engine, shift the selector lever to the P (Park) position (AT model) or move the
shift lever to the N (Neutral) position (MT
model) , and push the ignition switch to the
OFF position.AUTOMATIC TRANSMISSION
7 speed automatic transmission
The automatic transmission in your vehicle is
electronically controlled by a transmission con-
trol module to produce maximum efficiency and
smooth operation.
Shown on the following pages are the recom-
mended operating procedures for this transmis-
sion. Follow these procedures for maximum
vehicle performance and driving enjoyment.
Starting the vehicle
After starting the engine, fully depress the foot
brake pedal and push the selector lever button
before shifting the selector lever to the R
(Reverse), N (Neutral) , D (Drive) or Manual shift
mode position. Be sure the vehicle is fully
stopped before attempting to shift the selector
lever.
This automatic transmission model is de-
signed so that the foot brake pedal must
be depressed before shifting from P (Park)
to any drive position while the ignition
switch position is ON.
The selector lever cannot be moved out of
the P (Park) position and into any of the
other gear positions if the ignition switch
is pushed to the LOCK, OFF or ACC position.
1. Keep the foot brake pedal depressed and
push the selector lever button to shift into a
driving gear.
2. Release the parking brake and foot brake, then gradually start the vehicle in motion.
WARNING
.Do not depress the accelerator
pedal while shifting from P (Park)
or N (Neutral) to R (Reverse) D
(Drive) , or manual shift mode. Al-
ways depress the brake pedal until
shifting is completed. Failure to do
so could cause you to lose control
and have an accident.
. Cold engine idle speed is high, so
use caution when shifting into a
forward or reverse gear before the
engine has warmed up.
. Never shift to P (Park) or R (Re-
verse) while vehicle is moving for-
ward. Never shift to P (Park) or D
(Drive) while vehicle is moving rear-
ward. Failure to do so could cause
you to lose control and have an
accident.
DRIVING THE VEHICLE