2012 NISSAN 370Z COUPE child lock
[x] Cancel search: child lockPage 108 of 427
2-44Instruments and controls
POWER WINDOWS
WARNING
.Make sure that all passengers have
their hands, etc. inside the vehicle
while it is in motion and before
closing the windows. Use the win-
dow lock switch to prevent unex-
pected use of the power windows.
. Do not leave children unattended
inside the vehicle. They could un-
knowingly activate switches or con-
trols and become trapped in the
window. Unattended children could
become involved in serious acci-
dents.
The power windows operate when the ignition
switch is in the ON position or for about 45
seconds after the ignition switch is pushed to
the OFF position. If the driver’s or front
passenger’s door is opened during this period
of about 45 seconds, power to the windows is
canceled.
The power window switches will be deactivated
during soft top operation (Roadster models).
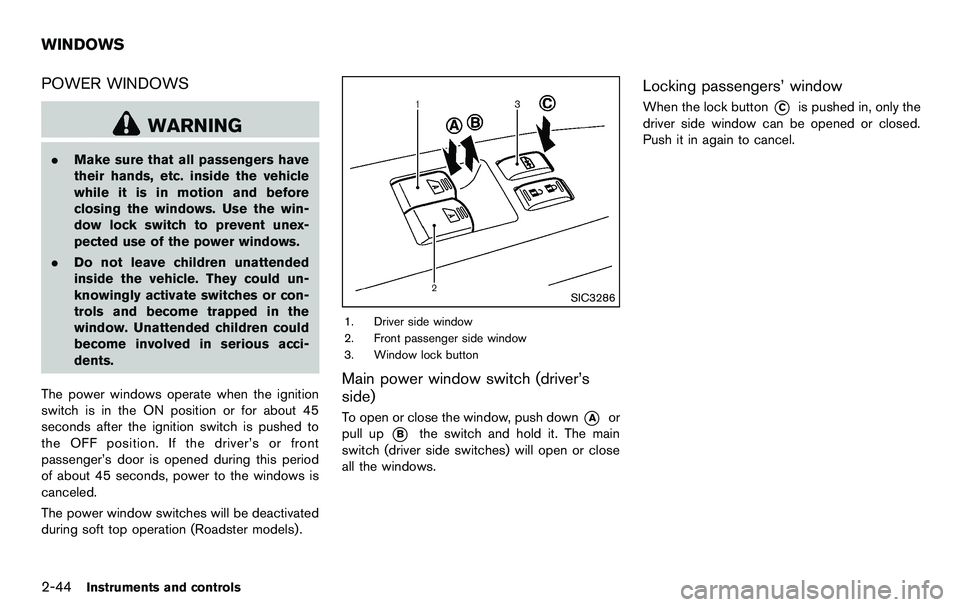
SIC3286
1. Driver side window
2. Front passenger side window
3. Window lock button
Main power window switch (driver’s
side)
To open or close the window, push down*Aor
pull up
*Bthe switch and hold it. The main
switch (driver side switches) will open or close
all the windows.
Locking passengers’ window
When the lock button*Cis pushed in, only the
driver side window can be opened or closed.
Push it in again to cancel.
WINDOWS
Page 120 of 427

3-4Pre-driving checks and adjustments
WARNING
.Always have the doors locked while
driving. Along with the use of seat
belts, this provides greater safety in
the event of an accident by helping
to prevent persons from being
thrown from the vehicle. This also
helps keep children and others from
unintentionally opening the doors,
and will help keep out intruders.
. Before opening any door, always
look for and avoid oncoming traffic.
. Do not leave children unattended
inside the vehicle. They could un-
knowingly activate switches or con-
trols. Unattended children could
become involved in serious acci-
dents.
SPA2565
LOCKING WITH MECHANICAL KEY
The power door lock system allows you to lock
or unlock all doors simultaneously using the
mechanical key.
.Turning the driver’s door key cylinder to the
front of the vehicle
*1will lock all doors.
. Turning the driver’s door key cylinder once
to the rear of the vehicle
*2will unlock the
driver’s door. After returning the key to the
neutral position
*3, turning it to the rear
again within 60 seconds will unlock all
doors.
. You can switch the lock system to the mode
that allows you to open all the doors when
the key is turned once. (See “How to use SETTING button” (P.4-11).)
OPENING AND CLOSING WINDOWS
WITH THE MECHANICAL KEY
The driver’s door key operation also allows you
to open and close the window that is equipped
with the automatic open/close function. (See
“Power windows” (P.2-44).)
To open the window, turn the driver’s door key
cylinder to the rear of the vehicle for
longer
than 1 second. The door is unlocked and the
window keeps opening while turning the key.
This function can also be performed by pushing
and holding the UNLOCK button on the
Intelligent Key. (See “Remote keyless entry
system” (P.3-13) .)
To close the window, turn the driver’s door key
cylinder to the front of the vehicle for longer
than 1 second. The door is locked and the
window keeps closing while turning the key.
DOORS
Page 134 of 427
3-18Pre-driving checks and adjustments
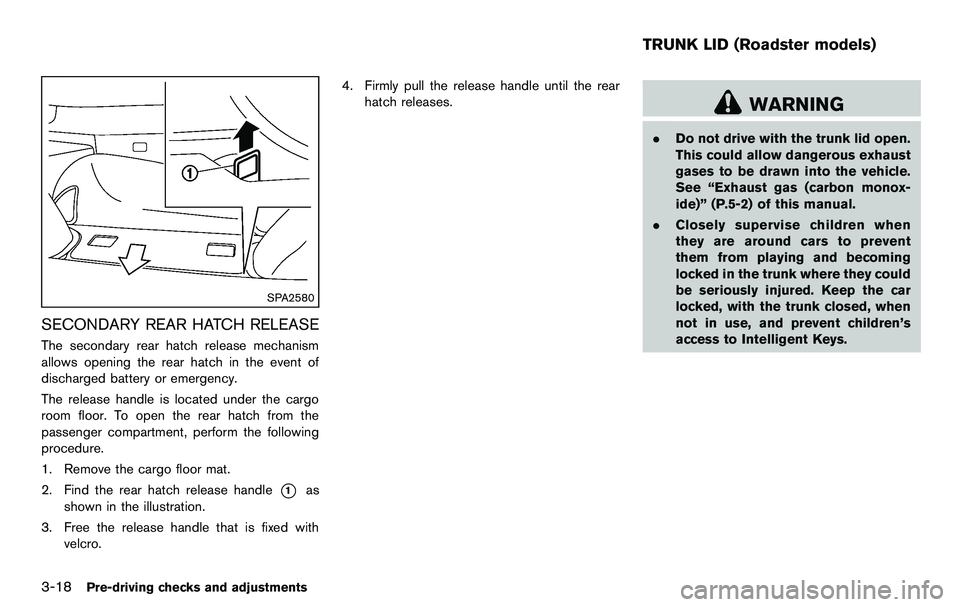
SPA2580
SECONDARY REAR HATCH RELEASE
The secondary rear hatch release mechanism
allows opening the rear hatch in the event of
discharged battery or emergency.
The release handle is located under the cargo
room floor. To open the rear hatch from the
passenger compartment, perform the following
procedure.
1. Remove the cargo floor mat.
2. Find the rear hatch release handle
*1as
shown in the illustration.
3. Free the release handle that is fixed with velcro. 4. Firmly pull the release handle until the rear
hatch releases.
WARNING
.Do not drive with the trunk lid open.
This could allow dangerous exhaust
gases to be drawn into the vehicle.
See “Exhaust gas (carbon monox-
ide)” (P.5-2) of this manual.
. Closely supervise children when
they are around cars to prevent
them from playing and becoming
locked in the trunk where they could
be seriously injured. Keep the car
locked, with the trunk closed, when
not in use, and prevent children’s
access to Intelligent Keys.
TRUNK LID (Roadster models)
Page 135 of 427
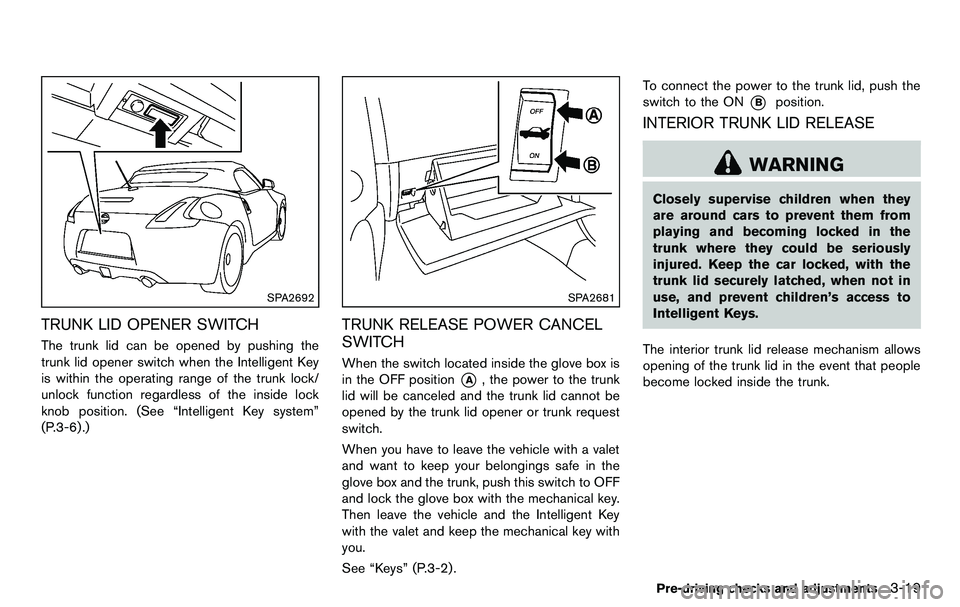
SPA2692
TRUNK LID OPENER SWITCH
The trunk lid can be opened by pushing the
trunk lid opener switch when the Intelligent Key
is within the operating range of the trunk lock/
unlock function regardless of the inside lock
knob position. (See “Intelligent Key system”
(P.3-6) .)
SPA2681
TRUNK RELEASE POWER CANCEL
SWITCH
When the switch located inside the glove box is
in the OFF position
*A, the power to the trunk
lid will be canceled and the trunk lid cannot be
opened by the trunk lid opener or trunk request
switch.
When you have to leave the vehicle with a valet
and want to keep your belongings safe in the
glove box and the trunk, push this switch to OFF
and lock the glove box with the mechanical key.
Then leave the vehicle and the Intelligent Key
with the valet and keep the mechanical key with
you.
See “Keys” (P.3-2) . To connect the power to the trunk lid, push the
switch to the ON
*Bposition.
INTERIOR TRUNK LID RELEASE
WARNING
Closely supervise children when they
are around cars to prevent them from
playing and becoming locked in the
trunk where they could be seriously
injured. Keep the car locked, with the
trunk lid securely latched, when not in
use, and prevent children’s access to
Intelligent Keys.
The interior trunk lid release mechanism allows
opening of the trunk lid in the event that people
become locked inside the trunk.
Pre-driving checks and adjustments3-19
Page 286 of 427
5-2Starting and driving
WARNING
.Do not leave children or adults who
would normally require the support
of others alone in your vehicle. Pets
should not be left alone either. They
could accidentally injure themselves
or others through inadvertent op-
eration of the vehicle. Also, on hot,
sunny days, temperatures in a
closed vehicle could quickly become
high enough to cause severe or
possibly fatal injuries to people or
animals.
. Properly secure all cargo to help
prevent it from sliding or shifting.
Do not place cargo higher than the
seatbacks. In a sudden stop or
collision, unsecured cargo could
cause personal injury (Coupe mod-
els) .
. Closely supervise children when
they are around cars to prevent
them from playing and becoming
locked in the trunk where they could
be seriously injured. Keep the car
locked with the trunk closed when
not in use, and prevent children’s access to car keys (Roadster mod-
els) .
If the engine oil temperature is high, the
engine protection mode, which helps re-
duce the chance of engine damage, could
activate and automatically decrease en-
gine power. Driving while the engine oil
temperature is high may result in engine
damage.
EXHAUST GAS (carbon monoxide)
WARNING
. Do not breathe exhaust gases; they
contain colorless and odorless car-
bon monoxide. Carbon monoxide is
dangerous. It can cause uncon-
sciousness or death.
. If you suspect that exhaust fumes
are entering the vehicle, drive with
all windows fully open, and have the
vehicle inspected immediately.
. Do not run the engine in closed
spaces such as a garage.
. Do not park the vehicle with the
engine running for any extended
length of time. .
Keep the rear hatch/trunk lid closed
while driving, otherwise exhaust
gases could be drawn into the
passenger compartment. If you
must drive with the rear hatch/trunk
lid open, follow these precautions:
1) Open all the windows.
2) Set the
air recirculation to
off and the fan control to high to
circulate the air.
. The exhaust system and body
should be inspected by a qualified
mechanic whenever:
— The vehicle is raised for service.
— You suspect that exhaust fumes
are entering into the passenger
compartment.
— You notice a change in the sound of the exhaust system.
— You have had an accident invol- ving damage to the exhaust
system, underbody, or rear of
the vehicle.
PRECAUTIONS WHEN STARTING
AND DRIVING
Page 365 of 427
c. Insert the clip through the undercoverinto the hole in the frame, then push the
center of the clip in to lock the clip in
place.
d. Install the bolts that hold the undercover in place. Be careful not to strip the bolts
or over-tighten them.
2. Lower the vehicle carefully to the ground.
3. Dispose of waste oil and filter properly.
WARNING
. Prolonged and repeated contact
with used engine oil may cause skin
cancer.
. Try to avoid direct skin contact with
used oil. If skin contact is made,
wash thoroughly with soap or hand
cleaner as soon as possible.
. Keep used engine oil out of reach of
children. When checking or replacement is required, we
recommend a NISSAN dealer for servicing.
CAUTION
.
Use only Genuine NISSAN Matic S
ATF. Do not mix with other fluids.
. Using automatic transmission fluid
other than Genuine NISSAN Matic S
ATF will cause deterioration in dri-
veability and automatic transmis-
sion durability, and may damage
the automatic transmission, which
is not covered by the NISSAN new
vehicle limited warranty.
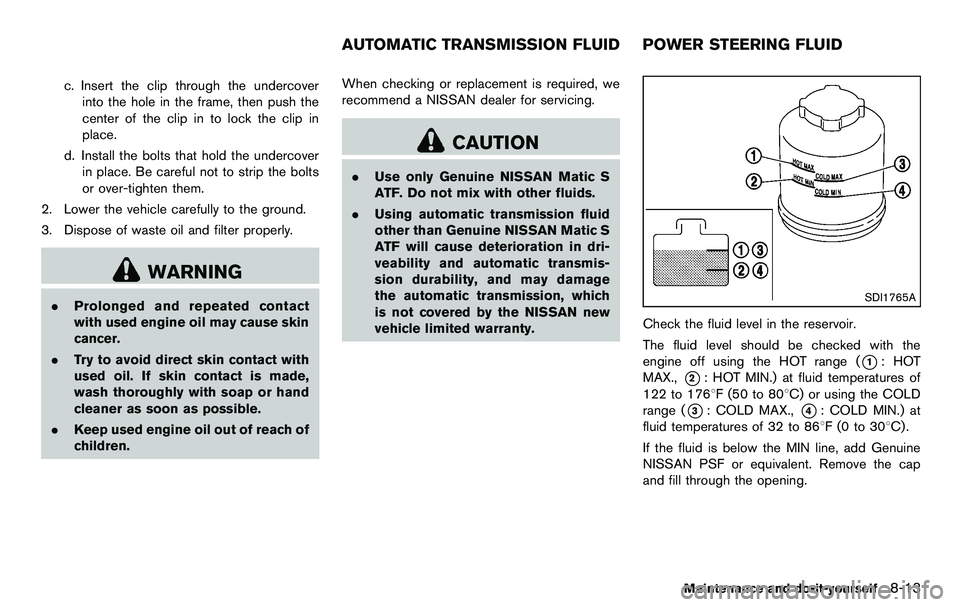
SDI1765A
Check the fluid level in the reservoir.
The fluid level should be checked with the
engine off using the HOT range (
*1:HOT
MAX.,
*2: HOT MIN.) at fluid temperatures of
122 to 1768F (50 to 808C) or using the COLD
range (
*3: COLD MAX.,*4: COLD MIN.) at
fluid temperatures of 32 to 868F(0to30 8C) .
If the fluid is below the MIN line, add Genuine
NISSAN PSF or equivalent. Remove the cap
and fill through the opening.
Maintenance and do-it-yourself8-13
AUTOMATIC TRANSMISSION FLUID POWER STEERING FLUID
Page 368 of 427
8-16Maintenance and do-it-yourself
.Keep the battery surface clean and dry.
Clean the battery with a solution of baking
soda and water.
. Make certain the terminal connections are
clean and securely tightened.
. If the vehicle is not to be used for 30 days or
longer, disconnect the negative (−) battery
terminal cable to prevent discharging it.
CAUTION
When the battery cable is removed from
the battery terminal, do not close either
of front doors. The automatic window
adjusting function will not work, and
the side roof panel may be damaged.
To disconnect the negative (−) battery terminal,
perform the procedure in the following order.
Otherwise, the window and the side roof panel
may contact and be damaged.
1. Close the windows.
2. Open the hood.
3. Close and lock all the doors.
4. Disconnect the negative (−) battery terminal.
5. Securely close the hood.
To connect the negative (−) battery terminal, perform the procedure in the following order.
Otherwise, the window and the side roof panel
may contact and be damaged.
1. Unlock and open the driver side door. Do
not close the door.
2. Open the hood.
3. Connect the negative (−) battery terminal. Then close the hood.
4. Fully open the driver side door window.
5. Close the driver side door and the window.
WARNING
. Do not expose the battery to flames
or electrical sparks. Hydrogen gas
generated by the battery is explo-
sive. Do not allow battery fluid to
contact your skin, eyes, fabrics, or
painted surfaces. After touching a
battery or battery cap, do not touch
or rub your eyes. Thoroughly wash
your hands. If the acid contacts your
eyes, skin or clothing, immediately
flush with water for at least 15
minutes and seek medical attention.
. Do not operate the vehicle if the
fluid in the battery is low. Low
battery fluid can cause a higher load on the battery which can generate
heat, reduce battery life, and in
some cases lead to an explosion.
. When working on or near a battery,
always wear suitable eye protection
and remove all jewelry.
. Battery posts, terminals and related
accessories contain lead and lead
compounds. Wash hands after
handling.
. Keep the battery out of the reach of
children.
BATTERY
Page 377 of 427

and replace it with a new fuse of the same
rating.
How to remove the extended storage
switch:
1. To remove the extended storage switch, besure the ignition switch is in the OFF or
LOCK position.
2. Be sure the headlight switch is in the OFF position.
3. Remove the fuse box cover.
4. Pinch the locking tabs
*1found on each
side of the storage switch.
5. Pull the storage switch straight out from the fuse box
*2.
SDI2451
CAUTION
Be careful not to allow children to
swallow the battery and removed parts. Replace the battery as follows:
1. Remove the mechanical key from the key.
2. Insert a small screwdriver into the slit of the
corner and twist it to separate the upper part
from the lower part. Use a cloth to protect
the casing.
3. Replace the battery with a new one. Recommended battery:
CR2032 or equivalent
.Do not touch the internal circuit andelectric terminals as doing so could
cause a malfunction.
.Hold the battery by the edges. Holdingthe battery across the contact points will
seriously deplete the storage capacity.
.Make sure that the +side faces the
bottom case.
Maintenance and do-it-yourself8-25
INTELLIGENT KEY BATTERY
REPLACEMENT