2012 NISSAN 370Z COUPE buttons
[x] Cancel search: buttonsPage 130 of 427
3-14Pre-driving checks and adjustments
Locking doors, rear hatch/trunk lid and
fuel-filler door
1. Push the ignition switch to the OFF positionand make sure you carry the Intelligent Key
with you.*
2. Close all the doors and the rear hatch/trunk lid.
3. Push the LOCK
button*1on the
Intelligent Key.
4. All the doors, the rear hatch/trunk lid and fuel-filler door will lock.
5. The hazard indicator flashes twice and the horn chirps once.
*: Doors and the rear hatch/trunk lid will lock with the Intelligent Key while the ignition switch is in
the ACC or ON position.
Unlocking doors, rear hatch/trunk lid and
fuel-filler door
1. Push the UNLOCKbutton*2on the
Intelligent Key once.
2. The hazard indicator flashes once. The driver’s door and fuel-filler door will unlock.
3. Push the UNLOCK
button on the
Intelligent Key again within 60 seconds.
4. The hazard indicator flashes once again. All the doors and the rear hatch/trunk lid will
unlock. All doors and the rear hatch/trunk lid will be
locked automatically unless one of the following
operations is performed within 1 minute after
pushing the UNLOCK
button on the
Intelligent Key while the doors are locked. If
during this 1-minute time period, the UNLOCK
button on the Intelligent Key is pushed, all
doors and the rear hatch/trunk lid will be locked
automatically after another 1 minute.
. Opening any door
. Pushing the ignition switch
. Inserting the Intelligent Key into the Intelli-
gent Key port
Opening windows
The UNLOCKbutton operation also allows
you to open a window that is equipped with the
automatic open/close function. (See “Power
windows” (P.2-44) .)
To open the window, push the door UNLOCK
button*2on the Intelligent Key for about
3 seconds after the door is unlocked.
To stop opening, release the UNLOCK
button.
Window cannot be closed using the Intelligent
Key.
The door window can be opened or closed by
turning the metal key in a door lock. (See
“Doors” (P.3-4).)
Using panic alarm
If you are near your vehicle and feel threatened,
you may activate the alarm to call attention as
follows:
1. Push the PANIC
button*3on the Key
for more than 1 second.
2. The theft warning alarm and headlights will stay on for 25 seconds.
3. The panic alarm stops when:
.It has run for 25 seconds, or.Any of the buttons on the Intelligent Key are pushed. (Note: Panic button should
be pushed for more than 1 second.)
Setting hazard indicator and horn mode
This vehicle is set in hazard indicator and horn
mode when you first receive the vehicle.
In hazard indicator and horn mode, when the
LOCK
button*1is pushed, the hazard
indicator flashes twice and the horn chirps once.
When the UNLOCK
button*2is pushed,
the hazard indicator flashes once.
If horns are not necessary, the system can be
switched to the hazard indicator mode.
In hazard indicator mode, when the LOCK
button is pushed, the hazard indicator flashes
twice. When the UNLOCK
button is
pushed, neither the hazard indicator nor the
Page 131 of 427
horn operates.Hazard indicator and horn mode:
DOOR LOCKDOOR UNLOCK
Intelligent Key system
(Using door handle or rear hatch/trunk request switch) HAZARD -
twice
OUTSIDE CHIME - twiceHAZARD -
once
OUTSIDE CHIME - once
Remote keyless entry system (Using
orbutton) HAZARD -
twice
HORN - once HAZARD -
once
HORN - none
Hazard indicator mode:
DOOR LOCK DOOR UNLOCK
Intelligent Key system
(Using door handle or rear hatch/trunk request switch) HAZARD -
twice
OUTSIDE CHIME - none HAZARD - none
OUTSIDE CHIME - none
Remote keyless entry system (Using
orbutton) HAZARD -
twice
HORN - none HAZARD - none
HORN - none
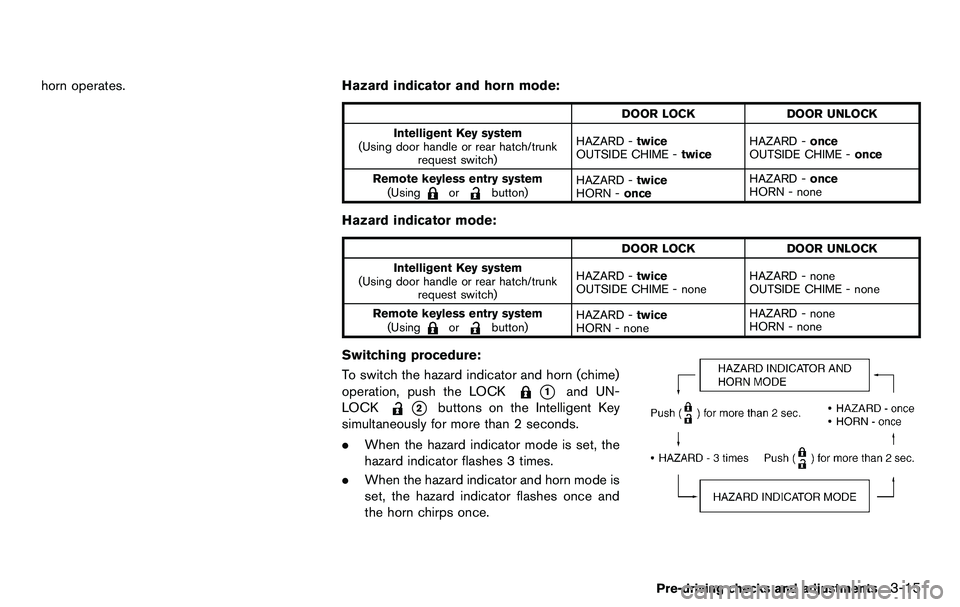
Switching procedure:
To switch the hazard indicator and horn (chime)
operation, push the LOCK
*1and UN-
LOCK
*2buttons on the Intelligent Key
simultaneously for more than 2 seconds.
. When the hazard indicator mode is set, the
hazard indicator flashes 3 times.
. When the hazard indicator and horn mode is
set, the hazard indicator flashes once and
the horn chirps once.
Pre-driving checks and adjustments3-15
Page 158 of 427

Steering-wheel-mounted controls for audio .............. 4-77
Antenna ........................................................................\
....... 4-79
Car phone or CB radio ........................................................ 4-80
Bluetooth
®hands-free phone system (models with
navigation system) ................................................................. 4-81
Regulatory information .................................................... 4-82
Voice commands .............................................................. 4-82
Control buttons ................................................................. 4-83
Connecting procedure .................................................... 4-83
Phone selection ................................................................ 4-84
Vehicle phonebook .......................................................... 4-84
Making a call ..................................................................... 4-86
Receiving a call ................................................................. 4-87
During a call ...................................................................... 4-88
Phone setting .................................................................... 4-89
Troubleshooting guide ..................................................... 4-90 Bluetooth
®hands-free phone system (models without
navigation system) (if so equipped) ................................. 4-91
Regulatory information .................................................. 4-92
Using the system ........................................................... 4-93
Control buttons ............................................................... 4-95
Getting started ............................................................... 4-95
List of voice commands ............................................... 4-97
Speaker Adaptation (SA) mode .............................. 4-100
Troubleshooting guide ............................................... 4-102
NISSAN Voice Recognition System (models with
navigation system) ............................................................. 4-103
NISSAN voice recognition Standard Mode ......... 4-103
Using the system ........................................................ 4-106
NISSAN voice recognition Alternate
Command Mode ......................................................... 4-114
Using the system ........................................................ 4-123
Troubleshooting guide ............................................... 4-128
Page 159 of 427
WARNING
.Do not disassemble or modify this
system. If you do, it may result in
accidents, fire, or electric shock.
. Do not use this system if you notice
any abnormality, such as a frozen
screen or lack of sound. Continued
use of the system may result in
accident, fire or electric shock.
. In case you notice any foreign
object in the system hardware, spill
liquid on it, or notice smoke or smell
coming from it, stop using the
system immediately and contact
your nearest NISSAN dealer. Ignor-
ing such conditions may lead to
accidents, fire, or electric shock.
. Park the vehicle in a safe location
and apply the parking brake to view
the images on the front center dis-
play screen.
Do not attempt to operate the system in
extreme temperature conditions [below
− 48F( −208 C) and above 1588 F (708C)].
Operating this system under these condi-
tions may result in system malfunctions.
SAA2273
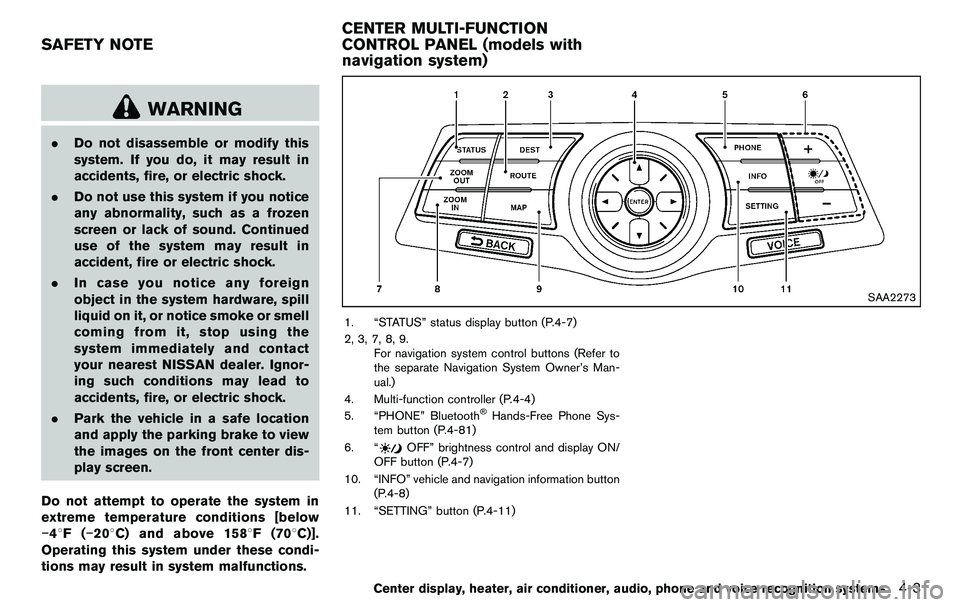
1. “STATUS” status display button (P.4-7)
2, 3, 7, 8, 9. For navigation system control buttons (Refer to
the separate Navigation System Owner’s Man-
ual.)
4. Multi-function controller (P.4-4)
5. “PHONE” Bluetooth
®Hands-Free Phone Sys-
tem button (P.4-81)
6. “
OFF” brightness control and display ON/
OFF button (P.4-7)
10. “INFO” vehicle and navigation information button (P.4-8)
11. “SETTING” button (P.4-11)
Center display, heater, air conditioner, audio, phone and voice recognition systems4-3
SAFETY NOTE CENTER MULTI-FUNCTION
CONTROL PANEL (models with
navigation system)
Page 160 of 427
4-4Center display, heater, air conditioner, audio, phone and voice recognition systems
SAA2274
HOW TO USE MULTI-FUNCTION
CONTROLLER
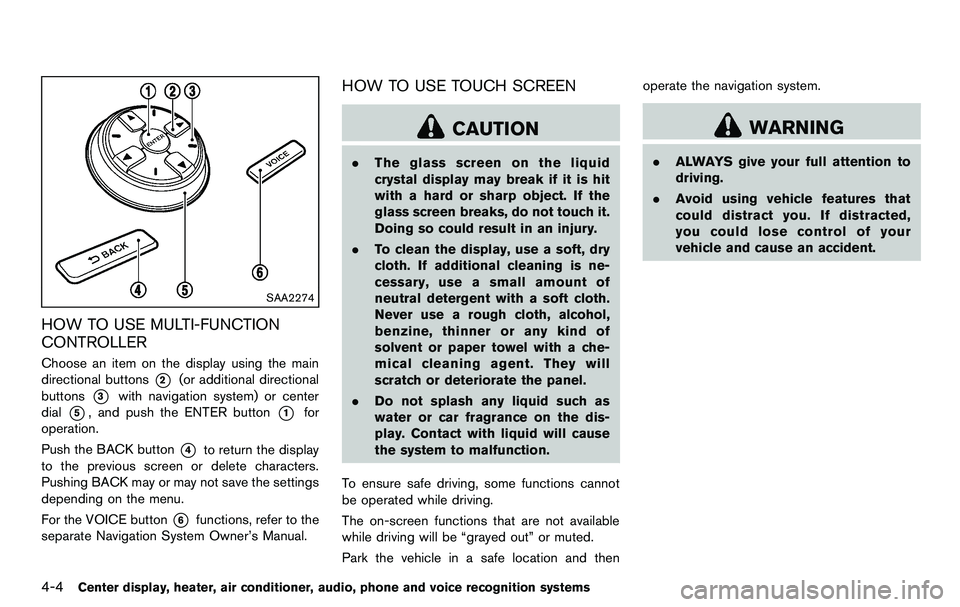
Choose an item on the display using the main
directional buttons
*2(or additional directional
buttons
*3with navigation system) or center
dial
*5, and push the ENTER button*1for
operation.
Push the BACK button
*4to return the display
to the previous screen or delete characters.
Pushing BACK may or may not save the settings
depending on the menu.
For the VOICE button
*6functions, refer to the
separate Navigation System Owner’s Manual.
HOW TO USE TOUCH SCREEN
CAUTION
. The glass screen on the liquid
crystal display may break if it is hit
with a hard or sharp object. If the
glass screen breaks, do not touch it.
Doing so could result in an injury.
. To clean the display, use a soft, dry
cloth. If additional cleaning is ne-
cessary, use a small amount of
neutral detergent with a soft cloth.
Never use a rough cloth, alcohol,
benzine, thinner or any kind of
solvent or paper towel with a che-
mical cleaning agent. They will
scratch or deteriorate the panel.
. Do not splash any liquid such as
water or car fragrance on the dis-
play. Contact with liquid will cause
the system to malfunction.
To ensure safe driving, some functions cannot
be operated while driving.
The on-screen functions that are not available
while driving will be “grayed out” or muted.
Park the vehicle in a safe location and then operate the navigation system.
WARNING
.
ALWAYS give your full attention to
driving.
. Avoid using vehicle features that
could distract you. If distracted,
you could lose control of your
vehicle and cause an accident.
Page 199 of 427
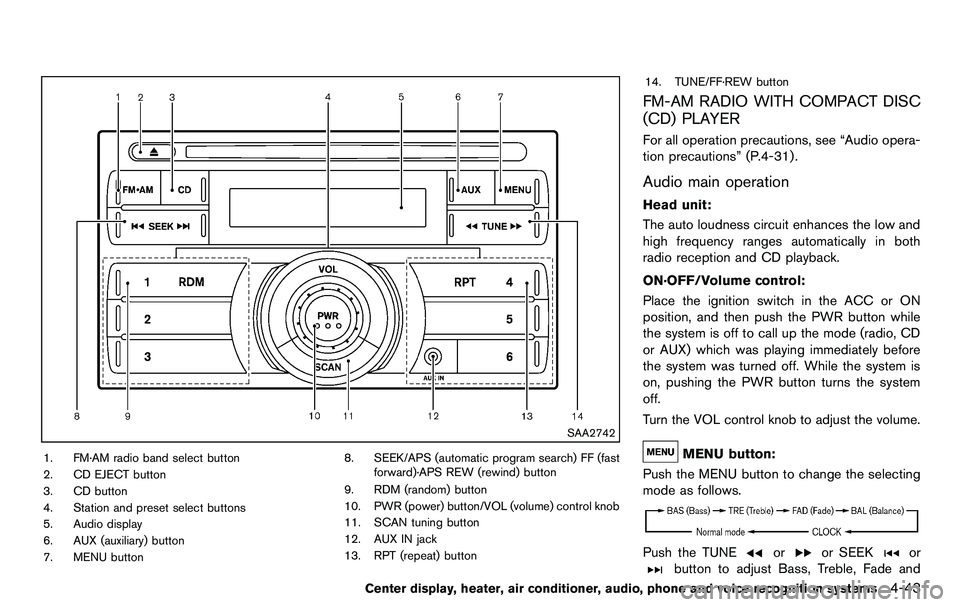
SAA2742
1. FM·AM radio band select button
2. CD EJECT button
3. CD button
4. Station and preset select buttons
5. Audio display
6. AUX (auxiliary) button
7. MENU button8. SEEK/APS (automatic program search) FF (fast
forward)·APS REW (rewind) button
9. RDM (random) button
10. PWR (power) button/VOL (volume) control knob
11. SCAN tuning button
12. AUX IN jack
13. RPT (repeat) button 14. TUNE/FF·REW button
FM-AM RADIO WITH COMPACT DISC
(CD) PLAYER
For all operation precautions, see “Audio opera-
tion precautions” (P.4-31) .
Audio main operation
Head unit:
The auto loudness circuit enhances the low and
high frequency ranges automatically in both
radio reception and CD playback.
ON·OFF/Volume control:
Place the ignition switch in the ACC or ON
position, and then push the PWR button while
the system is off to call up the mode (radio, CD
or AUX) which was playing immediately before
the system was turned off. While the system is
on, pushing the PWR button turns the system
off.
Turn the VOL control knob to adjust the volume.
MENU button:
Push the MENU button to change the selecting
mode as follows.
Push the TUNEoror SEEKor
button to adjust Bass, Treble, Fade and
Center display, heater, air conditioner, audio, phone and voice recognition systems4-43
Page 200 of 427
4-44Center display, heater, air conditioner, audio, phone and voice recognition systems
Balance to the desired level. Fade adjusts the
sound level between the front and rear speakers
and Balance adjusts the sound between the
right and left speakers.
Once you have adjusted the sound quality to the
desired level, push the MENU button repeatedly
until the radio or CD display reappears (normal
mode) . Otherwise, the radio or CD display will
automatically reappear after approximately 10
seconds.
Clock adjustment:
Push the MENU button until the CLOCK mode
appears. Then push the TUNE or SEEK button
to select “CLK-ON” or “CLK-OFF” to turn the
clock on or off.
“CLK-ON” needs to be selected before adjust-
ing the clock display.
1. Push the MENU button.
2. Push the MENU button again. The clockdisplay starts to flash.
3. Push the TUNE or SEEK button to adjust the hours.
4. Push the MENU button again. The display will switch to the minute adjustment mode.
5. Push the TUNE or SEEK button to adjust the minutes. 6. Push the MENU button again to exit the
clock mode.
The display will return to the regular clock
display after 5 seconds.
To reset the minute to zero, hold down the
MENU button and then push the TUNE or SEEK
button, the time will be reset as follows.
. In case the displayed minute is in the range
of 00 - 29, the hour will stay the same and
the minute will be reset to 00.
. In case the displayed minute is in the range
of 30 - 59, the hour will be advanced by one
hour and the minute will be reset to 00.
For example, if the MENU and TUNE buttons are
pushed while the time is between “8:00” and
“8:29”, the display will be reset to “8:00”. If
pushed while the time is between “8:30” and
“8:59”, the display will be reset to “9:00”. At the
same time the display will return to the previous
audio mode.FM-AM radio operation
Radio (FM/AM) band select:
Pushing the radio band select button will
change the band as follows:
AM ?FM1 ?FM2 ?AM
When the radio band select button is pushed
while the ignition switch is in the ACC or ON
position, the radio will come on at the station last
played.
The last station played will also come on when
the PWR button is pushed to ON.
If another audio source is playing when the radio
band select button is pushed, the audio source
will automatically be turned off and the last radio
station played will come on.
When the stereo broadcast signal is weak, the
radio will automatically change from stereo to
monaural reception.
TUNE (Tuning):
Push the TUNE button
orfor manual
tuning.
SEEK tuning:
Push the SEEK button
orto tune from
low to high or high to low frequencies and to
stop at the next broadcasting station.
Page 201 of 427
SCAN tuning:
Push the SCAN tuning button to tune from low
to high frequencies and stops at each broad-
casting station for 5 seconds. Pushing the
button again during this 5 seconds period will
stop SCAN tuning and the radio will remain
tuned to that station.
If the SCAN tuning button is not pushed within 5
seconds, SCAN tuning moves to the next
station.
toStation memory operations:
Twelve stations can be set for the FM band (6
each for FM1 and FM2) and 6 stations can be
set for the AM band.
1. Choose the radio band AM, FM1 or FM2 using the radio band select button.
2. Tune to the desired station using the SEEK, SCAN or TUNE button.
3. Select the desired station and push and hold the desired station preset buttons 1 to
6 until a beep sound is heard. (The radio
mutes when the select button is pushed.)
4. The station indicator will then come on and the sound will resume. Memorizing is now
complete.
5. Other buttons can be set in the same manner. If the battery cable is disconnected, or if the fuse
blows, the radio memory will be erased. In that
case, reset the desired stations.
Compact Disc (CD) player operation
Place the ignition switch in the ACC or ON
position, and insert the CD into the slot with the
label side facing up. The CD will be guided
automatically into the slot and start playing.
After loading the disc, the number of tracks on
the disc will appear on the display.
If the radio is already operating, it will auto-
matically turn off and the CD will play.
If the system has been turned off while the CD
was playing, pushing the PWR button will start
the CD.
MP3 or WMA CDs are not supported with this
CD player. If an MP3 or WMA CD is inserted
into the slot, the counter on the audio display
automatically advances without sound. However
this is a specification of the CD mechanism and
not a malfunction.
Do not use 3.1 in (8 cm) discs.
CD PLAY:
When the CD button is pushed with the system
off and the CD loaded, the system will turn on
and the CD will start to play. When the CD button is pushed with the CD
loaded and the radio playing, the radio will
automatically be turned off and the CD will start
to play.
FF (Fast Forward) , REW (Rewind):
When the
orof the TUNE button is
pushed while the CD is being played, the CD
will play while fast forwarding or rewinding.
When the button is released, the CD will return
to normal play speed.
APS (Automatic Program Search) FF,
APS REW:
When the
of the SEEK button is pushed
while the CD is being played, the next track or
the current track on the CD will start to play from
its beginning. Push several times to skip through
tracks. The CD will advance the number of times
the button is pushed. (When the last track on
the CD is skipped through, the first track will be
played.)
When the
button is pushed, the track being
played returns to its beginning. Push several
times to skip back through tracks. The CD will
go back the number of times the button is
pushed.
Center display, heater, air conditioner, audio, phone and voice recognition systems4-45