Page 427 of 714
 or more (2400 models), 1,400 lbs
(635 kg) or more (3000 models) be equippe")
4-20 Driving safety
4
Trailer brakesMitsubishi Motors recommends that any trailer having a total
weight of 1,250 lbs (567 kg) or more (2400 models), 1,400 lbs
(635 kg) or more (3000 models) be equipped with its own elec-
tric or surge-type brakes.
If you choose electric brakes, be sure they are electrically actu-
ated. Do not attempt to tap into your vehicle’s hydraulic sys-
tem. No matter how successful it may seem, any attempt to
attach trailer brakes to your vehicle’s hydraulic system will
lower braking effectiveness and create a potential hazard.Trailer lightsTrailer lights and equipment must comply with federal, state,
and local regulations. Check with your local recreational vehi-
cle dealer for the requirements in your area, and use only
equipment designed for your vehicle.
Since lighting and wiring vary by trailer type and brand, you
should have a qualified technician install a suitable connector
between the vehicle and the trailer. Improper equipment or
installation can cause damage to your vehicle’s electrical sys-
tem and affect your vehicle warranty.Additional trailer equipmentMany states and Canadian provinces require special outside
mirrors when towing a trailer. Even if they do not, you should
install special mirrors if you cannot clearly see behind you, or
if the trailer creates a blind spot.
Ask your trailer sales or rental agency if any other items are
recommended or required for your towing situation.
Operating hints
Driver preparationTowing a trailer requires a certain amount of experience.
Before setting out for the open road, you’ll want to get to know
your trailer. Acquaint yourself with the feel of handling and
braking with the added weight of the trailer. And always keep
in mind that the vehicle you are driving is now a good deal
longer and not nearly as responsive as your vehicle is without a
trailer.
WA R N I N G
!�If you have a rear window open and you tow a
trailer with your vehicle, carbon monoxide gas
which you cannot see or smell could come into your
vehicle. It can cause unconsciousness or death. Refer
to “Exhaust system” on page 7-38.
To maximize your safety when towing a trailer:�Have your exhaust system inspected for leaks, and
make necessary repairs before starting on your trip.�Keep the rear windows closed.�If exhaust does come into your vehicle through a
window or another opening, drive with your front,
main heating or cooling system on and with the
blower on any speed. This will bring fresh, outside
air into your vehicle. Do not use recirculation
because it only recirculates the air inside your vehi-
cle. Refer to “Air selection switch” on page 5-8, 5-18,
5-28, 5-38.
BK0138000US.book 20 ページ 2011年4月13日 水曜日 午前11時17分
Page 428 of 714

Driving safety
4-21
4
Vehicle preparationBefore you start, check the trailer hitch, safety chains, tires and
mirror adjustment.TireBe sure your vehicle’s tires are inflated to the cold inflation
pressure listed in the manual. You’ll find these numbers on the
tire and loading information placard at the sill of the driver’s
door.
Refer to “Tire inflation pressures” on page 7-27.Following distanceStay at least twice as far behind the vehicle ahead as you would
when driving your vehicle without a trailer. This can help you
avoid situations that require heavy braking and sudden turns.PassingYou’ll need more passing distance up ahead when you’re tow-
ing a trailer. And, because you’re a good deal longer, you’ll
need to go much farther beyond the passed vehicle before you
can return to your lane.Backing upHold the bottom of the steering wheel with one hand. Then, to
move the trailer to the left, just move that hand to the left. To
move the trailer to the right, move your hand to the right.
Always back up slowly and, if possible, have someone guide
you.
Making turnsWhen you’re turning with a trailer, make wider turns than nor-
mal to help prevent the trailer from striking shoulders, curbs,
road signs, trees or other objects.
Avoid jerky or sudden maneuvers. Signal well in advance.OverheatingTowing a trailer puts additional burden on the engine and tran-
saxle, which may cause overheating. Following are some sug-
gestions to reduce overheating:
CAUTION
!�Making sharp turns while towing a trailer could
cause the trailer to come in contact with the vehicle.
Your vehicle could be damaged. Avoid making sharp
turns while towing a trailer.Cause of overheating
Solution
Air conditioning on Turn off
Highway speeds Reduce speed
Going up hills Select lower position
Stop-and-go city traffic With the vehicle stopped, shift
to the “N” (NEUTRAL) posi-
tion and idle the engine at high
idle.
BK0138000US.book 21 ページ 2011年4月13日 水曜日 午前11時17分
Page 644 of 714
Vehicle care and maintenance
7-43
7
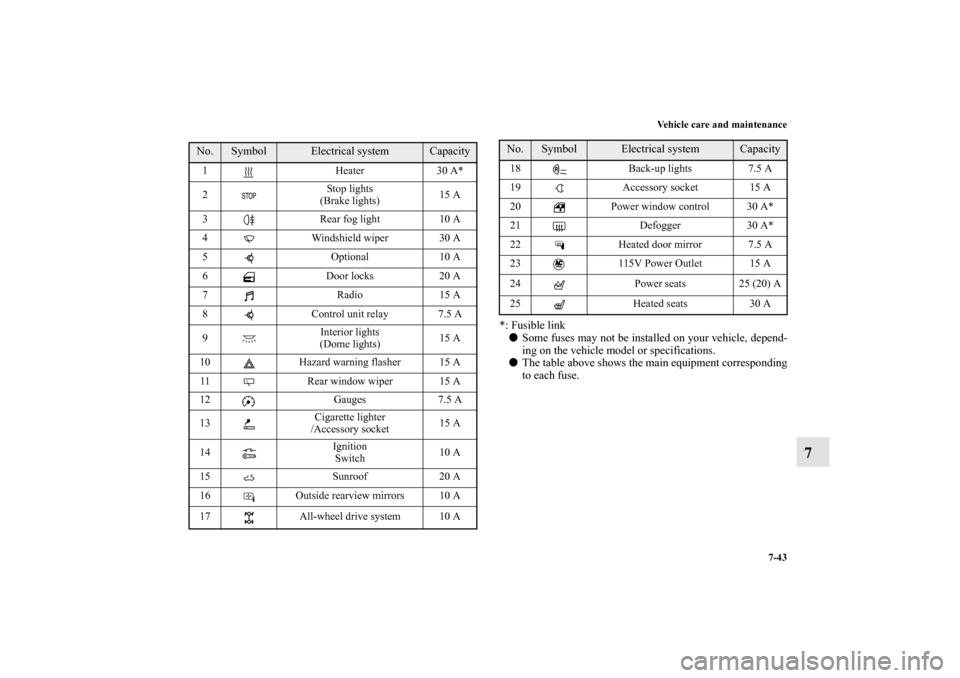
*: Fusible link
�Some fuses may not be installed on your vehicle, depend-
ing on the vehicle model or specifications.
�The table above shows the main equipment corresponding
to each fuse.
No.
Symbol
Electrical system
Capacity
1 Heater 30 A*
2Stop lights
(Brake lights)15 A
3 Rear fog light 10 A
4 Windshield wiper 30 A
5 Optional 10 A
6 Door locks 20 A
7Radio15 A
8 Control unit relay 7.5 A
9Interior lights
(Dome lights)15 A
10 Hazard warning flasher 15 A
11 Rear window wiper 15 A
12 Gauges 7.5 A
13Cigarette lighter
/Accessory socket15 A
14Ignition
Switch10 A
15 Sunroof 20 A
16 Outside rearview mirrors 10 A
17 All-wheel drive system 10 A
18 Back-up lights 7.5 A
19 Accessory socket 15 A
20 Power window control 30 A*
21 Defogger 30 A*
22 Heated door mirror 7.5 A
23 115V Power Outlet 15 A
24 Power seats 25 (20) A
25 Heated seats 30 ANo.
Symbol
Electrical system
Capacity
BK0138000US.book 43 ページ 2011年4月13日 水曜日 午前11時17分
Page 650 of 714
Vehicle care and maintenance
7-49
7
Bulb capacity
N00943000132
The bulb should only be replaced with a new bulb with the
same rating and type. The type and rating are listed on the base
of the bulb.Outside
N00950300775
[For vehicles without high intensity discharge headlights]
Description
Wa t t a g e
ANSI Trade
No. or Bulb
type
1 - Front turn signal light 21 W WY21W
2 - Headlight, high beam 60 W9005
HB3
3 - Headlight, low beam 51 W9006
HB4
4 - Front fog light
(if so equipped)55 W H11
5 - Front side-marker and
parking light5 W WY5W
6 - Side turn signal light
(on fender)
(if so equipped)5 W —
7 - Side turn signal light
(on outside rearview
mirror)
(if so equipped)——
BK0138000US.book 49 ページ 2011年4月13日 水曜日 午前11時17分
Page 651 of 714
![MITSUBISHI OUTLANDER 2012 3.G Owners Manual 7-50 Vehicle care and maintenance
7
[For vehicles equipped with high intensity discharge head-
lights]
NOTE�The side turn signal light (on outside rearview mirror) use
an LED instead of the bulb. C](/manual-img/19/7525/w960_7525-650.png "MITSUBISHI OUTLANDER 2012 3.G Owners Manual 7-50 Vehicle care and maintenance
7
[For vehicles equipped with high intensity discharge head-
lights]
NOTE�The side turn signal light (on outside rearview mirror) use
an LED instead of the bulb. C")
7-50 Vehicle care and maintenance
7
[For vehicles equipped with high intensity discharge head-
lights]
NOTE�The side turn signal light (on outside rearview mirror) use
an LED instead of the bulb. Check with an authorized
Mitsubishi Motors dealer or repair facility of your choice
when either light needs to be repaired or replaced.
�It is not possible to repair or replace only the bulb for the
side turn signal light (on fender).
Check with an authorized Mitsubishi Motors dealer or a
repair facility of your choice when the light needs to be
repaired or replaced.
Description
Wattage or Candle
power
ANSI Trade
No. or Bulb
type
1 - Front turn signal light 21 W WY21W
2 - Daytime running light27 W
32 cp1156
3 - Headlight, low/high
beam
(Discharge bulb)35 W —
4 - Front fog light
(if so equipped)55 W H11
5 - Front side-marker and
parking light5 W WY5W
7 - Side turn signal light
(on outside rearview
mirror)——
WA R N I N G
!�Check with an authorized Mitsubishi Motors dealer
or a repair facility of your choice when it is neces-
sary to repair a high intensity discharge headlight or
to replace the bulb.
The power circuit, bulb and electrodes generate high
voltages that may cause a severe shock.
BK0138000US.book 50 ページ 2011年4月13日 水曜日 午前11時17分
Page 652 of 714
Vehicle care and maintenance
7-51
7
NOTE�The tail and stop light and the high-mounted stop light use
an LED instead of the bulb. Check with an authorized
Mitsubishi Motors dealer or repair facility of your choice
when either light needs to be repaired or replaced.
Compartment
N00950400587
Item
Wa t t a g e
ANSI trade No.
or bulb type
8 - High-mounted stop light — —
9 - License plate light 5 W W5W
10 - Back-up light 21 W 7440
11 - Tail and stop light — —
12 - Rear side-marker light 5 W W5W
13 - Rear turn signal light 21 W WY21W
Item
Wa t t a g e
1 - Cargo room light 8 W
2 - Dome light (rear) 8 W
3 - Vanity mirror lights 3 W
4 - Dome light (front)/Reading light 8 W
5 - Center console down light –
6 - Lower glove compartment light 1.4 W
BK0138000US.book 51 ページ 2011年4月13日 水曜日 午前11時17分
Page 663 of 714
7-62 Vehicle care and maintenance
7
Side turn signal lights (on outside rearview mir-
ror) (if so equipped)
N00943500124
NOTE�The side turn signal lights (on outside rearview mirror)
uses an LED instead of the bulb.
Check with an authorized Mitsubishi Motors dealer or a
repair facility of your choice when the light needs to be
repaired or replaced.
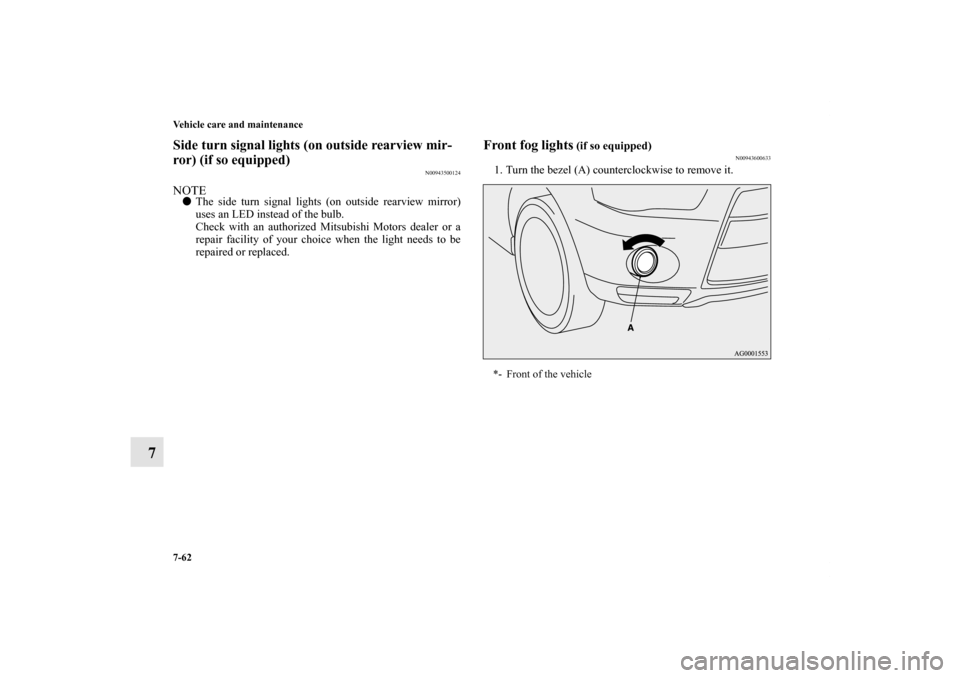
Front fog lights
(if so equipped)
N00943600633
1. Turn the bezel (A) counterclockwise to remove it.*- Front of the vehicle
BK0138000US.book 62 ページ 2011年4月13日 水曜日 午前11時17分
Page 678 of 714
Vehicle care and maintenance
7-77
7
2. Pull out the bulb.
3. To install the bulb, perform the removal steps in reverse.
Vanity mirror lights
N00952800080
1. Insert the tip of a screwdriver at the edge of the lens, pry
gently to remove the lens, and then remove the bulb from
the light holder.NOTE�Wrap a cloth around the tip of the screwdriver to keep
from scratching the lens.
2. To install the bulb, perform the removal steps in reverse.
BK0138000US.book 77 ページ 2011年4月13日 水曜日 午前11時17分