Page 305 of 722

3-210 Features and controls
3
3. Press and hold the multi-information meter switch (for
about 2 seconds or more) to switch in sequence from ON
(operation sound on) → OFF (operation sound off) → ON
(operation sound on).
The setting is changed to the selected condition.NOTE�If the battery is disconnected, the memory of the operation
sound setting is erased and is automatically set to “ON”
(operation sound on).
�The operation sound setting only deactivates the operation
sound of the multi-information meter switch and rheostat
meter illumination button. The warning display and other
sounds cannot be deactivated.
Changing the amount of time until “REST
REMINDER” is displayed
N00557500121
The amount of time until the display appears can be changed.
1. Press and hold the multi-information meter switch (for
about 2 seconds or more) to switch from the setting mode
screen to the menu screen.
Refer to “Changing the function settings (With ignition
switch in the “ON” position)” on page 3-201.
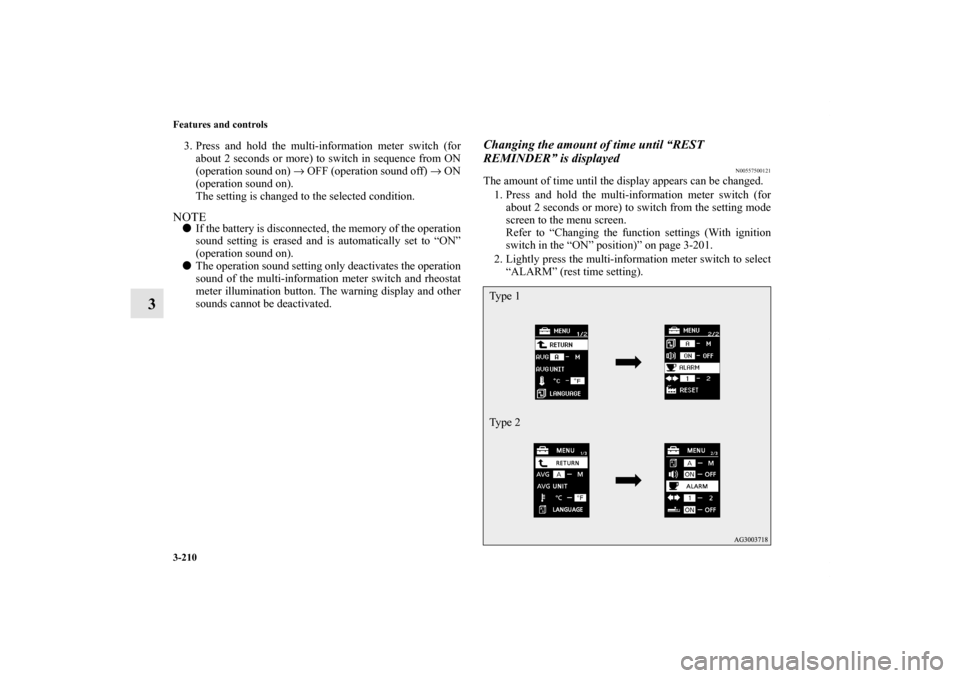
2. Lightly press the multi-information meter switch to select
“ALARM” (rest time setting).Ty p e 1
Ty p e 2
BK0138600US.book 210 ページ 2011年7月17日 日曜日 午後2時32分
Page 306 of 722

Features and controls
3-211
3
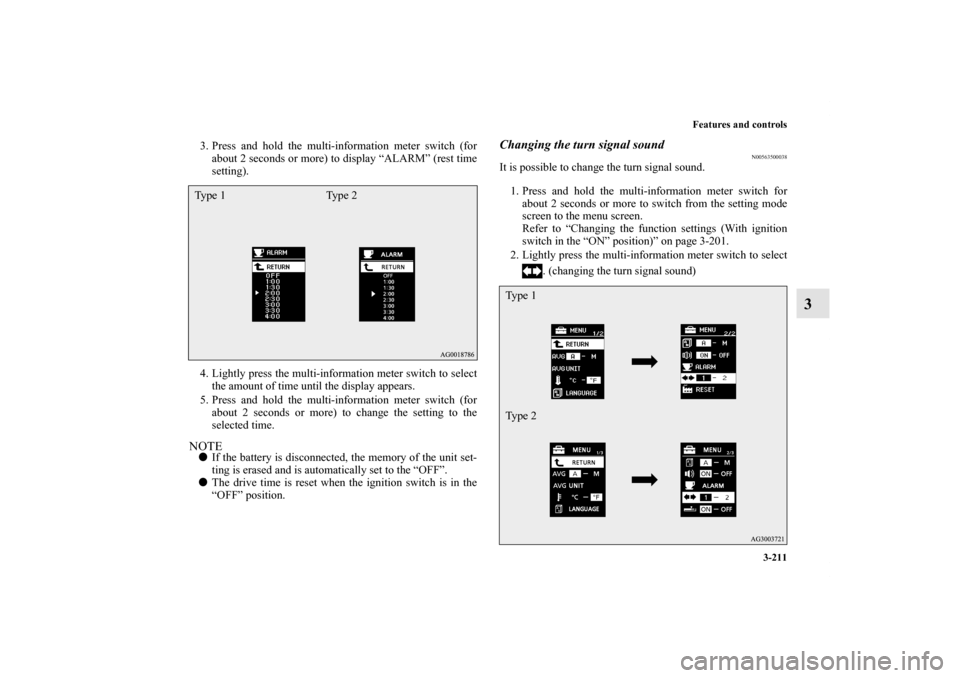
3. Press and hold the multi-information meter switch (for
about 2 seconds or more) to display “ALARM” (rest time
setting).
4. Lightly press the multi-information meter switch to select
the amount of time until the display appears.
5. Press and hold the multi-information meter switch (for
about 2 seconds or more) to change the setting to the
selected time.NOTE�If the battery is disconnected, the memory of the unit set-
ting is erased and is automatically set to the “OFF”.
�The drive time is reset when the ignition switch is in the
“OFF” position.
Changing the turn signal sound
N00563500038
It is possible to change the turn signal sound.
1. Press and hold the multi-information meter switch for
about 2 seconds or more to switch from the setting mode
screen to the menu screen.
Refer to “Changing the function settings (With ignition
switch in the “ON” position)” on page 3-201.
2. Lightly press the multi-information meter switch to select
. (changing the turn signal sound)
Type 1 Type 2
Ty p e 1
Ty p e 2
BK0138600US.book 211 ページ 2011年7月17日 日曜日 午後2時32分
Page 312 of 722

Features and controls
3-217
3
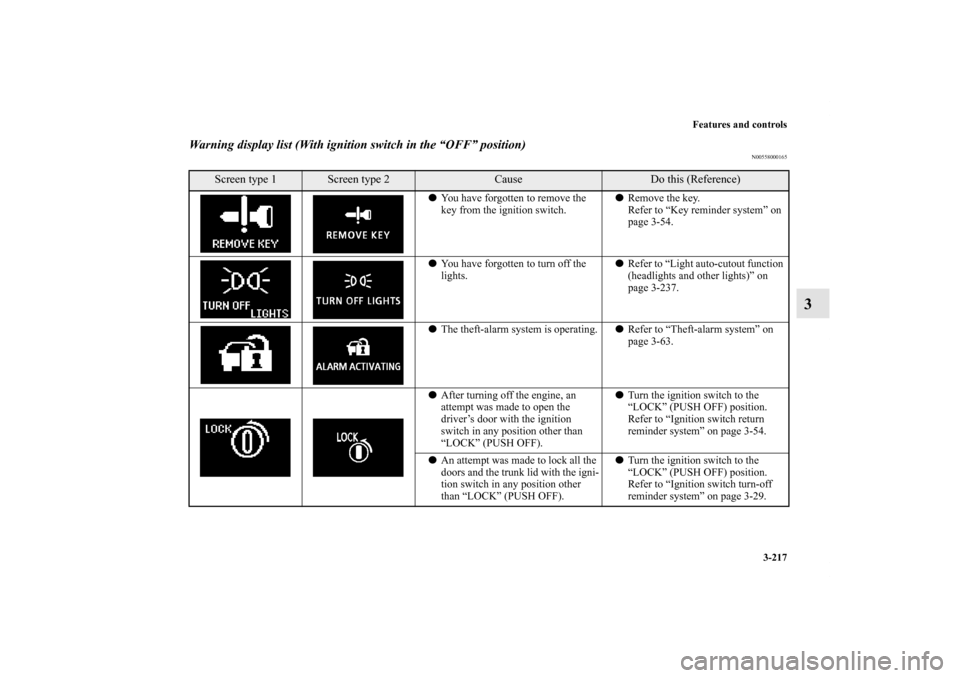
Warning display list (With ignition switch in the “OFF” position)
N00558000165
Screen type 1
Screen type 2
Cause
Do this (Reference)
�You have forgotten to remove the
key from the ignition switch.�Remove the key.
Refer to “Key reminder system” on
page 3-54.
�You have forgotten to turn off the
lights.�Refer to “Light auto-cutout function
(headlights and other lights)” on
page 3-237.
�The theft-alarm system is operating.�Refer to “Theft-alarm system” on
page 3-63.
�After turning off the engine, an
attempt was made to open the
driver’s door with the ignition
switch in any position other than
“LOCK” (PUSH OFF).�Turn the ignition switch to the
“LOCK” (PUSH OFF) position.
Refer to “Ignition switch return
reminder system” on page 3-54.
�An attempt was made to lock all the
doors and the trunk lid with the igni-
tion switch in any position other
than “LOCK” (PUSH OFF).�Turn the ignition switch to the
“LOCK” (PUSH OFF) position.
Refer to “Ignition switch turn-off
reminder system” on page 3-29.
BK0138600US.book 217 ページ 2011年7月17日 日曜日 午後2時32分
Page 335 of 722

3-240 Features and controls
3
Headlight flasher
N00550000198
You can flash the high beams by pulling the lever gently
toward you (2). The lights will go back to normal when you let
go. While the high beam is on, you will see a blue light on the
instrument panel.NOTE�You can flash the high beams by pulling the lever toward
you, even if the combination headlights and dimmer
switch is off.
�If you turn the lights off with the headlights set to high-
beam illumination, the headlights are automatically
returned to their low-beam setting when the combination
headlights and dimmer switch is next turned to the “ ”
position.
Welcome light (for vehicles with the theft-alarm
system)
N00563200107
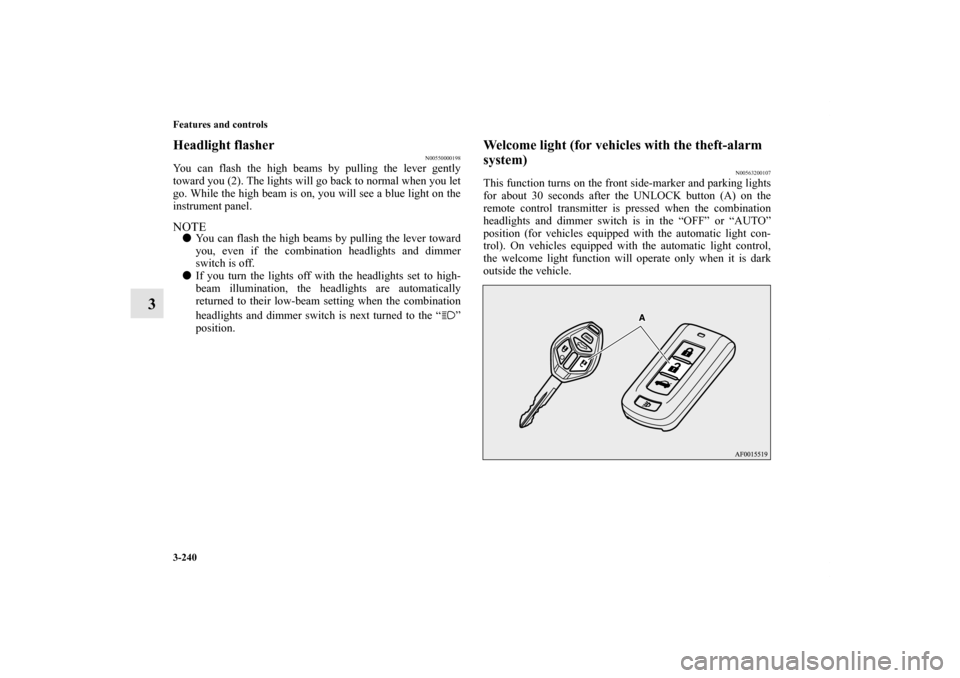
This function turns on the front side-marker and parking lights
for about 30 seconds after the UNLOCK button (A) on the
remote control transmitter is pressed when the combination
headlights and dimmer switch is in the “OFF” or “AUTO”
position (for vehicles equipped with the automatic light con-
trol). On vehicles equipped with the automatic light control,
the welcome light function will operate only when it is dark
outside the vehicle.
BK0138600US.book 240 ページ 2011年7月17日 日曜日 午後2時32分
Page 603 of 722
7-6 Vehicle care and maintenance
7
To closeUnlatch the prop from the engine hood and put it back in its
retainer.
Slowly lower the engine hood about 8 inches (20 cm), then let
it drop from its own weight.
NOTE�If this does not close the engine hood properly, drop it
again from a slightly higher position.
�Do not push down strongly on the engine hood. Depend-
ing on how strongly or where you push down, you could
create a dent in the vehicle body.
�For vehicles equipped with the theft-alarm system, if you
drive with the engine hood left open, warning display is
displayed on the information screen in the multi-informa-
tion display.
CAUTION
!�Be careful not to trap your hands or fingers when
closing the engine hood. �Make sure the engine hood is firmly closed before
driving.
If you drive without the engine hood completely
closed, it could open up while driving.
Type 1 Type 2
BK0138600US.book 6 ページ 2011年7月17日 日曜日 午後2時32分
Page 717 of 722

Alphabetical index
6Rear window defogger switch 3-254
Rear-view camera 3-172
Rearview mirror
Inside 3-80
Outside 3-83
Refrigerant (air conditioning) 9-10
Replacement of light bulbs 7-55
Replacing tires and wheels 7-34
Reporting Safety Defects 8-3
Roof antenna 5-148
S
Safe driving techniques 4-6
Seat 2-2
Arm rest 2-9
Front seats 2-3
Heated seats 2-7
Rear seats 2-8
Seats and restraint systems 2-3
Seat belt 2-13
Adjustable seat belt shoulder anchor 2-19
Child restraint 2-23
Driver’s seat belt reminder/warning 2-18
Force limiter 2-23
Front passenger seat belt warning light 2-19
Maintenance and inspection 2-34
Pre-tensioner 2-21
Seat belt extender 2-20
Seat belt instructions 2-14Seat belt use during pregnancy 2-21
Service brake 3-143
Service precautions 7-2
Snow tires 7-37
Spark plugs 7-41
Steering
Power steering fluid 7-22
,9-10
Tilt lock lever 3-79
Wheel lock 3-30
,3-88
Storage spaces 3-296
Sun visors 3-288
Supplemental Restraint System 2-34
How the Supplement Restraint System works 2-38
Servicing 2-57
Warning light/display 2-43
T
Tank capacity 1-5
,9-10
Theft-alarm system
System 3-63
Tire pressure monitoring system 3-166
Warning light/display 3-167
Tires 7-29
How to change a tire 6-9
Inflation pressure 7-32
Maintenance 7-34
Quality grading 8-2
Replacing tires and wheels 7-34
Rotation 7-35
BK0138600US.book 6 ページ 2011年7月17日 日曜日 午後2時32分
Page:
< prev 1-8 9-16 17-24