Page 679 of 722
7-82 Vehicle care and maintenance
7
Tail lights and back-up lights1. Open the trunk lid.
Remove the clips (A) and remove the cover (B).2. Remove the socket and bulb assemblies by turning them
counterclockwise.
C- Tail light
D- Back-up light
BK0138600US.book 82 ページ 2011年7月17日 日曜日 午後2時32分
Page 680 of 722
Vehicle care and maintenance
7-83
7
3. Remove the bulb by pulling it out.
4. To install the bulb, perform the removal steps in reverse.
License plate light
N00944000331
1. Remove the screws (A) from the license plate light lens
(B). Then, remove the lens and gasket (C), and withdraw
the bulb.
Back-up lightTail light
BK0138600US.book 83 ページ 2011年7月17日 日曜日 午後2時32分
Page 681 of 722
7-84 Vehicle care and maintenance
7
2. Remove the socket and bulb assembly together by turning
it counterclockwise.3. Remove the bulb by pulling it out.
4. To install the bulb, perform the removal steps in reverse.
BK0138600US.book 84 ページ 2011年7月17日 日曜日 午後2時32分
Page 682 of 722
Vehicle care and maintenance
7-85
7
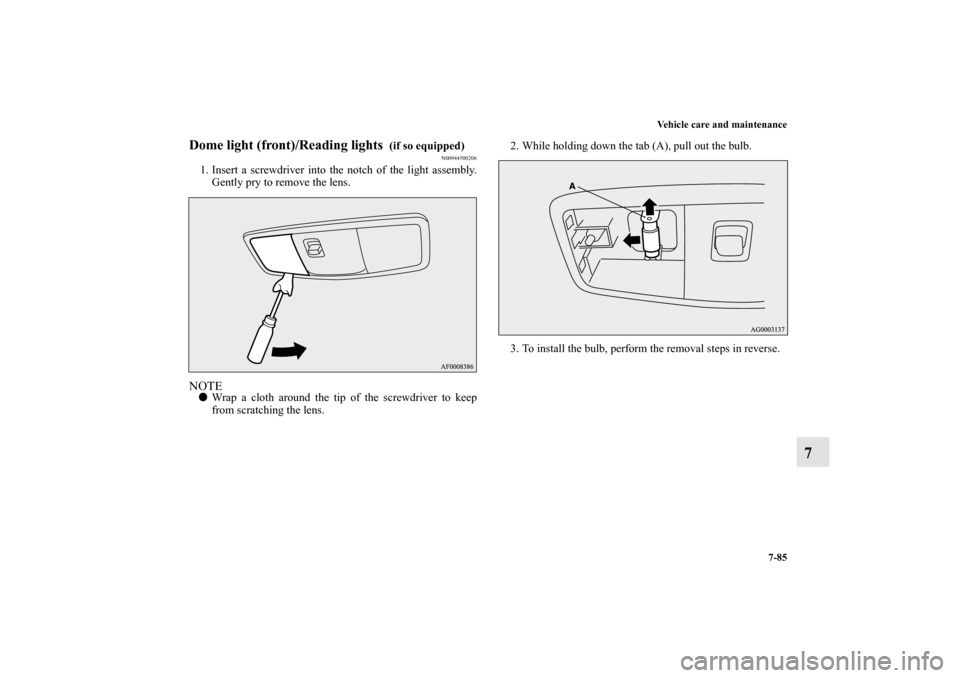
Dome light (front)/Reading lights
(if so equipped)
N00944500206
1. Insert a screwdriver into the notch of the light assembly.
Gently pry to remove the lens.NOTE�Wrap a cloth around the tip of the screwdriver to keep
from scratching the lens.2. While holding down the tab (A), pull out the bulb.
3. To install the bulb, perform the removal steps in reverse.
BK0138600US.book 85 ページ 2011年7月17日 日曜日 午後2時32分
Page 683 of 722
7-86 Vehicle care and maintenance
7
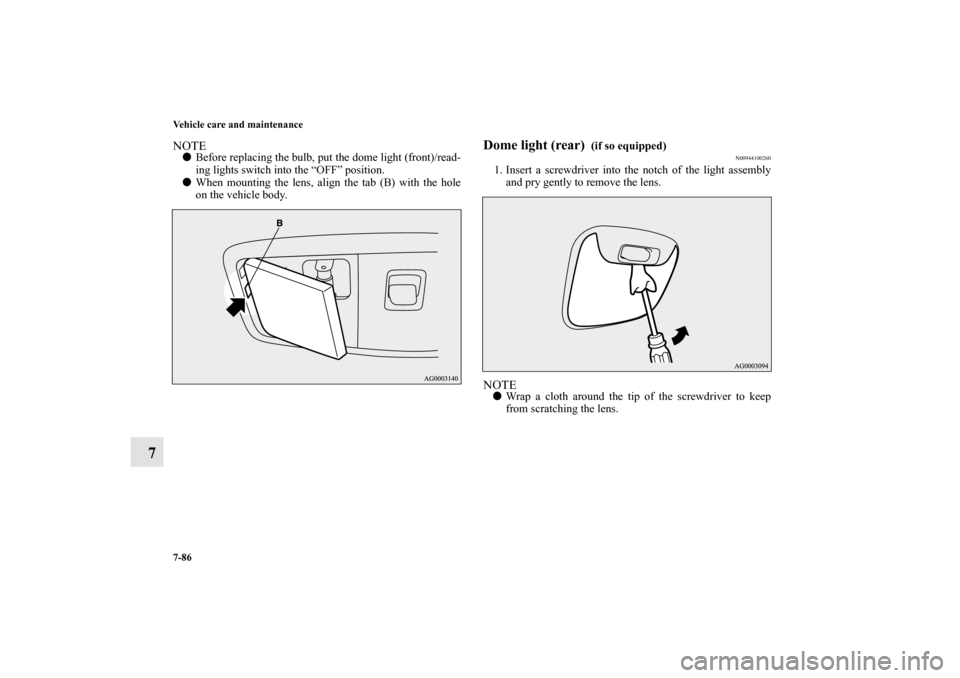
NOTE�Before replacing the bulb, put the dome light (front)/read-
ing lights switch into the “OFF” position.
�When mounting the lens, align the tab (B) with the hole
on the vehicle body.
Dome light (rear)
(if so equipped)
N00944100260
1. Insert a screwdriver into the notch of the light assembly
and pry gently to remove the lens.NOTE�Wrap a cloth around the tip of the screwdriver to keep
from scratching the lens.
BK0138600US.book 86 ページ 2011年7月17日 日曜日 午後2時32分
Page 684 of 722
Vehicle care and maintenance
7-87
7
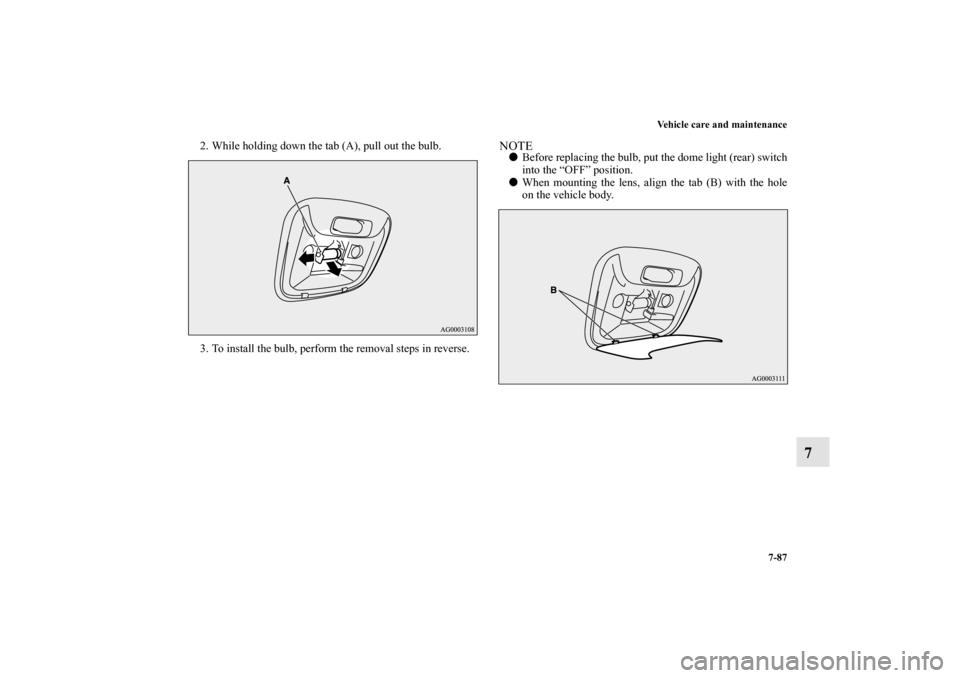
2. While holding down the tab (A), pull out the bulb.
3. To install the bulb, perform the removal steps in reverse.
NOTE�Before replacing the bulb, put the dome light (rear) switch
into the “OFF” position.
�When mounting the lens, align the tab (B) with the hole
on the vehicle body.
BK0138600US.book 87 ページ 2011年7月17日 日曜日 午後2時32分
Page 685 of 722
 away from the center as shown and
remove the light unit. Then remove the bulb by pulling
out.
2. To install the")
7-88 Vehicle care and maintenance
7
Trunk area light
N00944800094
1. Pull both clips (A) away from the center as shown and
remove the light unit. Then remove the bulb by pulling
out.
2. To install the bulb, perform the removal steps in reverse.
Vehicle care precautions
N00945100153
In order to maintain the value of your vehicle, perform regular
maintenance using the proper materials and procedures. Be
sure to use only those materials and procedures that meet your
local environmental pollution control regulations. Choose the
materials you will use carefully, to be sure that they do not con-
tain corrosives. If you are not sure, contact an authorized
Mitsubishi Motors dealer for help in choosing these materials.
CAUTION
!�Cleaning products can be dangerous. Some are poi-
sonous. Others are highly flammable. Some are dan-
gerous if you breathe their fumes in a closed space.
When you use anything in a container to clean your
vehicle, be sure to follow the instructions. Always
open your vehicle doors or windows when you’re
cleaning the inside. Never use the following chemi-
cals to clean your vehicle:
• Gasoline
• Carbon Tetrachloride
• Benzine
• Kerosene
• Naphtha
• Acetone
• Turpentine
• Paint Thinner
• Lacquer Thinner
• Nail Polish Remover
BK0138600US.book 88 ページ 2011年7月17日 日曜日 午後2時32分
Page 712 of 722
 1-8
ACD (Active center differential system) 3-132
ACD control mode display 3-134
ACD control mode switch 3-133
ACD warning display 3-134
Active stabilit")
Alphabetical index
1
A
Accessory (installation) 1-8
ACD (Active center differential system) 3-132
ACD control mode display 3-134
ACD control mode switch 3-133
ACD warning display 3-134
Active stability control (ASC) 3-151
ASC OFF display or ASC indicator 3-154
ASC operation display 3-154
Air cleaner filter 7-15
Air conditioning
Automatic air conditioning 5-31
,5-41
Important air conditioning operating tips 5-51
Manual air conditioning 5-12
,5-22
Air purifier 5-52
All-wheel driving operation 3-139
Aluminum wheels 7-94
Antenna
Roof antenna 5-148
Anti-lock braking system 3-147
Warning light / display 3-148,3-149
Arm rest 2-9
Assist grip 3-304
Audio
AM/FM electronically tuned radio with CD player 5-52
AM/FM electronically tuned radio with 6 CD autochanger 5-
80
Error codes 5-137
,5-139Handling of compact discs 5-145
Steering wheel audio remote control switch 5-134
Automatic air conditioning 5-31
,5-41
Auxiliary audio connector (RCA) 5-132
Auxiliary video connector (RCA) 5-132
AWC control fluid 7-20
B
Back-up lights
Bulb capacity 7-55
Replacement 7-82
Ball joint, steering linkage seals and drive shaft boots 7-43
Battery 7-23
Charging system warning light 3-230
Checking battery electrolyte level 7-26
Disconnection and connection 7-27
During cold weather 7-26
Removing and installing the battery upper cover (vehicles
with turbocharger) 7-23
Specification 9-9
To check the battery indicator 7-25
Bluetooth 2.0 interface 3-256
Bottle holder 3-303
Brake
Anti-lock braking system 3-147
Braking 4-8
Fluid 7-21
,9-10
Hose 7-43
Parking brake 3-77
BK0138600US.book 1 ページ 2011年7月17日 日曜日 午後2時32分
 and remove the cover (B).2. Remove the socket and bulb assemblies by turning them
counterc")
 from t")