Page 499 of 618
6-8 For emergencies
6
Tools
N00832600140
Jack
N00832700239
Before removing the jack, lift up the luggage floor board.
1- Bar
2- Wheel nut wrench
BK0142300US.book 8 ページ 2011年8月7日 日曜日 午前10時44分
Page 501 of 618

6-10 For emergencies
6
NOTE�The chocks shown in the illustration do not come with
your vehicle. It is recommended that you purchase chocks
or blocks and keep them in the vehicle for use if needed.
�If chocks or blocks are not available, use stones or any
other objects that are large enough to hold the wheel in
position.
6. Get the jack, bar and wheel nut wrench ready.
Refer to “Tools and jack” on page 6-7.Spare tire information
N00849600328
Compact spare tireThe compact spare tire is designed to save space in the trunk.
Its lighter weight makes it easier to use if a flat tire occurs.
WA R N I N G
!�Tires, including spare tire, degrade over time with
age even when they are not being used. It is recom-
mended that tires over 6 years generally be replaced
even if damage is not obvious.
CAUTION
!�While the compact spare tire is stowed, the inflation
pressure should be checked at least once a month to
assure that it remains at the recommended inflation
pressure. See the tire and loading information plac-
ard attached to the driver’s door sill.
Refer to “Tire and loading information placard” on
page 9-4.
�Driving with an improperly inflated tire can cause
an accident. If you have no choice but to drive with
an under-inflated tire, keep your speed down and
avoid sudden steering or braking, if possible. Inflate
the tire to the correct pressure as soon as possible.
Refer to “Tire inflation pressures” on page 7-23.�The compact spare tire should be used only tempo-
rarily. While the compact spare tire is being used,
the tire pressure monitoring system will not function
properly. Have the tire replaced or repaired at an
authorized Mitsubishi Motors dealer or a repair
facility of your choice as soon as possible.�You can use the same wheel nuts on the compact
spare tire wheel. �Do not go over 50 mph (80 km/h) when driving with
the compact spare tire.�Avoid fast starting and braking when driving with
the compact spare tire. �The diameter of the compact spare tire is different
from that of a standard tire. �Because the compact spare tire is designed only for
your vehicle, do not use it on any other vehicle. �Do not put the compact spare tire on a different
wheel, and do not put standard tires, snow tires,
wheel covers or trim rings on the compact spare
wheel. Otherwise, you could damage these parts or
other parts on your vehicle.�Do not use snow chains with your compact spare
tire. Using chains could cause damage to your vehi-
cle and loss of the chains.
CAUTION
!
BK0142300US.book 10 ページ 2011年8月7日 日曜日 午前10時44分
Page 503 of 618
6-12 For emergencies
6
To change a tire
N00849800405
1. Loosen the wheel nuts with the wheel nut wrench. Do not
remove the wheel nuts yet.2. Place the jack under one of the jacking points (A) shown
in the illustration. Use the jacking point closest to the tire
you wish to change.
WA R N I N G
!�Set the jack only at the positions shown here. If the
jack is set at a wrong position, it could dent your
vehicle or the jack might fall over and cause per-
sonal injury. �Do not use the jack on a tilted or soft surface.
Otherwise, the jack might slip and cause personal
injury. Always use the jack on a flat, hard surface.
Before setting the jack, make sure there are no sand
or pebbles under the jack base.
BK0142300US.book 12 ページ 2011年8月7日 日曜日 午前10時44分
Page 504 of 618
For emergencies
6-13
6
3. Rotate the jack by hand until the flange portion (B) fits in
the groove (C) at the top of the jack. 4. Insert the bar (D) into the wheel nut wrench (E). Then put
the end of the bar into the shaft’s jack end, as shown in the
illustration.
Slowly rotate the wheel nut wrench until the tire is raised
slightly off the ground surface.
WA R N I N G
!�Stop jacking up the vehicle as soon as the tire is
raised off the ground. It is dangerous to raise the
vehicle any higher. �Never get under the vehicle or put any portion of
your body under the vehicle while it is supported by
the jack. �Do not bump the raised vehicle or leave it sitting on
the jack for a long time. Both are very dangerous. �Do not use a jack except the one that came with your
vehicle.
BK0142300US.book 13 ページ 2011年8月7日 日曜日 午前10時44分
Page 505 of 618
6-14 For emergencies
6
5. Remove the wheel nuts with the wheel nut wrench, then
take the wheel off. 6. Clean out any mud, etc. on the hub surface (F), hub bolts
(G) or in the installation holes (H) in the wheel, and then
mount the spare tire.�The jack should not be used for any purpose other
than to change a tire. �No one should be in your vehicle when using the
jack. �Do not start or run the engine while your vehicle is
on the jack.�Do not turn the raised wheel. The tires that are still
on the ground could turn and make your vehicle fall
off the jack.
CAUTION
!�Handle the wheel carefully when changing the tire,
to avoid scratching the wheel surface.
WA R N I N G
!
BK0142300US.book 14 ページ 2011年8月7日 日曜日 午前10時44分
Page 506 of 618
For emergencies
6-15
6
7. Temporarily tighten the wheel nut.
• Normal wheels
Temporarily tighten the wheel nuts (flange nuts) until
their flange section comes in contact with the wheel and it
is no longer loose.
WA R N I N G
!�Mount the spare wheel with the valve stem (I) facing
outboard. If you cannot see the valve stem (I), you
have installed the wheel backwards.
Operating the vehicle with the spare wheel installed
backwards can cause vehicle damage and result in
an accident.
BK0142300US.book 15 ページ 2011年8月7日 日曜日 午前10時44分
Page 507 of 618
6-16 For emergencies
6
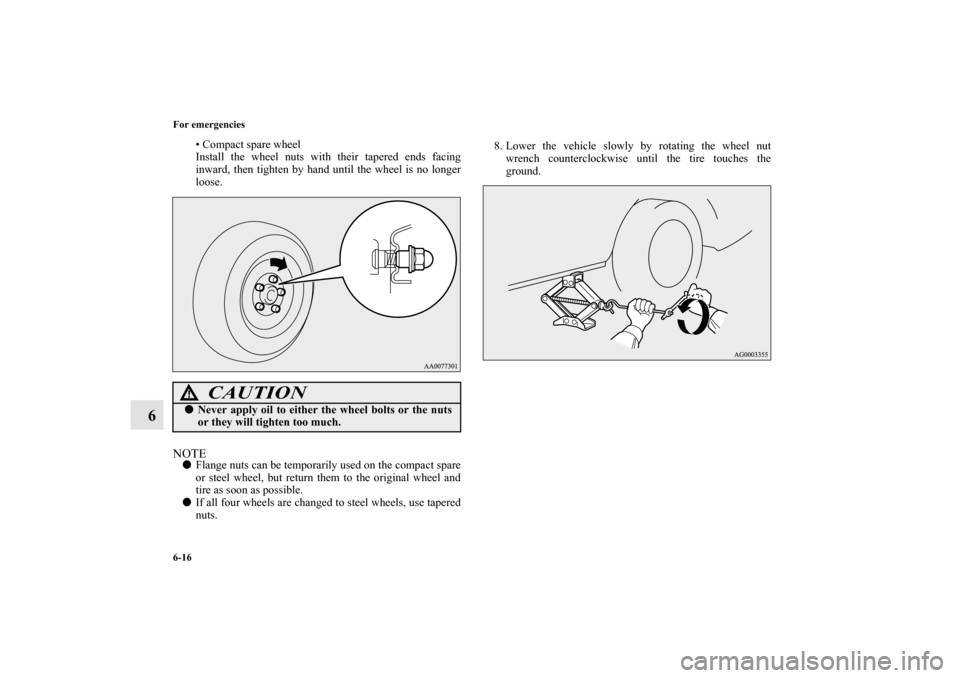
• Compact spare wheel
Install the wheel nuts with their tapered ends facing
inward, then tighten by hand until the wheel is no longer
loose.
NOTE�Flange nuts can be temporarily used on the compact spare
or steel wheel, but return them to the original wheel and
tire as soon as possible.
�If all four wheels are changed to steel wheels, use tapered
nuts.8. Lower the vehicle slowly by rotating the wheel nut
wrench counterclockwise until the tire touches the
ground.
CAUTION
!�Never apply oil to either the wheel bolts or the nuts
or they will tighten too much.
BK0142300US.book 16 ページ 2011年8月7日 日曜日 午前10時44分
Page 508 of 618

10. Lower the jack all t")
For emergencies
6-17
6
9. Tighten the nuts in the order shown in the illustration until
each nut has been tightened to the torque listed here.
65 to 80 ft-lb (88 to 108 N•m)
10. Lower the jack all the way and remove it.11. Check the tire inflation pressure. The recommended tire
pressure for your vehicle is listed on the tire and loading
information placard attached to the driver’s door sill as
shown in the illustration.
Refer to “Tire inflation pressures” on page 7-23.
CAUTION
!�Never use your foot or a pipe extension to apply
added force to the wheel nut wrench when tighten-
ing the wheel nuts. If you do so, you can over-tighten
the wheel nuts and damage the wheel, wheel nuts
and hub bolts.
CAUTION
!�Driving with an improperly inflated tire can cause
an accident. If you have no choice but to drive with
an under-inflated tire, keep your speed down and
avoid sudden steering or braking, if possible. Inflate
the tire to the correct pressure as soon as possible.
Refer to “Tire inflation pressures” on page 7-23.�After changing the tire and driving the vehicle about
620 miles (1,000 km), retighten the wheel nuts to
make sure that they have not come loose.
BK0142300US.book 17 ページ 2011年8月7日 日曜日 午前10時44分

 shown
in")
 fits in
the groove (C) at the top of the jack. 4. Insert the bar (D) into the wheel nut wrench (E). Then put
the end of t")
, hub bolts
(G) or in the installation holes (H) in")
 until
their flange section comes in contact with the wheel and it
is no")