Page 140 of 177

AUX / Video Entertainment System 9-11
Visual
AUX / Video Entertainment System
(if so equipped)AUX
By connecting your own video equipment,
etc. to Auxiliary Video connecter (RCA), you
can show the playback on the MMCS.
NOTE
Connecting to Auxiliary Video connecter (RCA)Using a video cable sold on the market, connect the
video equipment, etc. to Auxiliary Video connecter
(RCA).
Switching to Auxiliary Video connecter (RCA)Switching to Auxiliary Video connecter (RCA) will show
the video from the connected equipment.
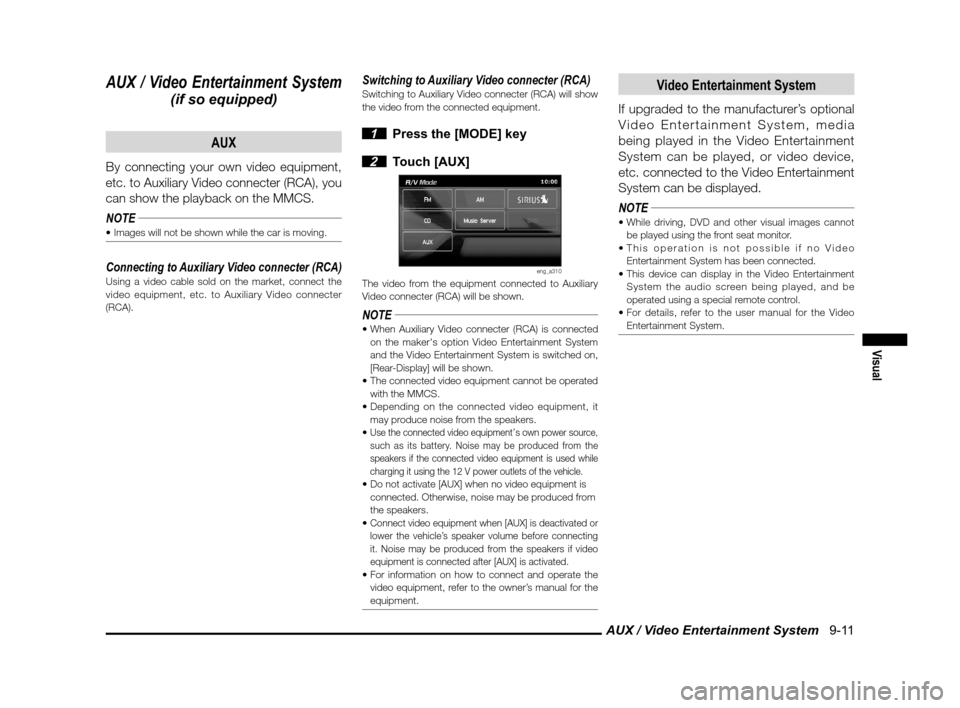
1 Press the [MODE] key
2 Touch [AUX]
eng_a310The video from the equipment connected to Auxiliary
Video connecter (RCA) will be shown.
NOTE on the maker's option Video Entertainment System
and the Video Entertainment System is switched on,
[Rear-Display] will be shown.
with the MMCS.
may produce noise from the speakers.
Use the connected video equipment’s own power source,
such as its battery. Noise may be produced from the
speakers if the connected video equipment is used while
charging it using the 12 V power outlets of the vehicle.
connected. Otherwise, noise may be produced from
the speakers.
Connect video equipment when [AUX] is deactivated or
lower the vehicle’s speaker volume before connecting
it. Noise may be produced from the speakers if video
equipment is connected after [AUX] is activated.
video equipment, refer to the owner’s manual for the
equipment.
Video Entertainment System
If upgraded to the manufacturer’s optional
Video Entertainment System, media
being played in the Video Entertainment
System can be played, or video device,
etc. connected to the Video Entertainment
System can be displayed.
NOTE
be played using the front seat monitor.
Entertainment System has been connected.
System the audio screen being played, and be
operated using a special remote control.
Entertainment System.
��������\b ���\b
��\f�� \
������ ��
������� �\b �\b��
�
Page 158 of 177
![MITSUBISHI LANCER EVOLUTION 2012 10.G MMCS Manual Adjusting the Screen 11-1
Settings
Setting
Adjusting the Screen
Adjustments related to the screen display.
Display Off
Turns OFF the monitor display.
1 Press the [SET] key, and touch
[Display Of MITSUBISHI LANCER EVOLUTION 2012 10.G MMCS Manual Adjusting the Screen 11-1
Settings
Setting
Adjusting the Screen
Adjustments related to the screen display.
Display Off
Turns OFF the monitor display.
1 Press the [SET] key, and touch
[Display Of](/manual-img/19/7469/w960_7469-157.png)
Adjusting the Screen 11-1
Settings
Setting
Adjusting the Screen
Adjustments related to the screen display.
Display Off
Turns OFF the monitor display.
1 Press the [SET] key, and touch
[Display Off]
eng_a018-2
eng_a161The monitor display is turned OFF.
NOTEAt this time, although the navigation voice guidance
will be switched off, the AV audio will remain on.
screen, or press any key.
Picture Control
Adjustments related to the picture quality.
1 Press the [SET] key, and touch
[Picture Control]
eng_a018-2
2 Touch [ - ] or [ + ] for “Brightness”,
“Contrast”, or “Black Level” to adjust
eng_a162
NOTE“Brightness” can be adjusted with headlights ON and
OFF separately.
picture quality
while a DVD image
is displayed,
“Tint” and “Color
Intensity” can also
be adjusted.
eng_a231
3 Touch [Back]The picture quality adjustment is completed.
Screen Size
Switches between Screen Size and other
displays for DVD image etc..
1 Press the [SET] key, and touch
[Screen Size]
eng_a163-2
2 Touch one of the following buttons
eng_a232
[Normal] Displays the screen in normal 4:3 aspect
ratio.
[Full] Extends the display evenly both left and right in wide mode.
[Wide] Extends the left and right parts only of
the display while leaving the center as is
in wide mode.
[Zoom] Magni� es the image displayed using 4:3 aspect ratio. (I.e., the top and bottom
are out of frame.)
3 Touch [Back]Screen Size switching is completed.
��������\b ���\b
��\f�� \
������
�
������� �\b �\b��
�
Page 159 of 177
Sound Control 11-2
Sound Control
Adjusts the sound.
If Premium Sound System is not connected
1 Press the [SET] key, and touch
[Sound Control]
eng_a018-2
2 Touch each item to adjust the sound
eng_a164
NOTE
ON sound quality and volume adjustments according
to vehicle speed.
3 Touch [Back] The sound adjustment is completed.
If Premium Sound System is connected
1 Press the [SET] key, and touch
[Sound Control]
eng_a018-2
eng_a233The sound control menu screen is displayed.
Audio Control
1 Touch [Audio Control] in the
Sound Control menu screen
2 Touch each item to adjust the
sound
eng_a234
NOTE
turn ON sound quality and volume adjustments
according to vehicle speed.
3 Touch [Back] The sound adjustment is completed.
��������\b ���\b
��\f�� \
������
��������� �\b �\b��
�
Page 163 of 177
System Settings 11-6 Keyboard Layout
Changing the layout of the keyboard.
[Alphabet]
eng_a169[PC]
eng_a170
Color SchemeSet the color scheme for the menu screen, etc.[Red] The menu is displayed using a red color scheme.
[Blue] The menu is displayed using a blue
color scheme.
A/V Icons on MapIt is possible to set whether or not to display on screen
icons displaying the audio status.
[On] Display.
[Off] Do not display.
Sensor CalibrationThe level of the vehicle speed sensor and gyro sensor
can be checked and the learning levels can be reset.
eng_a206
NOTE touching [Clear].
The learning levels can be reset.
A/C Cut inSetting whether or not to use an interrupt display
during air conditioning operations.
[On] Interrupt is displayed.
[Off] Interrupt is not displayed.
��������\b ���\b
��\f�� \
������
��������� �\b �\b�
�\f