2012 MITSUBISHI L200 window
[x] Cancel search: windowPage 195 of 370

NOTE
l Set
the temperature at about 22 (Type 1) or
25 (Type 2) under normal conditions.
l When the temperature is set to the highest or
the lowest setting under the AUTO opera-
tion, the air selection, mode selection, blower
speed and the air conditioning will be auto-
matically changed as follows.
Also, if manually operated after an automatic
changeover, manual operation will be selec-
ted.
• Quick Heating (When the temperature isset to the highest setting)
Outside air will be introduced, the air
flow will select foot position, and the air
conditioning will stop.
• Quick Cooling (When the temperature is set to the lowest setting)
Inside air will be recirculated, the air
flow will select face position, and the air
conditioning will operate.
Operating the system in manual mode E00704200040
Blower speed and ventilator mode may be control-
led
manually by setting the blower speed selection
dial and the mode selection dial to the desired posi-
tions. To return to automatic operation, set the dials
to the “AUTO” position.
Demisting of the windscreen and door windows E00704300689CAUTION
l
For
safety, make sure you have a clear
view through all the windows. To remove frost or mist from the windscreen and
door
windows, use the mode selection dial (“ ”
or “ ”).
For ordinary demisting
Use
this setting to keep the windscreen and door
windows clear of mist, and to keep the leg area heat-
ed (when driving in rain or snow). 1. Set
the air selection switch (A) to the outside
position.
2. Set the mode selection dial to the “ ”
posi-
tion.
3. Select your desired blower speed by turning the blower speed selection dial.
4. Select your desired temperature by turning the temperature control dial.
5. Push the air conditioning switch (B). For quick demisting
1.
Set
the mode selection dial to the “ ” posi-
tion.
2.
Set the blower to the maximum speed.
3. Set the temperature to the highest position.
NOTE l While the mode selection dial is set to the
“ ”
position, the air conditioning will oper-
ate automatically and the outside air position
will also be selected automatically.
l To demist effectively, direct the air flow
from the side ventilators towards the door win-
dows.
l Do not set the temperature control dial to the
max. cool position. Cool air will blow
against the window glasses and form mist on
them. For pleasant driving
5-11 5
OCRE12E1
Page 196 of 370

Important operation tips for the
air conditioning E00708300951
l Park the vehicle in the shade.
Parking
in the hot sun will make the vehicle
inside extremely hot, and it will require more
time to cool the interior.
If it is necessary to park in the sun, open the
windows for the first few minutes of air con-
ditioning operation to expel the hot air.
l Close the windows when the air conditioning
is in use. The entry of outside air through
open windows will reduce the cooling effi-
ciency.
l Too much cooling is not good for the health.
The inside air temperature should only be 5
to 6 °C below the outside air temperature.
l When operating the system, make sure the
air intake, which is located in front of the
windscreen, is free of obstructions such as
leaves and snow. Leaves collected in the air-
intake plenum may reduce air flow and plug
the plenum water drains.
Air conditioning system refrigerant
and lubricant recommendations
If the air conditioning seems less effective than usu-
al, the cause might be a refrigerant leak. We recom-
mend you to have the system inspected.
The air conditioning system in your vehicle must
be charged with the refrigerant HFC-134a and the
lubricant ZXL-100PG.
Use of any other refrigerant or lubricant will cause
severe damage which will result in the need to re-
place your vehicle’s entire air conditioning system.
The release of refrigerant into the atmosphere
should be prevented. It is recommended that the refrigerant be recovered
and recycled for further use.
During a long period of disuse
The
air conditioning should be operated for at least
five minutes each week, even in cold weather. This
is to prevent poor lubrication of the compressor in-
ternal parts and to maintain the air conditioning in
the best operating condition. Air purifier*
E00708400675
An
air filter has been incorporated into this air con-
ditioning so that dirt and dust are cleaned from the
air.
Replace the air filter periodically as its ability to
clean the air will be reduced as it collects pollen
and dirt. For the maintenance interval, refer to the
“SERVICE BOOKLET”.
NOTE
l Operation in certain conditions such as driv-
ing on a dusty road and frequent use of the
air conditioning can lead to reduction of serv-
ice life of the filter. When you feel that the
air flow is lower than normal or when the
windscreen or windows start to fog up easily,
replace the air filter.
We recommend you to have it checked. For pleasant driving
5-12
5
OCRE12E1
Page 197 of 370

LW/MW/FM electronic tuning radio with CD player*
E00708501745
The audio system can be used when the ignition switch is in the “ON” or “ACC” position. A- Display window
B- Audio system
NOTE l To listen to the audio system while the engine is stopped, turn the ignition key to the “ACC” position.
l If
a cellular phone is used inside the vehicle, it may create noise from the audio equipment. This does not mean that anything is wrong with your audio
equipment. In such a case, use the cellular phone at a place as far away as possible from the audio equipment.
l If foreign objects or water get into the audio equipment, or if smoke or a strange odour comes from it, immediately turn off the audio system. We recom-
mend your to have it checked. Never try to repair it by yourself. Avoid continuous usage without inspection by a qualified person.
l The audio system’s control knob can be removed to deter thieves. For details, refer to “Audio system anti-theft feature” on page 5-48.
l The audio amplifier (if so equipped) is located under the front right seat.
Do not subject the amplifier to a strong impact.
It could damage the amplifier or malfunctioning could result. For pleasant driving
5-13 5
OCRE12E1
Page 200 of 370

Radio control panel and display
E007089012281- PWR (On-Off) switch
2-
Memory select buttons
3- TUNE/SEEK (Up-step/Up-seek) button
4- TUNE/SEEK (Down-step/Down-seek) button
5- RADIO (FM/MW/LW selection) button 6- FM/MW/LW indicator
7-
Preset memory number display
8- ST (Stereo) indicator
9- Frequency display window For pleasant driving
5-16
5
OCRE12E1
Page 237 of 370

l
If this button is pressed in the voice recogni-
tion mode, the voice recognition mode will
be deactivated.
NOTE l When you press the SPEECH button to enter
voice recognition mode with a cellular phone
paired to the system, current information on
the cellular phone, such as “remaining bat-
tery life,” “signal strength” or “roaming,”
will be displayed on the audio display.*
*: Some cellular phones will not send this in-
formation to the Bluetooth ®
2.0 interface.
l Call waiting and three-way calls can be used
by the Bluetooth ®
2.0 interface, only if it is
possible to use those services with your cellu-
lar phone.
Voice recognition function E00727300471
The Bluetooth ®
2.0 interface is equipped with a
voice recognition function.
Simply say voice commands and you can perform
various operations and make or receive hands-free
calls.
With the Bluetooth ®
2.0 interface, voice recogni-
tion is possible for English, French, Spanish, Ital-
ian, German, Dutch, Portuguese and Russian. The
factory setting is English. NOTE
l If
the voice command that you say differs
from the predefined command or cannot be
recognised due to ambient noise or some oth-
er reason, the Bluetooth ®
2.0 interface will
ask you for the voice command again up to 3
times.
l For best performance and further reduction
of ambient noise, the vehicle windows
should be closed while engaging the voice rec-
ognition function.
l Depending on the selected language, some
functions may not be available.
Selecting the Language 1. Press the SPEECH button.
2. Say “Setup”.
3. Say “Language.”
4. The voice guide will say “Select a language:English, French, Spanish, Italian, German,
Dutch, Portuguese or Russian” Say the de-
sired language. (Example: Say “English.”)
5. The voice guide will say “English (French, Spanish, Italian, German, Dutch, Portuguese
or Russian) selected. Is this correct?” Say
“Yes.”
Answer “No” to return to Step 4.
NOTE l The voice guide will repeat the same mes-
sage twice. The first message is in the cur-
rent language, and the second message is in
the selected language.
l If many entries are registered in the vehicle
phone book, changing the language will take
longer. l
Changing the language deletes the mobile
phone book imported to the Bluetooth ®
2.0
interface. If you wish to use it, you will have
to import it again.
6. When the voice guide says “English (French, Spanish, Italian, German, Dutch, Portuguese
or Russian) selected,” the language change
process will be completed and the system
will return to the main menu.
Useful voice commands E00760000019
Help function E00760100010
The Bluetooth ®
2.0 interface is equipped with a
help function. If you say “Help” when the system
is waiting for a voice command input, the system
will tell you a list of the commands that can be
used under the circumstances.
Cancelling E00760200011
There are two cancel functions.
If
you are at the main menu, say “Cancel” to exit
from the Bluetooth ®
2.0 interface.
If you are anywhere else within the system, say
“Cancel” to return to the main menu.
Confirmation function setting E00760400013
The Bluetooth ®
2.0 interface is equipped with a con-
firmation function.
With the confirmation function activated, you are
given more opportunities than normal to confirm a
command when making various settings to the Blue-
tooth ®
2.0 interface. This allows you to decrease
the possibility that a setting is accidentally changed.
The confirmation function can be turned on or off
by following the steps below. For pleasant driving
5-53 5
OCRE12E1
Page 239 of 370

Speaker enrollment
E00727500196
It
takes about 2 to 3 minutes to complete the speak-
er enrollment process.
To ensure the best results, run through the process
while in the driver’s seat, in an environment that is
as quiet as possible (when there is no rain or strong
winds and the vehicle windows are closed). Please
turn off your phone while in speaker enrollment to
prevent interruption of the process.
Use the following procedure for speaker enrollment. 1. Stop your vehicle in a safe area, put the gear-shift lever in the “N” (Neutral) position
(M/T), or the selector lever in the “P”
(PARK) position (A/T), and pull the parking
brake lever.
NOTE l Speaker enrollment is not possible unless the
vehicle is parked. Make sure you park the ve-
hicle in a safe area before attempting speaker
enrollment.
2. Press the SPEECH button.
3. Say “Voice training”.
4. The voice guide will say “This operation must be performed in a quiet environment
while the vehicle is stopped. See the owner’s
manual for the list of required training phra-
ses. Press and release the SPEECH button
when you are ready to begin. Press the HANG-
UP button to cancel at any time”.
Press the SPEECH button to start the speaker
enrollment process. NOTE
l If
you do not start the speaker enrollment proc-
ess within 3 minutes of pressing the
SPEECH button, the speaker enrollment func-
tion will time out.
The voice guide will say “Speaker Enroll-
ment has timed out”. The system will then
beep and the voice recognition mode will be
deactivated.
5. The voice guide will prompt for phrase 1. Re- peat the corresponding phrase listed in table
“Enrollment commands” on page 5-66.
The system will register your voice and then
move on to the registration of the next com-
mand. Continue the process until all phrases
have been registered.
NOTE l To repeat the most recent voice training com-
mand, press and release the SPEECH button.
l If you press the HANG-UP button anytime
during the process, the system will beep and
stop the speaker enrollment process.
6. When all enrollment commands have been read out, the voice guide will say “Speaker
enrollment is complete”. The system will
then end the speaker enrollment process and
return to the main menu.
NOTE l Completing the speaker enrollment process
will turn on the voice model automatically.
l The commands “Help” and “Cancel” will not
work in this mode. Enabling and disabling the voice model and re-
training
E00727600096
You
can turn a voice model registered with the
speaker enrollment function on and off whenever
you want.
You can also retrain the system.
Use the following procedure to perform these ac-
tions. 1. Press the SPEECH button.
2. Say “Voice training”.
3. If you have completed a speaker enrollmentprocess once already, the voice guide will
say either “Enrollment is enabled. Would
you like to disable or retrain?” or “Enroll-
ment is disabled. Would you like to enable
or retrain?”
4. When enrollment is “enabled”, the voice mod- el is on; when enrollment is “disabled”, the
voice model is off. Say the command that
fits your needs.
Say “Retrain” to start the speaker enrollment
process and recreate a new voice model. (Re-
fer to “Speaker enrollment” on page 5-55.)
Connecting the Bluetooth ®
2.0 inter-
face and Bluetooth ®
device
E00760600204
Before you can make or receive hands-free calls or
play music using the Bluetooth ®
2.0 interface func-
tion,
you must pair the Bluetooth ®
device and Blue-
tooth ®
2.0 interface. For pleasant driving
5-55 5
OCRE12E1
Page 274 of 370

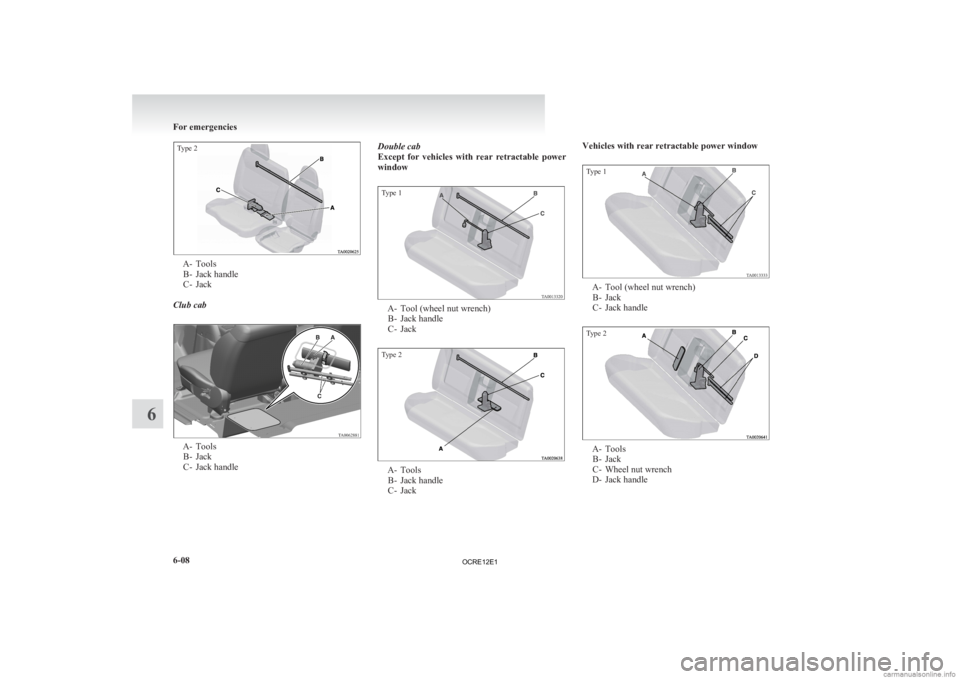
Type 2A- Tools
B-
Jack handle
C- Jack
Club cab A- Tools
B-
Jack
C- Jack handle Double cab
Except
for vehicles with rear retractable power
window
Type 1 A- Tool (wheel nut wrench)
B-
Jack handle
C- Jack
Type 2 A- Tools
B-
Jack handle
C- Jack Vehicles with rear retractable power window
Type 1
A- Tool (wheel nut wrench)
B-
Jack
C- Jack handle
Type 2 A- Tools
B-
Jack
C- Wheel nut wrench
D- Jack handle For emergencies
6-08
6
OCRE12E1
Page 276 of 370

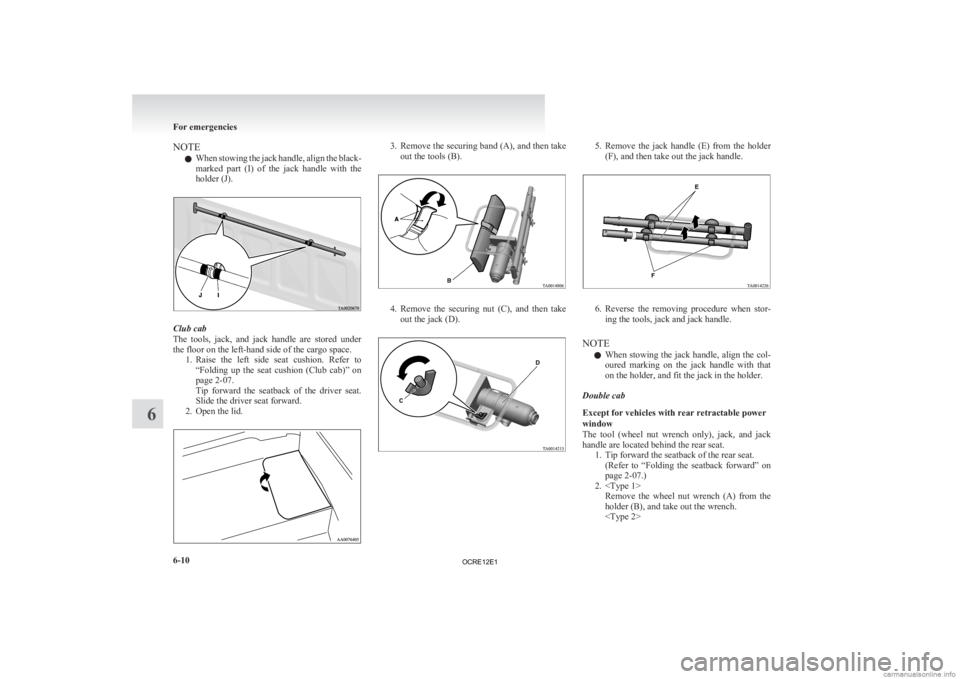
NOTE
l When
stowing the jack handle, align the black-
marked part (I) of the jack handle with the
holder (J). Club cab
The
tools, jack, and jack handle are stored under
the floor on the left-hand side of the cargo space. 1. Raise the left side seat cushion. Refer to“Folding up the seat cushion (Club cab)” on
page 2-07.
Tip forward the seatback of the driver seat.
Slide the driver seat forward.
2. Open the lid. 3. Remove
the securing band (A), and then take
out the tools (B). 4. Remove
the securing nut (C), and then take
out the jack (D). 5. Remove
the jack handle (E) from the holder
(F), and then take out the jack handle. 6. Reverse
the removing procedure when stor-
ing the tools, jack and jack handle.
NOTE l When stowing the jack handle, align the col-
oured marking on the jack handle with that
on the holder, and fit the jack in the holder.
Double cab
Except for vehicles with rear retractable power
window
The tool (wheel nut wrench only), jack, and jack
handle are located behind the rear seat. 1. Tip forward the seatback of the rear seat.(Refer to “Folding the seatback forward” on
page 2-07.)
2.
holder (B), and take out the wrench.
6-10
6
OCRE12E1