2012 MINI COUPE ROADSTER CONVERTIBLE spare tire
[x] Cancel search: spare tirePage 88 of 283
Technology for driving comfort and safetyCONTROLS
87
Flat Tire Monitor FTM
The concept
The system does not measure the actual
inflation pressure in the tires.
The system detects a pressure loss in a tire by
comparing the rotational speeds of the individ-
ual wheels while moving.
In the event of a pressure loss, the diameter and
therefore the rotational speed of the corre-
sponding wheel change. This is detected and
reported as a flat tire.
Functional requirement
The system must have been initialized while the
tire inflation pressure was correct; otherwise,
reliable signaling of a fl at tire is not ensured.
Initialize the system afte r every correction of the
tire inflation pressure and after every tire or
wheel change.
System limitations
Sudden serious tire damage caused by
external influences ca nnot be indicated in
advance. <
A natural, even pressure loss in all four tires
cannot be detected. Therefore, check the tire
inflation pressure regularly.
In the following situations, the system could be
delayed or malfunction:
> System has not been initialized.
> Driving on snowy or slippery road surface.
> Performance-oriented styl e of driving: slip in
the drive wheels, high lateral acceleration.
> Snow chains are attached.
When the vehicle is driven with a space-saver
spare tire, page 240, the Flat Tire Monitor
cannot function.
Status display
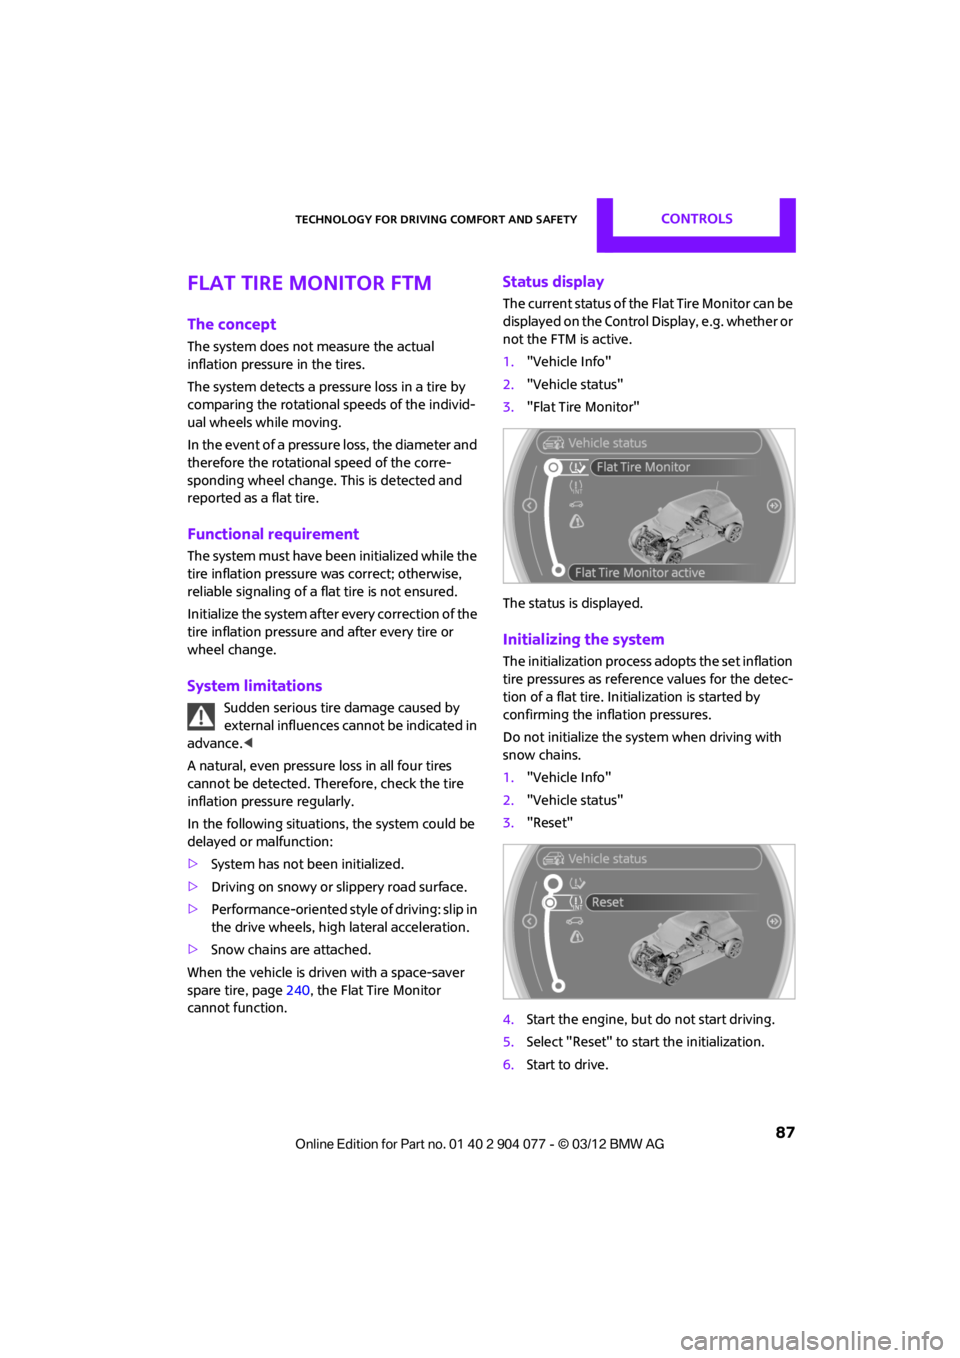
The current status of the Flat Tire Monitor can be
displayed on the Control Display, e.g. whether or
not the FTM is active.
1. "Vehicle Info"
2. "Vehicle status"
3. "Flat Tire Monitor"
The status is displayed.
Initializing the system
The initialization process adopts the set inflation
tire pressures as refere nce values for the detec-
tion of a flat tire. Initialization is started by
confirming the inflation pressures.
Do not initialize the system when driving with
snow chains.
1. "Vehicle Info"
2. "Vehicle status"
3. "Reset"
4. Start the engine, but do not start driving.
5. Select "Reset" to start the initialization.
6. Start to drive.
00320051004F004C00510048000300280047004C0057004C005200510003
Page 90 of 283
Technology for driving comfort and safetyCONTROLS
89
Vibrations or loud noises while driving can
indicate final failure of the tire. Reduce
your speed and bring the vehicle to a stop; oth-
erwise, pieces of tire may come off, which could
result in an accident. Do not continue driving
and contact your MINI dealer. <
Tire Pressure Monitor
TPM
The concept
Measuring the inflation pressure in the four
mounted tires. The system notifies you if there is
a significant loss of pressure in one or more tires.
Functional requirement
The system must have been reset while the
inflation pressure was correct; otherwise,
reliable signaling of a fl at tire is not ensured.
Always use wheels with TPM electronics to
ensure that the system will operate properly.
Reset the system again after each correction of
the tire inflation pressure and after every tire or
wheel change.
System limitations
Sudden, serious tire damage caused by
external influences ca nnot be indicated in
advance. <
The system does not operate correctly if it has
not been reset. For example, a flat tire may be
indicated despite correct tire inflation pressures.
The system is inactive and cannot indicate a flat
tire:
> If a wheel without TPM electronics, e.g. a
compact spare wheel, is mounted.
> Interference with TP M by other systems
or devices with the same transmission
frequency.
Status display
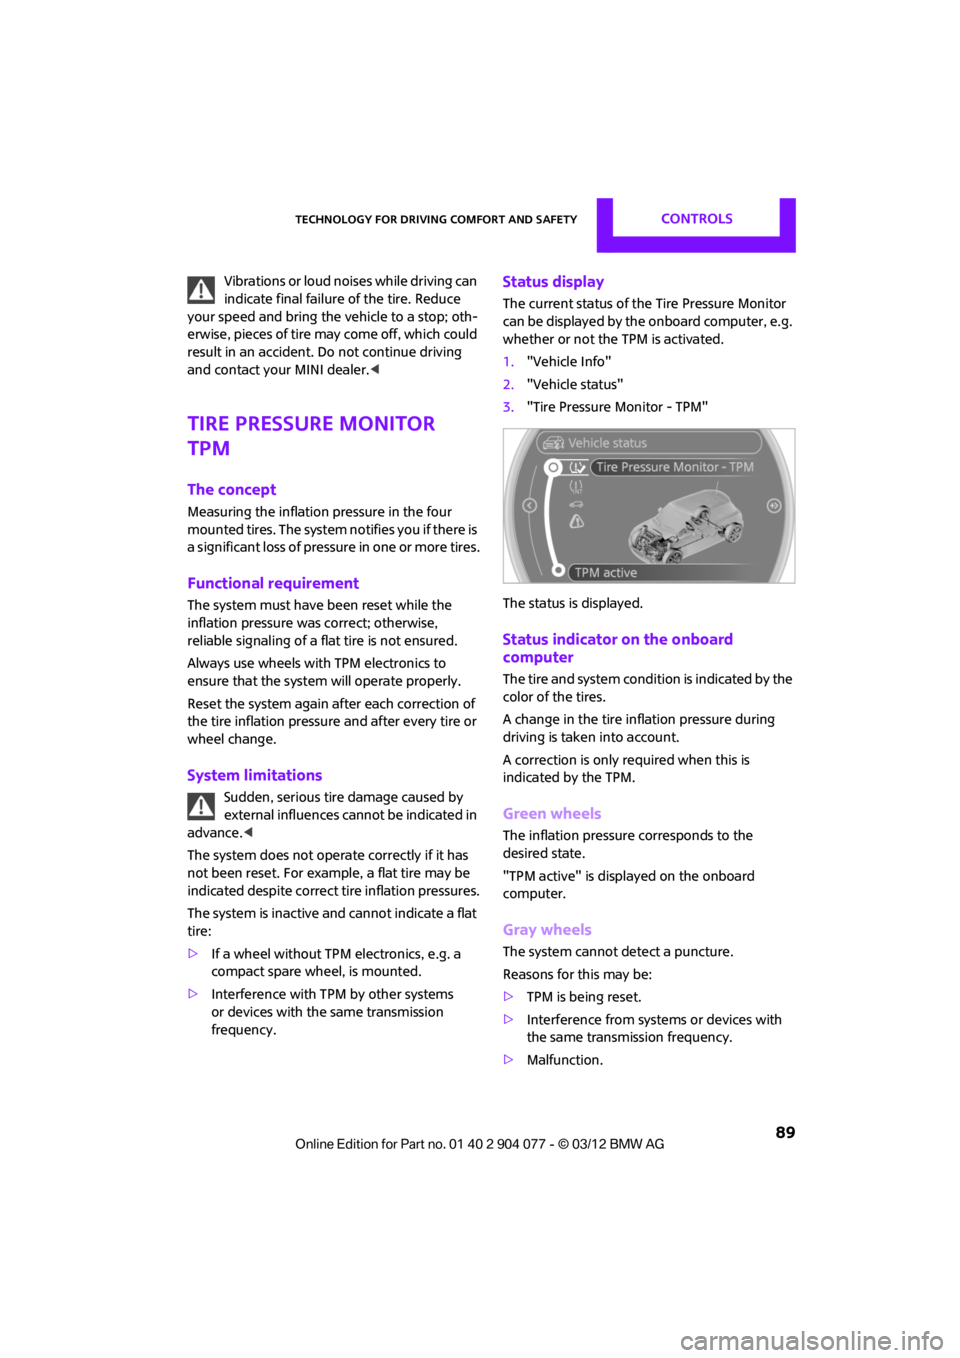
The current status of th e Tire Pressure Monitor
can be displayed by the onboard computer, e.g.
whether or not the TPM is activated.
1. "Vehicle Info"
2. "Vehicle status"
3. "Tire Pressure Monitor - TPM"
The status is displayed.
Status indicator on the onboard
computer
The tire and system condit ion is indicated by the
color of the tires.
A change in the tire in flation pressure during
driving is taken into account.
A correction is only required when this is
indicated by the TPM.
Green wheels
The inflation pressure corresponds to the
desired state.
"TPM active" is displayed on the onboard
computer.
Gray wheels
The system cannot detect a puncture.
Reasons for this may be:
> TPM is being reset.
> Interference from systems or devices with
the same transmission frequency.
> Malfunction.
00320051004F004C00510048000300280047004C0057004C005200510003
Page 93 of 283

CONTROLSTechnology for driving comfort and safety
92
Declaration according to NHTSA/
FMVSS 138 Tire Pressure Monitoring
Systems
Each tire, including the spare, should be
checked monthly when cold and inflated to the
inflation pressure recommended by the vehicle
manufacturer on the vehicle placard or tire infla-
tion pressure label. If your vehicle has tires of a
different size than the size indicated on the vehi-
cle placard or tire inflation pressure label, you
should determine the proper tire inflation pres-
sure for those tires. As an added safety feature,
your vehicle has been equipped with a tire pres-
sure monitoring system TPMS that illuminates a
low tire pressure telltal e when one or more of
your tires are significantly underinflated.
Accordingly, when the low tire pressure telltale
illuminates, you should st op and check your tires
as soon as possible, and inflate them to the
proper pressure. Driving on a significantly
underinflated tire causes the tire to overheat
and can lead to tire fail ure. Underinflation also
reduces fuel efficiency and tire tread life and
may affect the vehicle’s handling and stopping
ability. Please note that the TPMS is not a substi-
tute for proper tire maintenance, and it is the
driver’s responsibility to maintain correct tire
pressure, even if underi nflation has not reached
the level sufficient to trigger illumination of the
TPMS low tire pressure telltale. The TPMS malfunction indicator is combined
with the low tire pressure telltale. When the sys-
tem detects a malfunction, the telltale will flash
for approximately one minute and then remain
continuously lit. This
sequence will continue
upon subsequent vehicle startups as long as the
malfunction exists. When the malfunction indi-
cator is illuminated, the system may not be able
to detect or signal low tire pressure as intended.
TPMS malfunctions may occur for a variety of
reasons, including the installation of replace-
ment or alternate tires or wheels on the vehicle
that prevent the TPMS from functioning prop-
erly. Always check the TP MS malfunction telltale
after replacing one or mo re tires or wheels on
your vehicle to ensure that the replacement or
alternate tires and wheels allow the TPMS to
continue to function properly.
00320051004F004C00510048000300280047004C0057004C005200510003
Page 211 of 283
MOBILITYWheels and tires
210
The maximum permitted speed for these
tire inflation pressures is 100 mph or
160 km/h. Do not exceed this speed; otherwise,
tire damage and accidents may occur. <
Tire inflation pressures for driving above
100 mph or 160 km/h
In order to drive at maximum speeds in
excess of 100 mph or 160 km/h, adjust
pressures to the respective tire inflation pres-
sures listed on the following pages in the
columns for traveling sp eeds including those
exceeding 100 mph or 160 km/h. Otherwise,
tire damage and accidents could occur. <
Observe all national and local maximum speed
limits; otherwise, violat ions of the law could
occur.
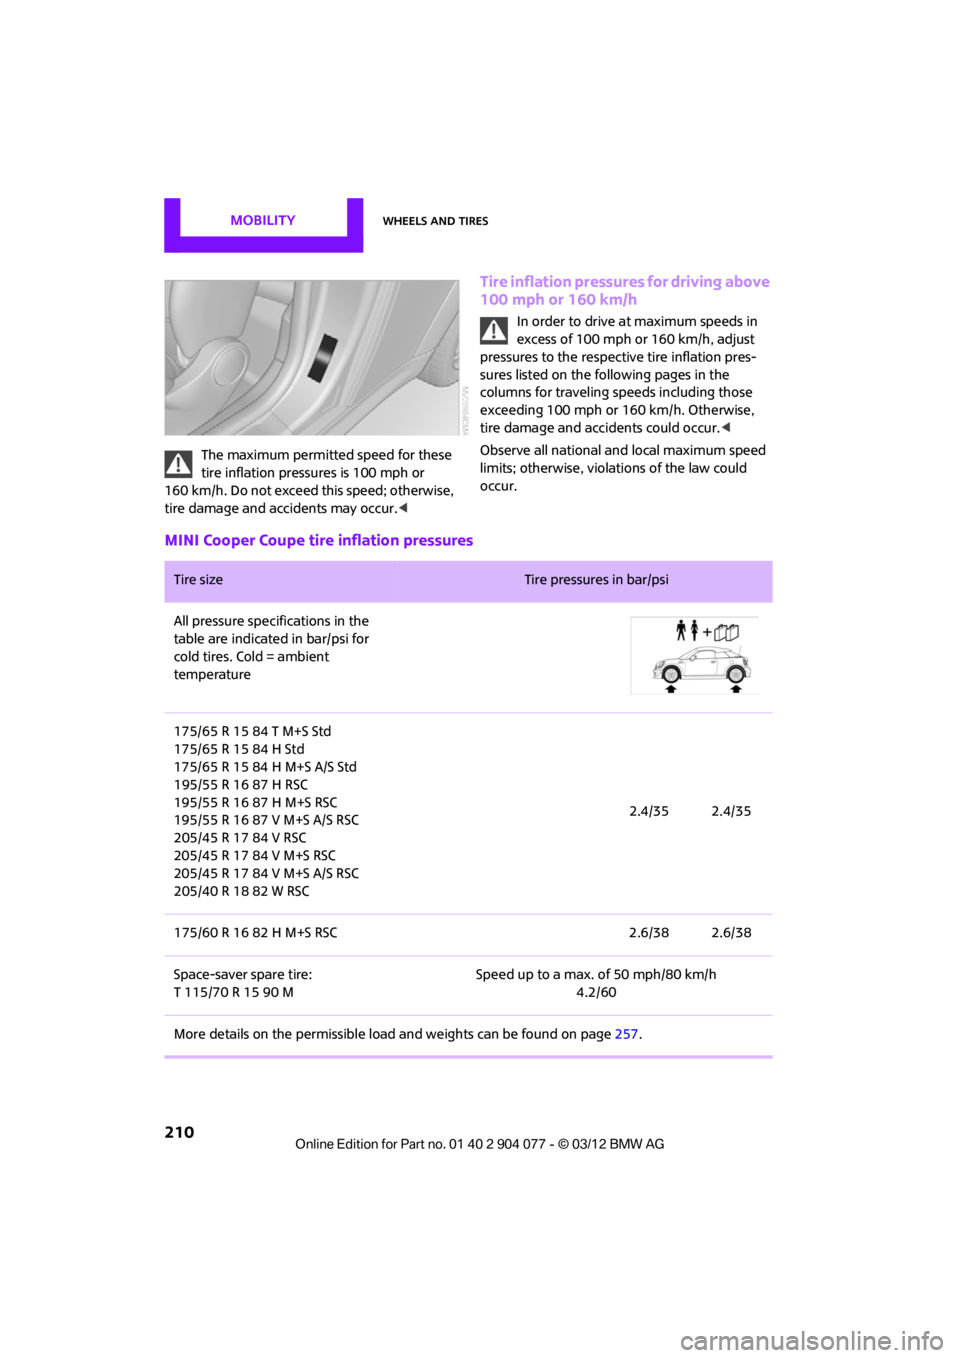
MINI Cooper Coupe tire inflation pressures
Tire size Tire pressures in bar/psi
All pressure specifications in the
table are indicated in bar/psi for
cold tires. Cold = ambient
temperature
175/65 R 15 84 T M+S Std
175/65 R 15 84 H Std
175/65 R 15 84 H M+S A/S Std
195/55 R 16 87 H RSC
195/55 R 16 87 H M+S RSC
195/55 R 16 87 V M+S A/S RSC
205/45 R 17 84 V RSC
205/45 R 17 84 V M+S RSC
205/45 R 17 84 V M+S A/S RSC
205/40 R 18 82 W RSC 2.4/35 2.4/35
175/60 R 16 82 H M+S RSC 2.6/38 2.6/38
Space-saver spare tire:
T 115/70 R 15 90 M Speed up to a max. of 50 mph/80 km/h
4.2/60
More details on the permissible load and weights can be found on page257.
00320051004F004C00510048000300280047004C0057004C005200510003
Page 213 of 283
MOBILITYWheels and tires
212
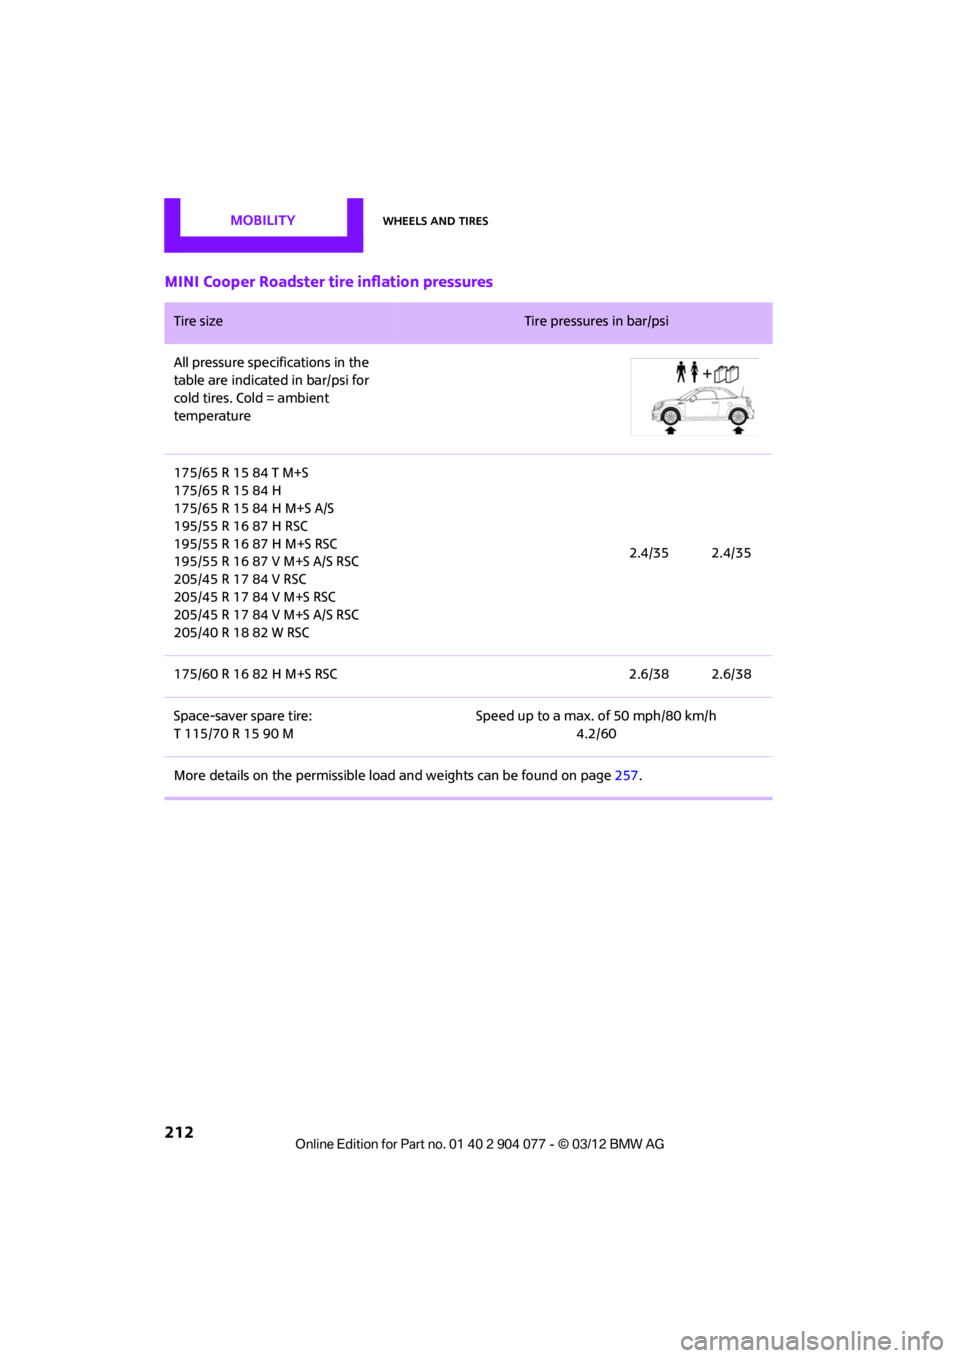
MINI Cooper Roadster tire inflation pressures
Tire size Tire pressures in bar/psi
All pressure specifications in the
table are indicated in bar/psi for
cold tires. Cold = ambient
temperature
175/65 R 15 84 T M+S
175/65 R 15 84 H
175/65 R 15 84 H M+S A/S
195/55 R 16 87 H RSC
195/55 R 16 87 H M+S RSC
195/55 R 16 87 V M+S A/S RSC
205/45 R 17 84 V RSC
205/45 R 17 84 V M+S RSC
205/45 R 17 84 V M+S A/S RSC
205/40 R 18 82 W RSC 2.4/35 2.4/35
175/60 R 16 82 H M+S RSC 2.6/38 2.6/38
Space-saver spare tire:
T 115/70 R 15 90 M Speed up to a max. of 50 mph/80 km/h
4.2/60
More details on the permissible load and weights can be found on page257.
00320051004F004C00510048000300280047004C0057004C005200510003
Page 220 of 283
Wheels and tiresMOBILITY
219
in the sidewalls ensures that the tire can con-
tinue to be used subject to certain restrictions,
even if depressurized.
For information on continuing to drive with a flat
tire, refer to Indication of a flat tire, page88.
New wheels and tires
Have new wheels and tires mounted only
by your MINI dealer or a specialized tire
shop that has specially trained personnel work-
ing in accordance with th e specifications of the
MINI manufacturer. If this work is not carried out
properly, there is a danger of subsequent dam-
age and related safety ha zards. Make sure that
the new wheels are balanced. <
Retreaded tires
The manufacturer of your MINI recom-
mends that you avoid using retreaded
tires, as this could impair driving safety. The
causes for this include potentially different tire
casing structures and of ten wide variations in
tire age, which can result in a limited service
life.<
Correct wheels and tires
The manufacturer of your MINI recom-
mends mounting only wheels and tires
that it has specifically approved for use on your
particular model. Although other wheels and
tires may theoretically have the same dimen-
sions, variations in factors such as manufactur-
ing tolerances can result in contact between tire
and bodywork, ultimately leading to serious
accidents. The manufacturer of your MINI can-
not evaluate non-approved wheels and tires to
determine if they are su ited for use, and there-
fore cannot ensure the operating safety of the
vehicle if they are mounted. <
Your MINI dealer will be glad to inform you
about the correct wheel an d tire combination for
your vehicle. The correct combination of wheels and tires is
also necessary to ensure
reliable operation of
various vehicle systems such as ABS and DSC.
To maintain good handling and vehicle
response, use only tires of a single brand and
tread configuration. After a tire has been
damaged, mount the previous wheel and tire
combination again as soon as possible.
Wheels with Tire Pressure Monitor TPM
electronics
When mounting new tires or changing over from
summer to winter tires, or vice versa, only use
wheels with TPM electronics; otherwise, the Tire
Pressure Monitor may not be able to detect a
puncture, refer to page 90. Your MINI dealer will
be glad to advise you.
Recommended tire brands
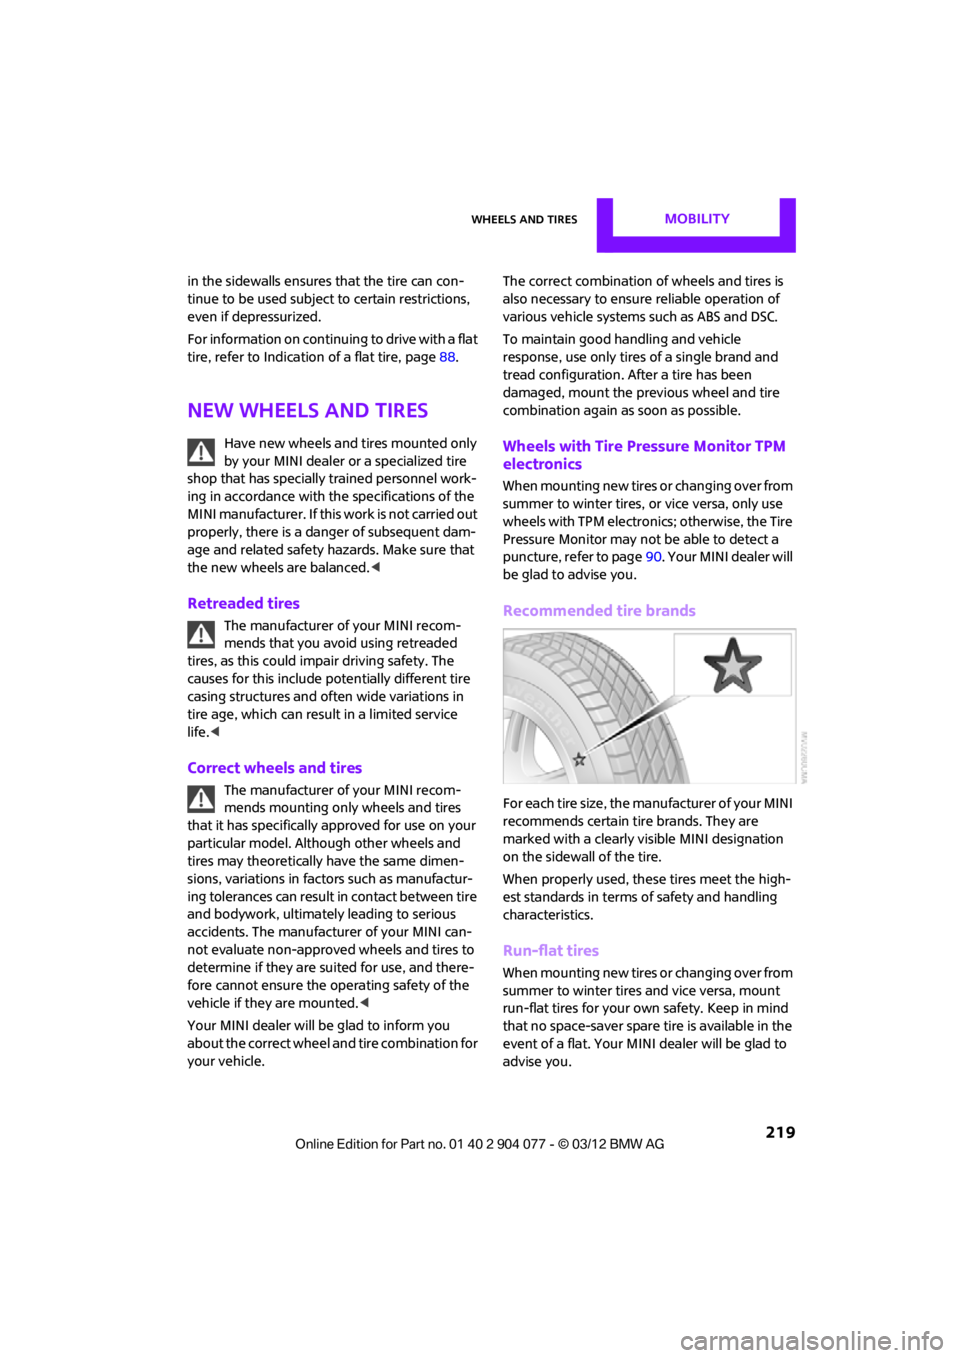
For each tire size, the manufacturer of your MINI
recommends certain tire brands. They are
marked with a clearly visible MINI designation
on the sidewall of the tire.
When properly used, these tires meet the high-
est standards in terms of safety and handling
characteristics.
Run-flat tires
When mounting new tires or changing over from
summer to winter tires and vice versa, mount
run-flat tires for your ow n safety. Keep in mind
that no space-saver spare tire is available in the
event of a flat. Your MINI dealer will be glad to
advise you.
00320051004F004C00510048000300280047004C0057004C005200510003
Page 232 of 283
Replacing componentsMOBILITY
231
Replacing components
Vehicle equipment
In this chapter, all production, country, and
optional equipment that is offered in the model
range is described. Equipment is also described
that is not available because of, for example,
selected options or count ry version. This also
applies to safety related functions and systems.
Toolkit
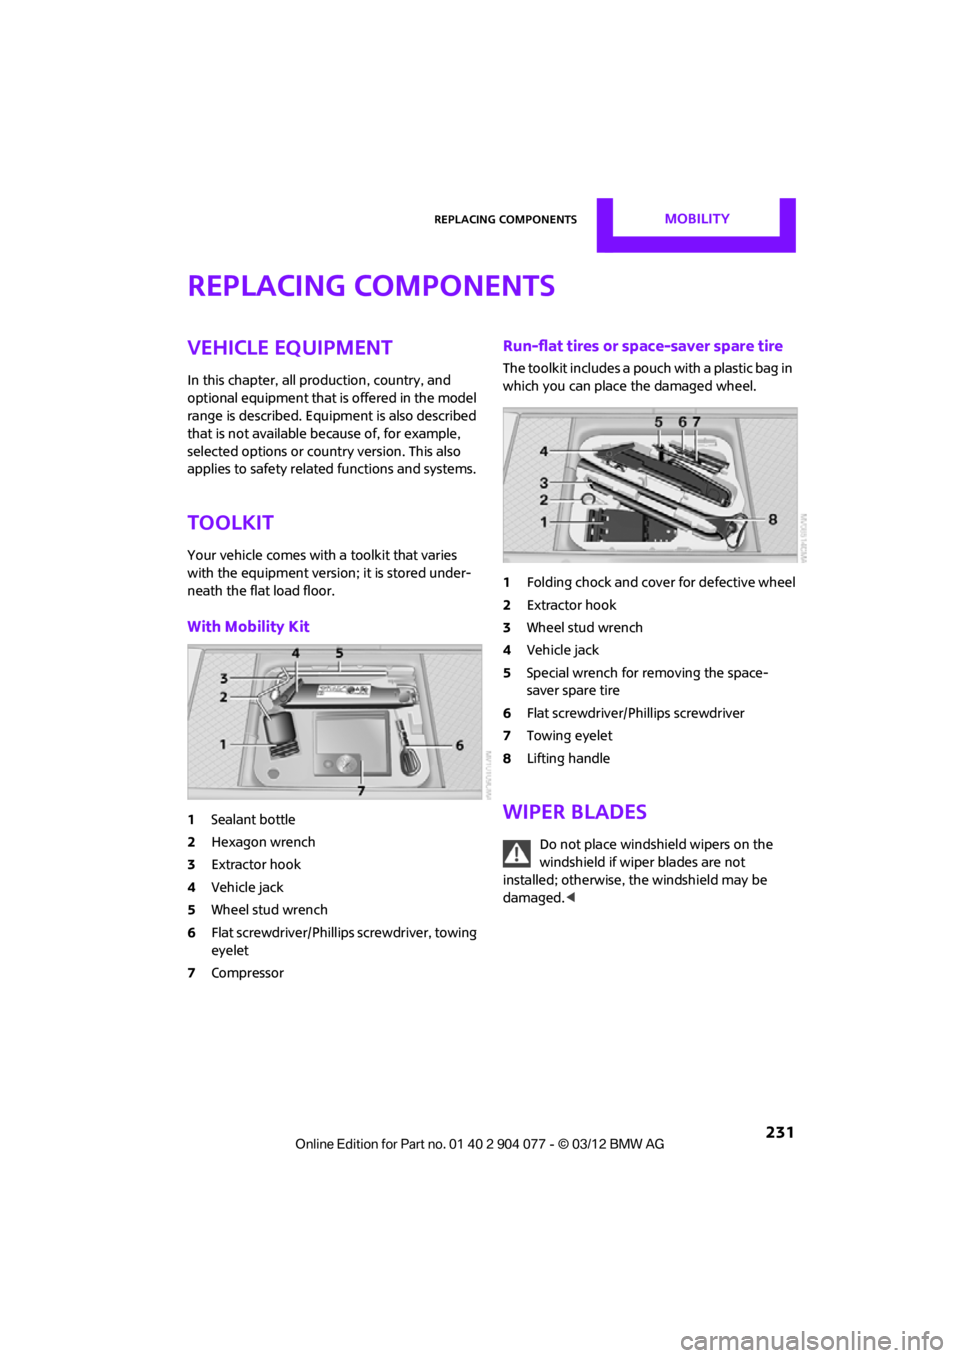
Your vehicle comes with a toolkit that varies
with the equipment version; it is stored under-
neath the flat load floor.
With Mobility Kit
1 Sealant bottle
2 Hexagon wrench
3 Extractor hook
4 Vehicle jack
5 Wheel stud wrench
6 Flat screwdriver/Phillips screwdriver, towing
eyelet
7 Compressor
Run-flat tires or space-saver spare tire
The toolkit includes a pouch with a plastic bag in
which you can place the damaged wheel.
1Folding chock and cove r for defective wheel
2 Extractor hook
3 Wheel stud wrench
4 Vehicle jack
5 Special wrench for removing the space-
saver spare tire
6 Flat screwdriver/Phillips screwdriver
7 Towing eyelet
8 Lifting handle
Wiper blades
Do not place windshield wipers on the
windshield if wiper blades are not
installed; otherwise, the windshield may be
damaged. <
00320051004F004C00510048000300280047004C0057004C005200510003
Page 238 of 283
Replacing componentsMOBILITY
237
Repairing a flat tire
Safety measures in the event of a
breakdown:
Park the vehicle as far as possible from moving
traffic and switch on the hazard warning
flashers.
Turn the steering wheel until the front wheels
are in the straight-ahead position and engage
the steering wheel lock. Engage the parking
brake and shift into 1st or reverse gear or place
the selector lever in position P.
All passengers should be outside the vehicle and
in a safe place, e.g. behind a guardrail.
Erect a warning triangle or warning flasher at the
appropriate distance if necessary. Comply with
all safety guidelines and regulations. <
In the event of a flat tire, different procedures
should be followed depending on the equip-
ment included in your vehicle:
> MINI Mobility Kit, refer to the following
section
> Run-flat tires, page 239
> Tire change with space-saver spare tire,
page 239
MINI Mobility Kit
Preparations
Use of the MINI Mobility Kit may be ineffective if
the tire puncture meas ures approx. 1/8 in/4 mm
or more. Contact the nearest MINI dealer if
the tire cannot be made drivable with the
Mobility Kit.
Do not remove foreign bodies which have
penetrated the tire if possible.
Follow the instructions on using the
Mobility Kit found on the compressor and
the sealant bottle. <
Remove the adhesive label for the speed limit
from the sealant bottle and affix it to the steer-
ing wheel.
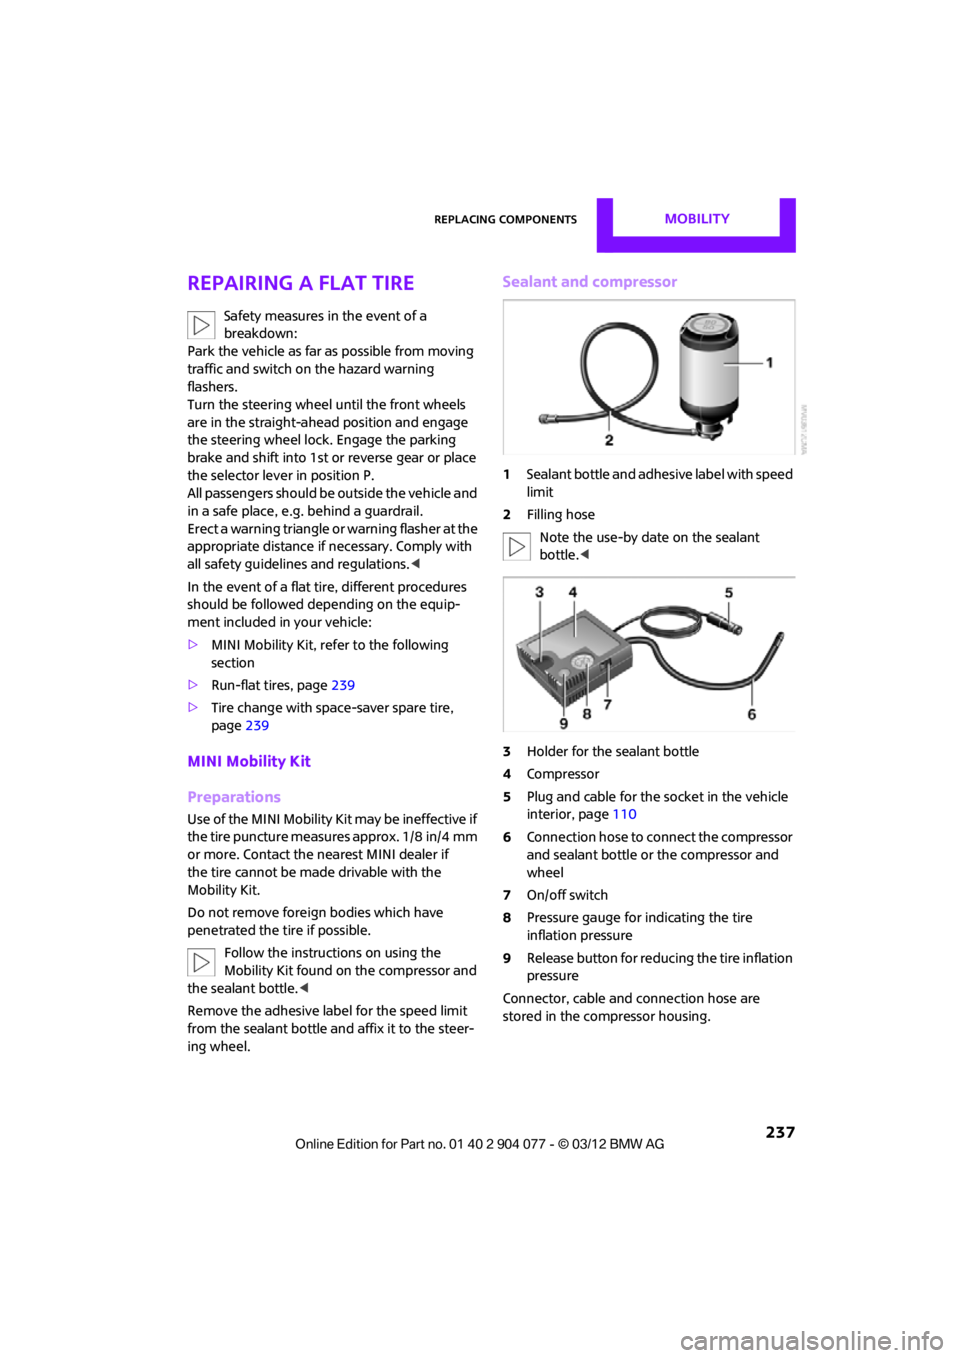
Sealant and compressor
1 Sealant bottle and adhesi ve label with speed
limit
2 Filling hose
Note the use-by date on the sealant
bottle. <
3 Holder for the sealant bottle
4 Compressor
5 Plug and cable for the socket in the vehicle
interior, page 110
6 Connection hose to connect the compressor
and sealant bottle or the compressor and
wheel
7 On/off switch
8 Pressure gauge for indicating the tire
inflation pressure
9 Release button for reduci ng the tire inflation
pressure
Connector, cable and connection hose are
stored in the compressor housing.
00320051004F004C00510048000300280047004C0057004C005200510003