2012 MINI COUPE ROADSTER CONVERTIBLE clock
[x] Cancel search: clockPage 225 of 283
MOBILITYEngine compartment
224
Coolant
Coolant consists of half water and half additive.
Not all commercially available additives are suit-
able for your MINI. Your MINI dealer knows
which additives are suitab le and will be glad to
advise you.
Only use suitable additives; otherwise,
engine damage may result. Because addi-
tives are harmful to your health, it is important
to follow the instructions on the containers. <
Comply with the appropriate environmen-
tal protection regulations when disposing
of coolant additives. <
Coolant temperature
If the coolant, and therefore the engine, should
overheat, then a warning lamp will go on.
A message appears on the Control Display.
Checking coolant level
Do not add coolant to the cooling system
when the engine is hot. Escaping coolant
can cause burns. <
Do not open the hood until the engine has
cooled down.
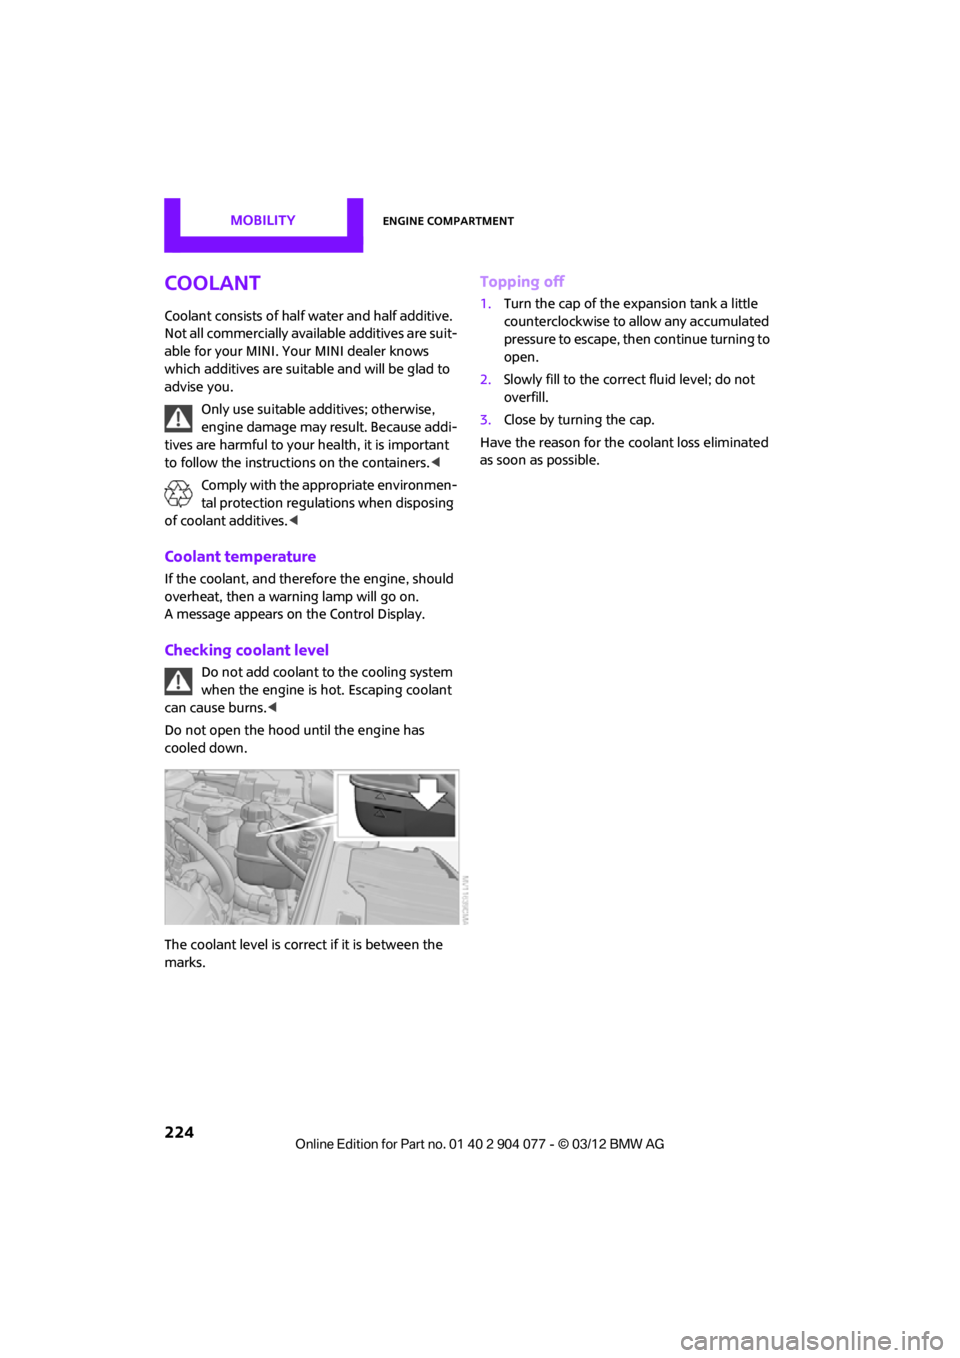
The coolant level is correct if it is between the
marks.
Topping off
1. Turn the cap of the expansion tank a little
counterclockwise to allow any accumulated
pressure to escape, then continue turning to
open.
2. Slowly fill to the correct fluid level; do not
overfill.
3. Close by turning the cap.
Have the reason for the coolant loss eliminated
as soon as possible.
00320051004F004C00510048000300280047004C0057004C005200510003
Page 234 of 283
Replacing componentsMOBILITY
233
Light-emitting diodes LEDs
Light-emitting diodes installed behind translu-
cent lenses serve as the light sources for many of
the controls and displays in your vehicle. These
light-emitting diodes are related to conven-
tional laser diodes, and legislation defines them
as Class 1 light-emitting diodes.
Do not remove the covers or expose the
eyes directly to the unfiltered light source
for several hours; otherw ise, this could cause
irritation of the retina. <
Headlamp glass lens
In cool or humid weather, condensation may
occur on the interiors of the headlamps. The
condensation disappears a short time after the
light is switched on. The headlamps do not need
to be changed.
Do not remove the condensation from head-
lamps, despite driving with lights on, and if
condensation increases, e.g., because of water
droplets, have this checked by your MINI dealer.
Xenon lamps
The service life of these bulbs is very long and
the probability of failure very low, provided that
they are not switched on and off an excessive
number of times. If a xenon lamp fails neverthe-
less, switch on the fog lamps and continue the
journey with great care, provided that local leg-
islation does not prohibit this.
Work on the xenon lighting system,
including lamp replacem ent, is only to be
carried out only by your MINI dealer. Due to high
voltage, there is a risk of fatal injury if work on
the xenon lamps is carried out improperly. <
Halogen low beams and high beams
H13 bulb, 60/5 watts
The H13 bulb is pressurized. Therefore,
wear safety glasses an d protective gloves.
Otherwise, there is a risk of injury if the bulb is
damaged. < Be careful when inst
alling the cover;
otherwise, leaks could occur and cause
damage to the headlamp system. <
Accessing the lamp from the engine
compartment
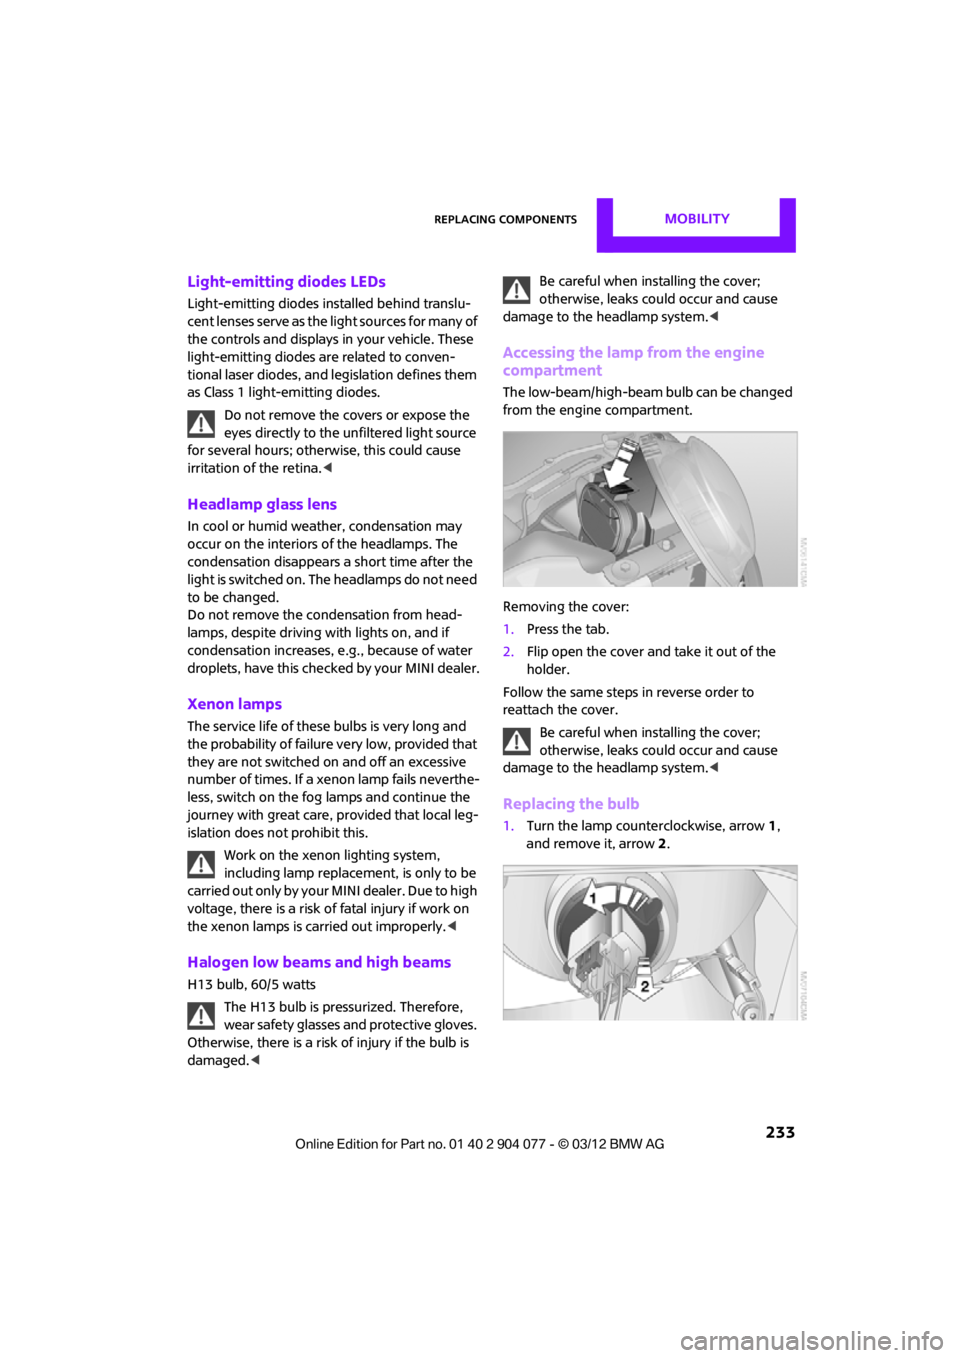
The low-beam/high-beam bulb can be changed
from the engine compartment.
Removing the cover:
1.Press the tab.
2. Flip open the cover and take it out of the
holder.
Follow the same steps in reverse order to
reattach the cover.
Be careful when inst alling the cover;
otherwise, leaks could occur and cause
damage to the headlamp system. <
Replacing the bulb
1.Turn the lamp counterclockwise, arrow 1,
and remove it, arrow 2.
00320051004F004C00510048000300280047004C0057004C005200510003
Page 235 of 283
MOBILITYReplacing components
234
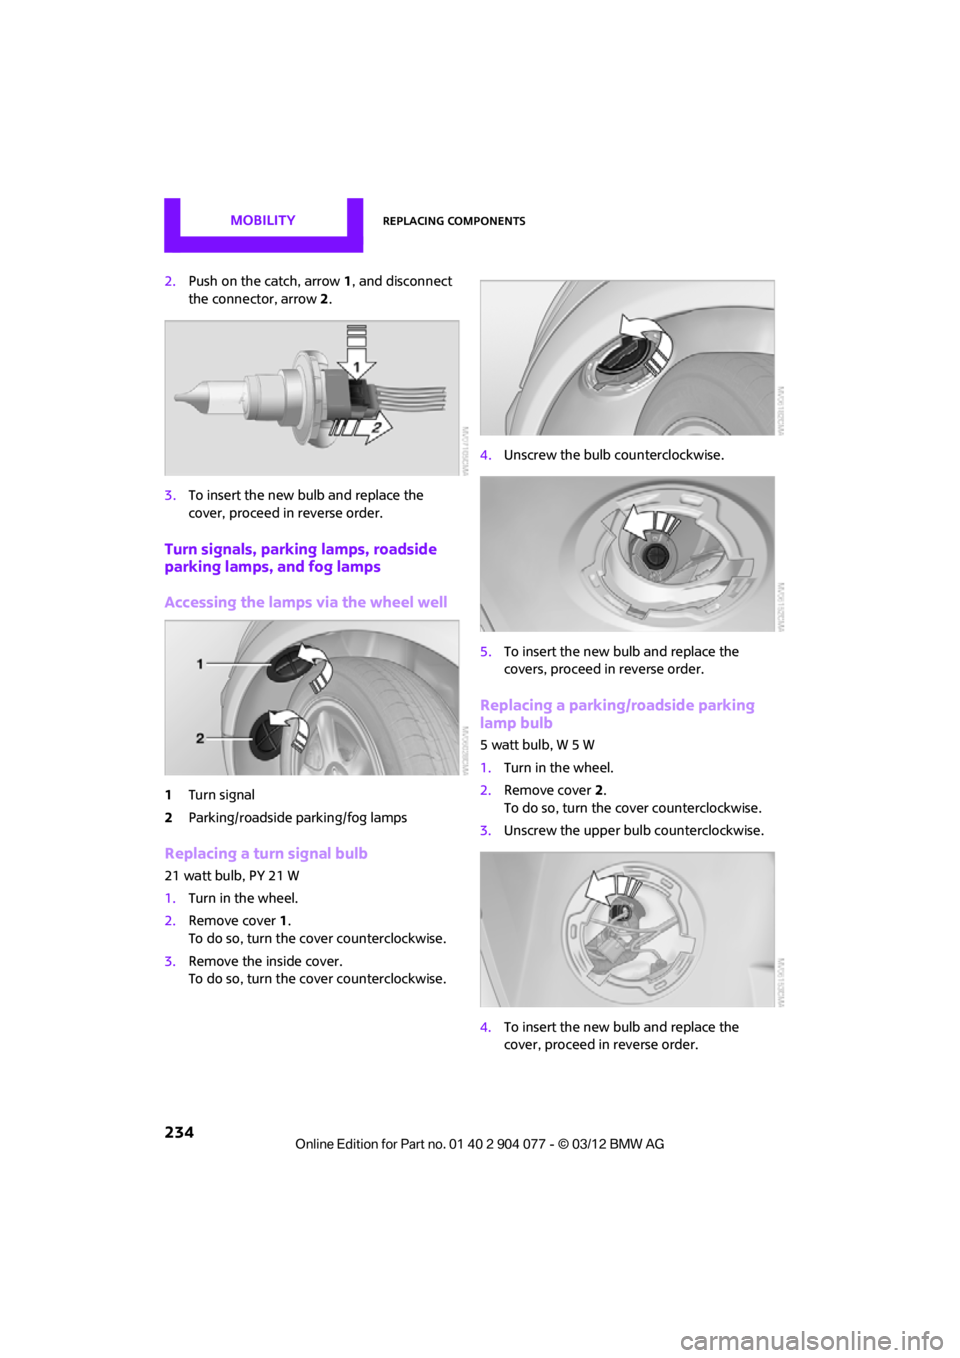
2.Push on the catch, arrow 1, and disconnect
the connector, arrow 2.
3. To insert the new bulb and replace the
cover, proceed in reverse order.
Turn signals, parking lamps, roadside
parking lamps, and fog lamps
Accessing the lamps via the wheel well
1Turn signal
2 Parking/roadside parking/fog lamps
Replacing a turn signal bulb
21 watt bulb, PY 21 W
1.Turn in the wheel.
2. Remove cover 1.
To do so, turn the cover counterclockwise.
3. Remove the inside cover.
To do so, turn the cover counterclockwise. 4.
Unscrew the bulb counterclockwise.
5. To insert the new bulb and replace the
covers, proceed in reverse order.
Replacing a parking/roadside parking
lamp bulb
5 watt bulb, W 5 W
1.Turn in the wheel.
2. Remove cover 2.
To do so, turn the cover counterclockwise.
3. Unscrew the upper bulb counterclockwise.
4. To insert the new bulb and replace the
cover, proceed in reverse order.
00320051004F004C00510048000300280047004C0057004C005200510003
Page 236 of 283
Replacing componentsMOBILITY
235
Replacing a fog lamp bulb
H8 bulb, 35 watts
1.Turn in the wheel.
2. Remove cover 2.
To do so, turn the cover counterclockwise.
3. Pull the cable connector.
4. Unscrew the lower bulb counterclockwise.
5. To insert the new bulb and replace the
cover, proceed in reverse order.
Side turn signals
5watt bulb, W5W
1.Push the lamp with the ventilation grate
forward and remove.
2. Unscrew the bulb holder counterclockwise.
3. Pull out and replace the bulb.
4. To insert the new bulb and replace the
cover, proceed in reverse order.
Tail lamps
Turn signals: 21 watt bulb, PY 21 W
Brake light: bulb 21 Watt/5 Watt, W 5 W
Other lights: bulb 21 Watt, P 21 W 1
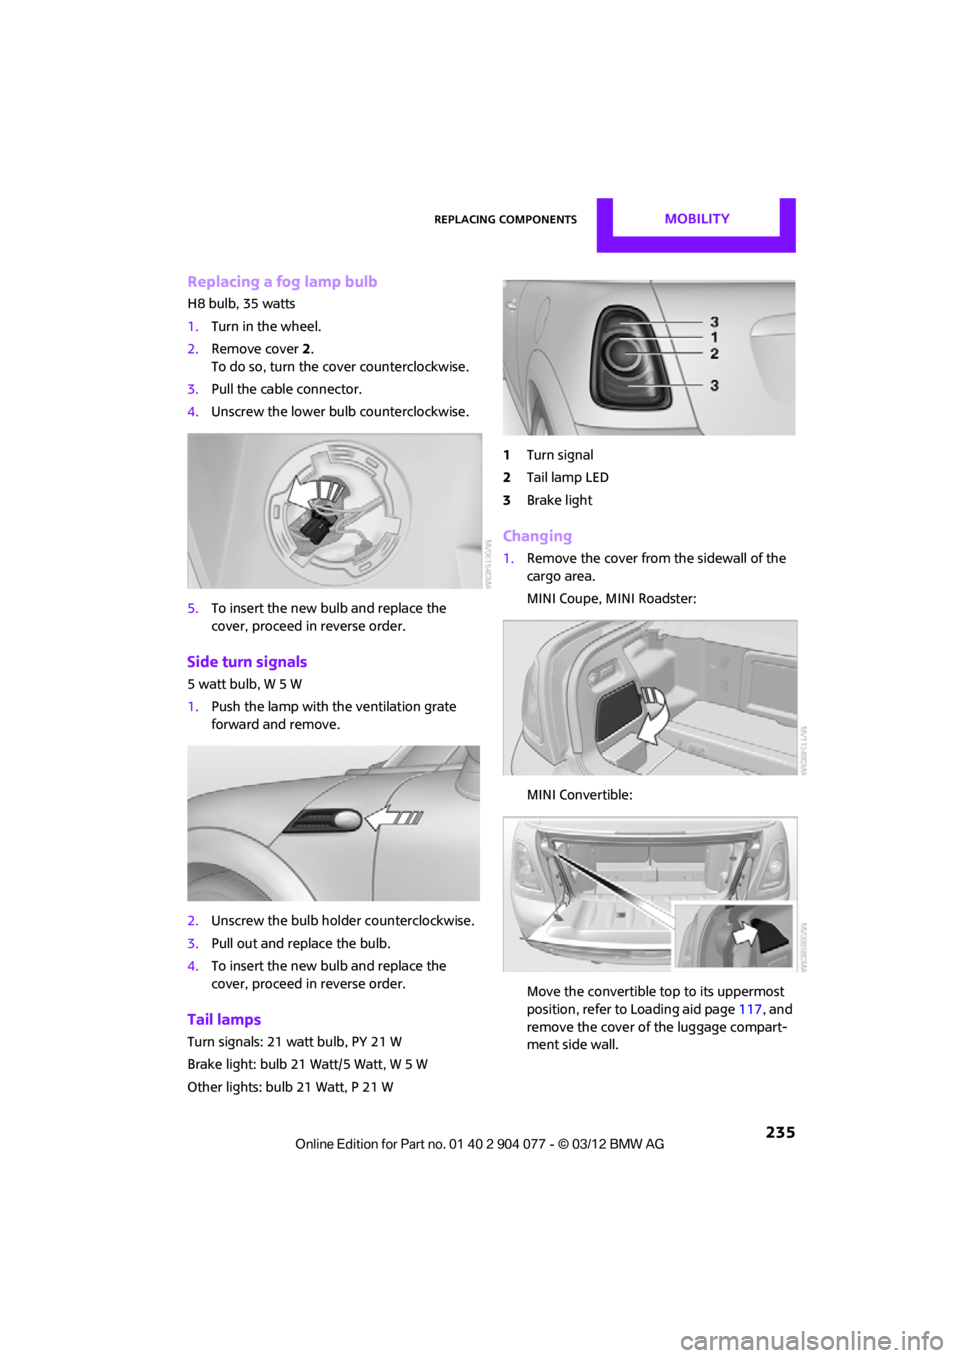
Turn signal
2 Tail lamp LED
3 Brake light
Changing
1.Remove the cover from the sidewall of the
cargo area.
MINI Coupe, MINI Roadster:
MINI Convertible:
Move the convertible top to its uppermost
position, refer to Loading aid page 117, and
remove the cover of the luggage compart-
ment side wall.
00320051004F004C00510048000300280047004C0057004C005200510003
Page 237 of 283
MOBILITYReplacing components
236
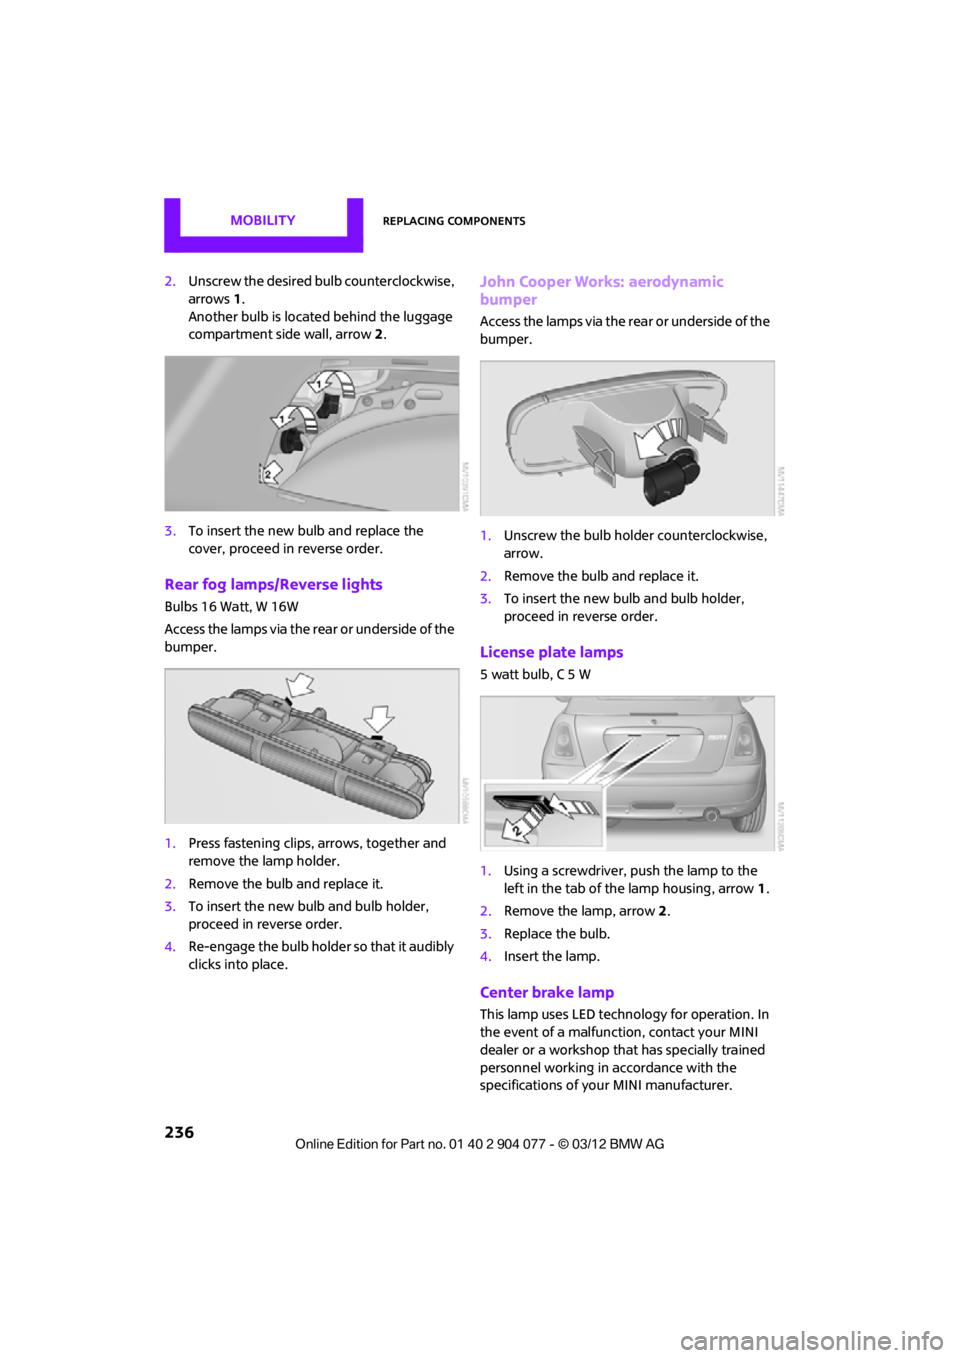
2.Unscrew the desired bulb counterclockwise,
arrows 1.
Another bulb is located behind the luggage
compartment side wall, arrow 2.
3. To insert the new bulb and replace the
cover, proceed in reverse order.
Rear fog lamps/Reverse lights
Bulbs 16 Watt, W 16W
Access the lamps via the rear or underside of the
bumper.
1.Press fastening clips, arrows, together and
remove the lamp holder.
2. Remove the bulb and replace it.
3. To insert the new bulb and bulb holder,
proceed in reverse order.
4. Re-engage the bulb holder so that it audibly
clicks into place.
John Cooper Works: aerodynamic
bumper
Access the lamps via the rear or underside of the
bumper.
1.Unscrew the bulb holder counterclockwise,
arrow.
2. Remove the bulb and replace it.
3. To insert the new bulb and bulb holder,
proceed in reverse order.
License plate lamps
5 watt bulb, C 5 W
1.Using a screwdriver, push the lamp to the
left in the tab of the lamp housing, arrow 1.
2. Remove the lamp, arrow 2 .
3. Replace the bulb.
4. Insert the lamp.
Center brake lamp
This lamp uses LED technology for operation. In
the event of a malfunction, contact your MINI
dealer or a workshop that has specially trained
personnel working in accordance with the
specifications of your MINI manufacturer.
00320051004F004C00510048000300280047004C0057004C005200510003
Page 271 of 283

REFERENCEEverything from A to Z
270
Carpets, care230
Car phone
– installation location, refer to Center armrest 108
– refer to Telephone 108
Car phone, refer to Telephone 170,180
Car radio, refer to Radio 149
Car wash, care 227
Car washes 227
Catalytic conver ter, refer to
Hot exhaust system 115
CD, audio playback 157
CD player 157
– controls 146
– fast forward/reverse 158
– random order 158
– selecting a track 157
– switching on/off 146
– tone control 147
– volume 147
Center armrest 108
Center brake lamp 236
Center console, refer to Around the center
console 14
Central locking system 29
– Comfort Access 36
– from inside 32
– from outside 29
Changing bulbs 232
Changing the language on the Control Display 80
Changing the measurement units on the Control
Display 74
Changing wheels 239
Charging the battery 241
Chassis number, refer to
Engine compartment 221
Check Control 77
Child restraint fixing system
LATCH 57
Child restraint systems 56
Child seats 56 Chrome parts, care
229
Chrome parts, refer to Care 227
Cigarette lighter 109
Cleaning headlamps 67
– washer fluid 67
Clock
– setting time 76
– 12 h/24 h mode 76
Closing
– from inside 32
– from outside 29
Cl ot
hes hooks 108
Cockpit 10
Cold start, refer to Starting the engine 61
Comfort Access 36
– replacing the battery 38
– what to observe before
entering a car wash 37
Comfort area, refer to Around the center console 14
Compartment for remote control, refer to Ignition
lock 60
Computer 71
– displays on Control Display 73
Condensation, refer to When the vehicle is parked 116
Condition Based Service CBS 225
Configuring settings, refer to
Personal Profile 28
Connecting vacuum cleaner, refer to Connecting electrical
appliances 110
Consumption, refer to Average fuel consumption 72
Contact editing 178
Contacts 177,194
– new contact 195
Continuing route guidance 135
Control Display
– settings 73 Control Display, refer to iDrive
– switching on/off
17
Control Display, refer to Onboard computer 17
Controls and displays 10
Control stick, refer to Onboard computer 17
Control unit, refer to Onboard computer 17
Convenience operation
– convertible top 32
– windows 30
Convenient access, refer to
Comfort Access 36
Convenient star t, refer to
Starting the engine 61
Convertible top 39
– manual 44
– mechanical 44
Coolant 224
– checking level 224
– filling 224
Coolant temperature 224
Cooling, maximum 104
Cooling fluid, refer to
Coolant 224
Copyright 2
Corneri n
g li
ght, refer to
Adaptive Light Control 97
Criteria for route 135
Cruise control
– indicator lamp 13
Cruising range 71
Cupholders 109
Curb weight, refer to Weights 257
Current fuel consumption 72
Current playback
– external devices 162
D
Dashboard, refer to Cockpit 10
Dashboard instruments, refer to Displays 12
Dashboard lighting, refer to Instrument lighting 99
00320051004F004C00510048000300280047004C0057004C005200510003
Page 273 of 283

REFERENCEEverything from A to Z
272
Emergency services, refer to Roadside Assistance 243
Emergency unlocking 34
Ending a call 174,186
Engine
– breaking in 114
– data 250
– overheated, refer to Coolant temperature 224
– speed 250
– starting, Comfort Access 36
Engine compartment 221
Engine coolant, refer to
Coolant 224
Engine malfunction
– indicator lamp 13
Engine oil
– additives, refer to Approved engine oils 223
– alternative oil types 223
– approved engine oils 223
– capacity 223
– checking level 222
– dipstick 222
– intervals between changes,
refer to Service
requirements 75
– MINI Maintenance
System 225
Engine oil level, checking 222
Engine output, refer to Engine data 250
Engine starti ng, refer to
Starting the engine 61
Entering destination 126
Entering intersection 127
Entertainment sound output on/off 146
Entry map for destination 131
ESP Electronic Stability Program, refer to Dynamic
Stability Control DSC 83
Exhaust system, refer to Hot exhaust system 115 Exterior mirrors
54
– adjusting 54
– automatic heating 54
– folding in and out 54
External audio device 108
External audio de vice, refer to
AUX-In connection 159
External care 227
External devices
– random play sequence 162
– software update 166
External temperature display
– change units of measure 74
– in the onboard computer 74
Eyes
– for tow-starting and towing
away 245
– for tying down loads 119
F
Failure messages, refer to
Check Control 77
Failure of an electrical consumer 242
Fastening safety belts, refer to Safety belts 53
Fastest route for
navigation 135
Fast forward
– CD player 158
Fault messages, refer to Check Control 77
Filter
– microfilter/activated- charcoal filter for automatic
climate control 105
– microfilter for air conditioner 103
Fine wood, care 230
First aid pouch 243
Fixture for remote control,
refer to Ignition lock 60
Flash when locking/ unlocking 30 Flat tire
– run-flat tires
218
– Tire Pressure Monitor TPM 89
Flat Tire Monitor FTM 87
– indicating a flat tire 88
– initializing the system 87
– snow chains 87
– system limits 87
Flat tires, refer to Tire condition 217
Floor mats, care 230
FM, waveband 149
Fog lamps
– replacing bulb 234,236
Folding roof, refer to Convertible top with
integrated sliding sunroof 39
Footbrake, refer to Braking safely 115
Footwell lamps 99
For your own safety 5
Front airbags 93
Front fog lamps 98,99
– replacing bulb 234
Front seat adjustment 51
Frost on windows, refer to Defrosting
windows 103,105
FTM, refer to Flat Tire Monitor 87
Fuel 207
– gauge 70
– high-quality brands 207
– quality 207
– specifications 207
– tank
capaci
ty 259
Fuel clock, refer to Fuel gauge 70
Fuel consumption display
– average fuel consumption 72
Fuel display, refer to Fuel gauge 70
Fuel filler flap 206
– releasing in the event of electrical malfunction 206
Fuses 242
00320051004F004C00510048000300280047004C0057004C005200510003
Page 278 of 283

Everything from A to ZREFERENCE
277
Reserve warning, refer to Fuel gauge 70
Reservoir for washer systems 67
Reset, refer to Resetting tone settings 148
Restraint systems
– for children 56
– refer to Safety belts 53
Reverse
– CD player 158
Reverse gear
– automatic transmission with
Steptronic 63
– manual transmission 62
Road map 137
Roadside Assistance 243
Roadside parking lamps 98
– replacing bulb 234
Road worthiness test, refer to Service requirements 75
Roof load capacity 257
Rope, refer to Tow-starting, towing away 246
Route 135,136
– bypassing sections 136
– changing 135,136
– changing criteria 135
– displaying arrow view 136
– displaying map view 137
– displaying streets or towns/ cities 136
– selecting 135
Route guidance 135
– bypassing a route section 136
– changing specified route 135
– distance and arrival 135
– voice instructions 139
– volume of voice instructions 139
Route section, changing 136
Route selection 135
RSC Run-flat System Component, refer to Run-flat
tires 218 Rubber parts, care
229
Run-flat System Component RSC, refer to Run-flat
tires 218
Run-flat tires 218
– flat tire 88
– tire inflation pressure 209
– tire replacement 219
– winter tires 220
S
Safety belt
– number50
Safety Belt Reminder 54
Safety belts 53
– damage 54
– indicator lamp 54
– reminder 54
– sitting safely 50
Safety belts, care 230
Safety systems
– airbags 93
– Antilock Brake System ABS 83
– Dynamic Stability Control DSC 83
– safety belts 53
Safety tires, refer to Run-flat tires 218
Satellite radio 151
– channel, activating or deactivating 152
– channel, selecting 152
– channel, storing 153
– favorites 154
– time shift 153
– Traffic Jump 155
Screen, refer to Onboard
computer controls 17
Screw thread for tow fitting 245
SDARS, refer to Satellite radio 151
Seat adjustment
– mechanical 51 Seats
51
– adjusting the seats 51
– heating 53
– sitting safely 50
Securing the vehicle
– from inside 32
– from outside 29
Selecting navigation system 124
Selecting new scale for
navigation 138
Selector lever
– automatic transmission with
Steptronic 63
Selector lever lock
– automatic transmission with
Steptronic, refer to
Shiftlock 63
– overriding manually 64
Selector lever positions
– automatic transmission with Steptronic 63
Service, refer to Roadside Assistance 243
Service car, refer to Roadside
Assistance 243
Service data in the remote control 225
Service Interval Display, refer to Condition Based Service
CBS 225
Service requ irem
ent
display,
refer to Condition Based
Service CBS 225
Service requirements 75
Settings
– clock, 12 h/24 h mode 76
– date format 77
Setting time and date 77
Setting time zone, time, and date 77
Shifting gears
– automatic transmission with Steptronic 64
– manual transmission 62
00320051004F004C00510048000300280047004C0057004C005200510003