2012 MINI COUPE ROADSTER CONVERTIBLE display
[x] Cancel search: displayPage 227 of 283
MOBILITYMaintenance
226
Socket for On-Board
Diagnosis OBD
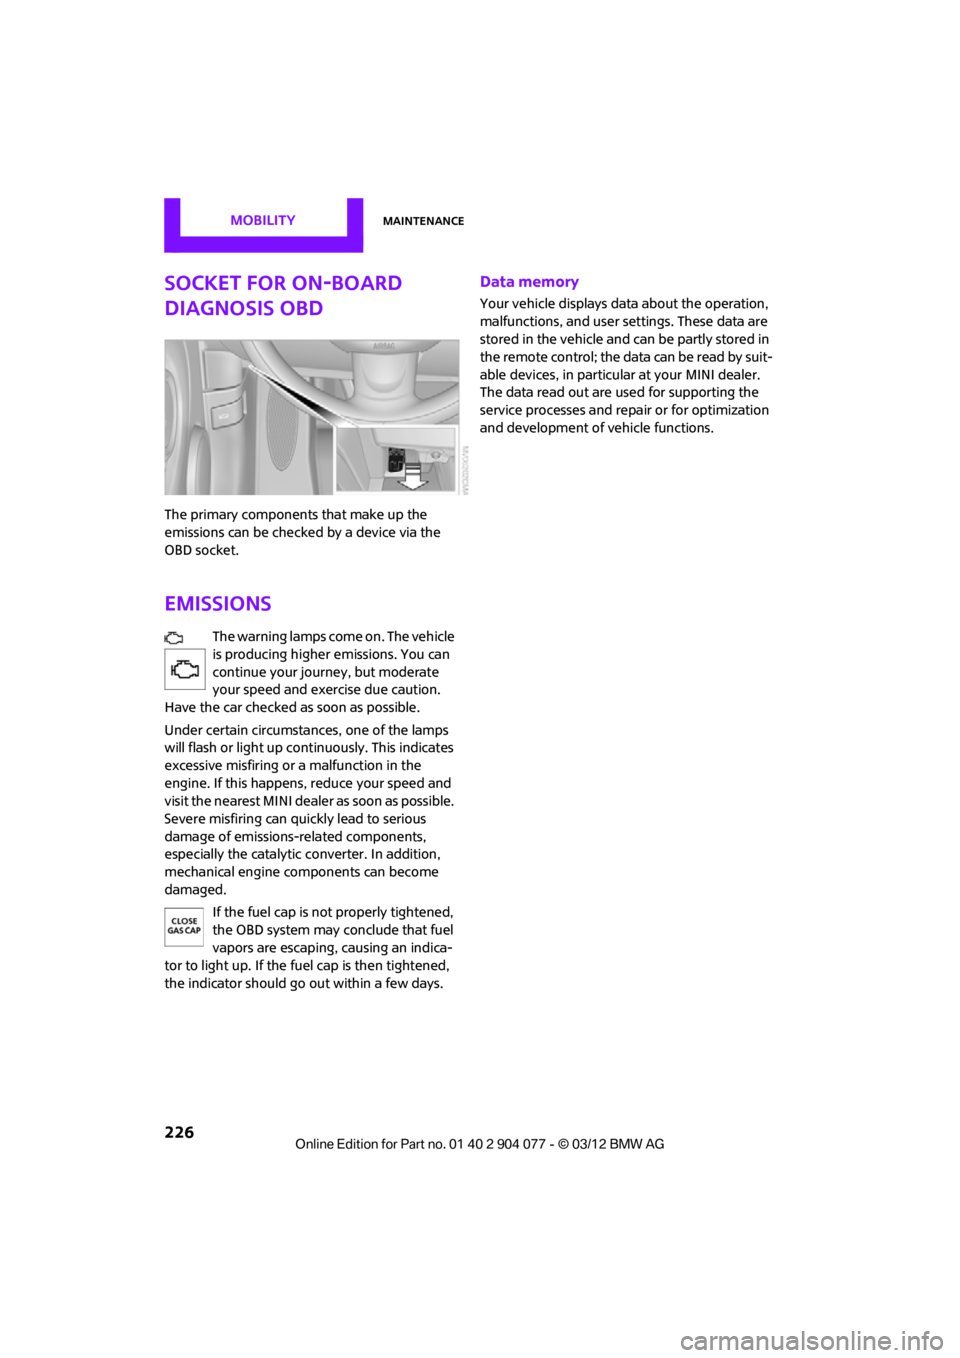
The primary components that make up the
emissions can be checked by a device via the
OBD socket.
Emissions
The warning lamps come on. The vehicle
is producing higher emissions. You can
continue your journey, but moderate
your speed and exercise due caution.
Have the car checked as soon as possible.
Under certain circumstances, one of the lamps
will flash or light up cont inuously. This indicates
excessive misfiring or a malfunction in the
engine. If this happens, reduce your speed and
visit the nearest MINI dealer as soon as possible.
Severe misfiring can quickly lead to serious
damage of emissions-related components,
especially the catalytic converter. In addition,
mechanical engine components can become
damaged.
If the fuel cap is not properly tightened,
the OBD system may conclude that fuel
vapors are escaping, causing an indica-
tor to light up. If the fuel cap is then tightened,
the indicator should go out within a few days.
Data memory
Your vehicle displays data about the operation,
malfunctions, and user settings. These data are
stored in the vehicle and can be partly stored in
the remote control; the data can be read by suit-
able devices, in particul ar at your MINI dealer.
The data read out are used for supporting the
service processes and repair or for optimization
and development of vehicle functions.
00320051004F004C00510048000300280047004C0057004C005200510003
Page 231 of 283
MOBILITYCare
230
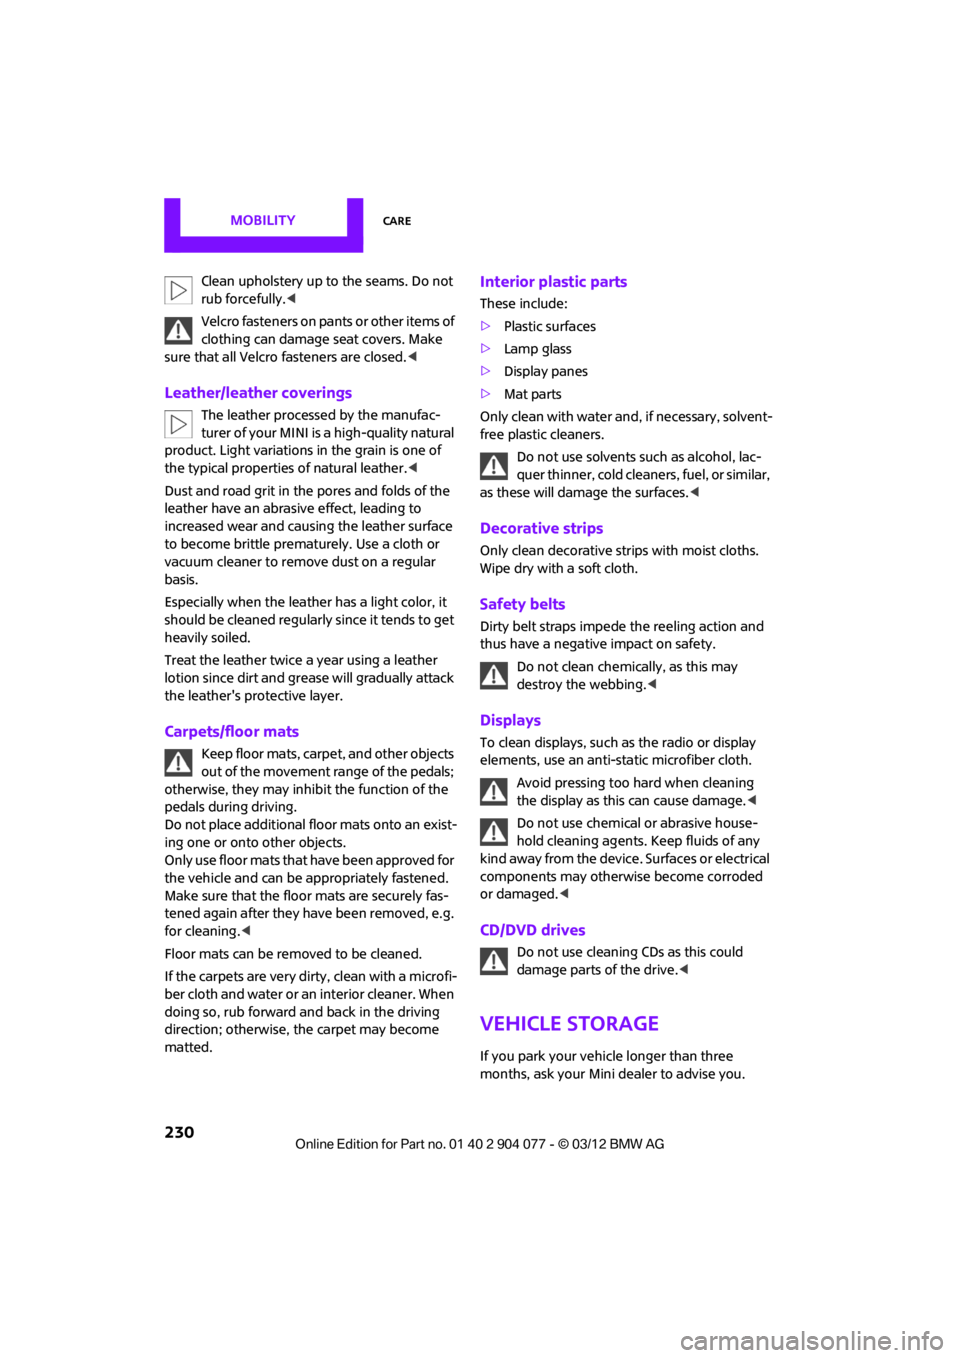
Clean upholstery up to the seams. Do not
rub forcefully.<
Velcro fasteners on pa nts or other items of
clothing can damage seat covers. Make
sure that all Velcro fasteners are closed. <
Leather/leather coverings
The leather processed by the manufac-
turer of your MINI is a high-quality natural
product. Light variations in the grain is one of
the typical properties of natural leather. <
Dust and road grit in th e pores and folds of the
leather have an abrasive effect, leading to
increased wear and causing the leather surface
to become brittle prematurely. Use a cloth or
vacuum cleaner to remo ve dust on a regular
basis.
Especially when the leather has a light color, it
should be cleaned regularl y since it tends to get
heavily soiled.
Treat the leather twice a year using a leather
lotion since dirt and grease will gradually attack
the leather's protective layer.
Carpets/floor mats
Keep floor mats, carpet, and other objects
out of the movement range of the pedals;
otherwise, they may inhibit the function of the
pedals during driving.
Do not place additional floor mats onto an exist-
ing one or onto other objects.
Only use floor mats that have been approved for
the vehicle and can be appropriately fastened.
Make sure that the floo r mats are securely fas-
tened again after they ha ve been removed, e.g.
for cleaning. <
Floor mats can be removed to be cleaned.
If the carpets are very di rty, clean with a microfi-
ber cloth and water or an interior cleaner. When
doing so, rub forward and back in the driving
direction; otherwise, the carpet may become
matted.
Interior plastic parts
These include:
> Plastic surfaces
> Lamp glass
> Display panes
> Mat parts
Only clean with water and, if necessary, solvent-
free plastic cleaners. Do not use solvents such as alcohol, lac-
quer thinner, cold clea ners, fuel, or similar,
as these will damage the surfaces. <
Decorative strips
Only clean decorative strips with moist cloths.
Wipe dry with a soft cloth.
Safety belts
Dirty belt straps impede the reeling action and
thus have a negative impact on safety.
Do not clean chemically, as this may
destroy the webbing. <
Displays
To clean displays, such as the radio or display
elements, use an anti-static microfiber cloth.
Avoid pressing too hard when cleaning
the display as this can cause damage. <
Do not use chemical or abrasive house-
hold cleaning agents. Keep fluids of any
kind away from the device. Surfaces or electrical
components may otherwise become corroded
or damaged. <
CD/DVD drives
Do not use cleaning CDs as this could
damage parts of the drive. <
Vehicle storage
If you park your vehicle longer than three
months, ask your Mini dealer to advise you.
00320051004F004C00510048000300280047004C0057004C005200510003
Page 234 of 283
Replacing componentsMOBILITY
233
Light-emitting diodes LEDs
Light-emitting diodes installed behind translu-
cent lenses serve as the light sources for many of
the controls and displays in your vehicle. These
light-emitting diodes are related to conven-
tional laser diodes, and legislation defines them
as Class 1 light-emitting diodes.
Do not remove the covers or expose the
eyes directly to the unfiltered light source
for several hours; otherw ise, this could cause
irritation of the retina. <
Headlamp glass lens
In cool or humid weather, condensation may
occur on the interiors of the headlamps. The
condensation disappears a short time after the
light is switched on. The headlamps do not need
to be changed.
Do not remove the condensation from head-
lamps, despite driving with lights on, and if
condensation increases, e.g., because of water
droplets, have this checked by your MINI dealer.
Xenon lamps
The service life of these bulbs is very long and
the probability of failure very low, provided that
they are not switched on and off an excessive
number of times. If a xenon lamp fails neverthe-
less, switch on the fog lamps and continue the
journey with great care, provided that local leg-
islation does not prohibit this.
Work on the xenon lighting system,
including lamp replacem ent, is only to be
carried out only by your MINI dealer. Due to high
voltage, there is a risk of fatal injury if work on
the xenon lamps is carried out improperly. <
Halogen low beams and high beams
H13 bulb, 60/5 watts
The H13 bulb is pressurized. Therefore,
wear safety glasses an d protective gloves.
Otherwise, there is a risk of injury if the bulb is
damaged. < Be careful when inst
alling the cover;
otherwise, leaks could occur and cause
damage to the headlamp system. <
Accessing the lamp from the engine
compartment
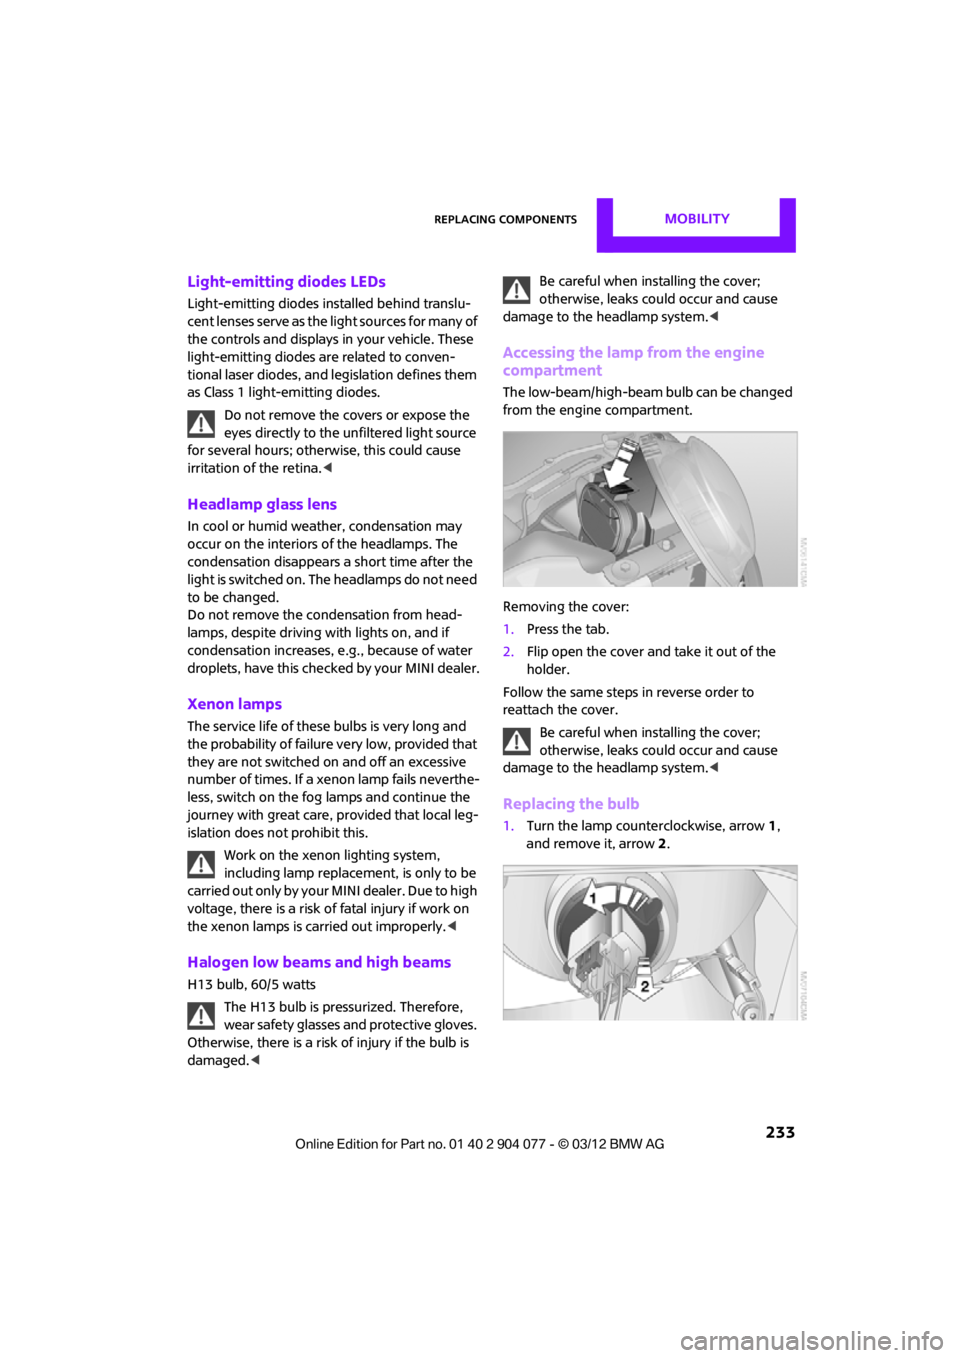
The low-beam/high-beam bulb can be changed
from the engine compartment.
Removing the cover:
1.Press the tab.
2. Flip open the cover and take it out of the
holder.
Follow the same steps in reverse order to
reattach the cover.
Be careful when inst alling the cover;
otherwise, leaks could occur and cause
damage to the headlamp system. <
Replacing the bulb
1.Turn the lamp counterclockwise, arrow 1,
and remove it, arrow 2.
00320051004F004C00510048000300280047004C0057004C005200510003
Page 243 of 283

MOBILITYReplacing components
242
Starting-aid terminals
Only charge the battery in the vehicle when the
engine is off. Connections, refer to Jump-start-
ing on page 243.
Charger
The use of a charger ensures that the battery has
a sufficient charge even when it is used for fre-
quent short-distance driv es, for example. Charg-
ers that have been developed especially for the
vehicle and adapted to the vehicle electrical
system are available at your MINI dealer.
Disposal
After replacing old batteries, return the
used batteries to your MINI dealer or to a
recycling center. Maintain the battery in an
upright position for transport and storage.
Always secure the battery against tipping over
during transport. <
Power failure
After a temporary power loss, some equipment
may not be fully functional and may require
initialization. Individual se ttings are also lost and
must be reprogrammed:
> Time and date
These values must be updated, page 76.
> Onboard monitor
Operability must be waited for, page124.
Indicator and warning lamps
Lights up in red:
Battery is no longer being charged.
Alternator malfunction.
Switch off all unnecessary electrical consumers.
Have the battery checked without delay. Lights up in yellow:
Battery charge level very low, battery
aged, or battery not securely con-
nected.
Charge it by taking a long er drive or by using an
external charger. If the display appears again,
have the battery checked as soon as possible.
Fuses
Do not attempt to repair a blown fuse or
replace it with a fuse of a different color or
Ampere rating. To do this could cause a fire in
the vehicle resulting from a circuit overload.
Have fuses replaced by your MINI dealer. <
A fuse assignment diag ram is located on the
inside of the fuse box cover panels.
In the engine compartment
Opening the cover
Press the latch.
In the vehicle interior
On the right side of the footwell.
Opening the cover
Press out at the recess.
00320051004F004C00510048000300280047004C0057004C005200510003
Page 261 of 283
REFERENCEShort commands for the voice activation system
260
Short commands for the voice
activation system
Vehicle equipment
In this chapter, all production, country, and
optional equipment that is offered in the model
range is described. Equipment is also described
that is not available because of, for example,
selected options or coun try version. This also
applies to safety relate d functions and systems.
General information
Instructions for the voice activation system, refer
to page23.
Having the possible sp oken commands read
aloud: {Voice commands }
The following short commands apply to vehicles
with voice activation sy stem. They do not work
for equipment with which only the mobile
phone can be operated by voice.
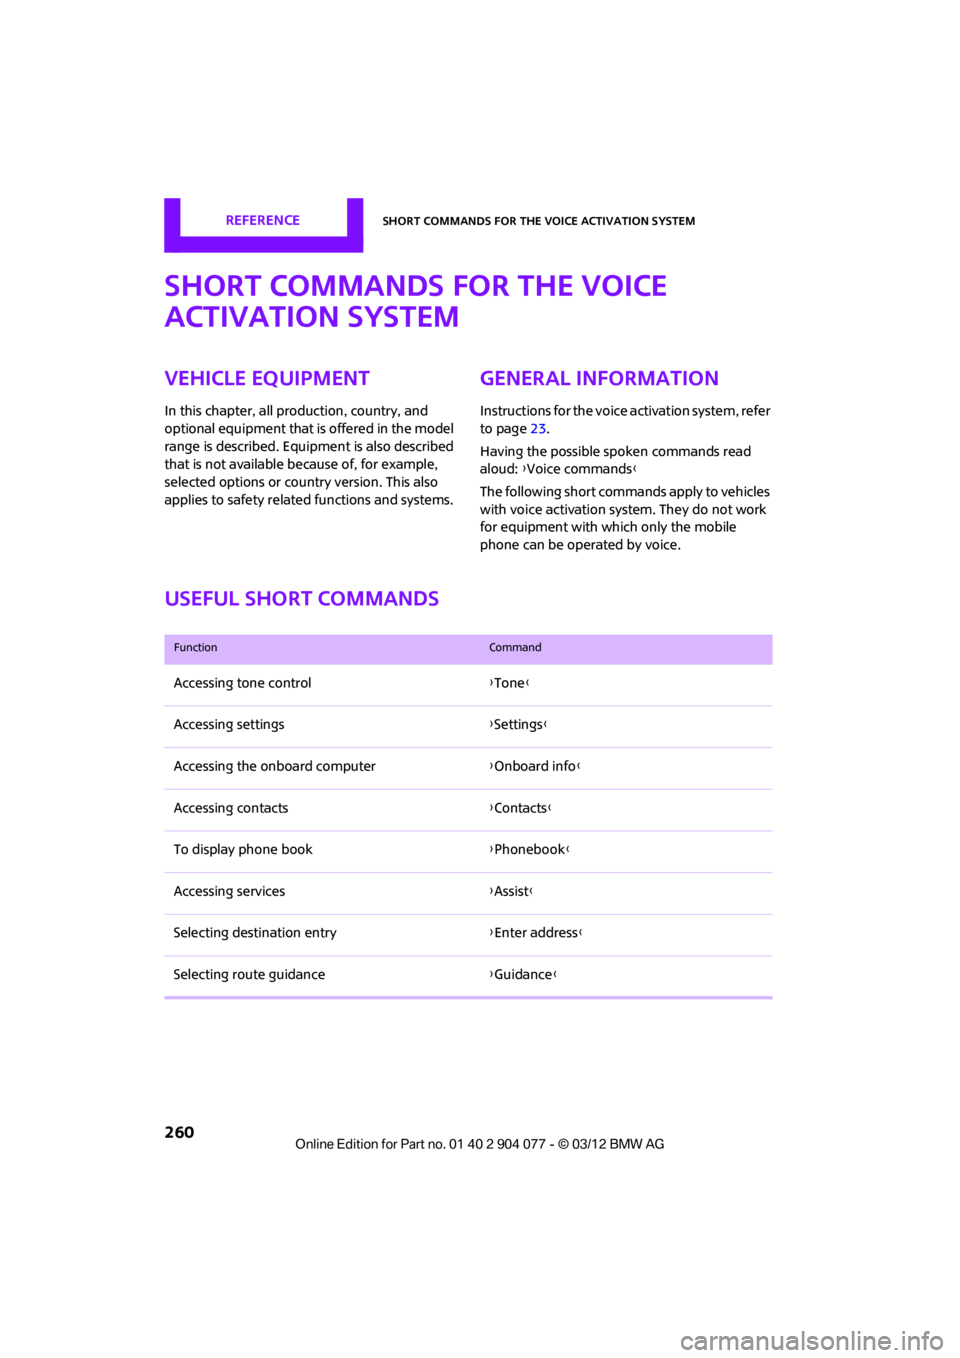
Useful short commands
FunctionCommand
Accessing tone control {Tone }
Accessing settings {Settings }
Accessing the onboard computer {Onboard info }
Accessing contacts {Contacts }
To display phone book {Phonebook }
Accessing services {Assist }
Selecting destination entry {Enter address}
Selecting route guidance {Guidance }
00320051004F004C00510048000300280047004C0057004C005200510003
Page 262 of 283
Short commands for the voice activation systemREFERENCE
261
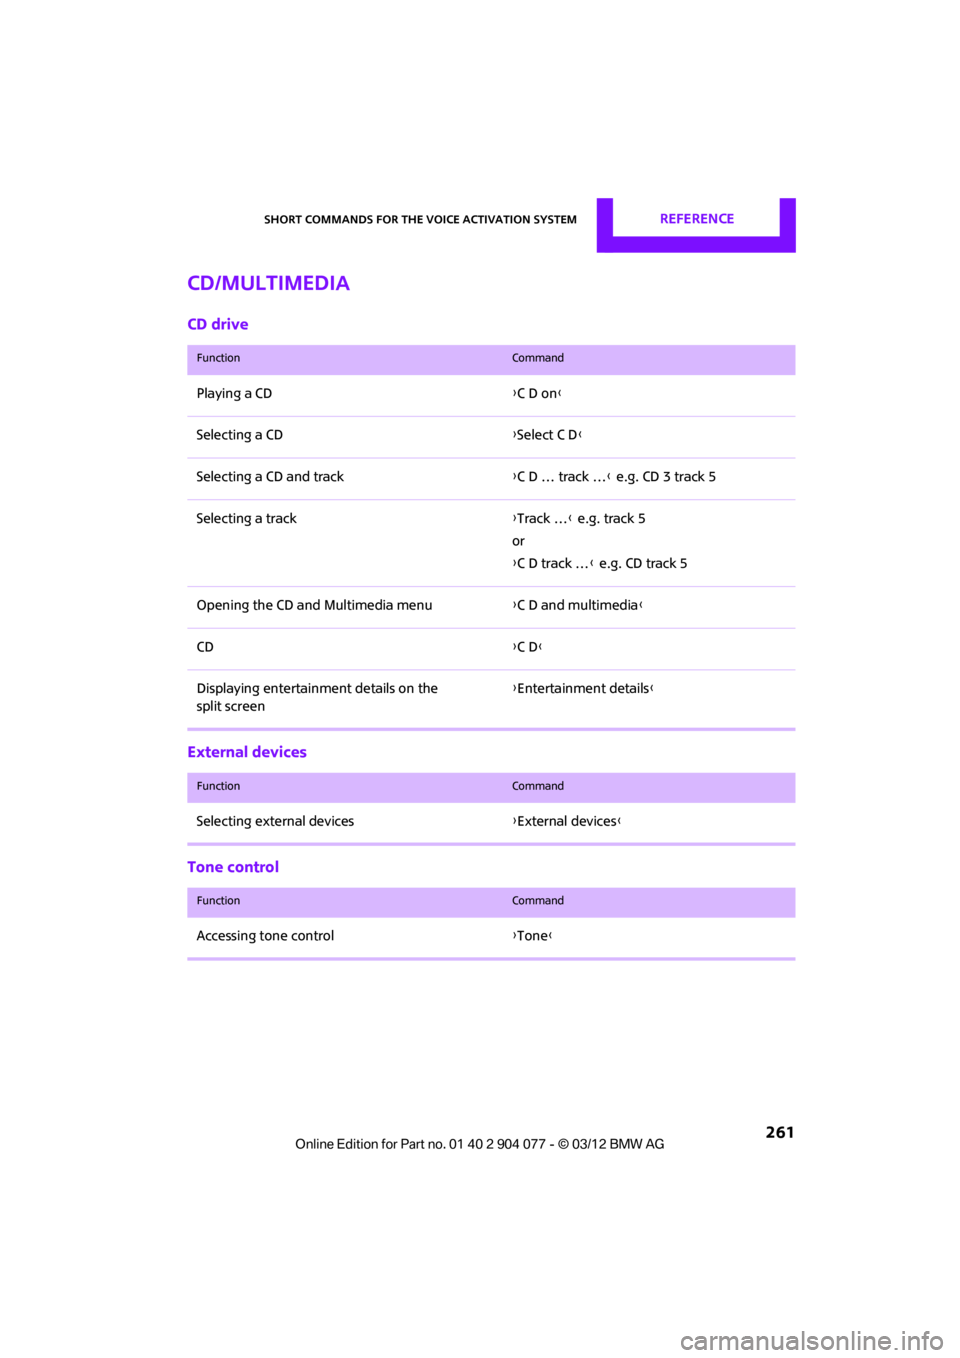
CD/Multimedia
CD drive
External devices
Tone control
FunctionCommand
Playing a CD{C D on}
Selecting a CD {Select C D }
Selecting a CD and track {C D … track … } e.g. CD 3 track 5
Selecting a track {Track … } e.g. track 5
or
{ C D track … } e.g. CD track 5
Opening the CD and Multimedia menu {C D and multimedia }
CD {C D }
Displaying entertainment details on the
split screen {
Entertainment details }
FunctionCommand
Selecting external devices {External devices }
FunctionCommand
Accessing tone control {Tone }
00320051004F004C00510048000300280047004C0057004C005200510003
Page 264 of 283
Short commands for the voice activation systemREFERENCE
263
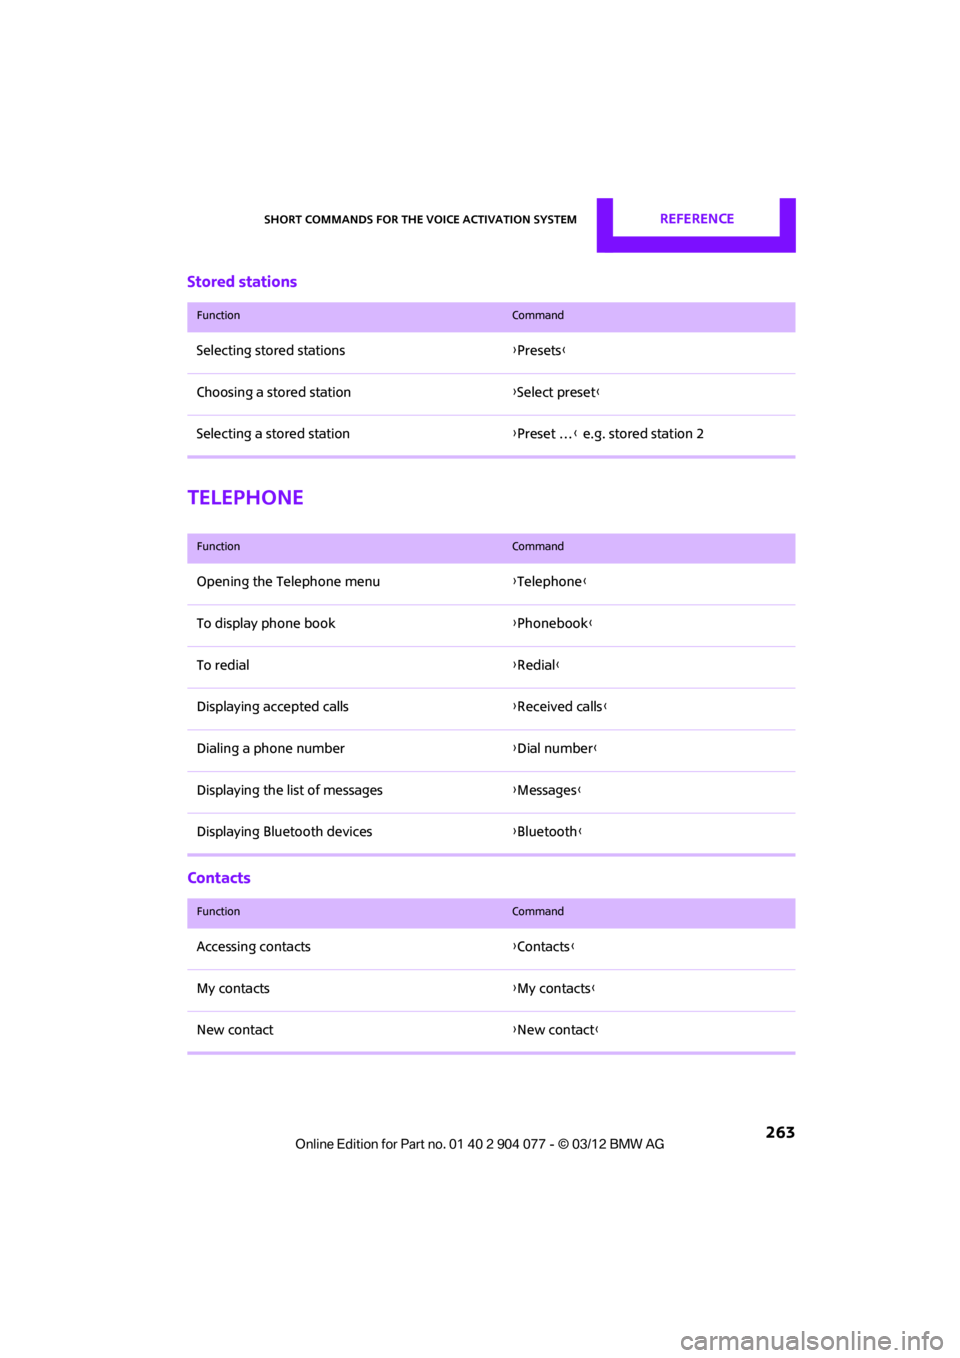
Stored stations
Telephone
Contacts
FunctionCommand
Selecting stored stations{Presets}
Choosing a stored station {Select preset }
Selecting a stored station {Preset … } e.g. stored station 2
FunctionCommand
Opening the Telephone menu {Telephone }
To display phone book {Phonebook }
To redial {Redial }
Displaying accepted calls {Received calls }
Dialing a phone number {Dial number}
Displaying the list of messages {Messages }
Displaying Bluetooth devices {Bluetooth }
FunctionCommand
Accessing contacts {Contacts }
My contacts {My contacts }
New contact {New contact }
00320051004F004C00510048000300280047004C0057004C005200510003
Page 265 of 283
REFERENCEShort commands for the voice activation system
264
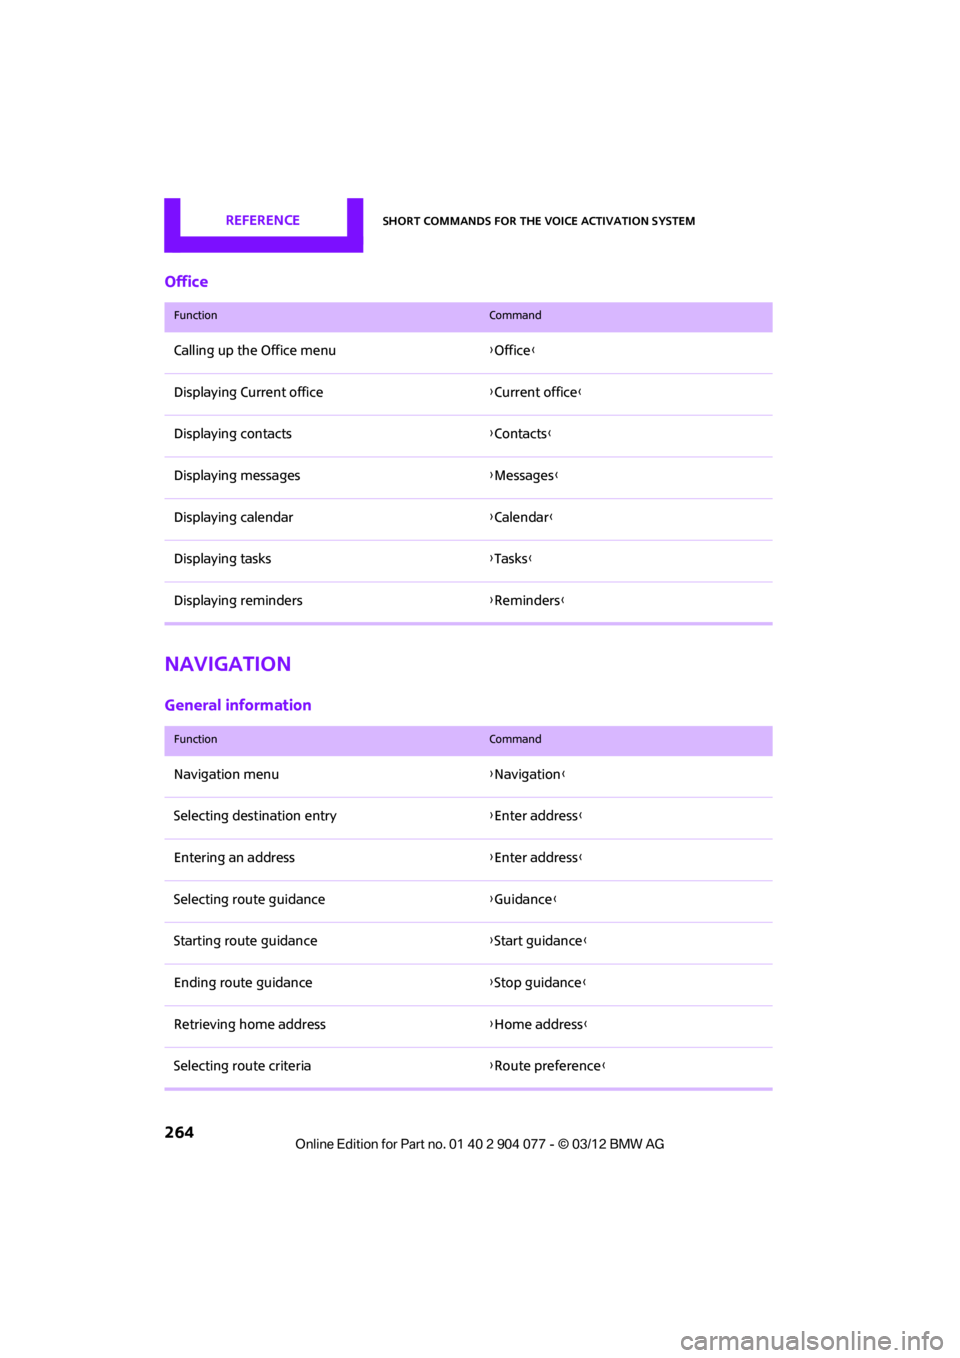
Office
Navigation
General information
FunctionCommand
Calling up the Office menu{Office }
Displaying Current office {Current office }
Displaying contacts {Contacts }
Displaying messages {Messages }
Displaying calendar {Calendar}
Displaying tasks {Tasks }
Displaying reminders {Reminders }
FunctionCommand
Navigation menu {Navigation }
Selecting destination entry {Enter address}
Entering an address {Enter address}
Selecting route guidance {Guidance }
Starting route guidance {Start guidance }
Ending route guidance {Stop guidance }
Retrieving home address {Home address }
Selecting route criteria {Route preference }
00320051004F004C00510048000300280047004C0057004C005200510003