2012 MERCEDES-BENZ SLS AMG COUPE trunk release
[x] Cancel search: trunk releasePage 10 of 288

Emergency releaseDriver's door .................................... 71
Trunk ............................................... 75
Vehicle ............................................. 71
Emergency Tensioning Devices
Function ........................................... 50
Safety guidelines ............................. 37
Emissions control
Service and warranty information ....18
Engine
Display message ............................ 176
Engine number ............................... 278
Irregular running ............................ 118
Starting .......................................... 116
Starting problems ..........................118
Starting the engine with the key ....116
Starting with the KEYLESS-GO
start function ................................. 116
Switching off .................................. 130
Engine diagnostics warning lamp .... 194
Engine electronics Problem (malfunction) ...................118
Engine oil
Adding ........................................... 220
Additives ........................................ 282
Checking the oil level ..................... 219
Display
message ................................ 178, 179
Filling capacity ............................... 280
Notes about oil grades ................... 282
Notes on oil level/consumption ....219
Temperature (on-board computer) . 160
Temperature gauge ........................ 148
Viscosity ........................................ 282
E-SELECT lever ................................... 119
ESP ®
(Electronic Stability
Program) Deactivating/activating ...................57
Display message ............................ 170
Function/notes ................................ 56
Important safety information ...........56
Warning lamp ................................. 192
ETS (Electronic Traction System) ....... 56
Exhaust check ................................... 133
Exhaust tail pipe (cleaning
instructions) ...................................... 228Exterior lighting
see Lights
Exterior mirrors
Adjusting ......................................... 89
Dipping (automatic) .........................90
Folding in/out (automatically) .........90
Folding in/out (electrically) .............90
Folding in when locking (on-board
computer) ...................................... 160
Out of position (troubleshooting) .....90
Setting ............................................. 90
Storing settings (memory
function) .......................................... 91
Storing the parking position ............. 91
F
Filler cap see Fuel filler flap
First-aid kit ......................................... 232
Flat tire Changing a wheel/mounting the
spare wheel ................................... 236
Preparing the vehicle .....................233
Raising the vehicle .........................237
TIREFIT kit ...................................... 233
Floormat ............................................. 216
Front windshield see Windshield
Fuel
Additives ........................................ 281
Consumption statistics ..................152
Displaying the range ......................152
Driving tips .................................... 132
Fuel gauge ....................................... 27
Important safety notes ..................280
Premium-grade unleaded gasoline . 281
Problem (malfunction) ...................129
Refueling ........................................ 127
Specifications ................................ 281
Tank content/reserve fuel .............280
Fuel filler flap, opening/closing ....... 127
Fuel filter (display message) ............ 180
Fuel level Calling up the range (on-board
computer) ...................................... 152
8Index
Page 17 of 288
Display message ............................ 181
Distribution of the vehicle
occupants (definition) ....................271
DOT, Tire Identification Number
(TIN) ............................................... 268
DOT (Department of
Transportation) (definition) ............268
GAWR (Gross Axle Weight Rating)
(definition) ..................................... 269
GVW (Gross Vehicle Weight)
(definition) ..................................... 269
GVWR (Gross Vehicle Weight
Rating) (definition) .........................269
Important safety notes ..................250
Increased vehicle weight due to
optional equipment (definition) ......269
Kilopascal (kPa) (definition) ...........270
Labeling (overview) ........................265
Load bearing index (definition) ......271
Load index ..................................... 267
Load index (definition) ...................270
Maximum loaded vehicle weight
(definition) ..................................... 269
Maximum load on a tire
(definition) ..................................... 270
Maximum permissible tire
pressure (definition) ....................... 270
Maximum tire load .........................263
Maximum tire load (definition) .......270
Optional equipment weight
(definition) ..................................... 271
PSI (pounds per square inch)
(definition) ..................................... 270
Replacing ....................................... 271
Service life ..................................... 251
Sidewall (definition) .......................270
Speed rating (definition) ................269
Storing ........................................... 272
Structure and characteristics
(definition) ..................................... 268
Technical data ............................... 274
Temperature .................................. 264
TIN (Tire Identification Number)
(definition) ..................................... 271
Tire bead (definition) ......................270
Tire pressure (definition) ................270
Tire pressures (recommended) ......269
Tire size (data) ............................... 272Tire size designation, load-bearing
capacity, speed rating .................... 265
Tire tread ....................................... 251
Tire tread (definition) .....................270
Total load limit (definition) .............271
Traction ......................................... 264
Traction (definition) .......................271
Tread wear ..................................... 264
Uniform Tire Quality Grading
Standards ...................................... 263
Uniform Tire Quality Grading
Standards (definition) ....................269
Unladen weight (definition) ............270
Wear indicator (definition) .............271
Wheel rim (definition) ....................269
see Flat tire
Top Tether ............................................ 53
Tow-away alarm .................................. 60
Towing Important safety guidelines ...........244
Installing the towing eye ................245
Removing the towing eye ...............246
With the rear axle raised ................246
Towing away
With both axles on the ground .......246
Transmission
Driving tips .................................... 122
Selector lever ................................ 119
Shift range ..................................... 125
Transmission position display ......... 121
Transmission positions .................... 121
Transporting the vehicle .................. 246
Trim pieces (cleaning instructions) . 229
Trip computer (on-board
computer) .......................................... 152
Trip meter see Trip odometer
Trip odometer
Calling up ....................................... 152
Resetting (on-board computer) ......152
Trunk
Emergency release ..........................75
Important safety guidelines .............73
Locking separately ...........................74
Opening (automatically from
inside) .............................................. 74Index15
Page 66 of 288
Useful information
i This Operator's Manual describes all
models and all standard and optional
equipment of your vehicle available at the
time of publication of the Operator's
Manual. Country-specific differences are
possible. Please note that your vehicle may
not be equipped with all features
described. This also applies to safety-
related systems and functions.
i Please read the information on qualified
specialist workshops ( Y page 21).
SmartKey
Key function
General notes
i USA only:
This device complies with Part 15 of the
FCC Rules. Operation is subject to the
following two conditions:
1. This device may not cause harmful
interference, and
2. this device must accept any interference
received, including interference that may
cause undesired operation.
Any unauthorized modification to this
device could void the user’s authority to
operate the equipment.
The Product label with FCC ID and IC
certification number can be found in the
battery case of the SmartKey.
i Canada only:
This device complies with RSS-210 of
Industry Canada. Operation is subject to
the following two conditions:
1. This device may not cause interference,
and
2. this device must accept any interference
received, including interference that may
cause undesired operation of the device.
Any unauthorized modification to this
device could void the user’s authority to
operate the equipment.
The Product label with FCC ID and IC
certification number can be found in the
battery case of the SmartKey.
Locking and unlocking centrally
The SmartKey centrally locks/unlocks:
R the doors
R the trunk lid
R the fuel filler flap
R the glove box
R the stowage/telephone compartment
under the armrest
GWARNING
If children are left unsupervised in the vehicle,
they could:
R open a door locked from inside the vehicle
R start the vehicle using a key which has been
left in the vehicle
R release the parking brake
They could thereby endanger themselves and
others. Never leave children unsupervised in
the vehicle. Always take the key with you
when leaving the vehicle, even if you are only
leaving it for a short time.
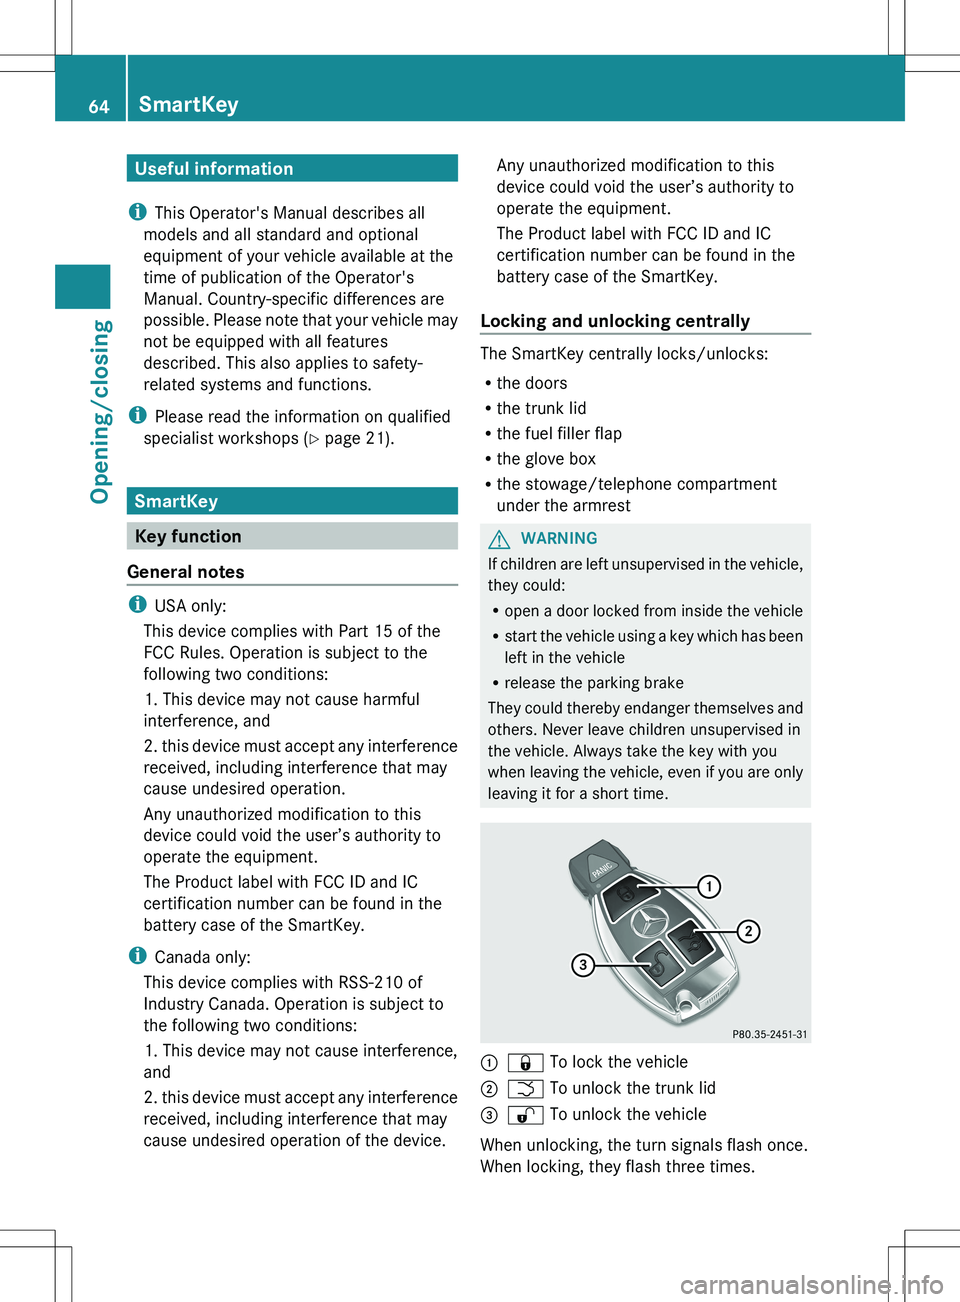
:& To lock the vehicle;F To unlock the trunk lid=% To unlock the vehicle
When unlocking, the turn signals flash once.
When locking, they flash three times.
64SmartKeyOpening/closing
Page 76 of 288
! The trunk lid swings upwards when
opened. Therefore, make sure that there is
sufficient clearance above the trunk lid.
Coupe: to open the trunk lid fully, a minimum
clearance of 5.5 ft (1.68 m) from the ground
is required.
Roadster: to open the trunk lid fully, a
minimum clearance of 5.7 ft (1.75 m) from
the ground is required.
The trunk lid can be:
R opened automatically from outside
R opened automatically from inside
R locked separately
R unlocked with the mechanical key
R opened with the emergency release button
Opening/closing the trunk
Opening and closing from outside the
vehicle
Opening
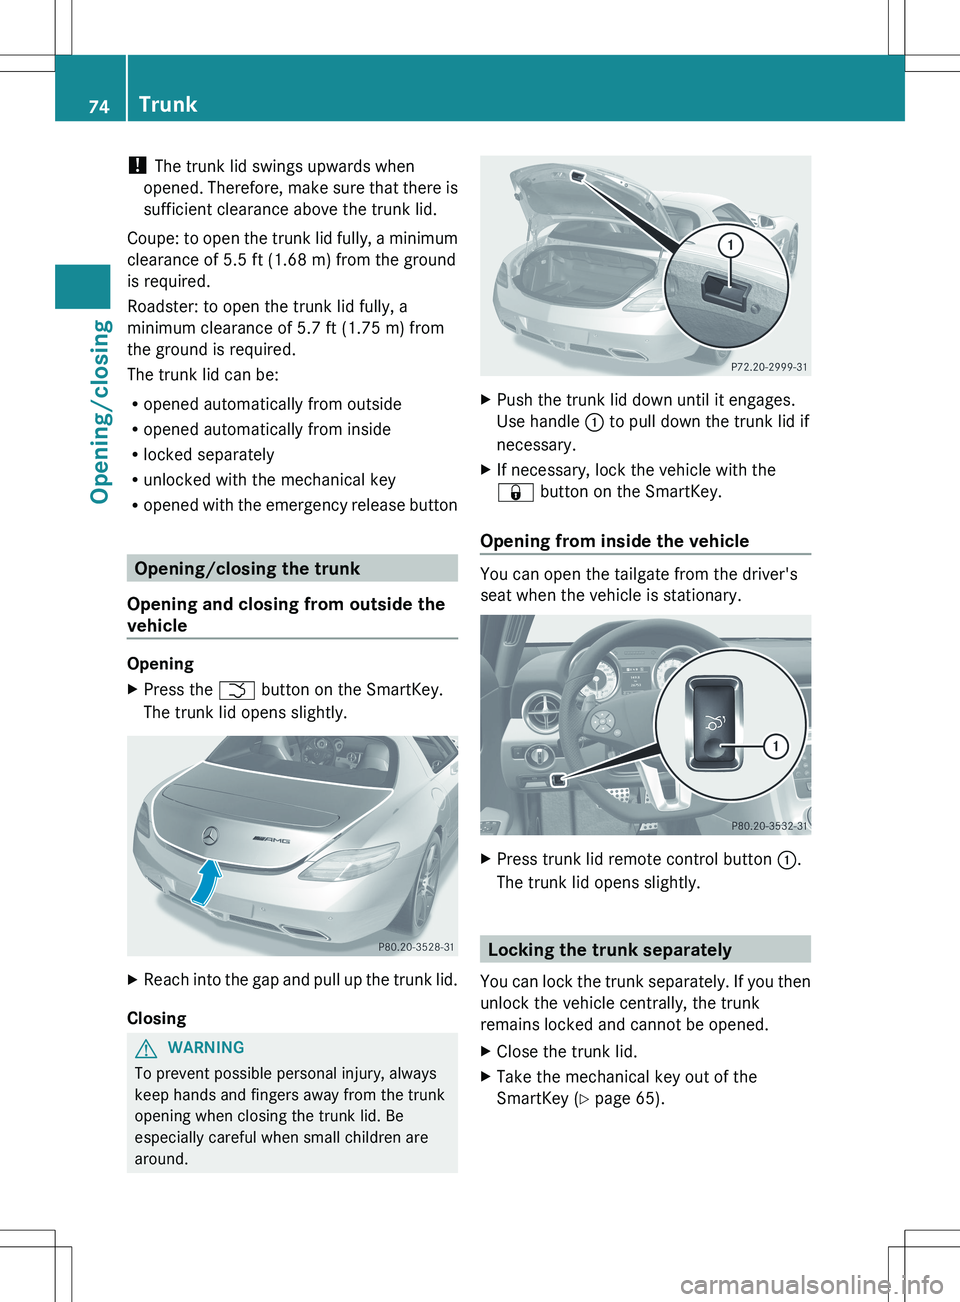
XPress the F button on the SmartKey.
The trunk lid opens slightly.XReach into the gap and pull up the trunk lid.
Closing
GWARNING
To prevent possible personal injury, always
keep hands and fingers away from the trunk
opening when closing the trunk lid. Be
especially careful when small children are
around.
XPush the trunk lid down until it engages.
Use handle : to pull down the trunk lid if
necessary.XIf necessary, lock the vehicle with the
& button on the SmartKey.
Opening from inside the vehicle
You can open the tailgate from the driver's
seat when the vehicle is stationary.
XPress trunk lid remote control button :.
The trunk lid opens slightly.
Locking the trunk separately
You can lock the trunk separately. If you then
unlock the vehicle centrally, the trunk
remains locked and cannot be opened.
XClose the trunk lid.XTake the mechanical key out of the
SmartKey ( Y page 65).74TrunkOpening/closing
Page 77 of 288
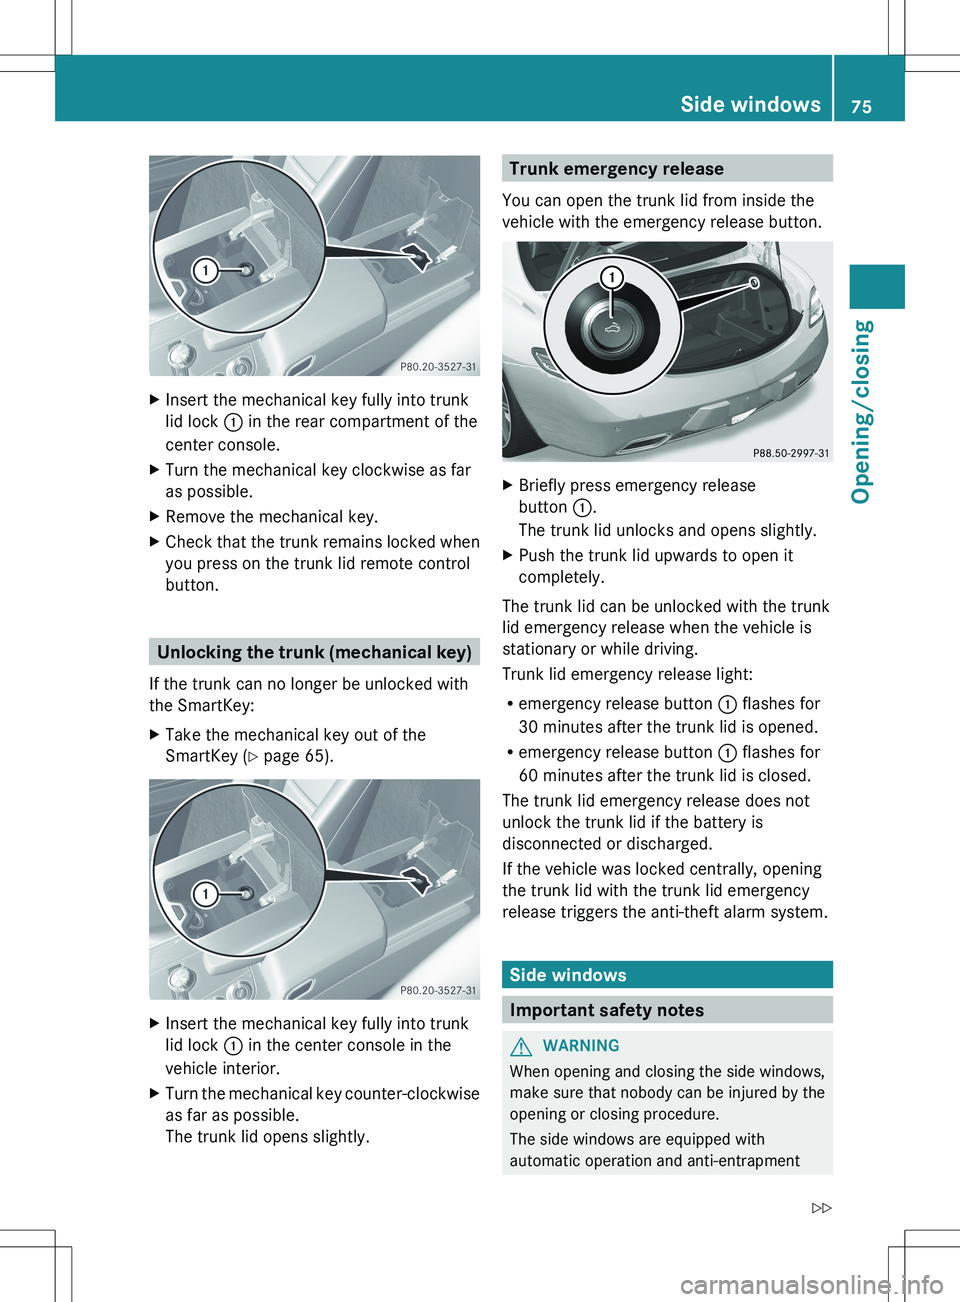
XInsert the mechanical key fully into trunk
lid lock : in the rear compartment of the
center console.XTurn the mechanical key clockwise as far
as possible.XRemove the mechanical key.XCheck that the trunk remains locked when
you press on the trunk lid remote control
button.
Unlocking the trunk (mechanical key)
If the trunk can no longer be unlocked with
the SmartKey:
XTake the mechanical key out of the
SmartKey ( Y page 65).XInsert the mechanical key fully into trunk
lid lock : in the center console in the
vehicle interior.XTurn the mechanical key counter-clockwise
as far as possible.
The trunk lid opens slightly.Trunk emergency release
You can open the trunk lid from inside the
vehicle with the emergency release button.XBriefly press emergency release
button :.
The trunk lid unlocks and opens slightly.XPush the trunk lid upwards to open it
completely.
The trunk lid can be unlocked with the trunk
lid emergency release when the vehicle is
stationary or while driving.
Trunk lid emergency release light:
R emergency release button : flashes for
30 minutes after the trunk lid is opened.
R emergency release button : flashes for
60 minutes after the trunk lid is closed.
The trunk lid emergency release does not
unlock the trunk lid if the battery is
disconnected or discharged.
If the vehicle was locked centrally, opening
the trunk lid with the trunk lid emergency
release triggers the anti-theft alarm system.
Side windows
Important safety notes
GWARNING
When opening and closing the side windows,
make sure that nobody can be injured by the
opening or closing procedure.
The side windows are equipped with
automatic operation and anti-entrapment
Side windows75Opening/closingZ
Page 133 of 288
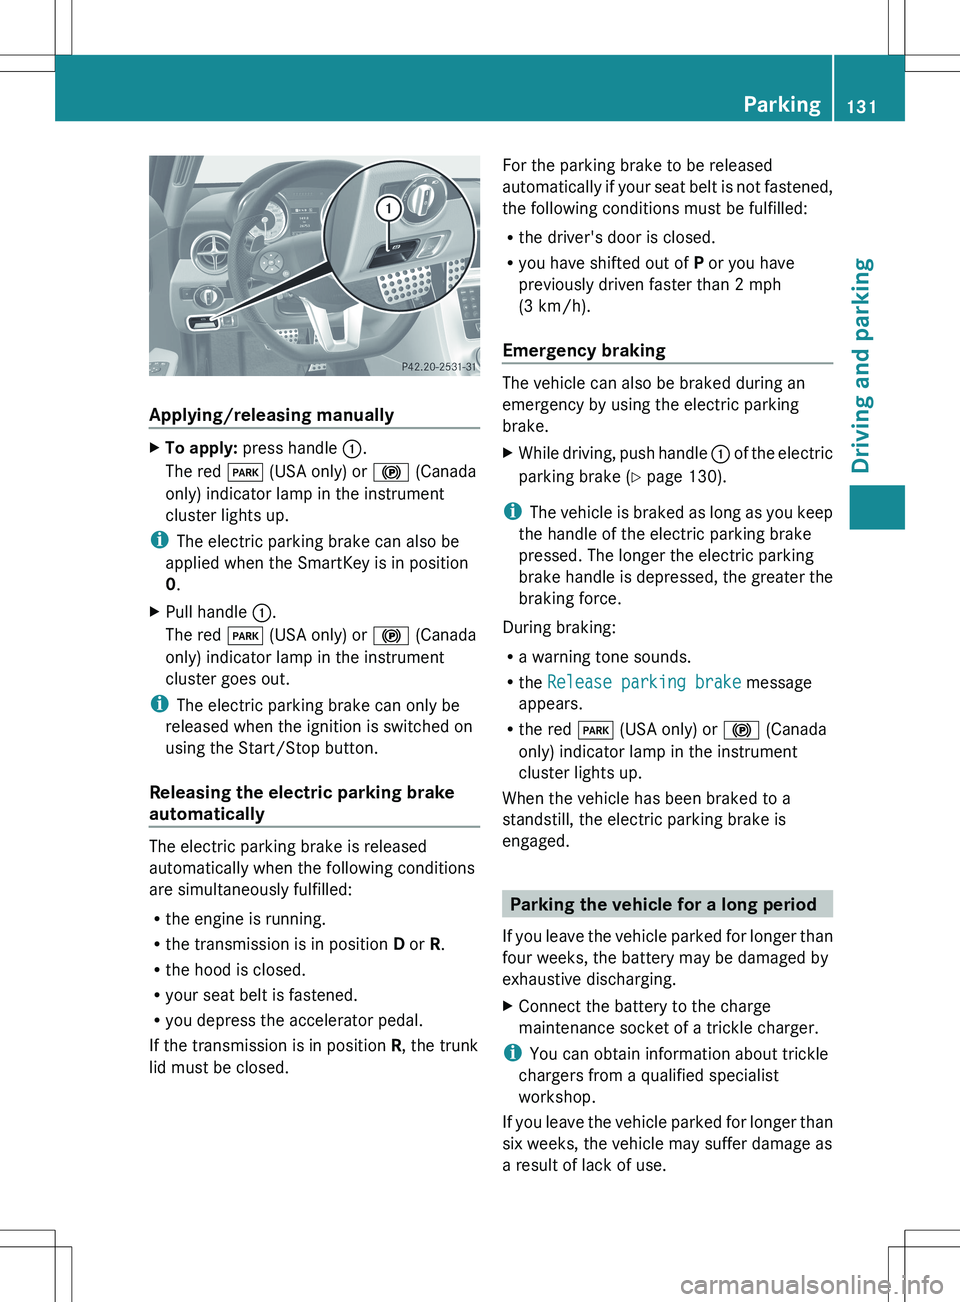
Applying/releasing manually
XTo apply: press handle :.
The red F (USA only) or ! (Canada
only) indicator lamp in the instrument
cluster lights up.
i The electric parking brake can also be
applied when the SmartKey is in position
0 .
XPull handle :.
The red F (USA only) or ! (Canada
only) indicator lamp in the instrument
cluster goes out.
i The electric parking brake can only be
released when the ignition is switched on
using the Start/Stop button.
Releasing the electric parking brake
automatically
The electric parking brake is released
automatically when the following conditions
are simultaneously fulfilled:
R the engine is running.
R the transmission is in position D or R.
R the hood is closed.
R your seat belt is fastened.
R you depress the accelerator pedal.
If the transmission is in position R, the trunk
lid must be closed.
For the parking brake to be released
automatically if your seat belt is not fastened,
the following conditions must be fulfilled:
R the driver's door is closed.
R you have shifted out of P or you have
previously driven faster than 2 mph
(3 km/h).
Emergency braking
The vehicle can also be braked during an
emergency by using the electric parking
brake.
XWhile driving, push handle : of the electric
parking brake ( Y page 130).
i
The vehicle is braked as long as you keep
the handle of the electric parking brake
pressed. The longer the electric parking
brake handle is depressed, the greater the
braking force.
During braking:
R a warning tone sounds.
R the Release parking brake message
appears.
R the red F (USA only) or ! (Canada
only) indicator lamp in the instrument
cluster lights up.
When the vehicle has been braked to a
standstill, the electric parking brake is
engaged.
Parking the vehicle for a long period
If you leave the vehicle parked for longer than
four weeks, the battery may be damaged by
exhaustive discharging.
XConnect the battery to the charge
maintenance socket of a trickle charger.
i You can obtain information about trickle
chargers from a qualified specialist
workshop.
If you leave the vehicle parked for longer than
six weeks, the vehicle may suffer damage as
a result of lack of use.
Parking131Driving and parkingZ
Page 203 of 288
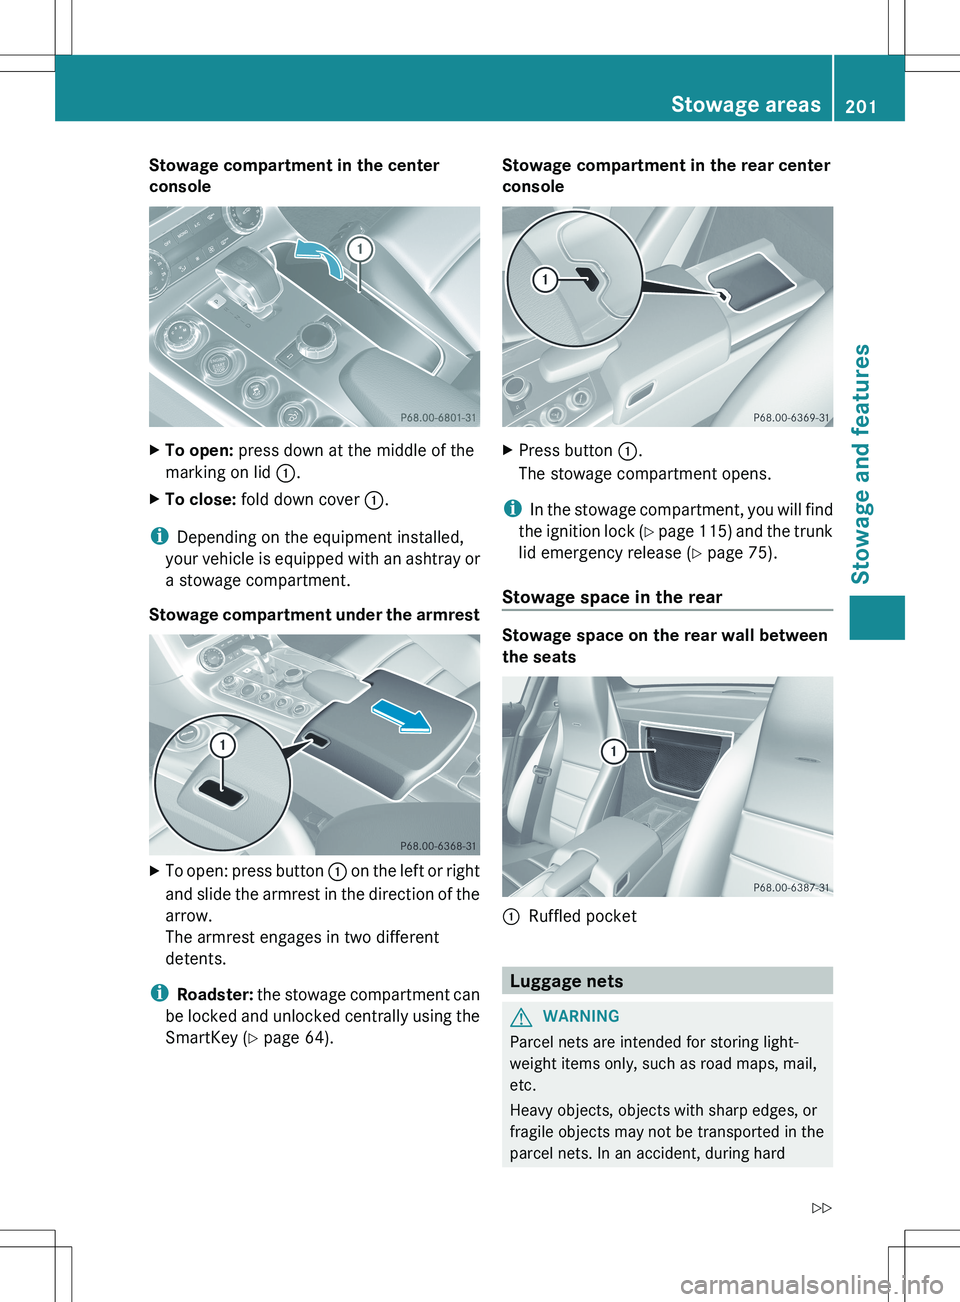
Stowage compartment in the center
consoleXTo open: press down at the middle of the
marking on lid :.XTo close: fold down cover :.
i
Depending on the equipment installed,
your vehicle is equipped with an ashtray or
a stowage compartment.
Stowage compartment under the armrest
XTo open: press button : on the left or right
and slide the armrest in the direction of the
arrow.
The armrest engages in two different
detents.
i Roadster: the stowage compartment can
be locked and unlocked centrally using the
SmartKey ( Y page 64).
Stowage compartment in the rear center
consoleXPress button :.
The stowage compartment opens.
i In the stowage compartment, you will find
the ignition lock (Y page 115) and the trunk
lid emergency release ( Y page 75).
Stowage space in the rear
Stowage space on the rear wall between
the seats
:Ruffled pocket
Luggage nets
GWARNING
Parcel nets are intended for storing light-
weight items only, such as road maps, mail,
etc.
Heavy objects, objects with sharp edges, or
fragile objects may not be transported in the
parcel nets. In an accident, during hard
Stowage areas201Stowage and featuresZ
Page 213 of 288
Extending and retracting the rear
spoiler manually
You can extend and retract the rear spoiler
manually for cleaning.
GWARNING
During manual retraction of the rear spoiler,
make sure that nobody becomes trapped. If
there is a danger of someone becoming
trapped, release the rear spoiler button to
pause retraction. The rear spoiler is then
extended again.
Never leave children unsupervised in the
vehicle. They could unintentionally retract the
extended rear spoiler. Someone could then
become trapped and seriously injured.
! Do not enter an automatic car wash with
the rear spoiler extended. Otherwise, the
rear spoiler may be damaged.
Only extend the rear spoiler in order to
clean it by hand. Retract it again when you
have finished cleaning it.
XClose the trunk lid.XSelect key position 2 with the Start/Stop
button.X To extend: press button :.
The rear spoiler is extended.
Button : flashes until the rear spoiler has
extended and then lights up in red.XTo retract: press and hold button : until
the rear spoiler is completely retracted.
Button : flashes until the rear spoiler has
retracted and then goes out.
Rear Spoiler retracts manually
appears in the display.
i If you release button : while retracting
the rear spoiler, it extends again
automatically.
Features211Stowage and featuresZ