2012 MERCEDES-BENZ SLS AMG COUPE tow bar
[x] Cancel search: tow barPage 16 of 288

Paddle shifters ............................... 123
Storing settings (memory
function) .......................................... 91
Stopwatch (RACETIMER) ................... 161
Stowage compartments Armrest (under) ............................. 201
Cup holders ................................... 202
Glove box ....................................... 200
Important safety information .........200
Parcel net ...................................... 201
Rear wall ........................................ 201
Stowage space
Center console .............................. 201
Center console (rear) .....................201
Summer opening
see Convenience opening feature
Summer tires ..................................... 252
Sun visor ............................................ 202
Supplemental Restraint System see SRS (Supplemental Restraint
System)
Surround lighting (on-board
computer) .......................................... 158
Suspension tuning AMG adaptive sport suspension
system ........................................... 138
Switching air-recirculation mode
on/off ................................................. 109
Switching off the alarm (ATA) ............ 59
T
Tachometer ........................................ 148
Tail lamps Display message ............................ 175
Tank
see Fuel tank
Tank content
Fuel gauge ....................................... 27
Technical data ................................... 284
Notes ............................................. 276
Tires/wheels ................................. 272
TELEAID
Call priority .................................... 209
Display message ............................ 173
Downloading destinations
(COMAND) ..................................... 209
Emergency call .............................. 206
Important safety notes ..................205
Locating a stolen vehicle ...............210
MB info call button ........................208
Remote vehicle locking ..................210
Roadside Assistance button ..........207
Search & Send ............................... 209
Self-test ......................................... 205
System .......................................... 205
Telephone
Accepting a call ............................. 155
Menu (on-board computer) ............155
Number from the phone book ........ 156
Redialing ........................................ 156
Rejecting/ending a call .................156
Temperature
Coolant (on-board computer) ......... 160
Engine oil ....................................... 148
Engine oil (on-board computer) ...... 160
Outside temperature ...................... 149
Theft deterrent systems
ATA (Anti-Theft Alarm system) .........59
Immobilizer ...................................... 59
Theft-deterrent systems
Tow-away alarm ............................... 60
Timing (RACETIMER) ......................... 161
TIREFIT kit .......................................... 233
Tire pressure Calling up (on-board computer) .....257
Checking manually ........................256
Display message .................... 181, 183
Maximum ....................................... 256
Notes ............................................. 254
Not reached (TIREFIT) ....................235
Reached (TIREFIT) ..........................235
Recommended ............................... 253
Tire pressure monitoring system
Function/notes ............................. 257
Restarting ...................................... 259
Warning lamp ................................. 196
Tires
Aspect ratio (definition) .................270
Average weight of the vehicle
occupants (definition) ....................269
Bar (definition) ............................... 268
Characteristics .............................. 268
Checking ........................................ 251
Definition of terms .........................268
Direction of rotation ......................27214Index
Page 235 of 288
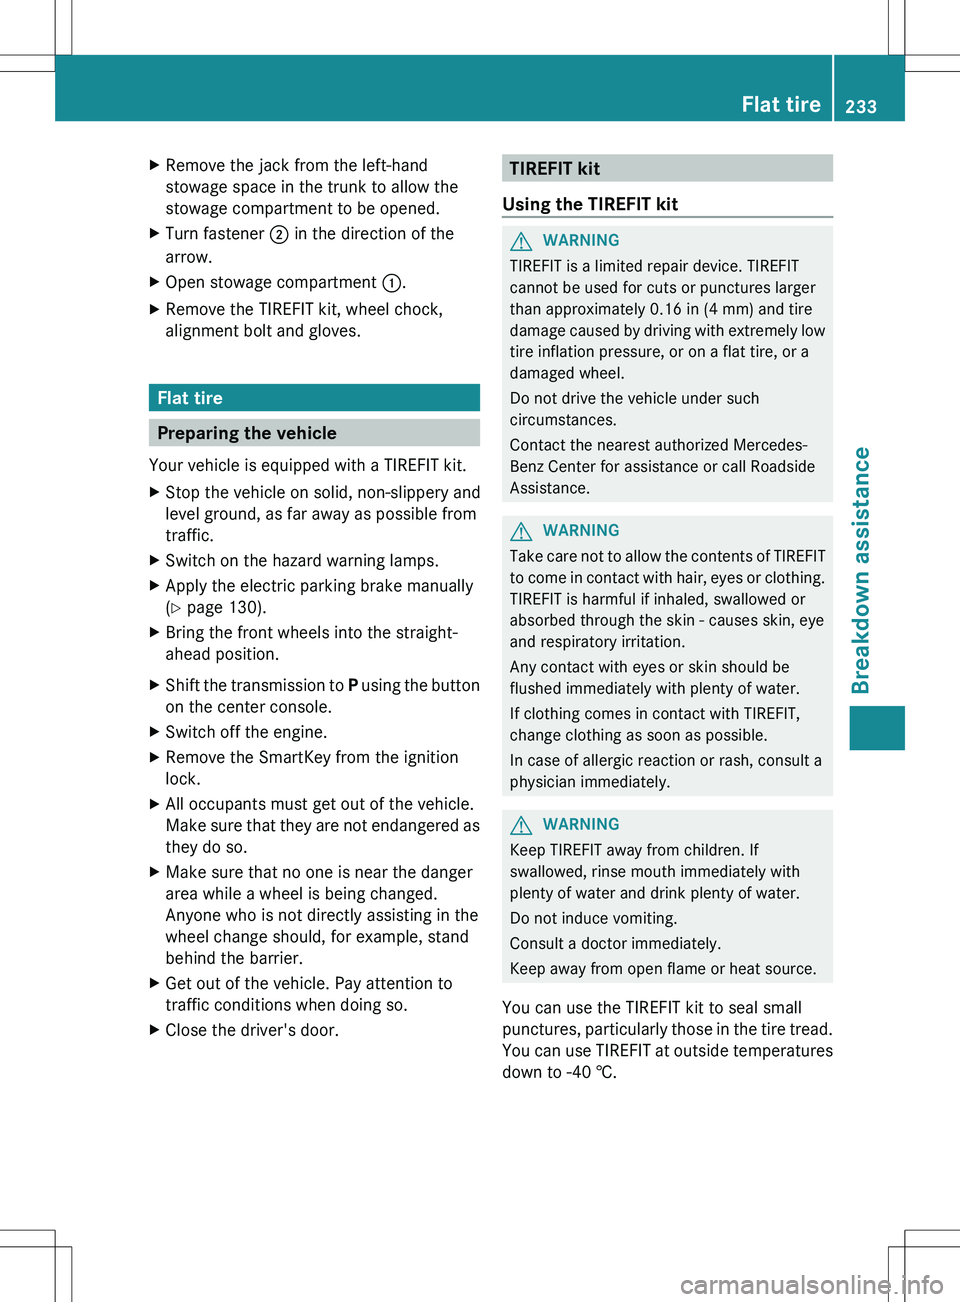
XRemove the jack from the left-hand
stowage space in the trunk to allow the
stowage compartment to be opened.XTurn fastener ; in the direction of the
arrow.XOpen stowage compartment :.XRemove the TIREFIT kit, wheel chock,
alignment bolt and gloves.
Flat tire
Preparing the vehicle
Your vehicle is equipped with a TIREFIT kit.
XStop the vehicle on solid, non-slippery and
level ground, as far away as possible from
traffic.XSwitch on the hazard warning lamps.XApply the electric parking brake manually
( Y page 130).XBring the front wheels into the straight-
ahead position.XShift the transmission to P using the button
on the center console.XSwitch off the engine.XRemove the SmartKey from the ignition
lock.XAll occupants must get out of the vehicle.
Make sure that they are not endangered as
they do so.XMake sure that no one is near the danger
area while a wheel is being changed.
Anyone who is not directly assisting in the
wheel change should, for example, stand
behind the barrier.XGet out of the vehicle. Pay attention to
traffic conditions when doing so.XClose the driver's door.TIREFIT kit
Using the TIREFIT kitGWARNING
TIREFIT is a limited repair device. TIREFIT
cannot be used for cuts or punctures larger
than approximately 0.16 in (4 mm) and tire
damage caused by driving with extremely low
tire inflation pressure, or on a flat tire, or a
damaged wheel.
Do not drive the vehicle under such
circumstances.
Contact the nearest authorized Mercedes-
Benz Center for assistance or call Roadside
Assistance.
GWARNING
Take care not to allow the contents of TIREFIT
to come in contact with hair, eyes or clothing.
TIREFIT is harmful if inhaled, swallowed or
absorbed through the skin - causes skin, eye
and respiratory irritation.
Any contact with eyes or skin should be
flushed immediately with plenty of water.
If clothing comes in contact with TIREFIT,
change clothing as soon as possible.
In case of allergic reaction or rash, consult a
physician immediately.
GWARNING
Keep TIREFIT away from children. If
swallowed, rinse mouth immediately with
plenty of water and drink plenty of water.
Do not induce vomiting.
Consult a doctor immediately.
Keep away from open flame or heat source.
You can use the TIREFIT kit to seal small
punctures, particularly those in the tire tread.
You can use TIREFIT at outside temperatures
down to -40 †.
Flat tire233Breakdown assistanceZ
Page 237 of 288
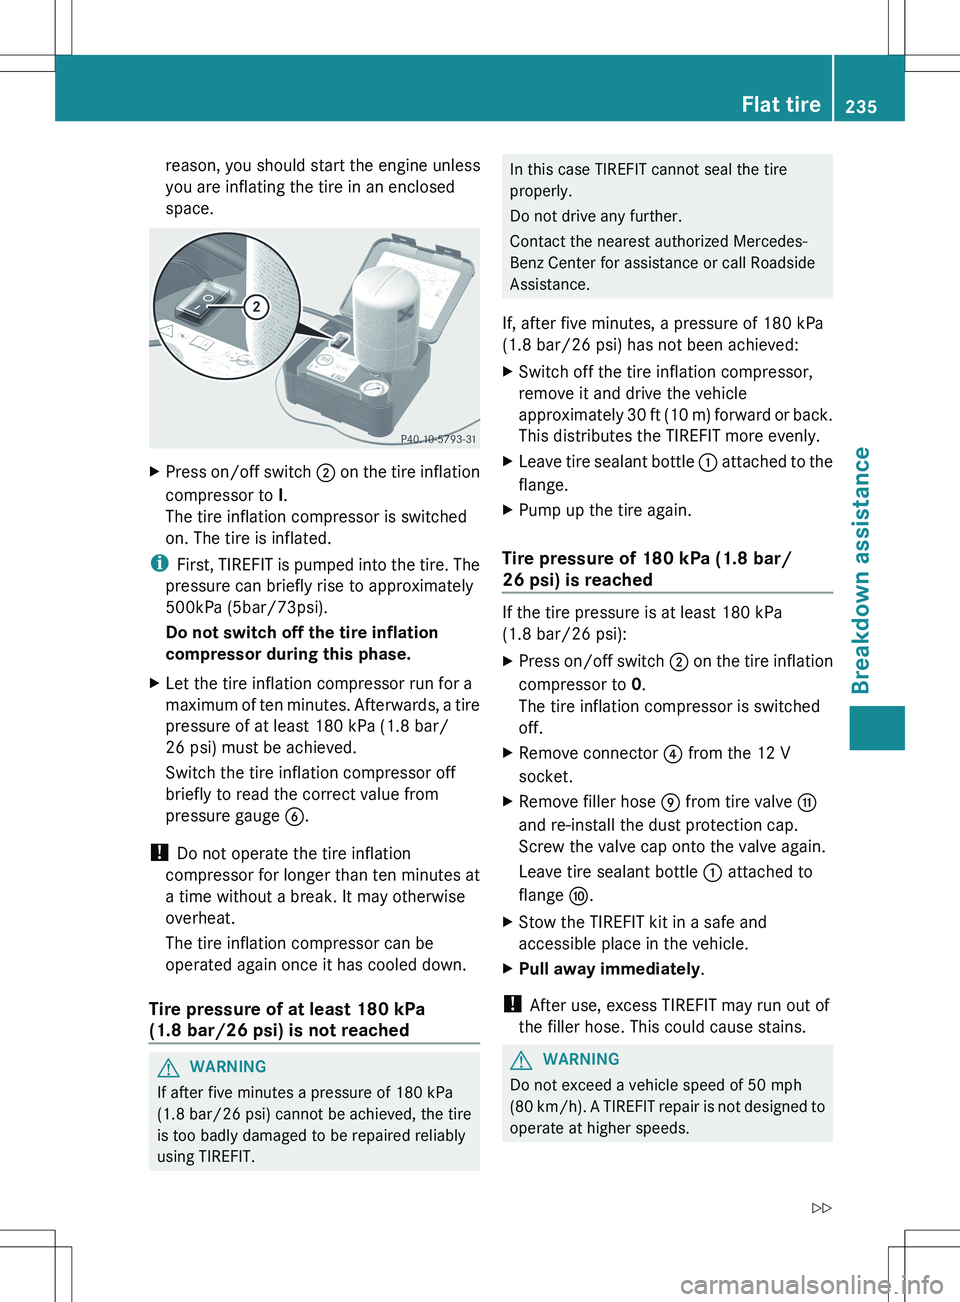
reason, you should start the engine unless
you are inflating the tire in an enclosed
space.XPress on/off switch ; on the tire inflation
compressor to I.
The tire inflation compressor is switched
on. The tire is inflated.
i First, TIREFIT is pumped into the tire. The
pressure can briefly rise to approximately
500kPa (5bar/73psi).
Do not switch off the tire inflation
compressor during this phase.
XLet the tire inflation compressor run for a
maximum of ten minutes. Afterwards, a tire
pressure of at least 180 kPa (1.8 bar/
26 psi) must be achieved.
Switch the tire inflation compressor off
briefly to read the correct value from
pressure gauge B.
!
Do not operate the tire inflation
compressor for longer than ten minutes at
a time without a break. It may otherwise
overheat.
The tire inflation compressor can be
operated again once it has cooled down.
Tire pressure of at least 180 kPa
(1.8 bar/26 psi) is not reached
GWARNING
If after five minutes a pressure of 180 kPa
(1.8 bar/26 psi) cannot be achieved, the tire
is too badly damaged to be repaired reliably
using TIREFIT.
In this case TIREFIT cannot seal the tire
properly.
Do not drive any further.
Contact the nearest authorized Mercedes-
Benz Center for assistance or call Roadside
Assistance.
If, after five minutes, a pressure of 180 kPa
(1.8 bar/26 psi) has not been achieved:XSwitch off the tire inflation compressor,
remove it and drive the vehicle
approximately 30 ft (10 m) forward or back.
This distributes the TIREFIT more evenly.XLeave tire sealant bottle : attached to the
flange.XPump up the tire again.
Tire pressure of 180 kPa (1.8 bar/
26 psi) is reached
If the tire pressure is at least 180 kPa
(1.8 bar/26 psi):
XPress on/off switch ; on the tire inflation
compressor to 0.
The tire inflation compressor is switched
off.XRemove connector ? from the 12 V
socket.XRemove filler hose E from tire valve G
and re-install the dust protection cap.
Screw the valve cap onto the valve again.
Leave tire sealant bottle : attached to
flange F.XStow the TIREFIT kit in a safe and
accessible place in the vehicle.XPull away immediately .
!
After use, excess TIREFIT may run out of
the filler hose. This could cause stains.
GWARNING
Do not exceed a vehicle speed of 50 mph
(80 km/h ). A TIREFIT repair is not designed to
operate at higher speeds.
Flat tire235Breakdown assistanceZ
Page 238 of 288
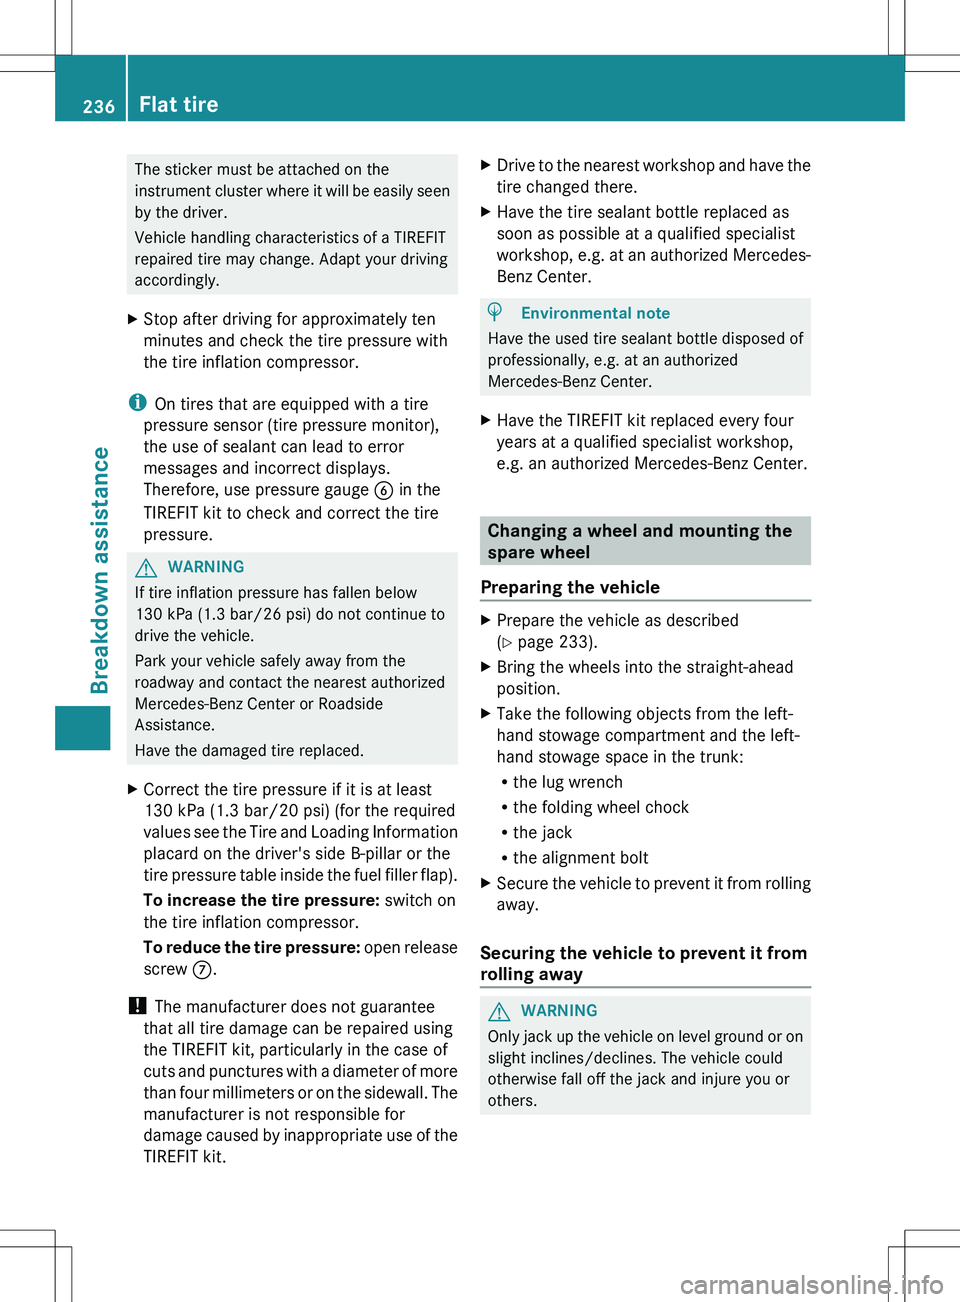
The sticker must be attached on the
instrument cluster where it will be easily seen
by the driver.
Vehicle handling characteristics of a TIREFIT
repaired tire may change. Adapt your driving
accordingly.XStop after driving for approximately ten
minutes and check the tire pressure with
the tire inflation compressor.
i On tires that are equipped with a tire
pressure sensor (tire pressure monitor),
the use of sealant can lead to error
messages and incorrect displays.
Therefore, use pressure gauge B in the
TIREFIT kit to check and correct the tire
pressure.
GWARNING
If tire inflation pressure has fallen below
130 kPa (1.3 bar/26 psi) do not continue to
drive the vehicle.
Park your vehicle safely away from the
roadway and contact the nearest authorized
Mercedes-Benz Center or Roadside
Assistance.
Have the damaged tire replaced.
XCorrect the tire pressure if it is at least
130 kPa (1.3 bar/20 psi) (for the required
values see the Tire and Loading Information
placard on the driver's side B-pillar or the
tire pressure table inside the fuel filler flap).
To increase the tire pressure: switch on
the tire inflation compressor.
To reduce the tire pressure: open release
screw C.
!
The manufacturer does not guarantee
that all tire damage can be repaired using
the TIREFIT kit, particularly in the case of
cuts and punctures with a diameter of more
than four millimeters or on the sidewall. The
manufacturer is not responsible for
damage caused by inappropriate use of the
TIREFIT kit.
XDrive to the nearest workshop and have the
tire changed there.XHave the tire sealant bottle replaced as
soon as possible at a qualified specialist
workshop, e.g. at an authorized Mercedes-
Benz Center.HEnvironmental note
Have the used tire sealant bottle disposed of
professionally, e.g. at an authorized
Mercedes-Benz Center.
XHave the TIREFIT kit replaced every four
years at a qualified specialist workshop,
e.g. an authorized Mercedes-Benz Center.
Changing a wheel and mounting the
spare wheel
Preparing the vehicle
XPrepare the vehicle as described
( Y page 233).XBring the wheels into the straight-ahead
position.XTake the following objects from the left-
hand stowage compartment and the left-
hand stowage space in the trunk:
R the lug wrench
R the folding wheel chock
R the jack
R the alignment boltXSecure the vehicle to prevent it from rolling
away.
Securing the vehicle to prevent it from
rolling away
GWARNING
Only jack up the vehicle on level ground or on
slight inclines/declines. The vehicle could
otherwise fall off the jack and injure you or
others.
236Flat tireBreakdown assistance
Page 246 of 288
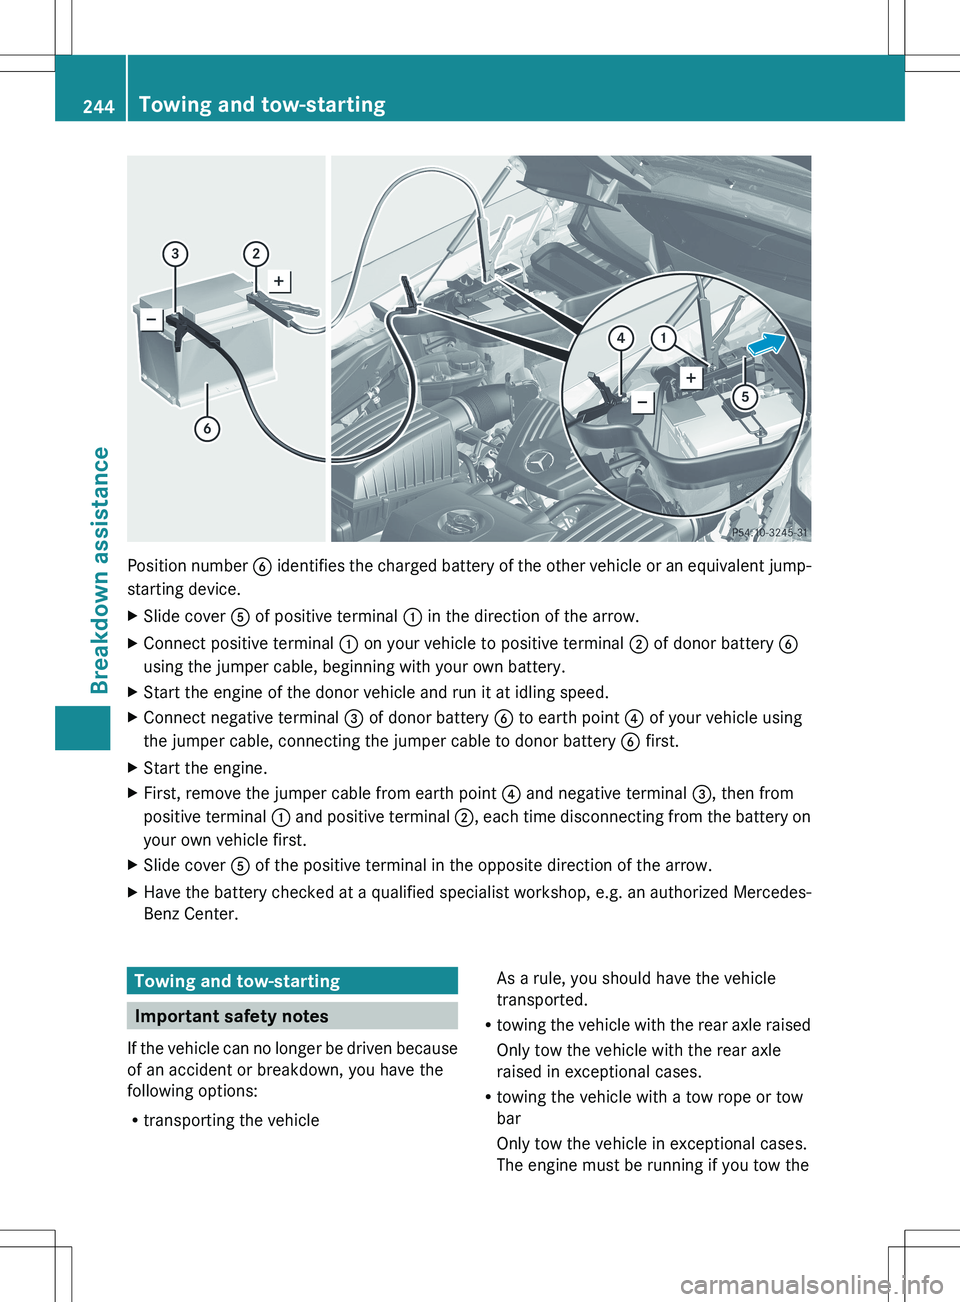
Position number B identifies the charged battery of the other vehicle or an equivalent jump-
starting device.
XSlide cover A of positive terminal : in the direction of the arrow.XConnect positive terminal : on your vehicle to positive terminal ; of donor battery B
using the jumper cable, beginning with your own battery.XStart the engine of the donor vehicle and run it at idling speed.XConnect negative terminal = of donor battery B to earth point ? of your vehicle using
the jumper cable, connecting the jumper cable to donor battery B first.XStart the engine.XFirst, remove the jumper cable from earth point ? and negative terminal =, then from
positive terminal : and positive terminal ;, each time disconnecting from the battery on
your own vehicle first.XSlide cover A of the positive terminal in the opposite direction of the arrow.XHave the battery checked at a qualified specialist workshop, e.g. an authorized Mercedes-
Benz Center.Towing and tow-starting
Important safety notes
If the vehicle can no longer be driven because
of an accident or breakdown, you have the
following options:
R transporting the vehicle
As a rule, you should have the vehicle
transported.
R towing the vehicle with the rear axle raised
Only tow the vehicle with the rear axle
raised in exceptional cases.
R towing the vehicle with a tow rope or tow
bar
Only tow the vehicle in exceptional cases.
The engine must be running if you tow the244Towing and tow-startingBreakdown assistance
Page 247 of 288
vehicle with a tow rope or tow bar. Observe
the following notes.GWARNING
If the brake system is malfunctioning, you
must use a rigid tow bar to tow the vehicle.
Before towing away, make sure that the
steering can be moved and is not locked.
If there is a malfunction in the power supply
or the vehicle's electrical system, you must
not tow the vehicle.
GWARNING
The following can occur if the vehicle is towed:
R the engine may not start.
R the on-board electronics may fail.
R the battery voltage may drop too much.
In these cases, the rear axle will be locked.
As a result, you might lose control of the
vehicle, cause an accident and injure yourself
and others.
! Use the SmartKey instead of the Start/
Stop button when towing the vehicle.
Start the engine and keep it running. Turn
the SmartKey to position 2 in the ignition.
Set the transmission to N using the E-
SELECT lever. Make sure that you then
leave the SmartKey in position 2.
Check the transmission position in the
instrument cluster.
! Make sure that the electric parking brake
is released. If the electric parking brake is
faulty, visit a qualified specialist workshop.
Mercedes-Benz recommends that you use
an authorized Mercedes-Benz Center for
this purpose.
! When towing, pull away slowly and
smoothly. If the tractive power is too high,
the vehicles could be damaged.
! Only secure the tow rope or tow bar at the
towing eyes. Otherwise, the vehicle could
be damaged.
! Do not use the towing eye for recovery,
as this could damage the vehicle. If in
doubt, recover the vehicle with a crane.
! You may only tow the vehicle a maximum
distance of 30 miles (50 km). A towing
speed of 30 mph (50 km/h) must not be
exceeded.
For towing distances over 30 miles
(50 km), the vehicle must loaded onto a
transporter.
! Do not tow with sling-type equipment.
This could damage the vehicle.
! Tow-starting the vehicle is not permitted.
The transmission may otherwise be
damaged.
Also observe the following notes:
R if the engine does not start, try jump-
starting it ( Y page 243). Tow-starting the
vehicle is not permitted.
R if it is not possible to jump-start the vehicle,
have it transported to the nearest qualified
specialist workshop, e.g. an authorized
Mercedes-Benz Center.
R if the transmission has been damaged,
have the vehicle transported to the nearest
qualified specialist workshop, e.g. an
authorized Mercedes-Benz Center.
Observe the display messages in the
instrument cluster.
Installing/removing the towing eye
Installing the towing eye
XTake the towing eye and the wheel
wrench 17
out of the wheel-change tool kit
( Y page 232).
The bracket for the removable towing eye is
in the bumper at the front. It is located under
the cover.
17 Not included in the scope of delivery.Towing and tow-starting245Breakdown assistanceZ