2012 MERCEDES-BENZ SLS AMG COUPE four wheel drive
[x] Cancel search: four wheel drivePage 128 of 288
Manual drive program
In manual drive program M, you need to
change gear yourself using the steering wheel
paddle shifters ( Y page 123). The
transmission only shifts down automatically
at low engine speeds depending on the
respective gear.
! In manual drive program M, the
transmission does not shift up
automatically even when the engine
limiting speed for the current gear is
reached. When the engine limiting speed is
reached, the fuel supply is cut to prevent
the engine from overrevving. Always make
sure that the engine speed does not reach
the red area of the tachometer and observe
the upshift indicator. There is otherwise a
risk of engine damage.XTo activate the manual drive program:
turn the drive program selector switch until
M appears in the instrument cluster's
multifunction display.
M lights up in red on the drive program
selector switch.XTo deactivate the manual drive
program: turn the drive program selector
switch and select another drive program.
Upshift indicator
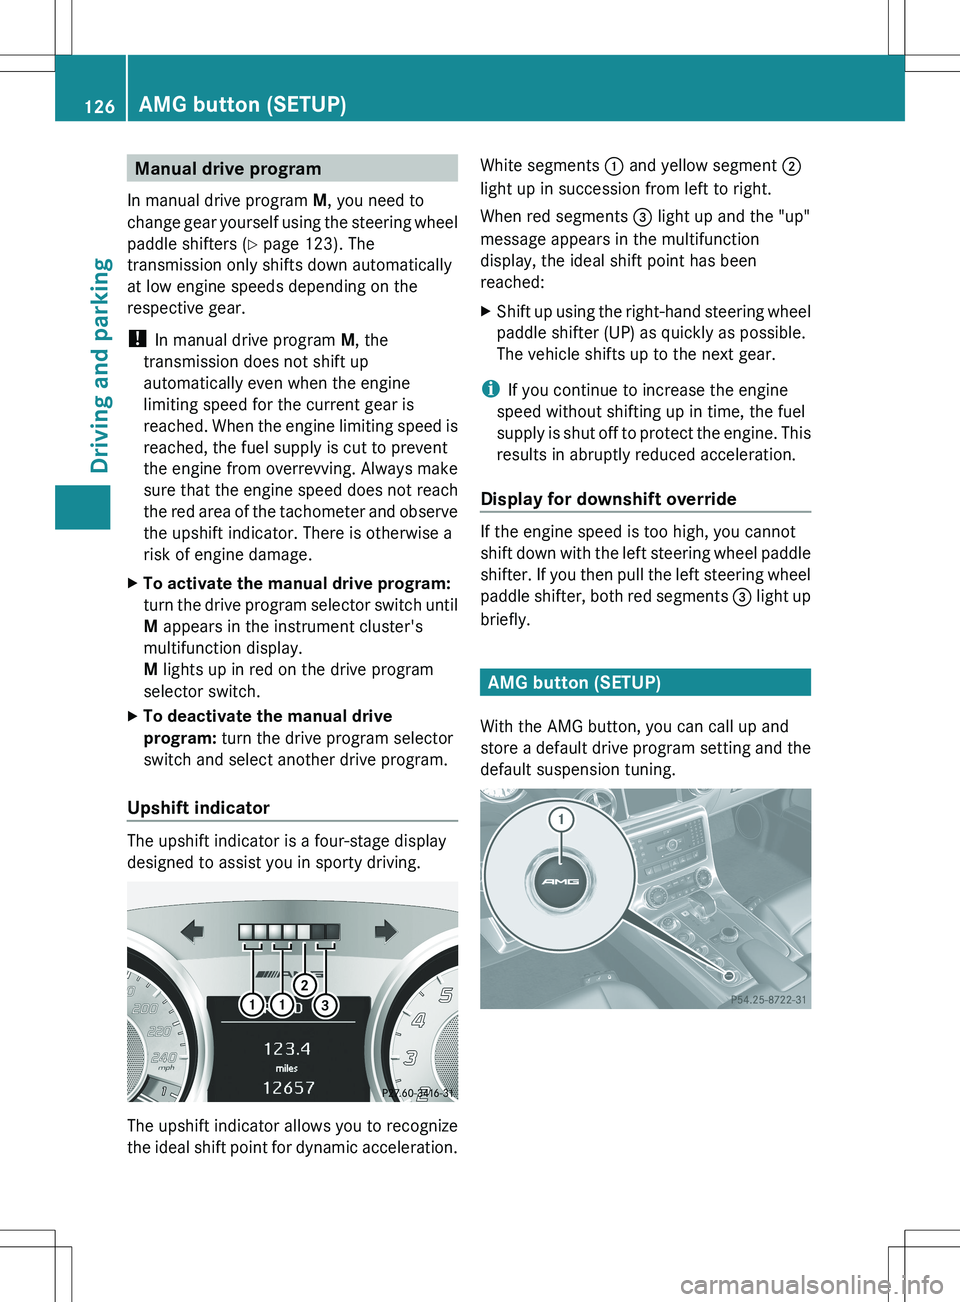
The upshift indicator is a four-stage display
designed to assist you in sporty driving.
The upshift indicator allows you to recognize
the ideal shift point for dynamic acceleration.
White segments : and yellow segment ;
light up in succession from left to right.
When red segments = light up and the "up"
message appears in the multifunction
display, the ideal shift point has been
reached:XShift up using the right-hand steering wheel
paddle shifter (UP) as quickly as possible.
The vehicle shifts up to the next gear.
i If you continue to increase the engine
speed without shifting up in time, the fuel
supply is shut off to protect the engine. This
results in abruptly reduced acceleration.
Display for downshift override
If the engine speed is too high, you cannot
shift down with the left steering wheel paddle
shifter. If you then pull the left steering wheel
paddle shifter, both red segments = light up
briefly.
AMG button (SETUP)
With the AMG button, you can call up and
store a default drive program setting and the
default suspension tuning.
126AMG button (SETUP)Driving and parking
Page 238 of 288
The sticker must be attached on the
instrument cluster where it will be easily seen
by the driver.
Vehicle handling characteristics of a TIREFIT
repaired tire may change. Adapt your driving
accordingly.XStop after driving for approximately ten
minutes and check the tire pressure with
the tire inflation compressor.
i On tires that are equipped with a tire
pressure sensor (tire pressure monitor),
the use of sealant can lead to error
messages and incorrect displays.
Therefore, use pressure gauge B in the
TIREFIT kit to check and correct the tire
pressure.
GWARNING
If tire inflation pressure has fallen below
130 kPa (1.3 bar/26 psi) do not continue to
drive the vehicle.
Park your vehicle safely away from the
roadway and contact the nearest authorized
Mercedes-Benz Center or Roadside
Assistance.
Have the damaged tire replaced.
XCorrect the tire pressure if it is at least
130 kPa (1.3 bar/20 psi) (for the required
values see the Tire and Loading Information
placard on the driver's side B-pillar or the
tire pressure table inside the fuel filler flap).
To increase the tire pressure: switch on
the tire inflation compressor.
To reduce the tire pressure: open release
screw C.
!
The manufacturer does not guarantee
that all tire damage can be repaired using
the TIREFIT kit, particularly in the case of
cuts and punctures with a diameter of more
than four millimeters or on the sidewall. The
manufacturer is not responsible for
damage caused by inappropriate use of the
TIREFIT kit.
XDrive to the nearest workshop and have the
tire changed there.XHave the tire sealant bottle replaced as
soon as possible at a qualified specialist
workshop, e.g. at an authorized Mercedes-
Benz Center.HEnvironmental note
Have the used tire sealant bottle disposed of
professionally, e.g. at an authorized
Mercedes-Benz Center.
XHave the TIREFIT kit replaced every four
years at a qualified specialist workshop,
e.g. an authorized Mercedes-Benz Center.
Changing a wheel and mounting the
spare wheel
Preparing the vehicle
XPrepare the vehicle as described
( Y page 233).XBring the wheels into the straight-ahead
position.XTake the following objects from the left-
hand stowage compartment and the left-
hand stowage space in the trunk:
R the lug wrench
R the folding wheel chock
R the jack
R the alignment boltXSecure the vehicle to prevent it from rolling
away.
Securing the vehicle to prevent it from
rolling away
GWARNING
Only jack up the vehicle on level ground or on
slight inclines/declines. The vehicle could
otherwise fall off the jack and injure you or
others.
236Flat tireBreakdown assistance
Page 259 of 288
using the tip of a pen, for example. Then
check the tire pressure again using the tire
pressure checker.XScrew the valve cap onto the valve.XRepeat these steps for the other tires.
Tire pressure monitor
Important safety notes
If a tire pressure monitor system is installed,
the vehicle's wheels have sensors that
monitor the tire pressures in all four tires. The
tire pressure monitor warns you if the
pressure drops in one or more of the tires. The
tire pressure monitor only functions if the
correct wheel electronics units are installed
on each wheel.
The tire pressure monitor has a yellow
warning lamp in the instrument cluster for
indicating pressure loss/malfunctions (USA)
or pressure loss (Canada). Whether the
warning lamp flashes or lights up indicates
whether a tire pressure is too low or the tire
pressure monitoring system is
malfunctioning:
R if the warning lamp is lit continuously, the
tire pressure on one or more tires is
significantly too low. The tire pressure
monitor is not malfunctioning.
R USA only: if the warning lamp flashes for
60 seconds and then remains lit constantly,
the tire pressure monitor is malfunctioning.
GWARNING
Each tire, including the spare (if provided),
should be checked at least once a month
when cold and inflated to the pressure
recommended by the vehicle manufacturer
on the Tire and Loading Information placard
on the driver's door B-pillar or the tire
pressure label on the inside of the fuel filler
flap. If your vehicle has tires of a different size
than the size indicated on the Tire and Loading
Information placard or the tire pressure label,
you should determine the proper tire pressure
for those tires.
As an added safety feature, your vehicle has
been equipped with a tire pressure monitoring
system (TPMS) that illuminates a low tire
pressure telltale when one or more of your
tires are significantly underinflated.
Accordingly, when the low tire pressure
telltale illuminates, you should stop and check
your tires as soon as possible, and inflate
them to the proper pressure. Driving on a
significantly underinflated tire causes the tire
to overheat and can lead to tire failure.
Underinflation also reduces fuel efficiency
and tire tread life, and may affect the vehicle's
handling and stopping ability. Please note that
the TPMS is not a substitute for proper tire
maintenance, and it is the driver's
responsibility to maintain correct tire
pressure, even if underinflation has not
reached the level to trigger illumination of the
TPMS low tire pressure telltale.
USA only:
Your vehicle has also been equipped with a
TPMS malfunction indicator to indicate when
the system is not operating properly. The
TPMS malfunction indicator is combined with
the low tire pressure telltale. When the
system detects a malfunction, the telltale will
flash for approximately 1 minute and then
remain continuously illuminated. This
sequence will continue upon subsequent
vehicle start-ups as long as the malfunction
exists. When the malfunction indicator is
illuminated, the system may not be able to
detect or signal low tire pressure as intended.
TPMS malfunctions may occur for a variety of
reasons, including the installation of
incompatible replacement or alternate tires
or wheels on the vehicle that prevent the
TPMS from functioning properly. Always
check the TPMS malfunction telltale after
replacing one or more tires or wheels on your
vehicle to ensure that the replacement or
alternate tires and wheels allow the TPMS to
continue to function properly.Tire pressure257Tires and wheelsZ
Page 261 of 288
Each tire that is affected by a significant loss
of pressure is highlighted with a color.
If the following message appears in the
multifunction display: Correct Tire
PressureXCheck the tire pressure on all four wheels
and correct it if necessary.
i If the wheel positions on the vehicle are
interchanged, the tire pressures may be
displayed for the wrong positions for a
short time. This is rectified after a few
minutes of driving, and the tire pressures
are displayed for the correct positions.
Restarting the tire pressure monitor
When you restart the tire pressure monitor,
all existing warning messages are deleted and
the warning lamps go out. The monitor uses
the currently set tire pressures as the
specified values for monitoring.
In most cases, the tire pressure monitor will
automatically detect the new reference
values, e.g. if you have:
R changed the tire pressure
R changed the wheels or tires
R mounted new wheels or tires
If you are defining the new reference values
manually:
XUse the table on the inside of the fuel filler
flap to ensure that the tire pressure is set
correctly in all four tires for the current
operating conditions.
Also observe the notes in the section on tire
pressures ( Y page 253).XSelect key position 2 with the Start/Stop
button.XPress the = or ; button to select the
Service menu.XPress the 9 or : button to select
TIRE PRESS. .XPress the a button.
The display shows either the current tire
pressure for the individual tires or theTire pressures will be displayed
after driving a few minutes
message.XPress the : button.
The Use Current Pressures as New
Reference Values message appears in
the multifunction display.XPress the a button.
The Tire Press. Monitor Restarted
message appears in the multifunction
display.
After a few minutes of driving, the current
pressures are adopted as the new
monitoring values.
Canceling the restart
XPress the % button.
or
XPress the 9 button to leave the menu.
Loading the vehicle
Instruction labels for tires and loads
GWARNING
Do not overload the tires by exceeding the
specified load limit as indicated on the Tire
and Loading Information placard on the
driver's door B-pillar. Overloading the tires
can overheat them, possibly causing a
blowout. Overloading the tires can also result
in handling or steering problems, or brake
failure.
Two instruction labels on your vehicle show
the maximum possible load.
(1)The Tire and Loading Information placard
is on the B-pillar on the driver's side. The
Tire and Loading Information placard
shows the maximum permissible number
of occupants and the maximum
permissible vehicle load. It also contains
details of the tire sizes andLoading the vehicle259Tires and wheelsZ
Page 266 of 288
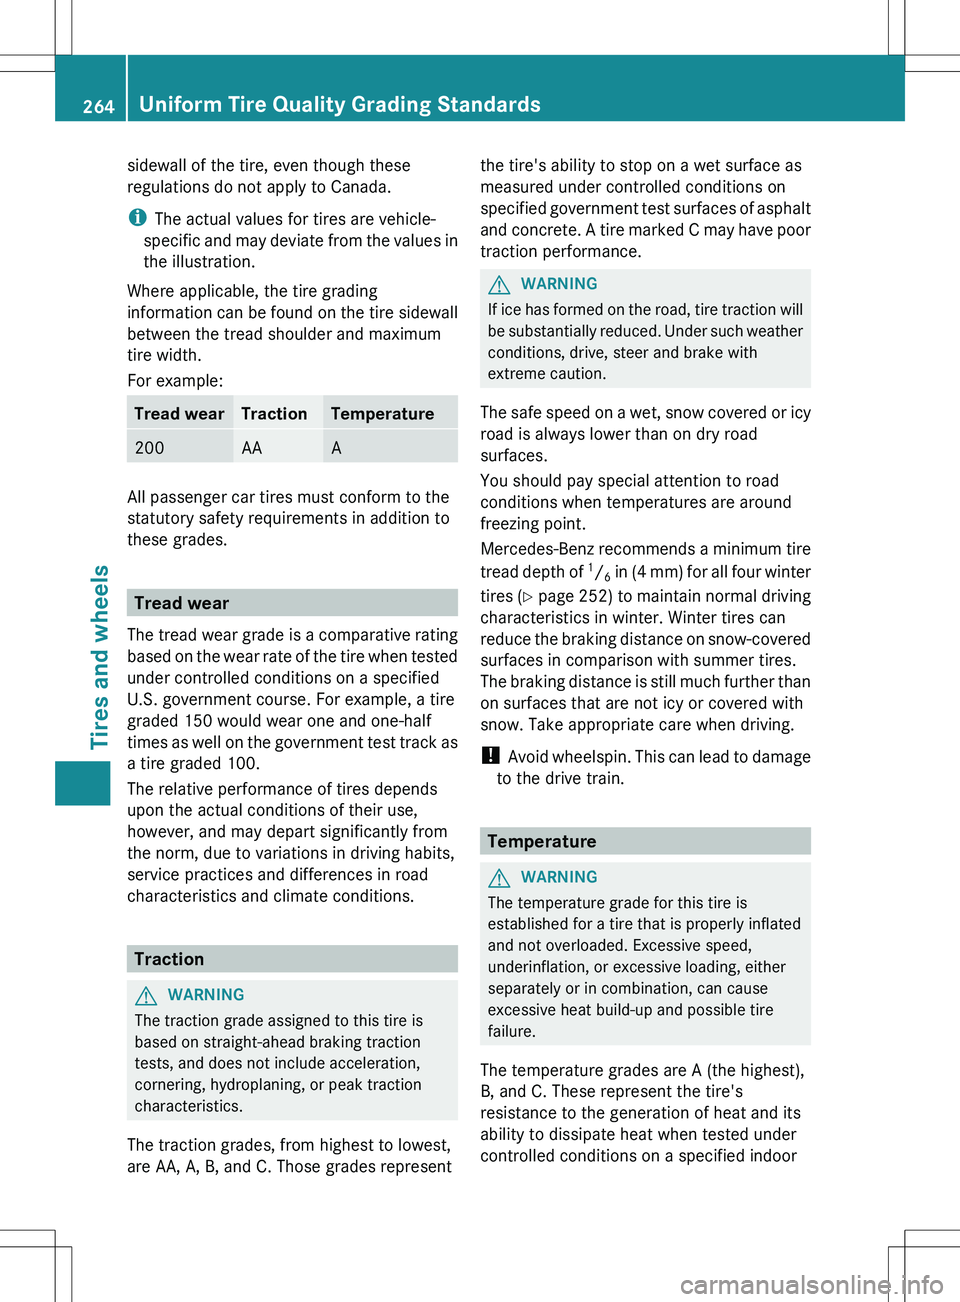
sidewall of the tire, even though these
regulations do not apply to Canada.
i The actual values for tires are vehicle-
specific and may deviate from the values in
the illustration.
Where applicable, the tire grading
information can be found on the tire sidewall
between the tread shoulder and maximum
tire width.
For example:Tread wearTractionTemperature200AAA
All passenger car tires must conform to the
statutory safety requirements in addition to
these grades.
Tread wear
The tread wear grade is a comparative rating
based on the wear rate of the tire when tested
under controlled conditions on a specified
U.S. government course. For example, a tire
graded 150 would wear one and one-half
times as well on the government test track as
a tire graded 100.
The relative performance of tires depends
upon the actual conditions of their use,
however, and may depart significantly from
the norm, due to variations in driving habits,
service practices and differences in road
characteristics and climate conditions.
Traction
GWARNING
The traction grade assigned to this tire is
based on straight-ahead braking traction
tests, and does not include acceleration,
cornering, hydroplaning, or peak traction
characteristics.
The traction grades, from highest to lowest,
are AA, A, B, and C. Those grades represent
the tire's ability to stop on a wet surface as
measured under controlled conditions on
specified government test surfaces of asphalt
and concrete. A tire marked C may have poor
traction performance.GWARNING
If ice has formed on the road, tire traction will
be substantially reduced. Under such weather
conditions, drive, steer and brake with
extreme caution.
The safe speed on a wet, snow covered or icy
road is always lower than on dry road
surfaces.
You should pay special attention to road
conditions when temperatures are around
freezing point.
Mercedes-Benz recommends a minimum tire
tread depth of 1
/ 6 in (4 mm) for all four winter
tires ( Y page 252) to maintain normal driving
characteristics in winter. Winter tires can
reduce the braking distance on snow-covered
surfaces in comparison with summer tires.
The braking distance is still much further than
on surfaces that are not icy or covered with
snow. Take appropriate care when driving.
! Avoid wheelspin. This can lead to damage
to the drive train.
Temperature
GWARNING
The temperature grade for this tire is
established for a tire that is properly inflated
and not overloaded. Excessive speed,
underinflation, or excessive loading, either
separately or in combination, can cause
excessive heat build-up and possible tire
failure.
The temperature grades are A (the highest),
B, and C. These represent the tire's
resistance to the generation of heat and its
ability to dissipate heat when tested under
controlled conditions on a specified indoor
264Uniform Tire Quality Grading StandardsTires and wheels