2012 MERCEDES-BENZ SLS AMG COUPE transmission
[x] Cancel search: transmissionPage 225 of 288
Have service work carried out as described
in the Maintenance Booklet. This may
otherwise lead to increased wear and
damage to the major assemblies or the
vehicle.
Driving abroad
An extensive Mercedes-Benz Service network
is also available in other countries. You can
obtain further information from any
authorized Mercedes-Benz Center.
Care
Notes on care
Regular care of your vehicle is a condition for
retaining the quality in the long term.
Use care products and cleaning agents
recommended and approved by Mercedes-
Benz.
GWARNING
Many cleaning products can be hazardous.
Some are poisonous, others are flammable.
Always follow the instructions on the
particular container. Always open your
vehicle's doors or windows when cleaning the
inside.
Never use fluids or solvents that are not
designed for cleaning your vehicle.
Always lock away cleaning products and keep
them out of reach of children.
! For cleaning your vehicle, do not use any
of the following:
R dry, rough or hard cloths
R abrasive cleaning agents
R solvents
R cleaning agents containing solvents
Do not scrub.
Do not touch the surfaces or protective
films with hard objects, e.g. a ring or ice
scraper. You could otherwise scratch or
damage the surfaces and protective film.
HEnvironmental note
Dispose of empty packaging and cleaning
cloths in an environmentally responsible
manner.
! Do not park the vehicle for an extended
period right after cleaning it, particularly
after having cleaned the wheels with wheel
cleaner. Wheel cleaners could cause
increased corrosion of the brake discs and
brake pads/linings. For this reason, you
should drive for a few minutes after
cleaning. Braking heats the brake discs and
brake pads, thus drying them. The vehicle
can then be parked.
Exterior care
Automatic car wash
GWARNING
Braking efficiency is reduced after washing
the vehicle. This could cause an accident.
After the vehicle has been washed, brake
firmly while paying attention to the traffic
conditions. This will warm up the brake discs,
thereby drying them more quickly. After
washing the vehicle, drive particularly
carefully until the brakes are dry and braking
power has been fully restored.
You can wash the vehicle in an automatic car
wash from the very start.
If the vehicle is very dirty, pre-wash it before
cleaning it in an automatic car wash.
! Never clean your vehicle in a Touchless
Automatic Car Wash as these use special
cleaning agents. These cleaning agents can
damage the paintwork or plastic parts.
! When washing your vehicle in a tow-
through car wash, use the SmartKey
instead of the Start/Stop button.
Start the engine using the SmartKey.. Move
the transmission to N with the E-SELECT
lever. Use the SmartKey to switch the
engine off again and then turn the
Care223Maintenance and careZ
Page 226 of 288
SmartKey to position 2. Make sure that you
then leave the SmartKey in position 2. You
may otherwise damage the vehicle, the
transmission or the car wash.
Check the transmission position in the
instrument cluster.
! Use the E-SELECT lever to shift the
transmission to N before switching the
engine off. If you open the driver's or front-
passenger door, the transmission remains
in this position for up to 30 minutes if the
SmartKey is in the ignition, even if the
engine is switched off. If you do not shift
the transmission to N using the E-SELECT
lever beforehand, it shifts automatically to
parking position P and locks the wheels if
the driver's or front-passenger door is
opened and the engine is switched off. This
may damage the vehicle, the transmission
or the car wash.
Observe the information on maneuvering
( Y page 129).
! Before driving into an automatic car wash,
make sure that it is suitable for the
dimensions of the vehicle. In particular,
make sure that:
R there is enough ground clearance
between the vehicle underbody and the
guide rails of the automatic car wash.
R the clearance width of the automatic car
wash is sufficient, particularly the width
of the guide rails.
R you enter the automatic car wash
straight and in the center of the guide
rails in order to avoid damaging the tires
or wheel rims.
Fold in the exterior mirrors before the
vehicle is washed. The exterior mirrors
could otherwise be damaged.
! Make sure that:R
the side windows are fully closed.
R the ventilation/heating is switched off
(the OFF button has been pressed/the
airflow control is set to position 0).
R that the windshield wiper switch is in
position 0.
Otherwise, the vehicle might be damaged.
! In portal car washes, the windshield
wipers may be moved up the windshield by
the cleaning brushes when the ignition is
switched off.
Set the Start/Stop button to key position
2 to reset the windshield wipers to their
original position.
! Vehicles with a matte finish:
Do not use wash programs with a hot wax
treatment under any circumstances.
After using an automatic car wash, wipe off
wax and drying agents from the windshield
and the wiper blades. This will prevent smears
and reduce wiping noises caused by residue
on the windshield.
Power washersGWARNING
Using power washers with circular-jet nozzles
(dirt grinders) may cause damage to the
vehicle, in particular to the tires.
Using damaged tires results in an increased
risk of accident. A sudden loss of tire pressure
while you are driving may cause you to lose
control of your vehicle, cause an accident and
injure yourself and others.
! Maintain a minimum distance of
11.8 in (30 cm) between the vehicle and the
power washer nozzle. Information about
the correct distance is available from the
equipment manufacturer.
Move the power washer nozzle around
when cleaning your vehicle.
224CareMaintenance and care
Page 235 of 288
XRemove the jack from the left-hand
stowage space in the trunk to allow the
stowage compartment to be opened.XTurn fastener ; in the direction of the
arrow.XOpen stowage compartment :.XRemove the TIREFIT kit, wheel chock,
alignment bolt and gloves.
Flat tire
Preparing the vehicle
Your vehicle is equipped with a TIREFIT kit.
XStop the vehicle on solid, non-slippery and
level ground, as far away as possible from
traffic.XSwitch on the hazard warning lamps.XApply the electric parking brake manually
( Y page 130).XBring the front wheels into the straight-
ahead position.XShift the transmission to P using the button
on the center console.XSwitch off the engine.XRemove the SmartKey from the ignition
lock.XAll occupants must get out of the vehicle.
Make sure that they are not endangered as
they do so.XMake sure that no one is near the danger
area while a wheel is being changed.
Anyone who is not directly assisting in the
wheel change should, for example, stand
behind the barrier.XGet out of the vehicle. Pay attention to
traffic conditions when doing so.XClose the driver's door.TIREFIT kit
Using the TIREFIT kitGWARNING
TIREFIT is a limited repair device. TIREFIT
cannot be used for cuts or punctures larger
than approximately 0.16 in (4 mm) and tire
damage caused by driving with extremely low
tire inflation pressure, or on a flat tire, or a
damaged wheel.
Do not drive the vehicle under such
circumstances.
Contact the nearest authorized Mercedes-
Benz Center for assistance or call Roadside
Assistance.
GWARNING
Take care not to allow the contents of TIREFIT
to come in contact with hair, eyes or clothing.
TIREFIT is harmful if inhaled, swallowed or
absorbed through the skin - causes skin, eye
and respiratory irritation.
Any contact with eyes or skin should be
flushed immediately with plenty of water.
If clothing comes in contact with TIREFIT,
change clothing as soon as possible.
In case of allergic reaction or rash, consult a
physician immediately.
GWARNING
Keep TIREFIT away from children. If
swallowed, rinse mouth immediately with
plenty of water and drink plenty of water.
Do not induce vomiting.
Consult a doctor immediately.
Keep away from open flame or heat source.
You can use the TIREFIT kit to seal small
punctures, particularly those in the tire tread.
You can use TIREFIT at outside temperatures
down to -40 †.
Flat tire233Breakdown assistanceZ
Page 244 of 288
Mercedes-Benz recommends that you do not
carry out work on batteries yourself, e.g.
removing or charging. Always have this work
performed at a qualified specialist workshop,
e.g. an authorized Mercedes-Benz Center.
i If the battery power supply has been
interrupted, e.g. if the battery has been
reconnected, you must reset the function
for automatically folding the exterior
mirrors in/out by folding the mirrors out
once ( Y page 90).
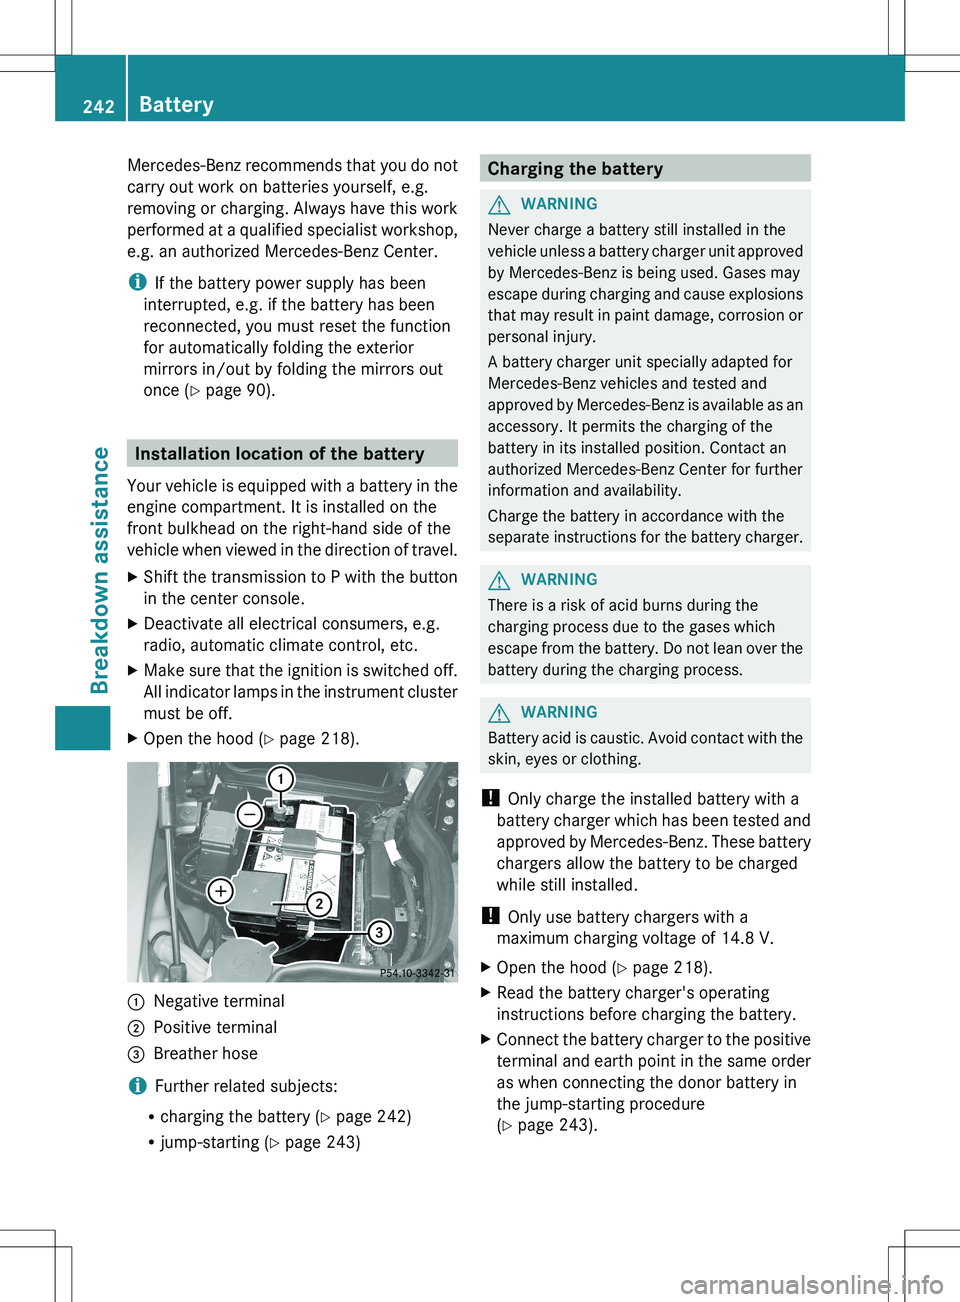
Installation location of the battery
Your vehicle is equipped with a battery in the
engine compartment. It is installed on the
front bulkhead on the right-hand side of the
vehicle when viewed in the direction of travel.
XShift the transmission to P with the button
in the center console.XDeactivate all electrical consumers, e.g.
radio, automatic climate control, etc.XMake sure that the ignition is switched off.
All indicator lamps in the instrument cluster
must be off.XOpen the hood ( Y page 218).:Negative terminal;Positive terminal=Breather hose
i Further related subjects:
R charging the battery ( Y page 242)
R jump-starting ( Y page 243)
Charging the batteryGWARNING
Never charge a battery still installed in the
vehicle unless a battery charger unit approved
by Mercedes-Benz is being used. Gases may
escape during charging and cause explosions
that may result in paint damage, corrosion or
personal injury.
A battery charger unit specially adapted for
Mercedes-Benz vehicles and tested and
approved by Mercedes-Benz is available as an
accessory. It permits the charging of the
battery in its installed position. Contact an
authorized Mercedes-Benz Center for further
information and availability.
Charge the battery in accordance with the
separate instructions for the battery charger.
GWARNING
There is a risk of acid burns during the
charging process due to the gases which
escape from the battery. Do not lean over the
battery during the charging process.
GWARNING
Battery acid is caustic. Avoid contact with the
skin, eyes or clothing.
! Only charge the installed battery with a
battery charger which has been tested and
approved by Mercedes-Benz. These battery
chargers allow the battery to be charged
while still installed.
! Only use battery chargers with a
maximum charging voltage of 14.8 V.
XOpen the hood ( Y page 218).XRead the battery charger's operating
instructions before charging the battery.XConnect the battery charger to the positive
terminal and earth point in the same order
as when connecting the donor battery in
the jump-starting procedure
( Y page 243).242BatteryBreakdown assistance
Page 245 of 288
Jump-startingGWARNING
Failure to follow these directions will cause damage to the electronic components, and can lead
to a battery explosion and severe injury or death.
Never lean over batteries while connecting or jump starting. You might get injured.
Battery fluid contains sulfuric acid. Do not allow this fluid to come in contact with eyes, skin or
clothing. In case it does, immediately flush affected area with water, and seek medical help if
necessary.
A battery will also produce hydrogen gas, which is flammable and explosive. Keep flames or
sparks away from battery, avoid improper connection of jumper cables, smoking, etc.
Attempting to jump start a frozen battery can result in it exploding, causing personal injury.
Read all instructions before proceeding.
! Avoid repeated and lengthy starting attempts. Otherwise, non-combusted fuel may
damage the catalytic converter and create a risk of fire.
Do not use a rapid charging device to start the vehicle.
Make sure the jumper cables are not damaged.
Make sure the jumper cables are not touching any other metal objects when they are
connected to the battery.
If your vehicle's battery is discharged, the engine can be jump-started from another vehicle
or from a second battery using jumper cables.
Observe the following points:
XThe battery is not accessible in all vehicles. If the other vehicle's battery is not accessible,
jump-start the vehicle using a second battery or a jump-starting device.XYou may only jump-start the vehicle when the engine and catalytic converter are cold.XDo not start the engine if the battery is frozen. Let the battery thaw first.XJump-starting may only be performed from batteries with a nominal voltage of 12 V.XOnly use jumper cables which have a sufficient cross-section and insulated terminal clamps.XMake sure that the jumper cables cannot come into contact with parts, such as the pulley
or the fan. These parts move when the engine is started and while it is running.XIf the battery is fully discharged, leave the battery that is being used to jump-start connected
for a few minutes before attempting to start. This charges the empty battery a little.
i Jumper cables and further information about jump-starting can be obtained from any
authorized Mercedes-Benz Center, for example.
XMake sure that the two vehicles do not touch.XPress the electric parking brake handle.XShift the transmission to P with the button in the center console.XDeactivate all electrical consumers, e.g. radio, automatic climate control, etc.XOpen the hood ( Y page 218).Jump-starting243Breakdown assistanceZ
Page 247 of 288
vehicle with a tow rope or tow bar. Observe
the following notes.GWARNING
If the brake system is malfunctioning, you
must use a rigid tow bar to tow the vehicle.
Before towing away, make sure that the
steering can be moved and is not locked.
If there is a malfunction in the power supply
or the vehicle's electrical system, you must
not tow the vehicle.
GWARNING
The following can occur if the vehicle is towed:
R the engine may not start.
R the on-board electronics may fail.
R the battery voltage may drop too much.
In these cases, the rear axle will be locked.
As a result, you might lose control of the
vehicle, cause an accident and injure yourself
and others.
! Use the SmartKey instead of the Start/
Stop button when towing the vehicle.
Start the engine and keep it running. Turn
the SmartKey to position 2 in the ignition.
Set the transmission to N using the E-
SELECT lever. Make sure that you then
leave the SmartKey in position 2.
Check the transmission position in the
instrument cluster.
! Make sure that the electric parking brake
is released. If the electric parking brake is
faulty, visit a qualified specialist workshop.
Mercedes-Benz recommends that you use
an authorized Mercedes-Benz Center for
this purpose.
! When towing, pull away slowly and
smoothly. If the tractive power is too high,
the vehicles could be damaged.
! Only secure the tow rope or tow bar at the
towing eyes. Otherwise, the vehicle could
be damaged.
! Do not use the towing eye for recovery,
as this could damage the vehicle. If in
doubt, recover the vehicle with a crane.
! You may only tow the vehicle a maximum
distance of 30 miles (50 km). A towing
speed of 30 mph (50 km/h) must not be
exceeded.
For towing distances over 30 miles
(50 km), the vehicle must loaded onto a
transporter.
! Do not tow with sling-type equipment.
This could damage the vehicle.
! Tow-starting the vehicle is not permitted.
The transmission may otherwise be
damaged.
Also observe the following notes:
R if the engine does not start, try jump-
starting it ( Y page 243). Tow-starting the
vehicle is not permitted.
R if it is not possible to jump-start the vehicle,
have it transported to the nearest qualified
specialist workshop, e.g. an authorized
Mercedes-Benz Center.
R if the transmission has been damaged,
have the vehicle transported to the nearest
qualified specialist workshop, e.g. an
authorized Mercedes-Benz Center.
Observe the display messages in the
instrument cluster.
Installing/removing the towing eye
Installing the towing eye
XTake the towing eye and the wheel
wrench 17
out of the wheel-change tool kit
( Y page 232).
The bracket for the removable towing eye is
in the bumper at the front. It is located under
the cover.
17 Not included in the scope of delivery.Towing and tow-starting245Breakdown assistanceZ
Page 248 of 288
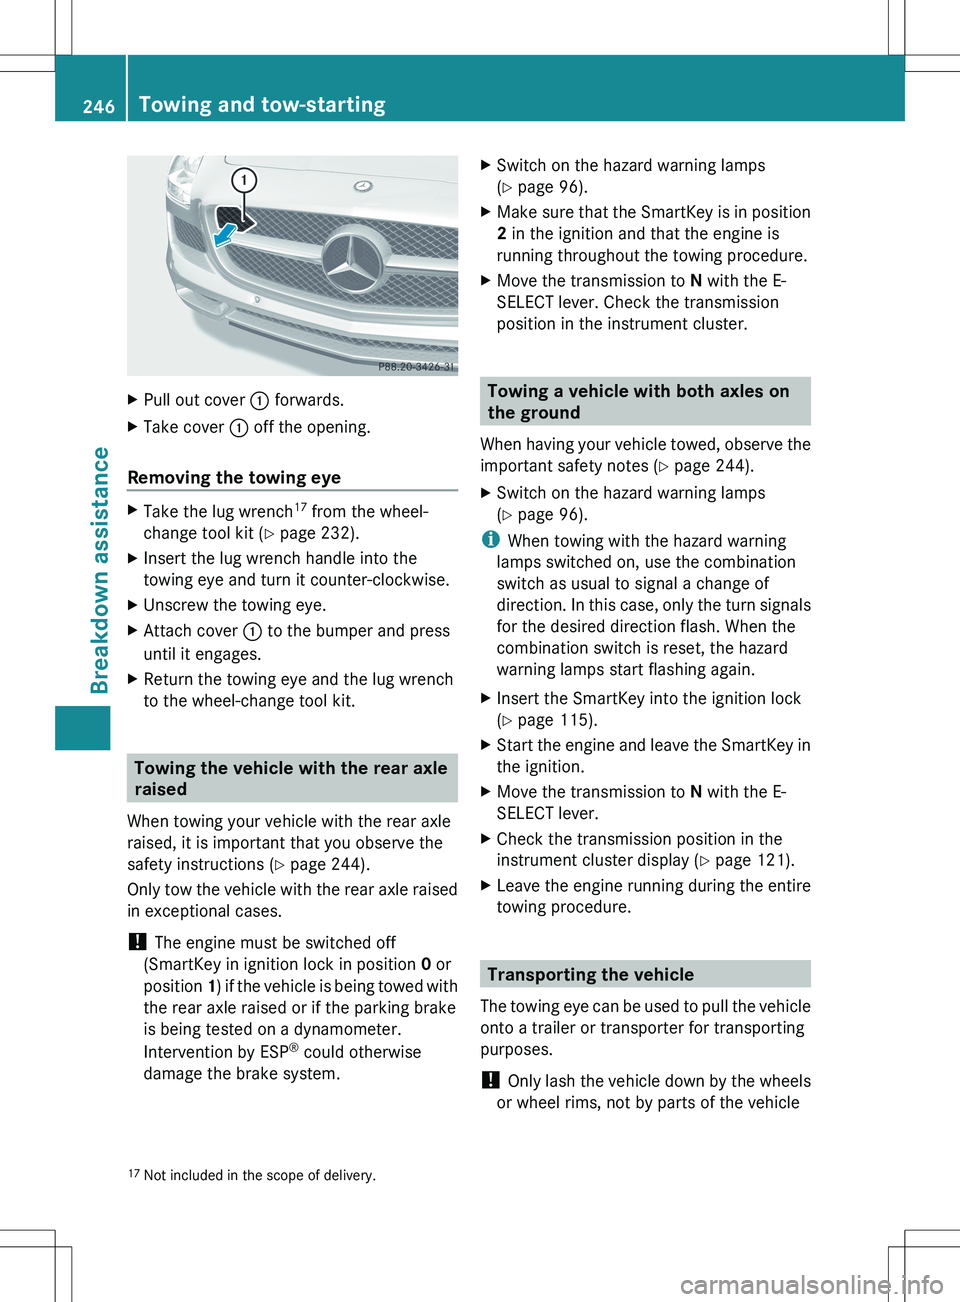
XPull out cover : forwards.XTake cover : off the opening.
Removing the towing eye
XTake the lug wrench 17
from the wheel-
change tool kit ( Y page 232).XInsert the lug wrench handle into the
towing eye and turn it counter-clockwise.XUnscrew the towing eye.XAttach cover : to the bumper and press
until it engages.XReturn the towing eye and the lug wrench
to the wheel-change tool kit.
Towing the vehicle with the rear axle
raised
When towing your vehicle with the rear axle
raised, it is important that you observe the
safety instructions ( Y page 244).
Only tow the vehicle with the rear axle raised
in exceptional cases.
! The engine must be switched off
(SmartKey in ignition lock in position 0 or
position 1) if the vehicle is being towed with
the rear axle raised or if the parking brake
is being tested on a dynamometer.
Intervention by ESP ®
could otherwise
damage the brake system.
XSwitch on the hazard warning lamps
( Y page 96).XMake sure that the SmartKey is in position
2 in the ignition and that the engine is
running throughout the towing procedure.XMove the transmission to N with the E-
SELECT lever. Check the transmission
position in the instrument cluster.
Towing a vehicle with both axles on
the ground
When having your vehicle towed, observe the
important safety notes ( Y page 244).
XSwitch on the hazard warning lamps
( Y page 96).
i
When towing with the hazard warning
lamps switched on, use the combination
switch as usual to signal a change of
direction. In this case, only the turn signals
for the desired direction flash. When the
combination switch is reset, the hazard
warning lamps start flashing again.
XInsert the SmartKey into the ignition lock
( Y page 115).XStart the engine and leave the SmartKey in
the ignition.XMove the transmission to N with the E-
SELECT lever.XCheck the transmission position in the
instrument cluster display ( Y page 121).XLeave the engine running during the entire
towing procedure.
Transporting the vehicle
The towing eye can be used to pull the vehicle
onto a trailer or transporter for transporting
purposes.
! Only lash the vehicle down by the wheels
or wheel rims, not by parts of the vehicle
17 Not included in the scope of delivery.246Towing and tow-startingBreakdown assistance
Page 249 of 288
such as axle or steering components.
Otherwise, the vehicle could be damaged.XStart the engine.XMake sure that the SmartKey is in position
2 in the ignition and that the engine is
running during the entire loading operation.XMove the transmission to N with the E-
SELECT lever. Check the transmission
position in the instrument cluster.
As soon as the vehicle is loaded:
XPrevent the vehicle from rolling away by
applying the electric parking brake.XShift the transmission to P with the button
in the center console.XTurn the SmartKey to position 0 in the
ignition lock and remove the SmartKey
from the ignition lock.XSecure the vehicle.
Fuses
Important safety notes
GWARNING
Only use fuses approved by Mercedes-Benz
with the specified amperage for the system in
question and do not attempt to repair or
bridge a blown fuse. Using other than
approved fuses or using repaired or bridged
fuses may cause an overload leading to a fire,
and/or cause damage to electrical
components and/or systems. Have the cause
determined and remedied by an authorized
Mercedes-Benz Center.
! Only use fuses that have been approved
for Mercedes-Benz vehicles and which
have the correct fuse rating for the system
concerned. Otherwise, components or
systems could be damaged.
The fuses in your vehicle serve to close down
faulty circuits. If a fuse blows, all the
components on the circuit and their functions
stop operating.
Blown fuses must be replaced with fuses of
the same rating, which you can recognize by
the color and value. The fuse ratings are listed
in the fuse allocation chart. An authorized
Mercedes-Benz Center will be happy to
advise you.
i If a fuse has blown, contact a breakdown
service or an authorized Mercedes-Benz
Center.
If the newly inserted fuse also blows, have the
cause traced and rectified at a qualified
specialist workshop, e.g. an authorized
Mercedes-Benz Center.
Before changing a fuse
XPark the vehicle and apply the electric
parking brake.XSwitch off all electrical consumers.XRemove the SmartKey from the ignition
lock.
The fuses are located in various fuse boxes:
R fuse box in the footwell on the front-
passenger side
R fuse box in the rear
The "Relay and fuse information sheet" is
located with the wheel-change toolkit in the
trunk.
Fuse box in the footwell
Fuses247Breakdown assistanceZ