Page 241 of 334
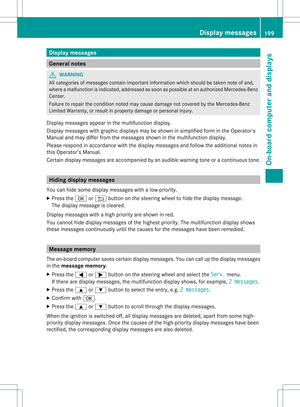
approximately one minute and then remain continuously illuminated. This sequence will be
repeated every time the vehicle is started as long as the malfunctio nexists. Whe nthe malfunction
indicator is illuminated, the system may not be able to detect or signal low tire pressure as
intended.
TPMS malfunctions may occur for a variety of reasons, including the installation of incompatible
replacement or alternate tires or wheels on the vehicle that prevent the TPMS from functioning
properly. Always check the TPMS malfunction telltale after replacing one or more tires or wheels
on your vehicle to ensure that the replacement or alternate tires and wheels allow the TPMS to
continue to function properly. Warning and indicator lamps in the instrument cluster
239On-board computer and displays Z
Page 242 of 334
Page 243 of 334
Useful information
............................242
Stowage areas .................................. 242
Features ............................................. 245 241Stowage and features
Page 244 of 334

Useful information
i This Operator's Manual describes all
models and all standard and optional
equipment of your vehicle available at the
time of publication of the Operator's
Manual. Country-specific differences are
possible. Please note that your vehicle may
not be equipped with all features
described. This also applies to safety-
related systems and functions.
i Please read the information on qualified
specialist workshops (Y page 23).Stowage areas
Stowage compartments
Important safety notes G
WARNING
To help avoid personal injury during a collision
or sudden maneuver, exercise care when
storing objects in the vehicle. Put luggage or
cargo in the trun kifpossible.
Keep compartment lids closed. This will help
to prevent stored objects from being thrown
about and injuring vehicle occupants during
R braking
R vehicle maneuvers
R an accident
Stowage compartments in the front Glove box
i
The glove box flap contains brackets for
coins, pens, and credit and service cards. X
To open: pull handle 0002and open glove box
flap 0003.
X To close: fold glove box flap 0003upwards
until it engages.
The glove box can be locked and unlocked
using the key (Y page 68) or using the
mechanical key. X
To lock: insert the mechanical key into the
lock and turn it 90° clockwise to position
0006.
X To unlock: insert the mechanical key into
the lock and turn it 90° counter-clockwise
to position 0005.242
Stowage areasStowage and features
Page 245 of 334

Eyeglasses compartment
X
To open: press marking 0002.
Stowage compartment in the center
console X
To open: briefly press the lower sectio nof
cover 0002.
X To remove the insert: pull the left-hand
side of the insert up and out.
X To install the insert: press the insert into
the housing.
i Depending on the vehicle equipment,
there may be an ashtray in the center
console instead of a storage compartment. Stowage compartment in front of the
armrest X
To open: slide cover 0002back.
Stowage compartment under the armrest
i Depending on the vehicle's equipment, a
12 V socket, a USB socket, and an AUX IN
connection or Media Interface are installed
in the stowage compartment. AMedia
Interface is a universal interface for mobile
audio equipment, e.g. for an iPod ®
or MP3
player (see the separate COMAND
operating instructions).
i The stowage compartment can be locked
and unlocked centrally using the SmartKey
(Y page 68). X
To open: press button 0002and raise
armrest 0003. Stowage areas
243Stowage and features Z
Page 246 of 334

Stowage compartments in the doors
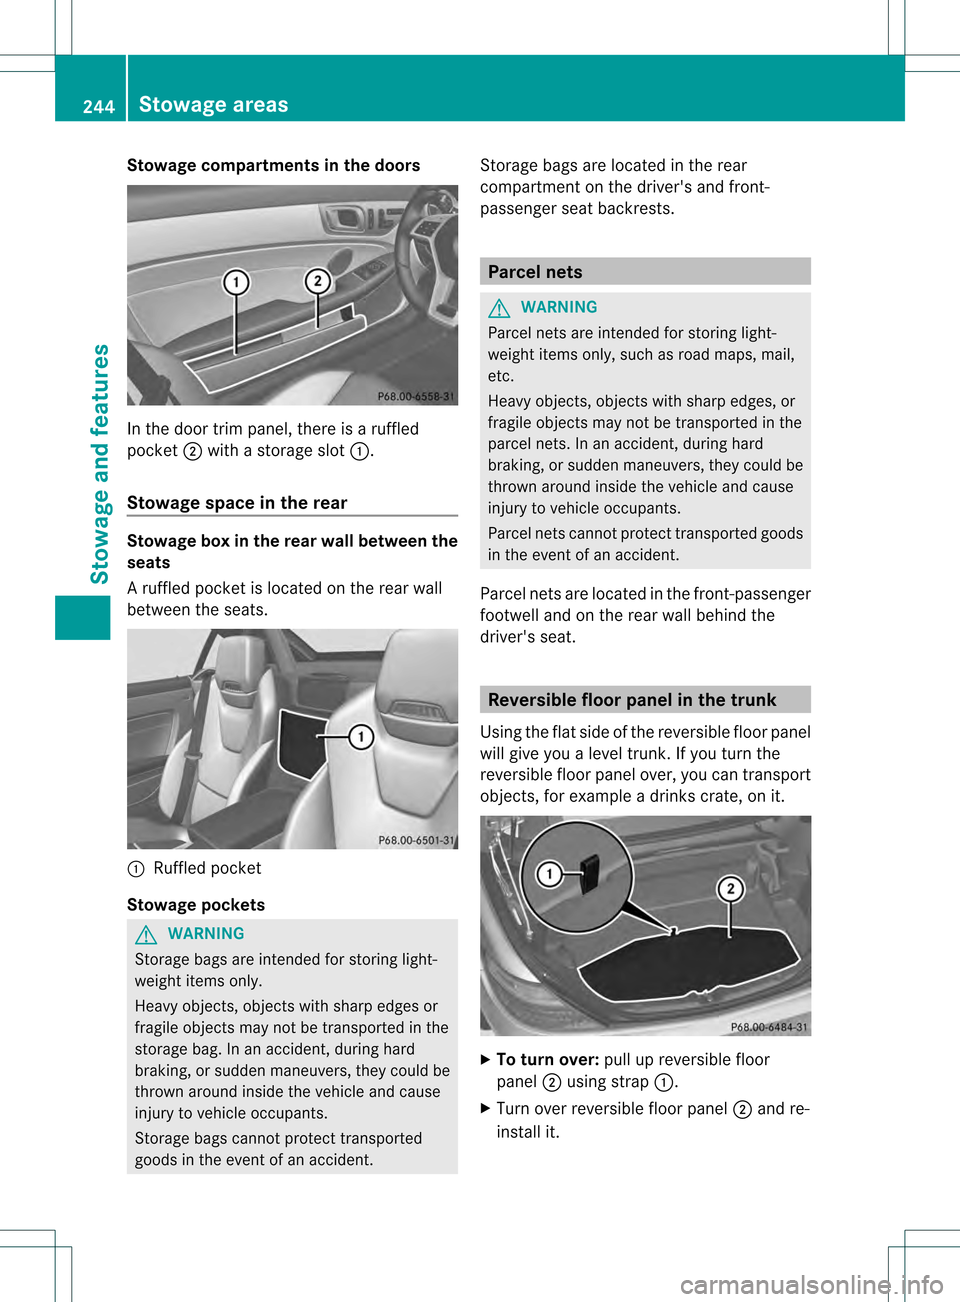
In the door trim panel, there is a ruffled
pocket
0003with a storage slot 0002.
Stowage space in the rear Stowage box in the rear wall between the
seats
Ar
uffled pocke tis located on the rear wall
between the seats. 0002
Ruffled pocket
Stowage pockets G
WARNING
Storage bags are intended for storing light-
weight items only.
Heavy objects, objects with sharp edges or
fragile objects may not be transported in the
storage bag. In an accident, during hard
braking, or sudden maneuvers, they could be
thrown around inside the vehicle and cause
injury to vehicle occupants.
Storage bags cannot protect transported
goods in the event of an accident. Storage bags are located in the rear
compartment on the driver's and front-
passenger seat backrests. Parcel nets
G
WARNING
Parcel nets are intended for storing light-
weight items only, such as road maps, mail,
etc.
Heavy objects, objects with sharp edges, or
fragile objects may not be transported in the
parcel nets. In an accident, during hard
braking, or sudden maneuvers, they could be
thrown around inside the vehicle and cause
injury to vehicle occupants.
Parcel nets cannot protect transported goods
in the event of an accident.
Parcel nets are located in the front-passenger
footwell and on the rear wall behind the
driver's seat. Reversible floor panel in the trunk
Using the flat side of the reversible floor panel
will give you alevel trunk. If you turn the
reversible floor panel over, you can transport
objects, for example a drinks crate, on it. X
To turn over: pull up reversible floor
panel 0003using strap 0002.
X Turn over reversible floor panel 0003and re-
install it. 244
Stowage areasStowage and features
Page 247 of 334

Attached to the reversible floor panel are two
flexible straps 0003thatyou can use to secure
objects, for example draft stop 0023when
reversible floor panel 0002has been turned
over. Roof carrier
Important safety notes !
This vehicle is not designed to transport
items on the roof. Roof carriers and other
devices which are mounted on the roof that
have not been specifically approved for this
model by Mercedes-Benz must not be used
as they could damage the vehicle and the
retractable hardtop (vario-roof).
At the time of going to print, Mercedes-
Benz does not offer any roof carrier or other
roof-installed devices for this model.
! This vehicle is not designed to transport
any items on the trunk lid or to allow
luggage carriers or equipment of any kind
to be installed to the trunk lid. Otherwise
the vehicle and the retractable hardtop
could be damaged. Features
Cup holders
Important safety notes G
WARNING
In order to help prevent spilling liquids on
vehicle occupants and/or vehicle equipment,
only use containers that fit into the cup
holder. Use lids on open containers and do
not fill containers to aheight where the
contents, especially hot liquids, could spill
during braking, vehicle maneuvers, or in an
accident. Liquids spilled on vehicle occupants
may cause serious personal injury. Liquids
spilled on vehicle equipment may cause
damage not covered by the Mercedes-Benz
Limited Warranty.
When not in use, keep the cup holder closed.
An open cup holder may cause injury to you
or others when contacted during braking,
vehicle maneuvers, or in an accident.
Keep in mind that objects placed in the cup
holder may come loose during braking,
vehicle maneuvers, or in an accident and be
thrown around in the vehicle interior. Objects
thrown around in the vehicle interior may
cause an acciden tand/o rserious personal
injury.
Cup holder in the front-compartment
center console You can remove the cup holder insert for
cleaning. Clean with clear, lukewarm water
only. Features
245Stowage and features Z
Page 248 of 334

X
To open: slide cover 0003back.
X To remove the insert: slide catch0002
inwards on both sides in the direction of the
arrow.
X Remove the cup holde rinser tupwards.
X To re-install the insert: place the insert in
the stowage space.
X Slide catch 0002outwards in the direction of
the arrow until it engages. Bottle holder
G
WARNING
Do not transport heavy, sharp-edged, or
fragile bottles in the bottle holder.
In the event of an accident, the bottle holder
cannot secure a bottle sufficiently. You and/
or vehicle occupants could be injured.
! Make sure that any bottles weighing more
than 0.5 kg that are stored in the bottle
holder rest on the vehicle floor. The bottle
holder could otherwise be damaged.
The bottle holder is designed for bottles with
a capacity of 25 fl. oz. (0.7 l) up to 54 fl. oz.
(1.5 l).
The bottle holder does not secure the bottles;
it merely prevents them from tipping over. X
Press the outer edge of button 0002and slide
in the direction of the arrow until the bottle
fits into the opening.
X Insert the bottle into the bottle holder. Sun visors
Overview of sun visors G
WARNING
Do not use the vanity mirror while driving.
Keep the vanity mirrors in the sun visors
closed while the vehicle is in motion.
Reflected glare can endanger you and others. 0002
Mirror light
0003 Bracket
0023 Retaining strip, e.g. for a car park ticket
0022 Vanity mirror
0020 Mirror cover
i When driving at high speeds with the side
window or roof open:
If you have inserted a car park ticket into
retaining strip 0023, make sure that it is not
blown away by the wind.
Vanity mirror in the sun visor Mirror light
0002only functions if the sun visor
is clipped into retainer 0003and mirror cover
0020 has been folded up.
Glare from the side X
Fold down the sun visor.
X Pull the sun visor out of retainer 0003.
X Swing the sun visor to the side.
X Slide the sun visor forwards and back as
required. 246
FeaturesStowage and features