2012 MERCEDES-BENZ SLK55AMG seat adjustment
[x] Cancel search: seat adjustmentPage 94 of 334
Useful information
i This Operator's Manual describes all
models and all standard and optional
equipment of your vehicle available at the
time of publication of the Operator's
Manual. Country-specific differences are
possible. Please note that your vehicle may
not be equipped with all features
described. This also applies to safety-
related systems and functions.
i Please read the information on qualified
specialist workshops (Y page 23).Correcting the driver's seat position
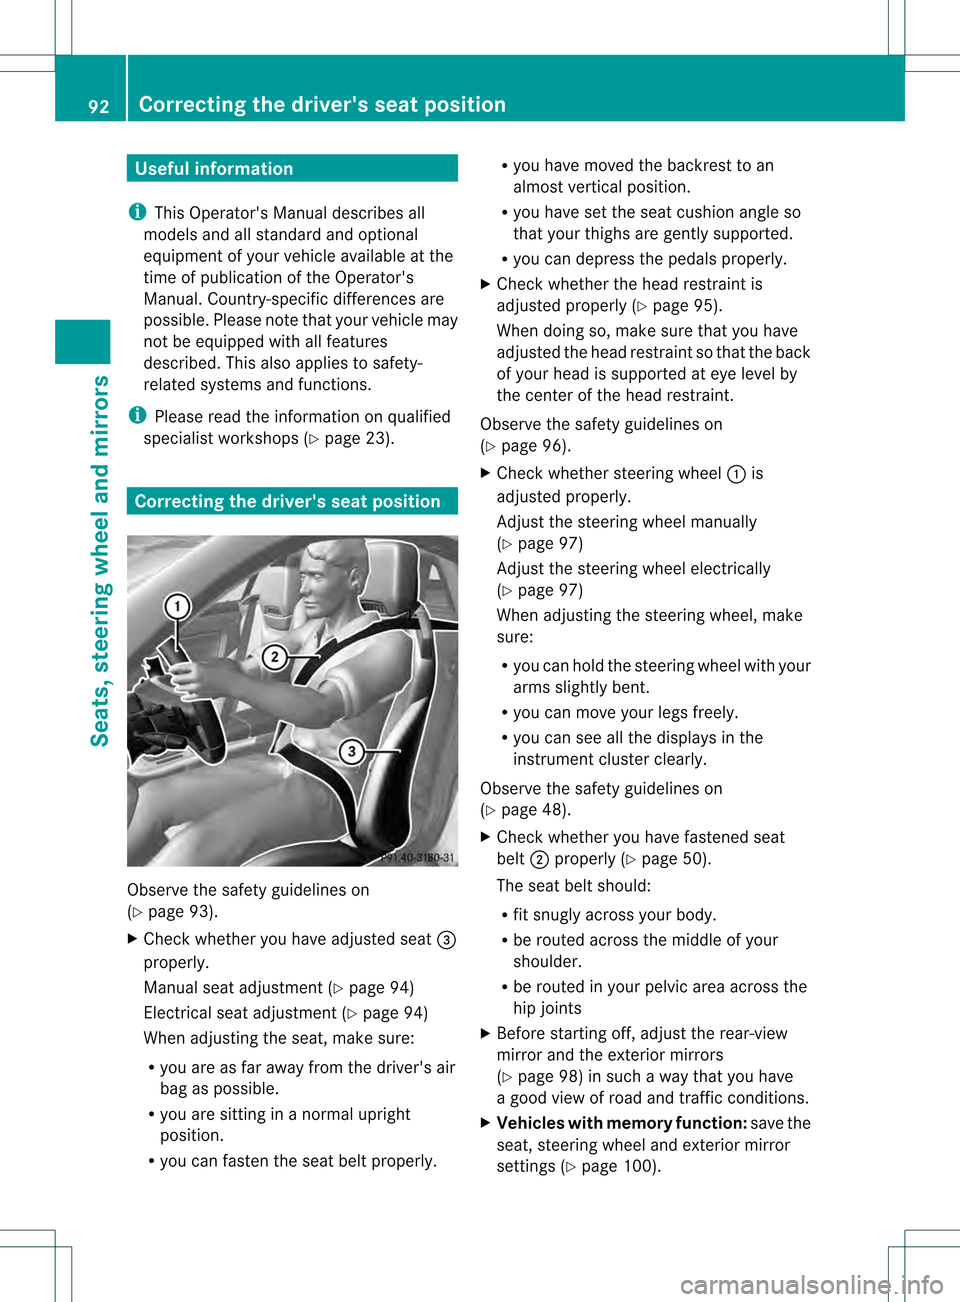
Observe the safety guidelines on
(Y
page 93).
X Check whether you have adjusted seat 0023
properly.
Manual seat adjustment (Y page 94)
Electrical seat adjustment (Y page 94)
When adjusting the seat, make sure:
R you are as far away from the driver's air
bag as possible.
R you are sitting in a normal upright
position.
R you can fasten the seat belt properly. R
you have moved the backrest to an
almost vertical position.
R you have set the seat cushion angle so
that your thighs are gently supported.
R you can depress the pedals properly.
X Check whether the head restraint is
adjusted properly (Y page 95).
When doing so, make sure that you have
adjusted the head restraint so that the back
of your head is supported at eye level by
the center of the head restraint.
Observe the safety guidelines on
(Y page 96).
X Check whether steering wheel 0002is
adjusted properly.
Adjust the steering wheel manually
(Y page 97)
Adjust the steering wheel electrically
(Y page 97)
When adjusting the steering wheel, make
sure:
R you can hold the steering wheel with your
arms slightly bent.
R you can move your legs freely.
R you can see all the displays in the
instrumen tcluste rclearly.
Observe the safety guidelines on
(Y page 48).
X Check whether you have fastened seat
belt 0003properly (Y page 50).
The seat belt should:
R fit snugly across your body.
R be routed across the middle of your
shoulder.
R be routed in your pelvic area across the
hip joints
X Before starting off, adjust the rear-view
mirror and the exterior mirrors
(Y page 98) in such a way that you have
a good view of road and traffic conditions.
X Vehicles with memory function: save the
seat, steering wheel and exterior mirror
settings (Y page 100). 92
Correcting the driver's seat positionSeats, steering wheel and mirrors
Page 95 of 334
Seats
Important safety notes
G
WARNING
In order to avoid possible loss of vehicle
control, all seat, head restraint, steering
wheel and rear view mirror adjustments, as
well as fastening of seat belts, must be done
before setting the vehicle in motion. G
WARNING
Do not adjust the driver's seat while driving.
Adjusting the seat while driving could cause
the driver to lose control of the vehicle.
Never travel in a moving vehicle with the seat
backrest in an excessively reclined position as
this can be dangerous. You could slide under
the seat belt in a collision. If you slide under
it, the seat belt would apply force at the
abdomen or neck.T his could cause serious or
fatal injuries. The seat backrest and seat belts
provide the best restraint when the wearer is
in a position that is as upright as possible and
seat belts are properly positioned on the
body. G
WARNING
Your seat belt must be adjusted so that you
can correctly fasten your seat belt.
Observe the following points:
R adjust the seat backrest until your arms are
slightly angled when holding the steering
wheel.
R adjust the seat to a comfortable seating
position that still allows you to reach the
accelerator/brake pedal safely. The
position should be as far back as possible
with the driver still able to operate the
controls properly.
R adjust the head restraint so that it is as
close to the head as possible and the center of the head restraint supports the back of
the head at eye level.
R never place hands under the seat or near
any moving parts while a seat is being
adjusted.
Failure to do so could result in an accident
and/or serious personal injury. G
WARNING
The electrically adjustable seats can be
operated at any time. Therefore, do not leave
children unattended in the vehicle, or with
access to an unlocked vehicle. Achild's
unsupervised access to a vehicle could result
in an accident and/or serious personal injury. G
WARNING
Children 12 years old and under must be
seated and properly secured in an
appropriately sized infant restraint, child
restraint system, or booster seat
recommended for the size and weight of the
child. For additional information, see the
"Children in the vehicle" section.
Ac hild's risk of serious or fatal injuries is
significantly increased if the child restraints
are not properly secured in the vehicle and/
or the child is not properly secured in the child
restraint. G
WARNING
For your protection, drive only with properly
positioned head restraints.
Adjust the head restraint so that it is as close
to the head as possible and the center of the
head restraint supports the back of the head
at eye level. This will reduce the potential for
injury to the head and neck in the event of an
accident or similar situation.
Do not drive the vehicle without the seat head
restraints. Head restraints are intended to
help reduce injuries during an accident. Seats
93Seats, steering wheel and mirrors Z
Page 96 of 334

!
To avoid damage to the seats and the seat
heating, observe the following information:
R do not spill any liquids on the seats. If
liquid is spilled on the seats, dry them as
soon as possible.
R if the seat covers are damp or wet, do not
switch on the seat heating. The seat
heating should also not to be used to dry
the seats.
R clean the seat covers as recommended;
see the "Interior care" section.
R do not transport heavy loads on the
seats. Do not place sharp objects on the
seat cushions, e.g. knives, nails or tools.
The seats should only be occupied by
passengers, if possible.
R when the seat heating is in operation, do
not cover the seats with insulating
materials, e.g. blankets, coats, bags,
seat covers, child seats or booster seats.
! Make sure that there are no objects in the
footwell or behind the seats when resetting
the seats. There is a risk that the seats
and/or the objects could be damaged.
i The head restraints are equipped with the
NECK-PRO system (Y page 47). For this
reason, it is not possible to remove the
head restraints from the seats.
For more information, contact a qualified
specialist workshop. Adjusting the seats manually Seat fore-and-aft adjustment
X
Lift handle 0002and slide the seat forwards
or backwards.
X Release lever 0002again.
Make sure that you hear the seat engage in
position.
Backrest angle X
Relieve the pressure on the backrest.
X Pull handle 0003and adjust the backrest to
the desired angle.
X Release handle 0003again.
The backrest must audibly engage.
Seat height X
Pull handle 0023upwards or push it down
repeatedly until the seat has reached the
desired height. Adjusting the seats electrically
0002
Backrest angle
0003 Seat fore-and-aft adjustment
0023 Seat cushion angle
0022 Seat height
i You can store the seat settings using the
memory function (Y page 100).94
SeatsSeats, steering wheel and mirrors
Page 98 of 334
Problems with the seat heating
The seat heating has switched itself off
prematurely. The vehicle's electrical system
voltage is too low because too many electrical
consumers are switched on.
X
Switch off electrical consumers that you do
not need, such as the rear window
defroster or interior lighting.
X Once the battery is sufficiently charged,
switch on the seat heating again. AIRSCARF
Switching on/off G
WARNING
Very hot air can flow out of the AIRSCARF
vents in the head restraints when AIRSCARF
is in operation. This can cause burns on
unprotected skin near the AIRSCARF vents.
Lower the heating output in good time, when
necessary.
The AIRSCARF function warms the head and
neck area of vehicle occupants with warm air.
The warm air flows out of the holes in the head
restraints.
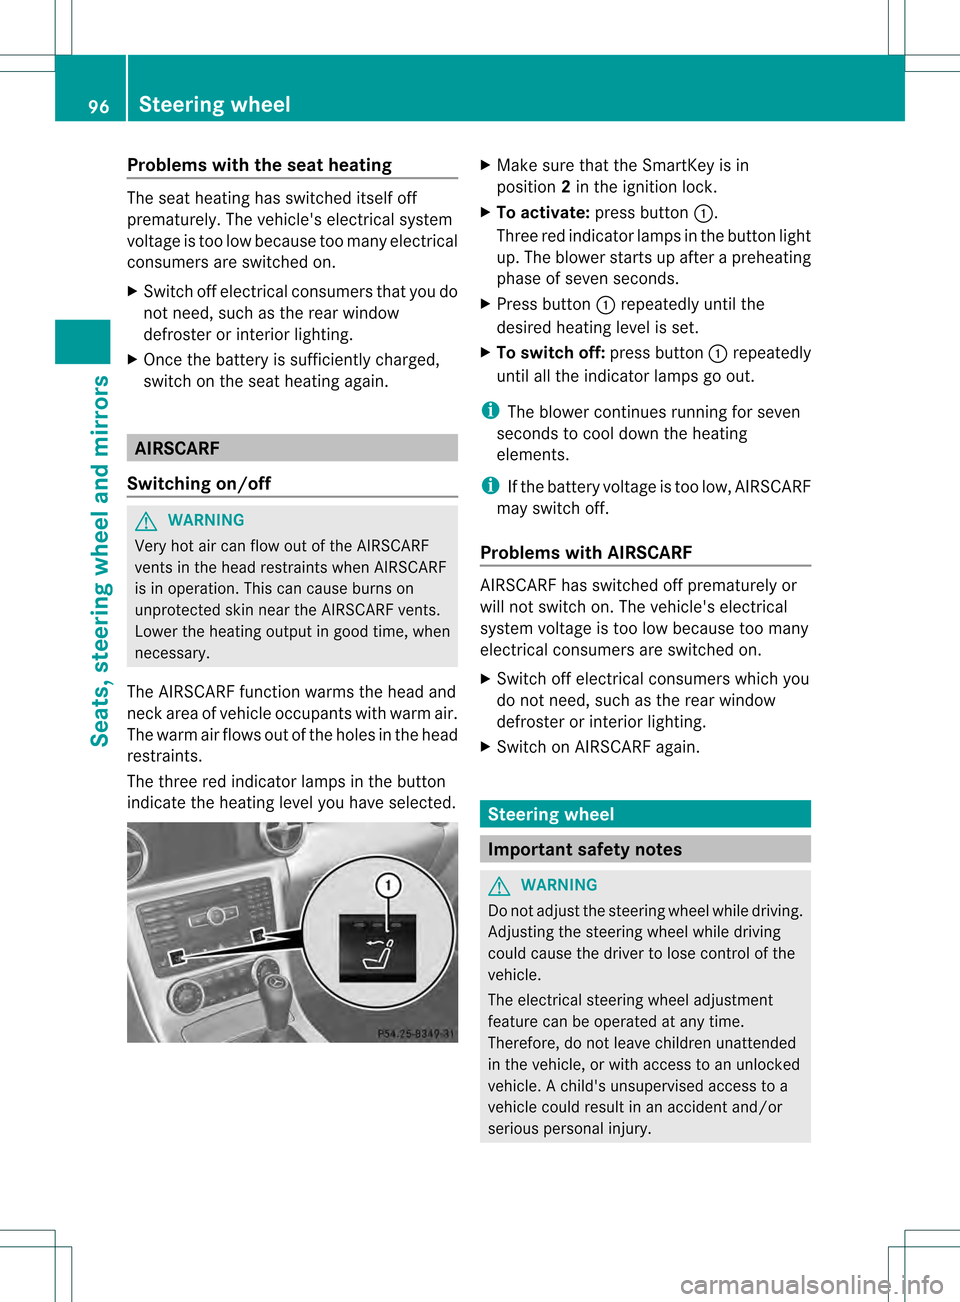
The three red indicator lamps in the button
indicate the heating level you have selected. X
Make sure that the SmartKey is in
position 2in the ignition lock.
X To activate: press button 0002.
Three red indicator lamps in the button light
up. The blower starts up after a preheating
phase of seven seconds.
X Press button 0002repeatedly until the
desired heating level is set.
X To switch off: press button0002repeatedly
until all the indicator lamps go out.
i The blower continues running for seven
seconds to cool down the heating
elements.
i If the battery voltage is too low, AIRSCARF
may switch off.
Problems with AIRSCARF AIRSCARF has switched off prematurely or
will not switch on. The vehicle's electrical
system voltage is too low because too many
electrical consumers are switched on.
X
Switch off electrical consumers which you
do not need, such as the rear window
defroster or interior lighting.
X Switch on AIRSCARF again. Steering wheel
Important safety notes
G
WARNING
Do not adjust the steering wheel while driving.
Adjusting the steering wheel while driving
could cause the driver to lose control of the
vehicle.
The electrical steering wheel adjustment
feature can be operated at any time.
Therefore, do not leave children unattended
in the vehicle, or with access to an unlocked
vehicle. Achild's unsupervised access to a
vehicle could result in an accident and/or
serious personal injury. 96
Steering wheelSeats, steering wheel and mirrors
Page 99 of 334

Adjusting the steering wheel
manually
0002
Release lever
0003 To adjust the steering wheel height
0023 To adjust the steering wheel position
(fore-and-aft adjustment)
X Fold release lever 0002down completely in
the direction of the arrow.
The steering column is unlocked.
X Adjus tthe steering wheel to the desired
position.
X Push release lever 0002up completely.
The steering column is locked.
X Check if the steering column is locked.
When doing so, try to push the steering
wheel up or down or try to move it in the
fore-and-aft direction. Adjusting the steering wheel
electrically
0002
To adjust the steering wheel height
0003 To adjust the steering wheel position
(fore-and-aft adjustment)
i Related topics:
R EASY-ENTRY/EXIT feature
(Y page 97)
R Storing settings (Y page 100) EASY-ENTRY/EXIT feature
Important safety notes The EASY-ENTRY/EXIT feature makes getting
in and out of your vehicle easier.
You can activate and deactivate the EASY-
ENTRY/EXIT feature in the on-board
computer (Y page 194). G
WARNING
You must make sure no one can become
trapped or injured by the moving steering
wheel when the easy-entry/exit feature is
activated.
To stop steering wheel movement, move
steering wheel adjustment stalk or press the
memory position switch.
Do not leave children unattended in the
vehicle, or with access to an unlocked vehicle.
Children could open the driver's door and
unintentionally activate the easy-entry/exit
feature, which could result in an accident
and/or serious personal injury. Steering wheel
97Seats, steering wheel and mirrors Z
Page 100 of 334

G
WARNING
Let the system complete the adjustment
procedure before setting the vehicle in
motion. All steering wheel adjustment must
be completed before setting the vehicle in
motion. Driving off with the steering wheel
still adjusting could cause the drive rto lose
control of the vehicle.
Position of the steering wheel when the
EASY-ENTRY/EXIT featur eis active The steering wheel swings upwards when
you:
R
remove the SmartKey from the ignition lock
R open the driver's door and KEYLESS-GO is
in position 1
R open the driver's door and the SmartKey is
in position 0or 1in the ignition lock
i The steering wheel only moves upwards if
it has not already reached the upper end
stop.
Position of the steering wheel for
driving The steering wheel is moved to the last
selected position when:
R
the driver's door is closed.
R you insert the SmartKey into the ignition
lock.
or
R you press the Start/Stop button once on
vehicles with KEYLESS-GO.
When you close the driver's door with the
ignition switched on, the steering wheel is
also automatically moved to the previously
set position.
The last position of the steering wheel is
stored after each manual setting or when you
store the setting with the memory function
(Y page 100). Crash-responsive EASY-EXIT feature If the crash-responsive EASY-EXIT feature is
triggered in an accident, the steering column
will move upwards when the driver's door is
opened. This occurs irrespective of the
position of the SmartKey in the ignition lock.
This makes it easier to exit the vehicle and
rescue the occupants.
The crash-responsive EASY-EXIT feature is
only operational after an accident if the EASY-
EXIT/ENTRY feature is activated in the on-
board computer. Mirrors
Rear-view mirror
Rear-view mirror (manual anti-glare) X
Anti-glare mode: flick anti-glare lever 0002
forwards or back. Exterior mirrors
Adjusting the exterior mirrors G
WARNING
Exercise care when using the passenger-side
exterior rear view mirror. The mirror surface
is convex (outwardly curved surface for a
wider field of view). Objects in mirror are
closer than they appear. Check your interior
rear view mirror and glance over your
shoulder before changing lanes. 98
MirrorsSeats, steering wheel and mirrors
Page 102 of 334
incident light fro
mheadlamps strikes the
sensor in the rear-view mirror.
The mirrors do not go into anti-glare mode if
reverse gear is engaged or the interior lighting
is switched on. Parking position for the exterior
mirror on the front-passenger side
Setting and storing the parking position You can position the front-passenger side
exterior mirror in such a way that you can see
the rear wheel on that side as soon as you
engage reverse gear. You can store this
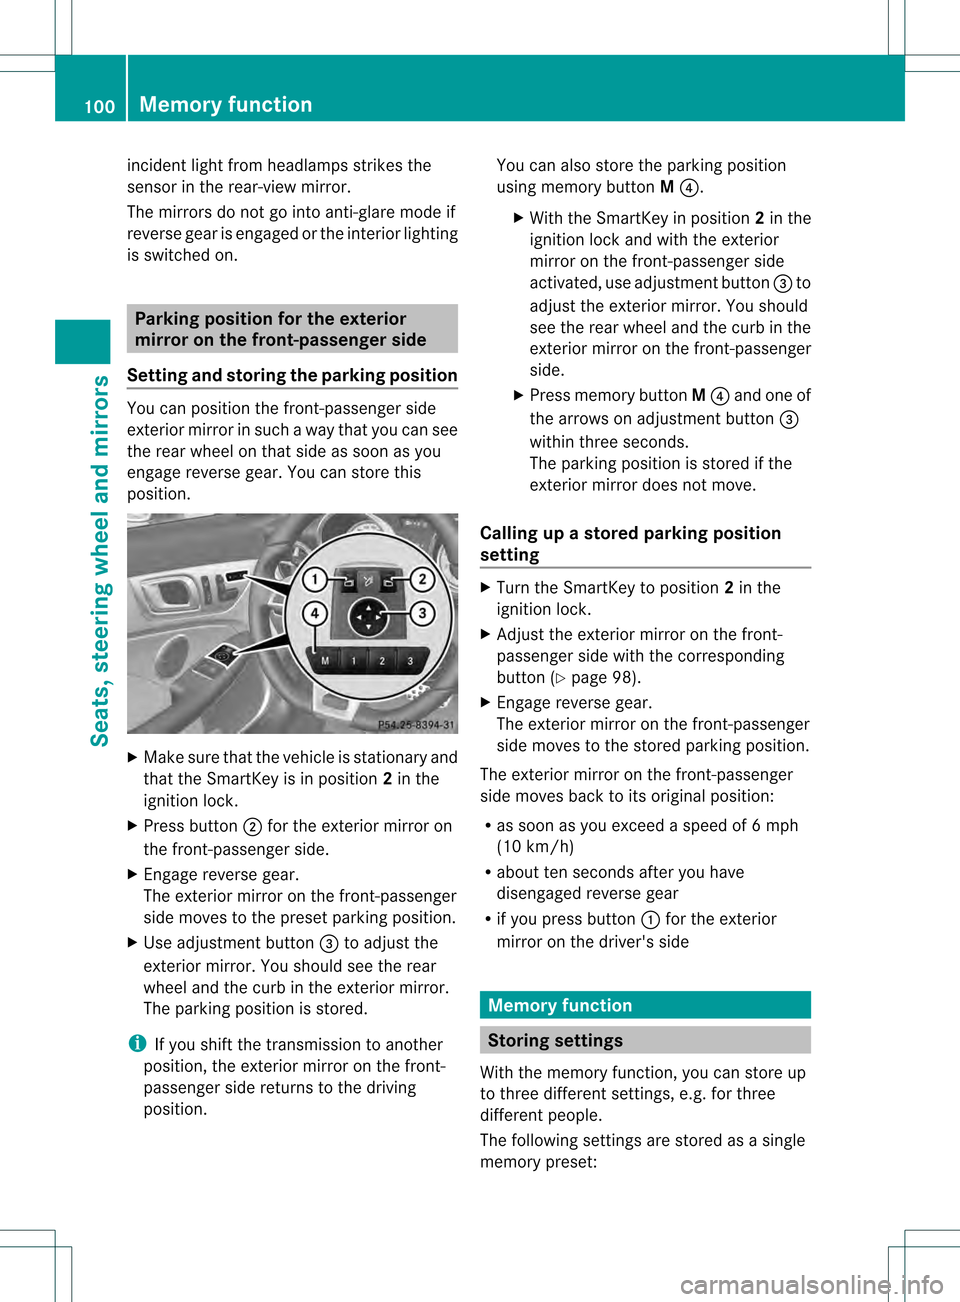
position. X
Make sure that the vehicle is stationary and
that the SmartKey is in position 2in the
ignition lock.
X Press button 0003for the exterior mirror on
the front-passenger side.
X Engage reverse gear.
The exterior mirror on the front-passenger
side moves to the preset parking position.
X Use adjustment button 0023to adjust the
exterior mirror .You should see the rear
wheel and the curb in the exterior mirror.
The parking position is stored.
i If you shift the transmission to another
position, the exterior mirror on the front-
passenger side returns to the driving
position. You can also store the parking position
using memory button
M0022.
X With the SmartKey in position 2in the
ignition lock and with the exterior
mirror on the front-passenger side
activated, use adjustmen tbutton 0023to
adjust the exterio rmirror. You should
see the rear wheel and the curb in the
exterior mirror on the front-passenger
side.
X Press memory button M0022 and one of
the arrows on adjustment button 0023
within three seconds.
The parking position is stored if the
exterior mirror does not move.
Calling up a stored parking position
setting X
Turn the SmartKey to position 2in the
ignition lock.
X Adjust the exterior mirror on the front-
passenger side with the corresponding
button (Y page 98).
X Engage reverse gear.
The exterior mirror on the front-passenger
side moves to the stored parking position.
The exterior mirror on the front-passenger
side moves back to its original position:
R as soon as you exceed a speed of 6mph
(10 km/h)
R about ten seconds after you have
disengaged reverse gear
R if you press button 0002for the exterior
mirror on the driver's side Memory function
Storing settings
With the memory function, you can store up
to three different settings, e.g. for three
differen tpeople.
The following settings are stored as a single
memory preset: 100
Memory functionSeats, steering wheel and mirrors
Page 165 of 334
The DISTRONIC PLUS braking effect is
canceled and the vehicle can start moving if:
R DISTRONIC PLUS is deactivated using the
cruise control lever.
R you accelerate.
R there is a malfunction in the system or an
interruption in the power supply, e.g.
battery failure.
R the electrical system in the engine
compartment, the battery or the fuses are
tampered with.
R the battery is disconnected.
If you wish to leave the vehicle or park it,
deactivate DISTRONIC PLUS and secure the
vehicle against rolling away.
If DISTRONIC PLUS detects that the vehicle
in fronti s stopping, it brakes your vehicle until
it is stationary.
Once your vehicle is stationary, it remains
stationary and you do not need to depress the
brake.
i After a time, the electric parking brake
secures the vehicle and relieves the service
brake.
i Depending on the specified minimum
distance, your vehicle will come to a
standstill at a sufficient distance behind the
vehicle in front.T he specified minimum
distance is set using the control on the
cruise control lever.
The electric parking brake automatically
secures the vehicle if DISTRONIC PLUS is
activated and:
R the driver's door is open and the driver's
seat belt is unfastened.
R the hood is opened.
R a system malfunction occurs.
R the power supply is not sufficient.
If there is a malfunction in the vehicle
electronics, a warning message may also
appearint he multifunction display.
Brake Immediately X
Immediately depress the brake pedal firmly
until the warning message in the
multifunction display goes out. DISTRONIC
PLUS is deactivated.
Shift to 'P' X
Shift the transmission to position Pto
prevent the vehicle from rolling away.
DISTRONIC PLUS is deactivated. The
warning message in the multifunction
display disappears.
The horn will also sound at regular intervals if
DISTRONIC PLUS is activated and you:
R switch the engine off, open the driver's
door and remove your seat belt
R open the hood
The sounding of the horn alerts you to the fact
that the vehicle has been parked while
DISTRONIC PLUS is still activated. The sound
becomes louder if you attempt to lock the
vehicle. The vehicle is not locked until
DISTRONIC PLUS is deactivated.
i If the engine has been switched off, it
cannot be started again until DISTRONIC
PLUS has been deactivated.
Setting aspeed G
WARNING
Keep in mind tha titmay take a brie fmoment
until the vehicle has made the necessary
adjustments.
Increase or decrease the set vehicle speed to
a value that the prevailing road conditions and
legal speed limits permit. Otherwise, sudden
and unexpected acceleration or deceleration
of the vehicle could cause an accident and/
or serious injury to you and others.
X Press the cruise control lever up 0002for a
higher speed or down 0003for a lower speed.
X To adjust the speed in 1 mph
increments (1 km/h increments): briefly Driving systems
163Driving and parking Z