2012 MERCEDES-BENZ SLK55AMG radio
[x] Cancel search: radioPage 175 of 334
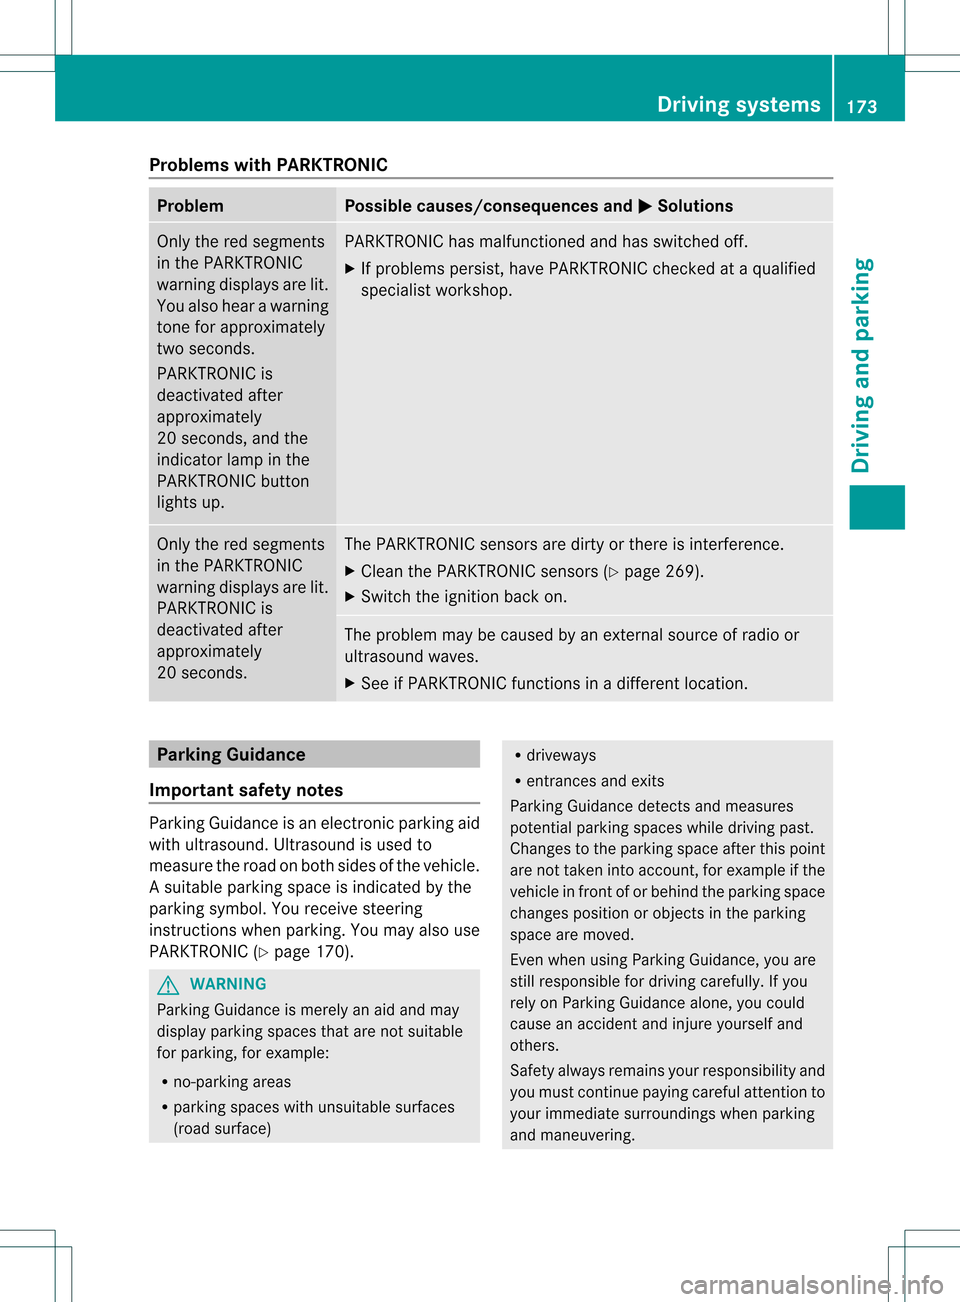
Problems with PARKTRONIC
Problem Possible causes/consequences and
0001 Solutions
Only the red segments
in the PARKTRONIC
warning displays are lit.
You also hear a warning
tone for approximately
two seconds.
PARKTRONIC is
deactivated after
approximately
20 seconds, and the
indicator lamp in the
PARKTRONIC button
lights up. PARKTRONIC has malfunctioned and has switched off.
X
If problems persist, have PARKTRONIC checked at a qualified
specialist workshop. Only the red segments
in the PARKTRONIC
warning displays are lit.
PARKTRONIC is
deactivated after
approximately
20 seconds. The PARKTRONIC sensors are dirty or there is interference.
X
Cleant he PARKTRONIC sensors (Y page 269).
X Switch the ignition back on. The problem may be caused by an external source of radio or
ultrasound waves.
X See if PARKTRONIC functions in a different location. Parking Guidance
Important safety notes Parking Guidance is an electronic parking aid
with ultrasound. Ultrasound is used to
measure the road on both sides of the vehicle.
As uitable parking space is indicated by the
parking symbol. You receive steering
instructions when parking .You may also use
PARKTRONIC (Y page 170). G
WARNING
Parking Guidance is merely an aid and may
display parking spaces that are not suitable
for parking, for example:
R no-parking areas
R parking spaces with unsuitable surfaces
(road surface) R
driveways
R entrances and exits
Parking Guidance detects and measures
potential parking spaces while driving past.
Changes to the parking space after this point
are not taken into account, for example if the
vehicle in front of or behind the parking space
changes position or objects in the parking
space are moved.
Even when using Parking Guidance, you are
still responsible for driving carefully. If you
rely on Parking Guidance alone, you could
cause an accident and injure yourself and
others.
Safety always remains your responsibility and
you must continue paying careful attention to
your immediate surroundings when parking
and maneuvering. Driving systems
173Driving and parking Z
Page 190 of 334

Other status indicators of the
navigation system R
0002:y ou have reached the destination or an
intermediate destination.
R New Route... or
Calculating Route : a
new route is being calculated.
R Off Map or
Off Mapped Road :t
he vehicle
position is outside the area of the digital
map (off-map position).
R No Route :n
o route could be calculated to
the selected destination. Audio menu
Selecting aradio station i
SIRIUS XM satellite radio functions like a
normal radio.
For more information on satellite radio
operation, see the separate operating
instructions.
You can only change the waveband and store
new stations using Audio 20 or COMAND.
X Switch on Audio 20 or COMAND (see the
separate operating instructions) and select
Radio.
X Press the 0002or0005 button on the
steering wheel to select the Audio menu.
0002
Waveband
0003 Station 13 X
To selectas toredstation: briefly press
the 0003 or0004 button.
X To select a station from the station
list: press and briefly hold the 0003
or 0004 button.
X To select astation using station
search 14
:press and briefly hold the 0003
or 0004 button.
Operating audio player or audio media Audio data from various audi
odevices or
media can be played, depending on the
equipment installed in the vehicle.
X Switch on Audio 20 or COMAND and select
the audio device or medium (see the
separate operating instructions).
X Press the 0002or0005 button on the
steering wheel to select the Audio menu.
CD changer display (example)
0002
Current title
X To select the next/previous track:
briefly press the 0003or0004 button.
X To select a track from the track list
(rapid scrolling): press and hold the
0003 or0004 button until the desired track
has been reached.
If you press and hold the 0003or0004
button, the rapid scrollin gspeed is increased.
Not all audio drives or data carriers support
this function.
13 If the station has been stored, the memory position will also be displayed.
14 Only if no station list is received. 188
Menus and submenusOn-board computer and displays
Page 210 of 334

Display messages Possible causes/consequences and
0001 Solutions
PRE-SAFE
Function Currently
Limited See Oper.
Manual G
Risk of accident
PRE-SAFE ®
Brake is temporarily inoperative. Possible causes are:
R the DISTRONIC PLUS cover in the radiator trim is dirty
R function is impaired due to heavy rain or snow.
R the sensors in the bumpers are dirty.
R the rada rsensor system is temporarily inoperative, e.g. due to
electromagnetic radiation emitted by nearby TV or radio
stations or other sources of electromagnetic radiation.
R AMG vehicles: ESP ®
is deactivated.
R the system is outside the operating temperature range.
R the on-board voltage is too low.
If the display message does not disappear:
X Pull over and stop the vehicle safely as soon as possible, paying
attention to road and traffic conditions.
X Apply the electric parkin gbrake.
X Clean the DISTRONIC PLUS cover in the radiator trim
(Y page 269).
X Clean the bumpers (Y page 269).
X Restart the engine.
X AMG vehicles: reactivate ESP ®
(Y page 60).
If the system detects that the sensors are fully operational, the
display message disappears.
PRE-SAFE ®
Brake is operational again. PRE-SAFE
Functions Limited
See Operator's
Manual G
Risk of accident
PRE-SAFE ®
Brake is defective. BAS PLUS or the distance warning
signal may also have failed.
X Visi taqualified specialist workshop. 0019
SRS Malfunction
Service Required G
Risk of injury
There is a malfunction in the SRS (Supplemental Restraint
System). The 0019warning lamp also lights up in the instrument
cluster.
X Visit a qualified specialist workshop. 208
Display messagesOn-board computer and displays
Page 223 of 334
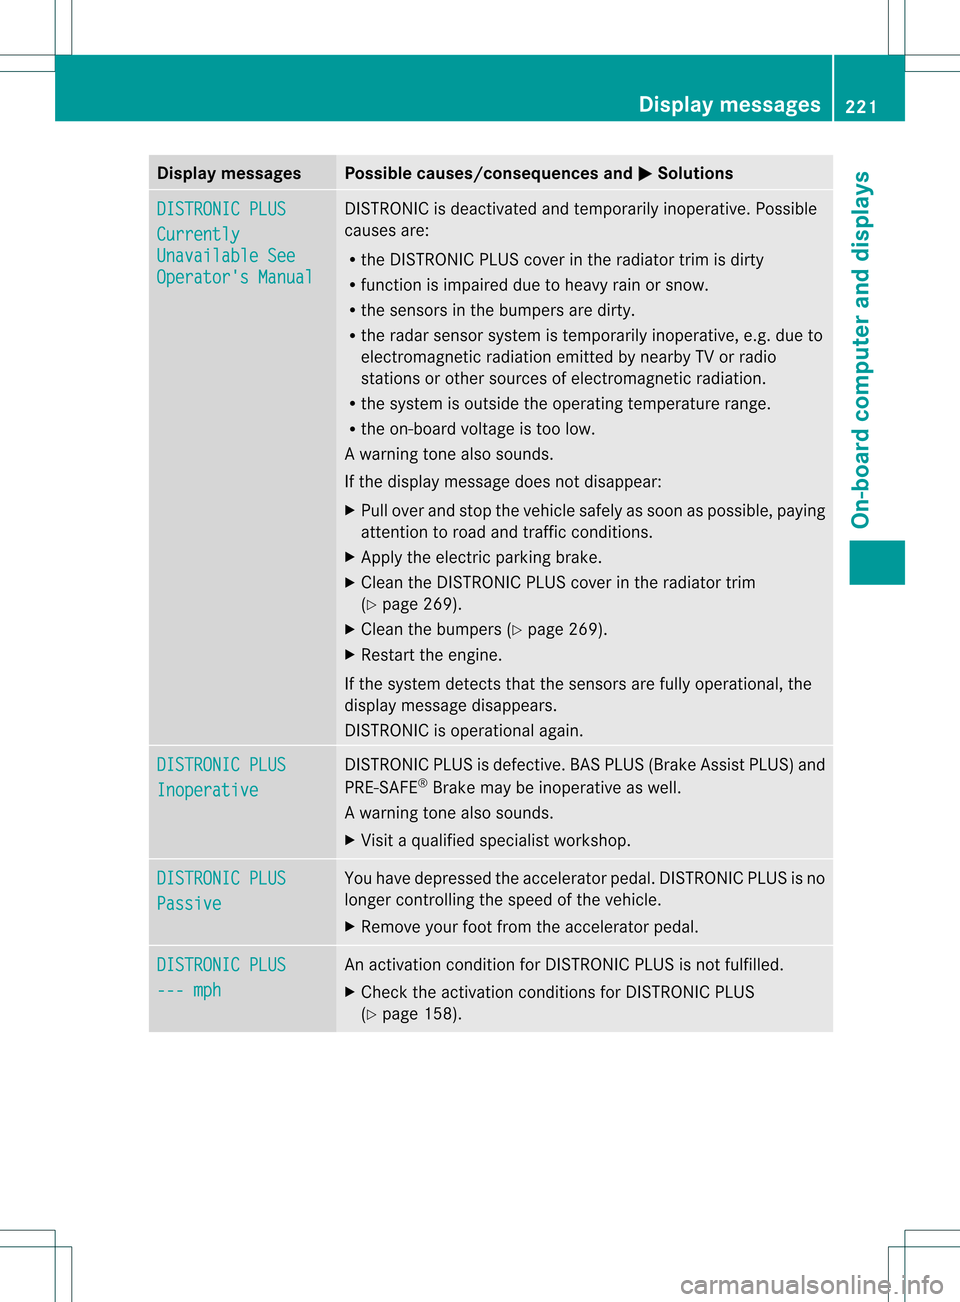
Display messages Possible causes/consequences and
0001 Solutions
DISTRONIC PLUS
Currently
Unavailable See
Operator's Manual DISTRONIC is deactivated and temporarily inoperative. Possible
causes are:
R
the DISTRONIC PLUS cover in the radiator trim is dirty
R function is impaired due to heavy rain or snow.
R the sensors in the bumpers are dirty.
R the rada rsensor system is temporarily inoperative, e.g. due to
electromagnetic radiation emitted by nearby TV or radio
stations or other sources of electromagnetic radiation.
R the system is outside the operating temperature range.
R the on-board voltage is too low.
Aw arning tone also sounds.
If the display message does no tdisappear:
X Pull over and stop the vehicle safely as soon as possible, paying
attention to road and traffic conditions.
X Apply the electric parking brake.
X Clean the DISTRONIC PLUS cover in the radiator trim
(Y page 269).
X Clean the bumpers (Y page 269).
X Restar tthe engine.
If the system detects that the sensors are fully operational, the
display message disappears.
DISTRONIC is operational again. DISTRONIC PLUS
Inoperative DISTRONIC PLUS is defective. BAS PLUS (Brake Assist PLUS) and
PRE-SAFE
®
Brake may be inoperative as well.
Aw arning tone also sounds.
X Visi taqualified specialist workshop. DISTRONIC PLUS
Passive You have depressed the accelerator pedal. DISTRONIC PLUS is no
longer controlling the speed of the vehicle.
X
Remove your foot from the accelerator pedal. DISTRONIC PLUS
--- mph An activation condition for DISTRONIC PLUS is not fulfilled.
X
Check the activation conditions for DISTRONIC PLUS
(Y page 158). Display messages
221On-board computer and displays Z
Page 225 of 334
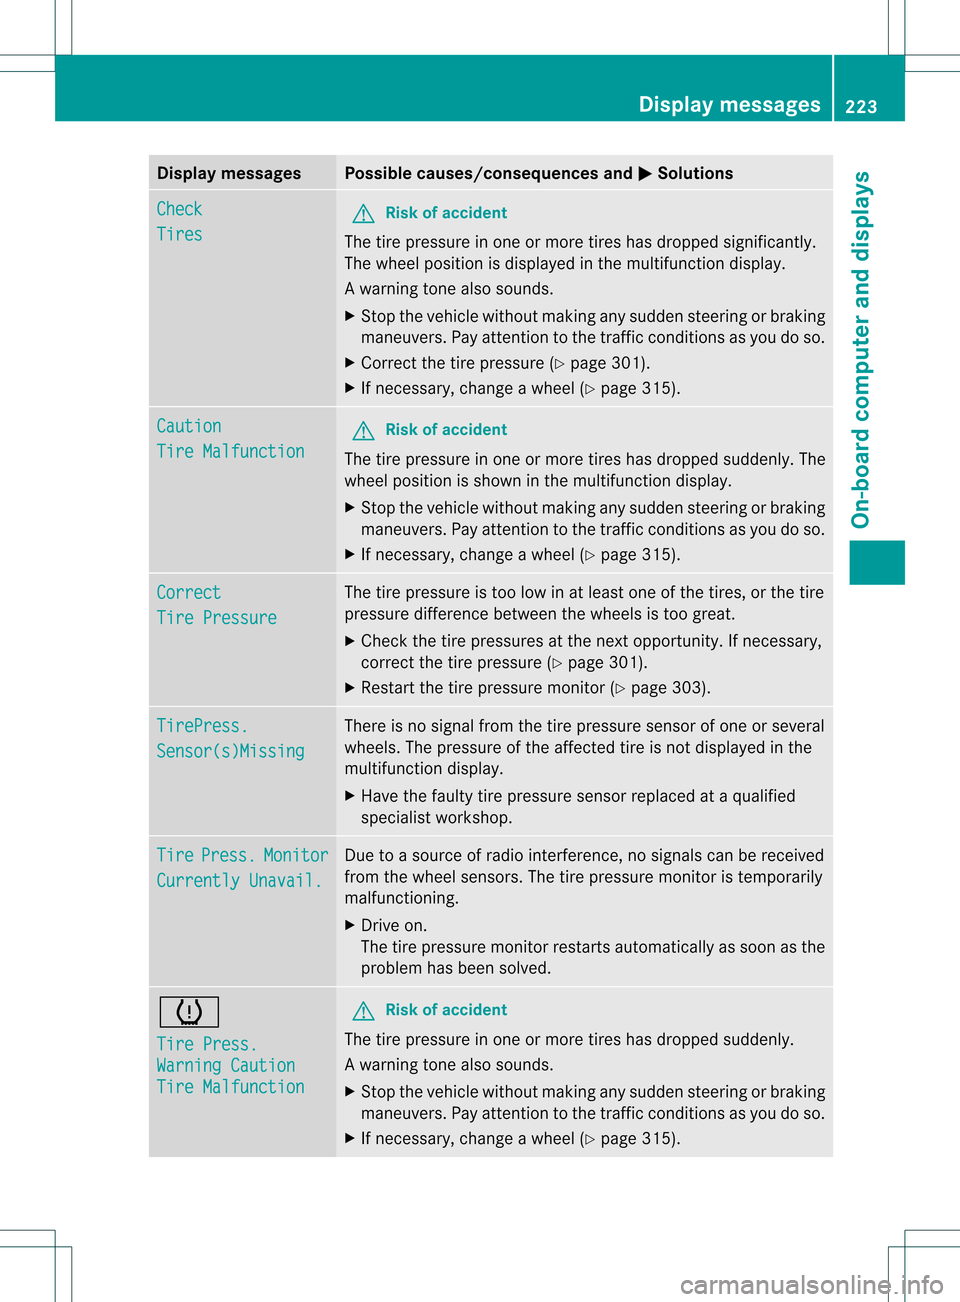
Display messages Possible causes/consequences and
0001 Solutions
Check
Tires G
Risk of accident
The tire pressure in one or more tires has dropped significantly.
The wheel position is displayed in the multifunction display.
Aw arning tone also sounds.
X Stop the vehicle without making any sudde nsteering or braking
maneuvers. Pay attentio nto the traffic conditions as you do so.
X Correct the tire pressure (Y page 301).
X If necessary, change a wheel (Y page 315).Caution
Tire Malfunction G
Risk of accident
The tire pressure in one or more tires has dropped suddenly. The
wheel position is shown in the multifunction display.
X Stop the vehicle without making any sudden steering or braking
maneuvers. Pay attention to the traffic conditions as you do so.
X If necessary, change a wheel (Y page 315).Correct
Tire Pressure The tire pressure is too low in at least one of the tires, or the tire
pressure difference between the wheels is too great.
X Check the tire pressures at the next opportunity. If necessary,
correct the tire pressure (Y page 301).
X Restart the tire pressure monitor (Y page 303).TirePress.
Sensor(s)Missing There is no signal from the tire pressure sensor of one or several
wheels. The pressure of the affected tire is not displayed in the
multifunction display.
X
Have the faulty tire pressure sensor replaced at a qualified
specialist workshop. Tire Press. Monitor
Currently Unavail. Due to a source of radio interference, no signals can be received
from the wheel sensors. The tire pressure monitor is temporarily
malfunctioning.
X
Drive on.
The tire pressure monitor restarts automatically as soon as the
problem has been solved. 0015
Tire Press.
Warning Caution
Tire Malfunction G
Risk of accident
The tire pressure in one or more tires has dropped suddenly.
Aw arning tone also sounds.
X Stop the vehicle without making any sudde nsteering or braking
maneuvers. Pay attentio nto the traffic conditions as you do so.
X If necessary, change a wheel (Y page 315). Display messages
223On-board computer and displays Z
Page 229 of 334
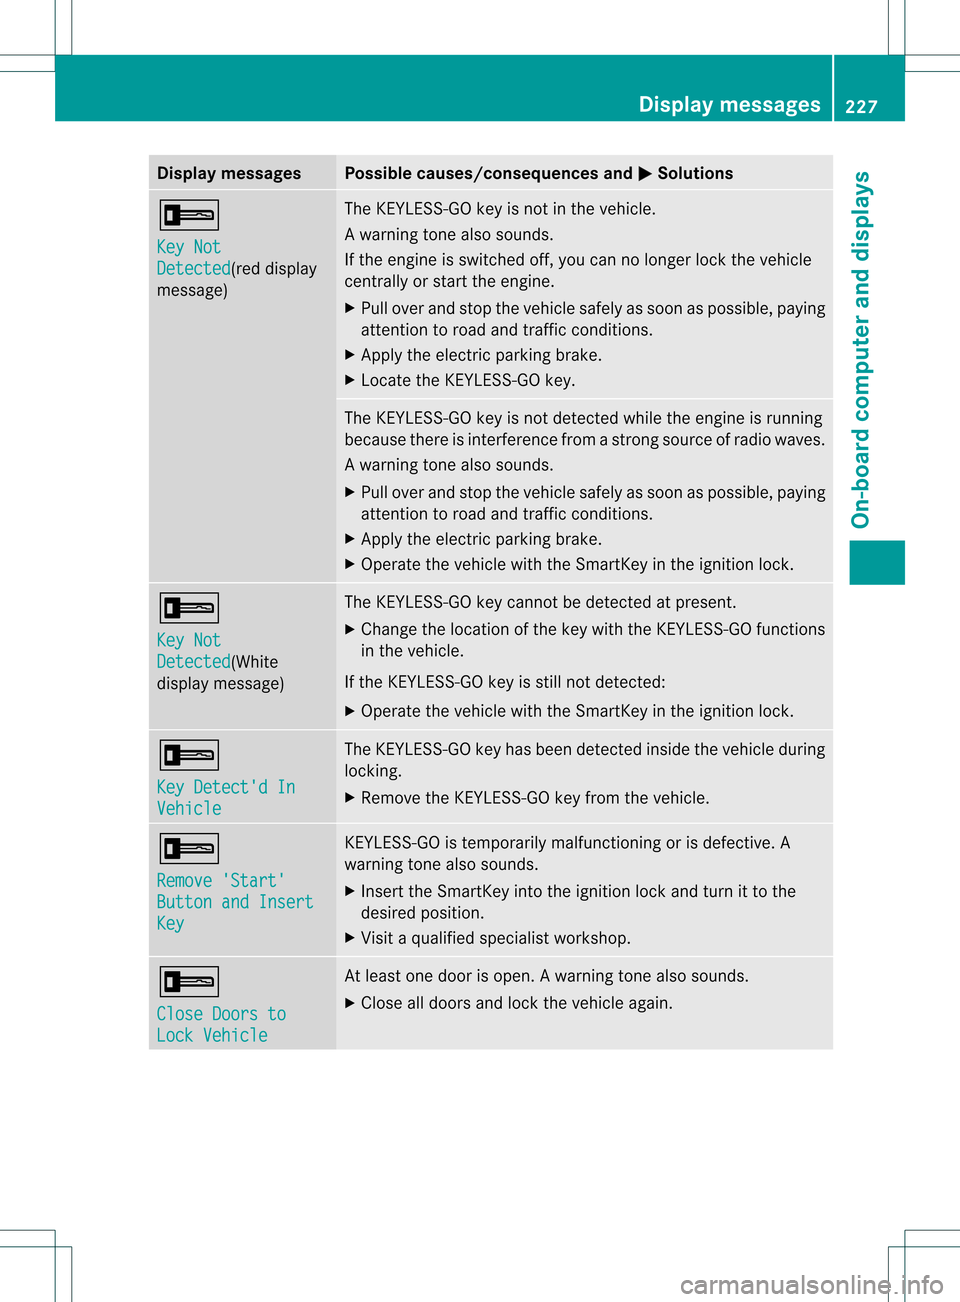
Display messages Possible causes/consequences and
0001 Solutions
000A
Key Not
Detected (red display
message) The KEYLESS-GO key is not in the vehicle.
Aw
arning tone also sounds.
If the engine is switched off, you can no longer loc kthe vehicle
centrally or start the engine.
X Pull over and stop the vehicle safely as soon as possible, paying
attention to road and traffic conditions.
X Apply the electric parking brake.
X Locate the KEYLESS-GO key. The KEYLESS-GO key is not detected while the engine is running
because there is interference from a strong source of radio waves.
Aw
arning tone also sounds.
X Pull ove rand stop the vehicle safely as soo nas possible, paying
attention to road and traffic conditions.
X Apply the electric parking brake.
X Operate the vehicle with the SmartKey in the ignition lock. 000A
Key Not
Detected (White
display message) The KEYLESS-GO key cannot be detected at present.
X
Change the location of the key with the KEYLESS-GO functions
in the vehicle.
If the KEYLESS-GO key is still not detected:
X Operate the vehicle with the SmartKey in the ignition lock. 000A
Key Detect'd In
Vehicle The KEYLESS-GO key has been detected inside the vehicle during
locking.
X
Remove the KEYLESS-GO key from the vehicle. 000A
Remove 'Start'
Button and Insert
Key KEYLESS-GO is temporarily malfunctioning or is defective. A
warning tone also sounds.
X
Insert the SmartKey into the ignition lock and turn it to the
desired position.
X Visit a qualified specialist workshop. 000A
Close Doors to
Lock Vehicle At least one door is open.
Awarning tone also sounds.
X Close all doors and loc kthe vehicle again. Display messages
227On-board computer and displays Z
Page 258 of 334
X
Point remote control 0020at a distance of
2 to 8 inches (5 to 20 cm) at buttons 0003
to 0022 on the rear-view mirror.
i The required distance between remote
control 0020and the integrated garage door
opener depends on the garage door drive
system. Several attempts might be
necessary. You should test every position
for at least 25 seconds before trying
another position.
X Press and hold button 0021on remot econtrol
0020 until indicator lamp 0002lights up green.
If indicator lamp 0002lights up green or
flashes, then programming has been
successful.
X Release button 0021on remote control 0020for
the garage door drive system.
If indicator lamp 0002lights up red:
X Repeat the programming procedure for the
corresponding button on the rear-view
mirror. When doing so, vary the distance
between remote control 0020and the rear-
view mirror.
i If the indicator lamp flashes green after
successful programming, the garage door
system is operating on arolling code. After
programming, you must synchronize the
garage door opener integrated in the rear-
view mirror with the receiver of the garage
door system.
Synchronizing the rolling code
Your vehicle must be within reach of the
garage door or exterior gate drive. Make sure
that neither your vehicle nor any persons/
objects are present within the sweep of the
door or gate.
Observe the safety notes when performing
the rolling code synchronization
(Y page 254).
X Turn the SmartKey to position 2in the
ignition lock.
X Press the programming button of the door
or gate drive (see the door or gate drive operating instructions, e.g. under
"Programming of additional remote
controls").
i Usually, you now have 30seconds to
initiate the next step.
X Press previously programmed button 0003,
0023 or0022 of the integrated garage door
opener until the door starts to move.
The rolling code synchronization is then
complete.
Notes on programming the remote
control
Canadia nradio frequency laws require a
"break" (or interruption) of the transmission
signals after broadcasting for a few seconds.
Therefore, these signals may no tlast long
enough for the integrated garage door
opener. The signal is no trecognized during
programming. Comparable with Canadian
law, some U.S.g arage door openers are
designed to "time-out" in the same manner.
Proceed as follows:
R if you live in Canada
R if you have difficulties programming the
garage door opener (regardless of where
you live) when using the programming
steps
X Press and hold one of buttons 0003to0022 on
the integrated garage door opener.
Afte rashort time, indicator lamp 0002starts
flashing yellow.
X Release the button.
X Press button 0021of garage door remote
control 0020for two seconds, then release it
for two seconds.
X Press button 0021againf or two seconds.
X Repeat this sequence on button 0021of
remote control 0020until indicator lamp 0002
lights up green.
If indicator lamp 0002turns red, repeat the
process.
X Continue with the other programming
steps (see above). 256
FeaturesStowage and features
Page 288 of 334

X
Switch off all electrical consumers (e.g. radio, blower, etc.).
X Ope nthe hood (Y page 260). Position number
0021identifies the charged battery of the other vehicle or an equivalent jump-
starting device.
X Slide cover 0002of positive terminal 0003in the direction of the arrow.
X Connect positive terminal 0003on your vehicle to positive terminal 0023of donor battery 0021
using the jumper cable, beginning with your own battery.
X Start the engine of the donor vehicle and run it at idling speed.
X Connect negative terminal 0022of donor battery 0021to ground point 0020of your vehicle using
the jumper cable, connecting the jumper cable to donor battery 0021first.
X Start the engine.
X Before disconnecting the jumper cables, let the engine run for several minutes.
X First remove the jumper cables from ground point 0020and negative terminal 0022, then from
positive terminal 0003and positive terminal 0023, each time beginning at the contacts on your
own vehicle first.
X Close cover 0002of positive terminal 0003after removing the jumper cables.
X Have the battery checked at a qualified specialist workshop.
i Jump-starting is not considered to be a normal operating condition.
i Jumper cables and further information regarding jump starting can be obtained at any
qualified specialist workshop. 286
Jump-startingBreakdown assistance