2012 MERCEDES-BENZ SLK55AMG bulb
[x] Cancel search: bulbPage 111 of 334
X
Have the headlamps checked at a qualified
specialist workshop. Interio
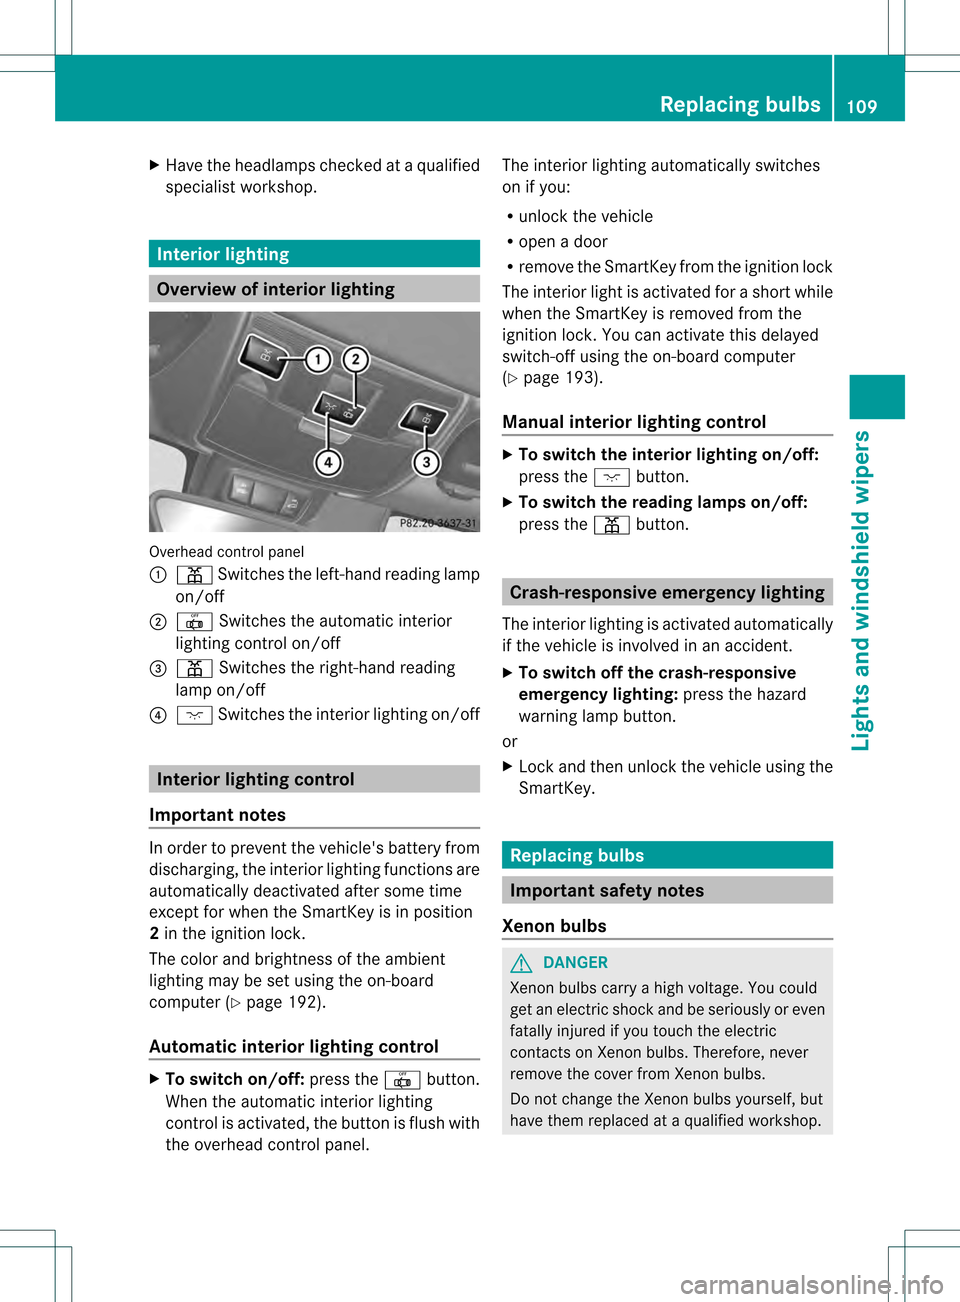
rlighting Overview of interior lighting
Overhead control panel
0002
0010 Switches the left-hand reading lamp
on/off
0003 0017 Switches the automatic interior
lighting control on/off
0023 0010 Switches the right-hand reading
lamp on/off
0022 0002 Switches the interior lighting on/off Interior lighting control
Important notes In order to prevent the vehicle's battery from
discharging, the interior lighting functions are
automatically deactivated after some time
except for when the SmartKey is in position
2 in the ignition lock.
The color and brightness of the ambient
lighting may be set using the on-board
computer (Y page 192).
Automatic interior lighting control X
To switch on/off: press the0017button.
When the automatic interior lighting
control is activated, the button is flush with
the overhead control panel. The interior lighting automatically switches
on if you:
R unloc kthe vehicle
R open a door
R remove the SmartKey from the ignition lock
The interior light is activated for a short while
when the SmartKey is removed from the
ignition lock. You can activate this delayed
switch-off using the on-board computer
(Y page 193).
Manual interior lighting control X
To switch the interior lighting on/off:
press the 0002button.
X To switch the reading lamps on/off:
press the 0010button. Crash-responsive emergency lighting
The interior lighting is activated automatically
if the vehicle is involved in an accident.
X To switch off the crash-responsive
emergency lighting: press the hazard
warning lamp button.
or
X Lock and then unlock the vehicle using the
SmartKey. Replacing bulbs
Important safety notes
Xenon bulbs G
DANGER
Xenon bulbs carry a high voltage. You could
get an electric shock and be seriously or even
fatally injured if you touch the electric
contacts on Xenon bulbs. Therefore, never
remove the cover from Xenon bulbs.
Do not change the Xenon bulbs yourself, but
have them replaced at a qualified workshop. Replacing bulbs
109Lights and windshield wipers Z
Page 112 of 334
If yourv
ehicle is equipped with Xenon bulbs,
you can recognize this by the following: the
cone of light from the Xenon bulbs moves
from the top to the bottom and back again
when you start the engine. For this to be
observed, the lights must be switched on
before starting the engine.
Bulbs and lamps are an important aspect of
vehicle safety. You must therefore make sure
that these function correctly at all times.
Have the headlamp setting checked regularly.
Other bulbs There are bulbs other than the Xenon bulbs
that you cannot replace. Replace only the
bulbs listed (Y
page 110). Have the bulbs that
you cannot replace yourself changed at a
qualified specialist workshop.
If you require assistance changing bulbs,
consult a qualified specialist workshop.
Do not touch the glass tube of new bulbs with
your bare hands. Even minor contamination
can burn into the glass surface and reduce
the service life of the bulbs. Always use a lint-
free cloth or only touch the base of the bulb
when installing.
Only use bulbs of the correct type.
If the new bulb still does not light up, consult
a qualified specialist workshop.
Bulbs and lamps are an important aspect of
vehicle safety. You must therefore make sure
that these function correctly at all times.
Have the headlamp setting checked regularly. G
WARNING
Bulbs and lamps can become very hot. For
this reason, allow them to cool down before
changing them. Otherwise, you could burn
yourself when you touch them.
Keep bulbs out of the reach of children.
Otherwise, they could, for example, damage
the bulbs and injure themselves.
Never use a bulb which has been dropped.
Such a bulb may explode and injure you.
Halogen bulbs are pressurized and could
explode when you change them, especially if they are very hot. You should therefore wear
eye protection and gloves when you are
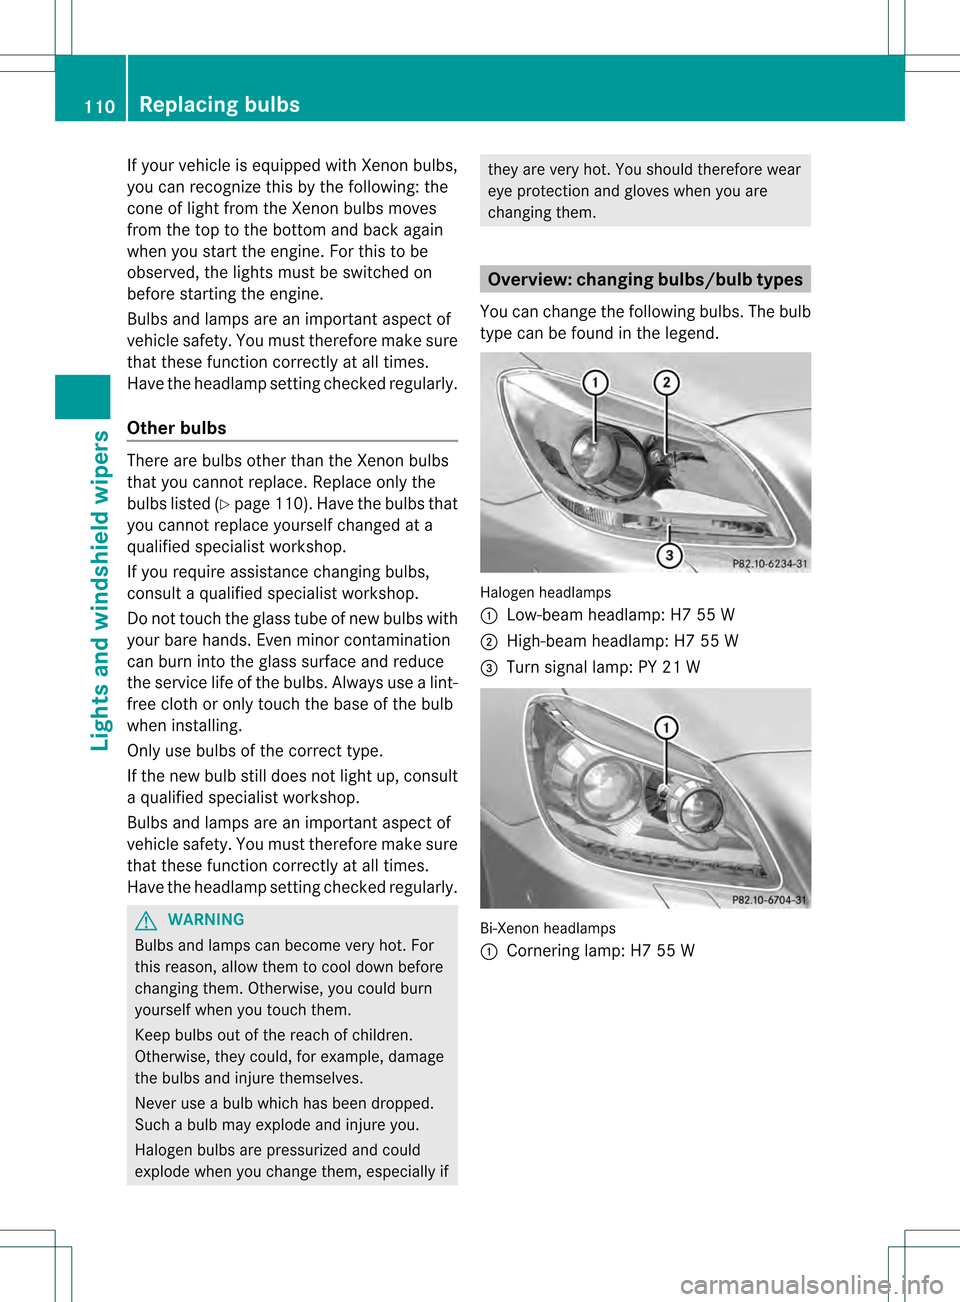
changing them. Overview: changing bulbs/bulb types
You can change the following bulbs. The bulb
type can be found in the legend. Halogen headlamps
0002
Low-beam headlamp: H7 55 W
0003 High-beam headlamp: H7 55 W
0023 Turn signal lamp: PY 21 W Bi-Xenon headlamps
0002
Cornering lamp: H7 55 W 110
Replacing bulbsLights and windshield wipers
Page 113 of 334

Tail lamp
0002
Backup lamp: W 16 W Changing the front bulbs
Removing and installing the cover in the
front wheel housing You must remove the cover from the front
wheel housing before you can change the
front bulbs. X
To remove: switch off the lights.
X Turn the front wheels inwards.
X Slide up cover 0002and lift it out.
X To install: insert cover 0002again and slide
it downwards until it engages. Low-beam headlamps (halogen
headlamps) X
Remove the cover in the front wheel arch
(Y page 111).
X Turn housing cover 0002counter-clockwise
and pull it out.
X Press clamp 0003upward.
X Pull out connector 0023with the bulb.
X Take the bulb out of connector 0023.
X Attach the new bulb to connector 0023and
insert it into the bracket of clamp 0003.
Make sure the bulb is positioned correctly.
X Press clamp 0003downward.
X Attach housing cover 0002and turn it
clockwise until it engages.
X Replace the cover in the front wheel arch
(Y page 111).
High-beam headlamps (halogen
headlamps)/cornering lamps( Bi-Xenon
headlamps) Replacing bulbs
111Lights andwindshield wipers Z
Page 114 of 334

X
Switch off the lights.
X Ope nthe hood.
X Turn housing cover 0002counter-clockwise
and pull it out.
X Push the bulb upwards by the holder,
disconnectita nd pull it outofbulb
holder 0003.
X Inser tthe new bulb into bulb holder 0003,
push it down and secure it in place.
X Attach housing cover 0002and turn it
clockwise until it engages.
Parking lamps/standing lamps
(halogen headlamps) Due to their location, have the bulbs in the
side marker lamp changed at a qualified
specialist workshop.
Turn signal lamp (halogen headlamps) X
Switch off the lights.
X Open the hood.
X Turn bulb holder 0002counterclockwise and
pull it out.
X Take the bulb out of bulb holder 0002.
X Insert the new bulb into bulb holder 0002.
X Insert bulb holder 0002and turn it clockwise
until it engages. Changing the rear bulbs
Backup lamp X
Switch off the lights.
X Make sure the roof is closed.
X Open the trunk.
X Turn and pull out buffer stop 0003.
X Unclip catch 0002for side paneling 0023. X
Reach upwards into side paneling 0023,
loosen and pull downwards until
holder 0022of the backup lamp is easily
accessible.
X Pull out bulb holder 0022.
X Pull out the bulb.
X Insert the new bulb into bulb holder 0022.
X Insert bulb holder 0022until it engages.
X Install side paneling 0023precisely.
X Clip in catch 0002for side paneling 0023.
X Push in and tighten buffer stop 0003.112
Replacing bulbsLights and windshield wipers
Page 215 of 334
Lights
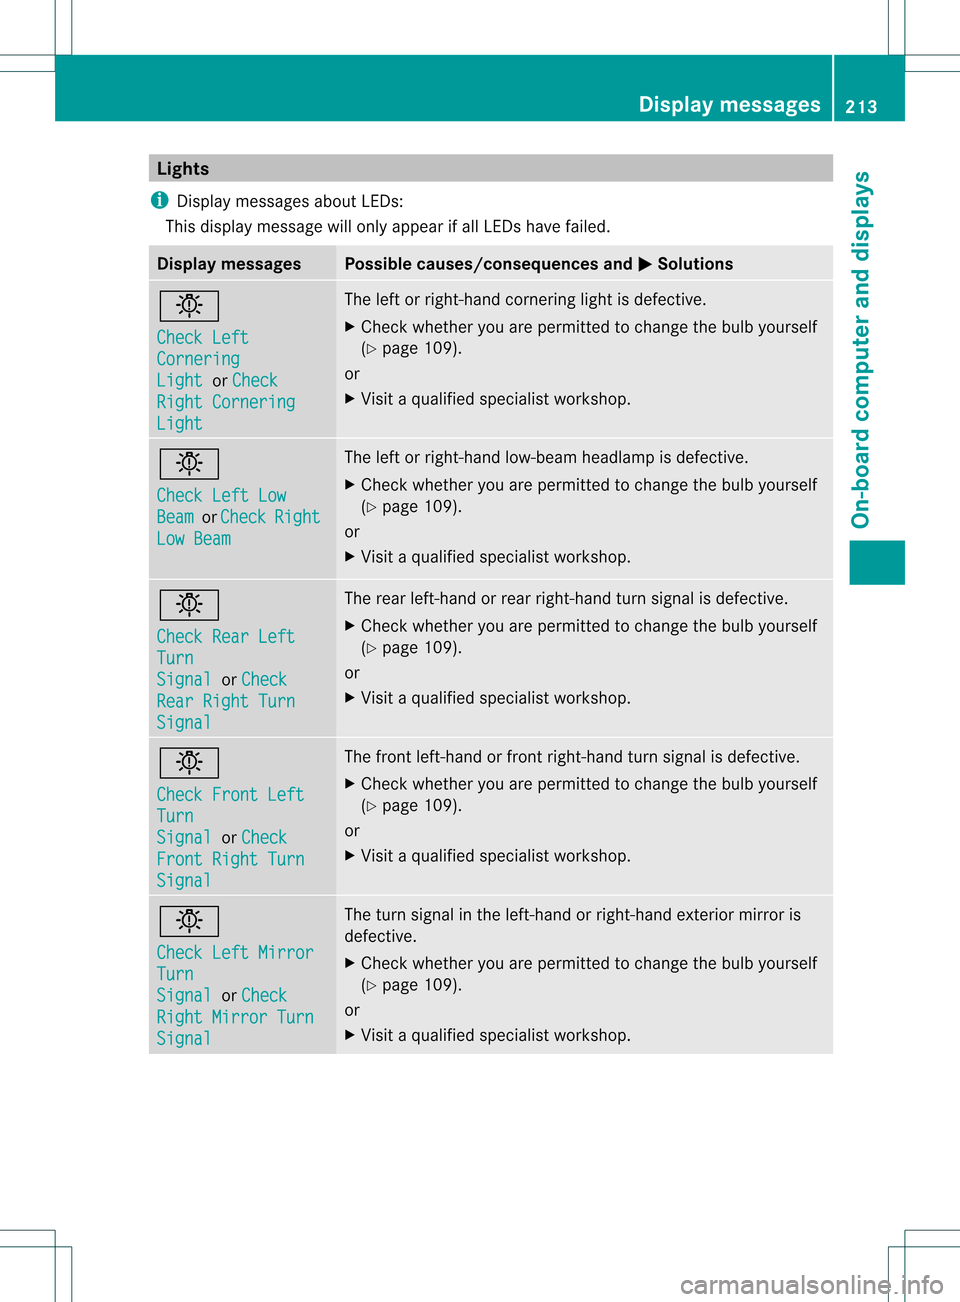
i Display messages about LEDs:
This display message will only appear if all LEDs have failed. Displa
ymessages Possible causes/consequences and
0001 Solutions
0001
Check Left
Cornering
Light or
Check Right Cornering
Light The left or right-hand cornering light is defective.
X
Chec kwhether you are permitted to change the bulb yourself
(Y page 109).
or
X Visit a qualified specialist workshop. 0001
Check Left Low
Beam or
Check Right
Low Beam The left or right-hand low-beam headlamp is defective.
X
Check whether you are permitted to change the bulb yourself
(Y page 109).
or
X Visit a qualified specialist workshop. 0001
Check Rear Left
Turn
Signal or
Check Rear Right Turn
Signal The rear left-hand or rear right-hand turn signal is defective.
X
Check whether you are permitted to change the bulb yourself
(Y page 109).
or
X Visit a qualified specialist workshop. 0001
Check Front Left
Turn
Signal or
Check Front Right Turn
Signal The front left-hand or front right-hand turn signal is defective.
X
Check whether you are permitted to change the bulb yourself
(Y page 109).
or
X Visit a qualified specialist workshop. 0001
Check Left Mirror
Turn
Signal or
Check Right Mirror Turn
Signal The turn signal in the left-hand or right-hand exterior mirror is
defective.
X
Check whether you are permitted to change the bulb yourself
(Y page 109).
or
X Visit a qualified specialist workshop. Display messages
213On-board computer and displays Z
Page 216 of 334
Display messages Possible causes/consequences and
0001 Solutions
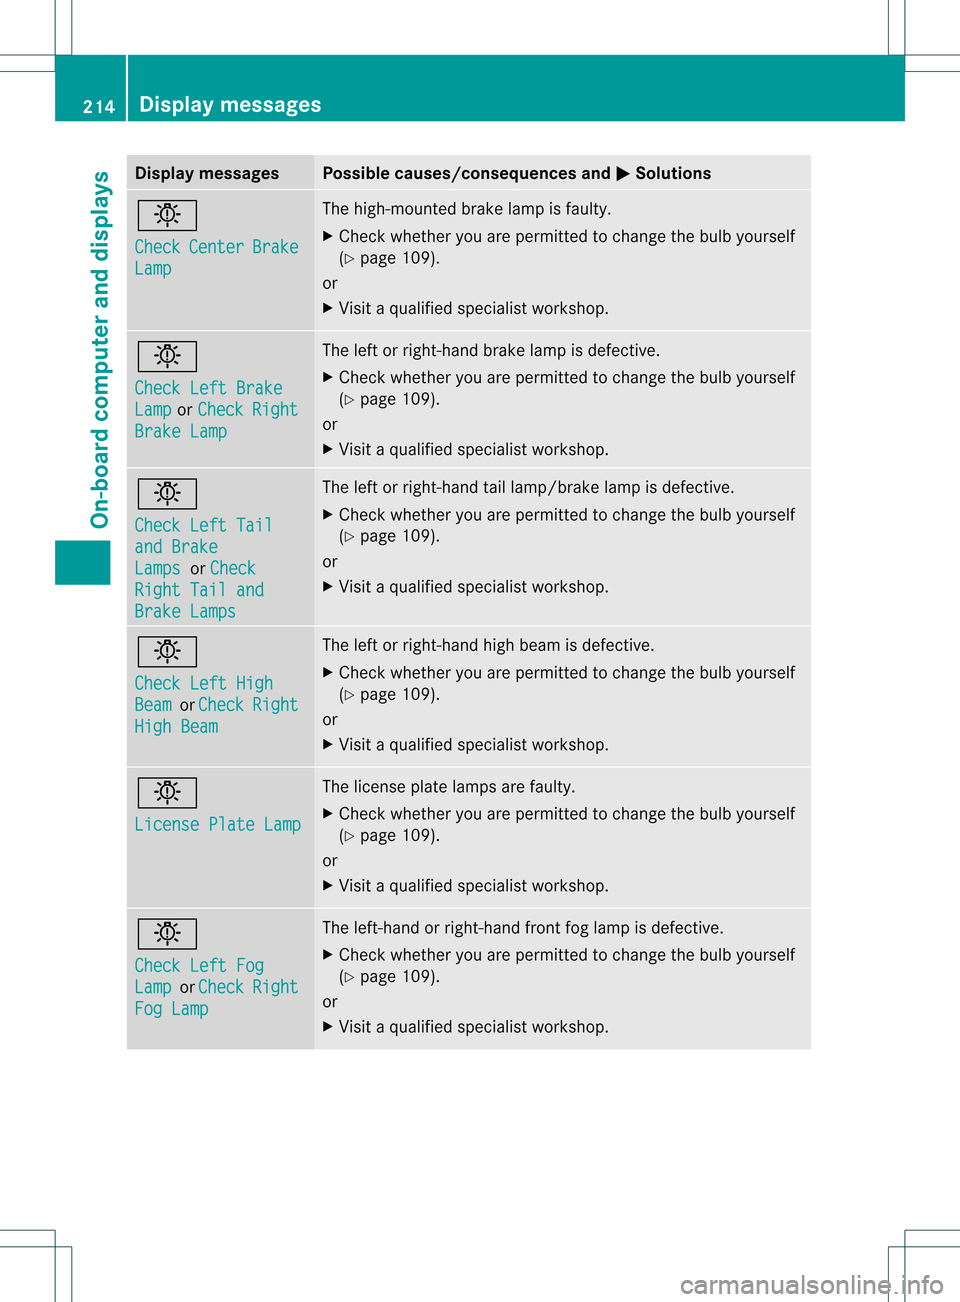
0001
Check
Center Brake
Lamp The high-mounted brake lamp is faulty.
X
Chec kwhether you are permitted to change the bulb yourself
(Y page 109).
or
X Visit a qualified specialist workshop. 0001
Check Left Brake
Lamp or
Check Right
Brake Lamp The left or right-hand brake lamp is defective.
X
Check whether you are permitted to change the bulb yourself
(Y page 109).
or
X Visit a qualified specialist workshop. 0001
Check Left Tail
and Brake
Lamps or
Check Right Tail and
Brake Lamps The left or right-hand tail lamp/brake lamp is defective.
X
Check whether you are permitted to change the bulb yourself
(Y page 109).
or
X Visit a qualified specialist workshop. 0001
Check Left High
Beam or
Check Right
High Beam The left or right-hand high beam is defective.
X
Check whether you are permitted to change the bulb yourself
(Y page 109).
or
X Visit a qualified specialist workshop. 0001
License Plate Lamp The license plate lamps are faulty.
X
Check whether you are permitted to change the bulb yourself
(Y page 109).
or
X Visit a qualified specialist workshop. 0001
Check Left Fog
Lamp or
Check Right
Fog Lamp The left-hand or right-hand front fog lamp is defective.
X
Check whether you are permitted to change the bulb yourself
(Y page 109).
or
X Visit a qualified specialist workshop. 214
Display messagesOn-board computer and displays
Page 217 of 334
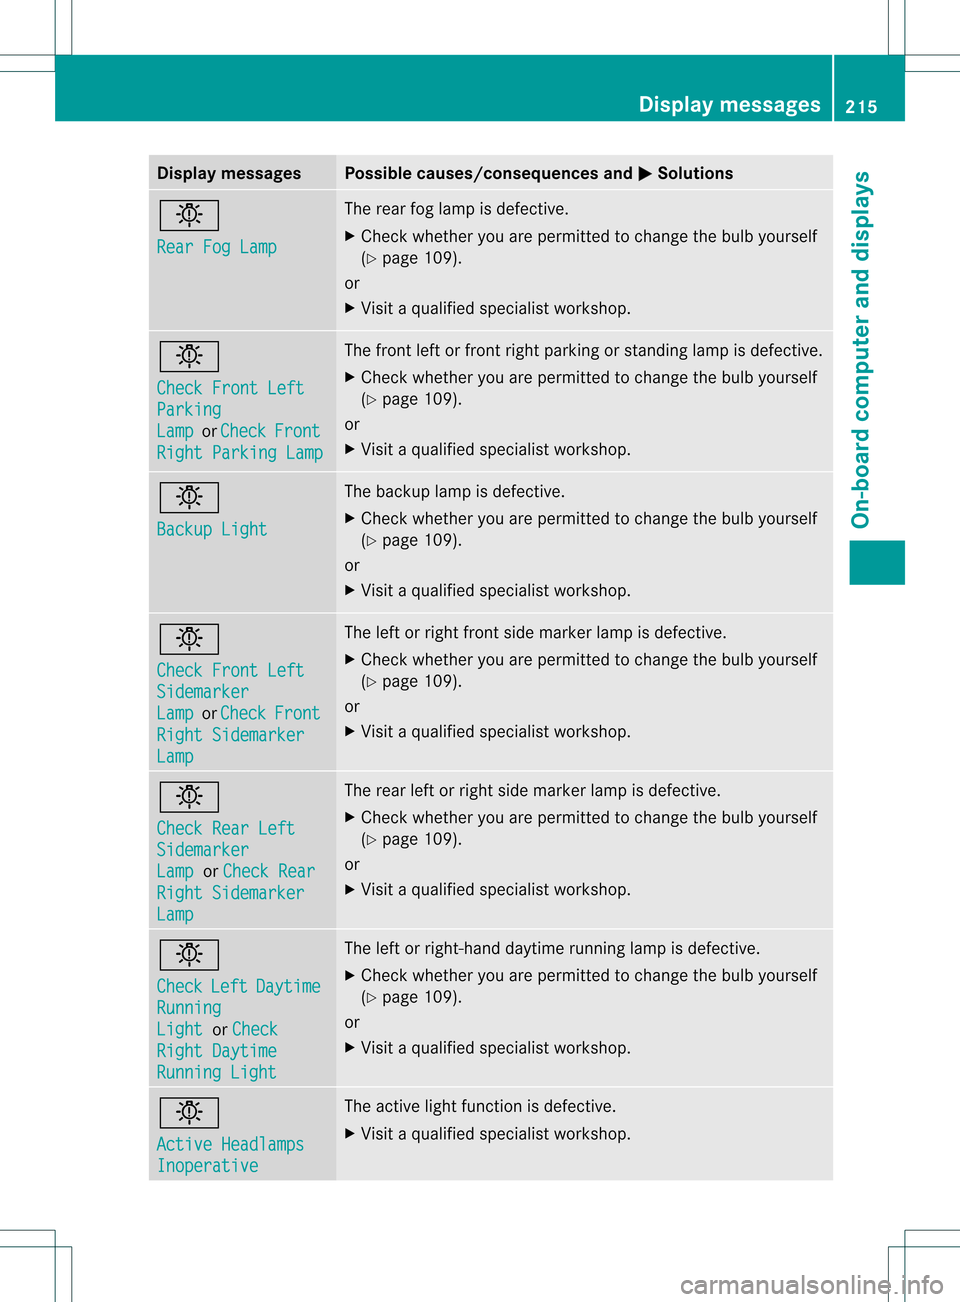
Display messages Possible causes/consequences and
0001 Solutions
0001
Rear Fog Lamp The rear fog lamp is defective.
X
Chec kwhether you are permitted to change the bulb yourself
(Y page 109).
or
X Visit a qualified specialist workshop. 0001
Check Front Left
Parking
Lamp or
Check Front
Right Parking Lamp The front left or front right parking or standing lamp is defective.
X
Check whether you are permitted to change the bulb yourself
(Y page 109).
or
X Visit a qualified specialist workshop. 0001
Backup Light The backup lamp is defective.
X
Check whether you are permitted to change the bulb yourself
(Y page 109).
or
X Visit a qualified specialist workshop. 0001
Check Front Left
Sidemarker
Lamp or
Check Front
Right Sidemarker
Lamp The left or right front side marker lamp is defective.
X
Check whether you are permitted to change the bulb yourself
(Y page 109).
or
X Visit a qualified specialist workshop. 0001
Check Rear Left
Sidemarker
Lamp or
Check Rear Right Sidemarker
Lamp The rear left or right side marker lamp is defective.
X
Check whether you are permitted to change the bulb yourself
(Y page 109).
or
X Visit a qualified specialist workshop. 0001
Check
Left Daytime
Running
Light or
Check Right Daytime
Running Light The left or right-hand daytime running lamp is defective.
X Check whether you are permitted to change the bulb yourself
(Y page 109).
or
X Visit a qualified specialist workshop. 0001
Active Headlamps
Inoperative The active light function is defective.
X
Visit a qualified specialist workshop. Display messages
215On-board computer and displays Z