2012 MERCEDES-BENZ SLK ROADSTER warning light
[x] Cancel search: warning lightPage 251 of 321
Useful information
i This Owner's Manual describes all models
and all standard and optional equipment
available to your vehicle at the time of pub-
lication of the Owner's Manual. Country-
specific deviations are possible. Please
note that your vehicle may not be equipped
with all features described. This also
applies to safety-relevan tsystems and
functions.
i Please read the information on qualified
specialist workshops (Y page 22).Engine compartment
Bonnet
Active bonnet (pedestrian protection) Operating principle
The active bonne tcan reduce the ris kofinjury
to pedestrians in certain accident situations.
Raising the active bonnet increases the clear-
ance to hard components, such as the engine.
If the active bonnet has been triggered, it will
be raised in the area of the bonnet hinges by
approximatel y85 mm. The active bonnet is
triggered by pyrotechnics.
! An active bonnet that had bee ntriggered
must be repaired at a qualified specialist
workshop. The active bonnet function will
then be available again. The additional
pedestrian protection provided by the
active bonnet will then be restored.
For the drive to the workshop, reset the trig-
gered active bonnet yourself. If the active
bonnet has been triggered, pedestrian pro-
tection may be limited.
Resetting G
WARNING
There is a risk of injury if the bonnet is open,
even if the engine is not running. Some engine components can become very
hot.
To avoid the risk of burns, only touch those
components described in the Owner's Manual
and observe the relevant safety notes. X
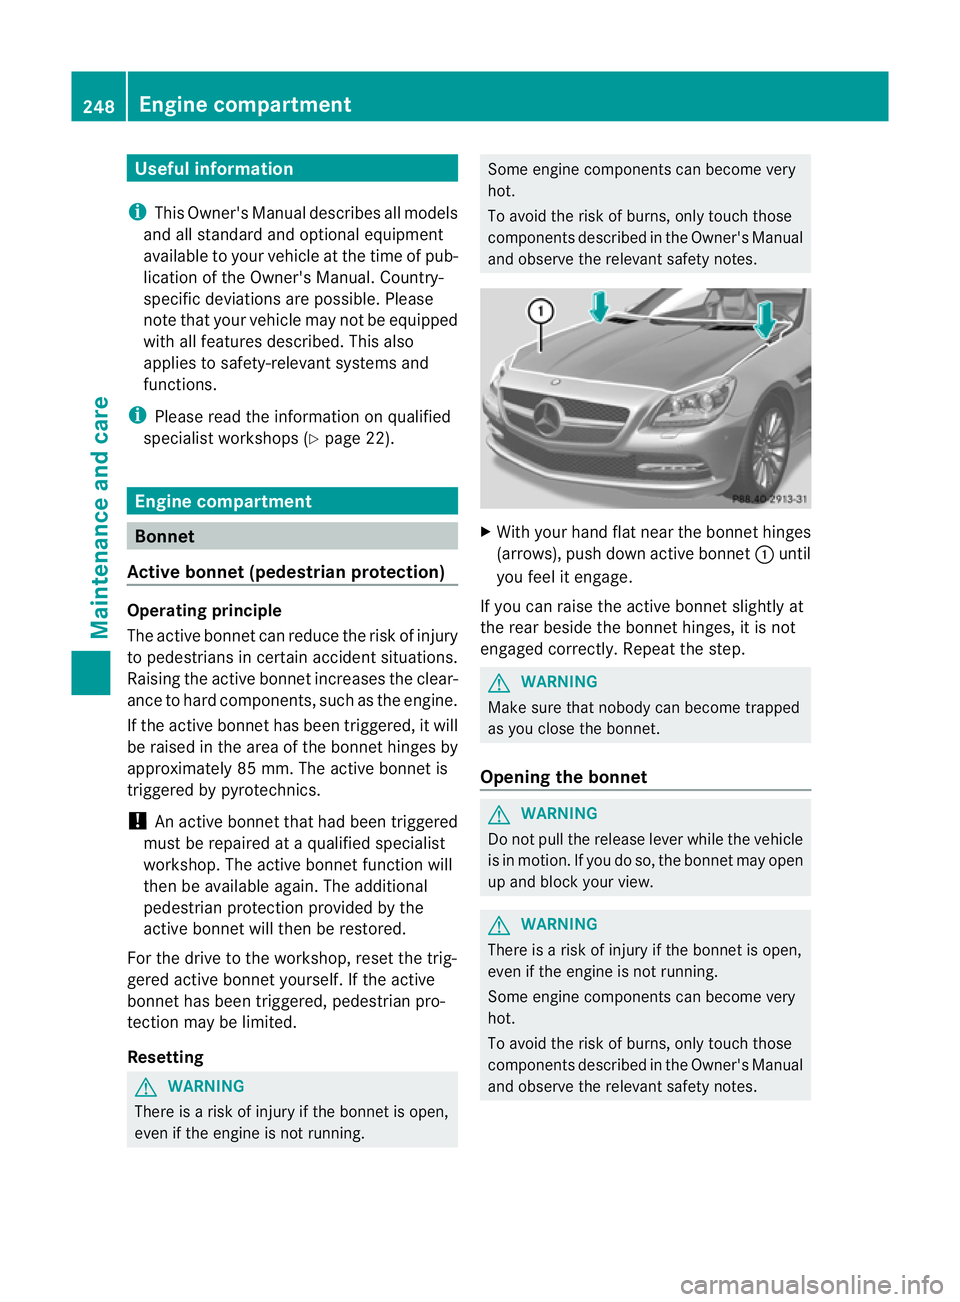
With yourh and flat near the bonne thinges
(arrows), push down active bonnet :until
you feel it engage.
If you can raise the active bonnet slightly at
the rear beside the bonnet hinges, it is not
engaged correctly. Repeat the step. G
WARNING
Make sure that nobody can become trapped
as you close the bonnet.
Opening the bonnet G
WARNING
Do not pull the release lever while the vehicle
is in motion. If you do so, the bonnet may open
up and block your view. G
WARNING
There is a risk of injury if the bonnet is open,
even if the engine is not running.
Some engine components can become very
hot.
To avoid the risk of burns, only touch those
components described in the Owner's Manual
and observe the relevant safety notes. 248
Engine compartmentMaintenance and care
Page 253 of 321
X
Lower the bonnet and let it fall from a
heightofa pproximately 20 cm.
X Check that the bonnet has engaged prop-
erly.
If the bonnet can be raised slightly, it is not
properly engaged. Open it again and close
it with a little more force. Radiator
i Vehicles with adiesel engine: do not
cover the radiator. Do not use thermal
mats, insect protection covers or anything
similar. Doing so can cause the Onboard
Diagnostics System to display inaccurate
values. Some of these values are legally
required and must be correct. Engine oil
Notes on oil level Depending on driving style, the vehicle con-
sumes up to 0.
8lof oil per 1,000 km .The oil
consumption may be higher than this when
the vehicle is new or if you frequently drive at
high engine speeds.
AMG vehicles: before operation on race
tracks, check the oil level and (Y page 250)
top up if necessary (Y page 250). Race track
operation is only permitted with a maximum
engine oil level.
Depending on the engine, the oil dipstick may
be installed at a different location.
When checking the oil level:
R park the vehicle on a level surface.
R the engine should be switched off for
approximately five minutes if the engine is
at normal operating temperature.
R if the engine is not at normal operating
temperature, e.g. if the engine was only
started briefly: wait about 30 minutes
before carrying out the measurement. Checking the oil level using the oil dip-
stick
Example: vehicles with a petrol engine
Example: vehicles with a diesel engine
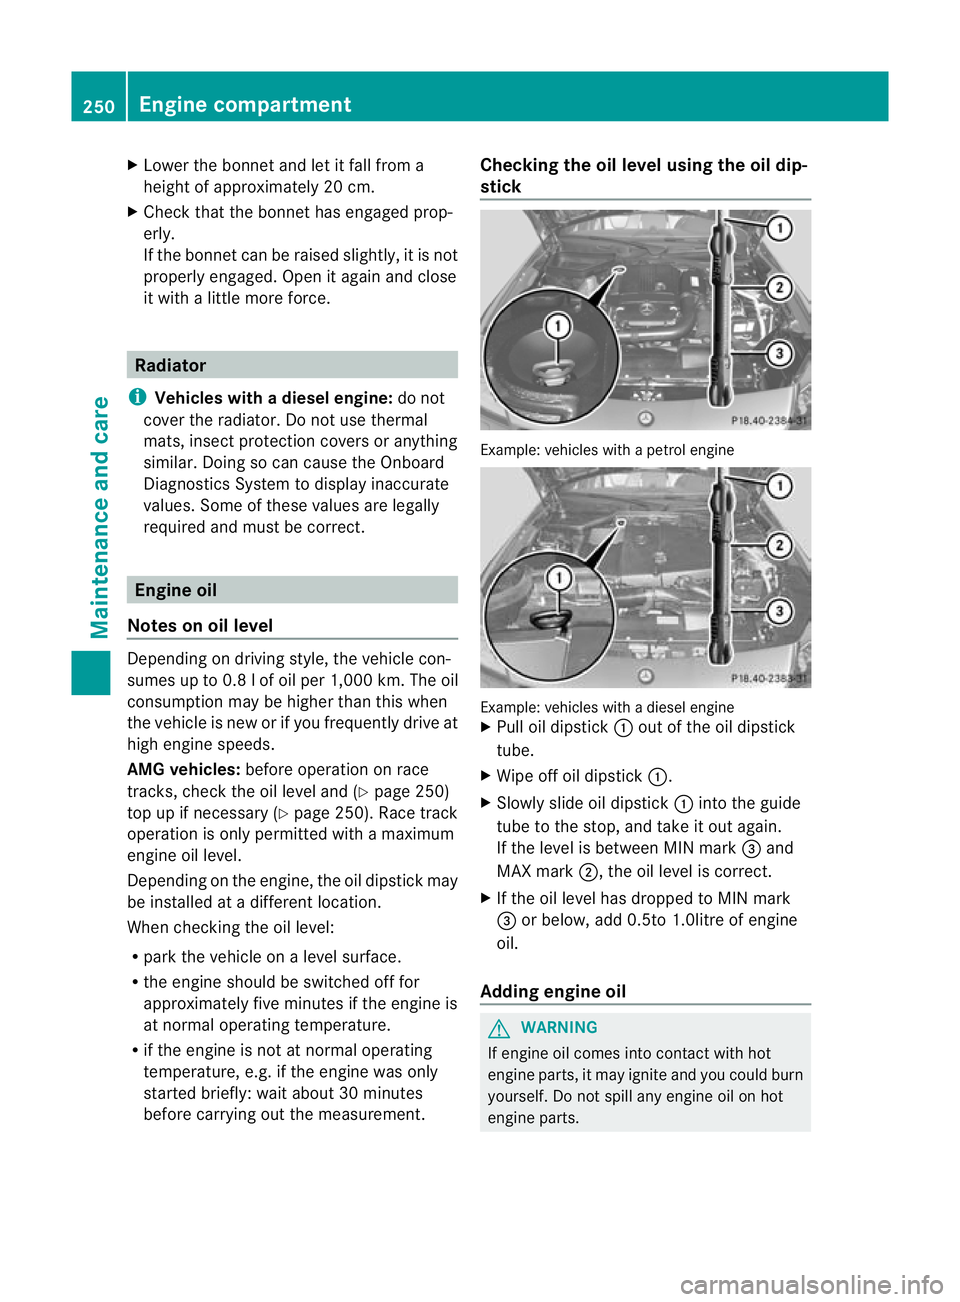
X
Pull oil dipstick :out of the oil dipstick
tube.
X Wipe off oil dipstick :.
X Slowly slide oil dipstick :into the guide
tube to the stop, and take it out again.
If the level is between MIN mark =and
MAX mark ;, the oil level is correct.
X If the oil level has dropped to MIN mark
= or below, add 0.5to 1.0litre of engine
oil.
Adding engine oil G
WARNING
If engine oil comes into contact with hot
engine parts, it may ignite and you could burn
yourself. Do not spill any engine oil on hot
engine parts. 250
Engine compartmentMaintenance and care
Page 257 of 321
Care of the exterior
Automatic car wash G
WARNING
Braking efficiency is reduced after washing
the vehicle .This could cause an accident. For
this reason, following a car wash, drive with
particular care until the brakes are dry. G
WARNING
The vehicle is braked when the HOLD function
or DISTRONIC PLUS is activated. Therefore,
deactivate the HOLD function and DISTRONIC
PLUS before the vehicle is washed in an auto-
matic car wash.
You can wash the vehicle in an automatic car
wash from the very start.
! Lock the vehicle when washing it in an
automatic car wash. The vehicle could oth-
erwise be damaged.
! We recommend automatic car washes
with an adjustable 15
high-pressure pre-
cleaning program. In car washes that use
high water pressures, there is a danger that
a small quantity of water may leak into the
vehicle.
Wash off excess dirt before cleaning the vehi-
cle in an automatic car wash.
! Make sure that the automatic transmis-
sion is in position Nwhen washing your
vehicle in a tow-through car wash. The vehi-
cle could be damaged if the transmission is
in another position.
! Make sure that:
R the side windows and roof are com-
pletely closed.
R the blower for the ventilation/heating is
switched off (OFF button is depressed/
airflow control is turned to position 0).
R the windscreen wiper switch is at posi-
tion 0. The vehicle could otherwise be damaged.
After using an automatic car wash, wipe off
wax from the windscreen and the wiper
blades. This will prevent smears and reduce
wiping noises caused by residue on the wind-
screen.
Washing by hand In some countries, washing by hand is only
allowed at specially equipped washing bays.
Observe the legal requirements for each indi-
vidual country.
X Do not use hot water and do not wash the
vehicle in direct sunlight.
X Use a soft sponge to clean.
X Use a mild cleaning agent, such as a car
shampoo approved by Mercedes-Benz.
X Thoroughly hose down the vehicle with a
gentle jet of water.
X Do not point the water jet directly towards
the air inlet.
X Use plenty of water and rinse out the
sponge frequently.
X Rinse the vehicle with clean water and dry
thoroughly with a chamois.
X Do not let the cleaning agent dry on the
paintwork.
When using the vehicle in winter, remove all
traces of road salt deposits carefully and as
soon as possible.
High-pressure cleaning equipment G
WARNING
Do not use high-pressure cleaners with circu-
lar-jet nozzles (dirt grinders) to clean your
vehicle, in particular the tyres. You could oth-
erwise damage the tyres and cause an acci-
dent.
! Always maintain a distance of at least
30 cm between the vehicle and the high-
pressure cleaner nozzle. Information about
15 In accordance with the specifications for Cabrioletp rograms.254
CareMaintenance and care
Page 259 of 321
Always have paintwork repairs carried out
at a qualified specialis
tworkshop.
! Do not use wash programs with a hot wax
treatment under any circumstances.
i The vehicle should preferably be washed
by hand using a soft sponge, car shampoo
and plenty of water.
i Use only insect remover and car shampoo
from the range of recommended and
approved Mercedes-Benz care products.
Cleaning the windows G
WARNING
Switch off the windscreen wipers and remove
the key from the ignition lock before cleaning
the windscreen or the wiper blades. On vehi-
cles with KEYLESS-GO, press the Start/Stop
button repeatedly until all indicator lamps in
the instrument cluster have gone off. The
windscreen wipers could otherwise move and
injure you.
X Clean the inside and outside of the win-
dows with a damp cloth and a cleaning
agent that is recommended and approved
by Mercedes-Benz.
! Do not use dry cloths, abrasive products,
solvents or cleaning agents containing sol-
vents to clean the inside of the windows.
Do not touch the insides of the windows
with hard objects, e.g. an ice scraper or
ring. There is otherwise a risk of damaging
the windows.
! Clean the water drainage channels of the
windscreen and the rear window at regular
intervals. Deposits such as leaves, petals
and pollen may under certain circumstan-
ces prevent water from draining away.T his
can lead to corrosion damage and damage
to electronic components. Cleaning the wiper blades G
WARNING
Switch off the windscreen wipers and remove
the key from the ignition lock before cleaning
the windscreen or the wiper blades. On vehi-
cles with KEYLESS-GO, press the Start/Stop
button repeatedly until all indicator lamps in
the instrument cluster have gone off. The
windscreen wipers could otherwise move and
injure you.
! Do not pull on the wiper blade. Otherwise,
the wiper blade could be damaged.
! Do not clean wiper blades too often and
do not rub them too hard. Otherwise, the
graphite coating could be damaged. This
could cause wiper noise.
X Fold the wiper arms away from the wind-
screen.
X Cleant he wiper blades carefully using a
damp cloth.
X Fold the windscreen wipers back again
before switching on the ignition.
! Hold the wiper arm securely when folding
back. The windscreen could be damaged if
the wiper arm hits against it suddenly.
Cleaning the exterior lighting !
Only use cleaning agents or cleaning
cloths that are suitable for plastic lenses.
Unsuitable cleaning agents or cleaning
cloths could scratch or damage the plastic
lenses of the exterior lighting.
X Cleant he plastic lenses of the exterior
lighting using a wet sponge and a mild
cleaning agent, e.g. Mercedes-Ben zcar
shampoo. Or clean the exterior lighting
with cleaning cloths.
Cleaning the mirror turn signal !
Only use cleaning agents or cleaning
cloths that are suitable for plastic lenses.
Unsuitable cleaning agents or cleaning 256
CareMaintenance and care
Page 268 of 321
X
Remove the cap from valve Con the faulty
tyre.
X Screw filler hose Donto valve C.
X Inser tplug =into the socket of the ciga-
rette lighter (Y page 240) or into a 12 V
power socket in your vehicle (Y page 241).
X Turn the key to position 1(Ypage 127) in
the ignition lock.
X Press on/off switch ?on the tyre inflation
compressor to ON.
The tyre inflation compressor is switched
on. The tyre is inflated.
i First, tyre sealant is pumped into the tyre.
The pressure can briefly rise to approx-
imately 500 kPa (5 bar, 73 psi).
Do not switch off the tyre inflation com-
pressor during this phase.
X Let the tyre inflation compressor run for a
maximum of ten minutes. The tyre should
the nhave attained a pressure of at least
200 kPa (2.0 bar, 29 psi).
! Do not operate the tyre inflation com-
pressor for longer than ten minutes at a
time without a break .Itmay otherwise
overheat.
The tyre inflation compressor can be oper-
ated again once it has cooled down.
If a pressure of 200 kP a(2 .0 ba r,29 psi) has
bee nachieved afte rten minutes, see
(Y page 265).
If a pressure of 200 kPa (2.0 ba r,29 psi) has
not bee nachieved afte rten minutes, see
(Y page 265).
Tyre pressure of 200 kPa (2.0 bar/
29 psi) not reached If a pressure of 200 kPa
(2.0 ba r,29 psi) has
not been achieved after ten minutes:
X Switch off the tyre inflation compressor.
X Unscrew the filler hose from the valve of
the faulty tyre. X
Very slowly drive forwards or reverse
approximately 10 m.
X Pump up the tyre again.
After a maximum of ten minutes, the tyre
pressure must be at least 200 kPa (2.0 bar,
29 psi). G
WARNING
If the required tyre pressure is not reached
after the specified time, the tyre is too badly
damaged. The tyre sealant cannot repair the
tyre in this instance. Damaged tyres and a tyre
pressure that is too low can significantly
impair the vehicle's braking and driving char-
acteristics. There is a risk of accident.
Do not continue driving. Contact a qualified
specialist workshop.
Tyre pressure of 200 kPa (2.0 bar/
29 psi) reached X
Switch off the tyre inflation compressor.
X Unscrew the filler hose from the valve of
the faulty tyre.
! After use, excess tyre sealant may run out
of the filler hose .This could cause stains.
Therefore, place the filler hose in the plastic
bag that contained the TIREFIT kit.
X Stow the tyre sealant bottle, the tyre infla-
tion compressor and the warning triangle.
X Pull away immediately. G
WARNING
At yre temporarily sealed with tyre sealant
impairs the driving characteristics and is not
suitable for higher speeds .There is a risk of
accident.
You should therefore adapt your driving style
accordingly and drive carefully. Do not exceed
the specified maximum speed with a tyre that
has been repaired using tyre sealant.
The maximum speed for a tyre sealed with
tyre sealant is 80 km/h. The "max. 80 km/h"
sticker must be affixed to the instrumentc lus-
ter within the driver's field of vision. Flat tyre
265Breakdown assistance Z
Page 271 of 321
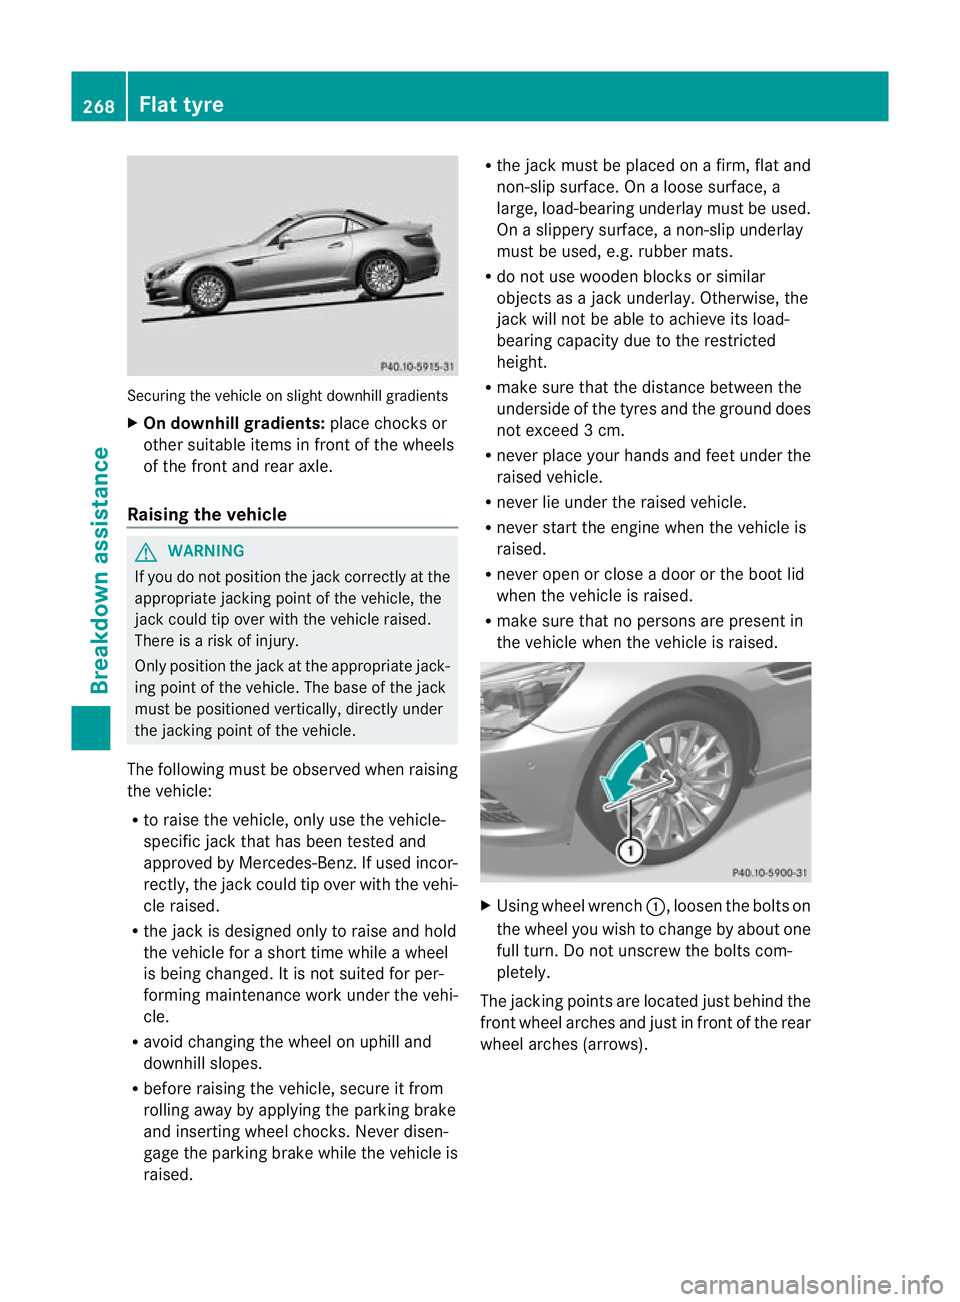
Securing the vehicle on slight downhill gradients
X
On downhill gradients: place chocks or
othe rsuitable items in fron tofthe wheels
of the front and rear axle.
Raising the vehicle G
WARNING
If you do not position the jack correctly at the
appropriate jacking point of the vehicle, the
jack could tip over with the vehicle raised.
There is a risk of injury.
Only position the jack at the appropriate jack-
ing point of the vehicle. The base of the jack
must be positioned vertically, directly under
the jacking point of the vehicle.
The following must be observed when raising
the vehicle:
R to raise the vehicle, only use the vehicle-
specific jack that has been tested and
approved by Mercedes-Benz. If used incor-
rectly, the jack could tip over with the vehi-
cle raised.
R the jack is designed only to raise and hold
the vehicle for a short time while a wheel
is being changed. It is not suited for per-
forming maintenance work under the vehi-
cle.
R avoid changing the wheel on uphill and
downhill slopes.
R before raising the vehicle, secure it from
rolling away by applying the parking brake
and inserting wheel chocks. Never disen-
gage the parking brake while the vehicle is
raised. R
the jack must be placed on a firm, flat and
non-slip surface. On a loose surface, a
large, load-bearing underlay must be used.
On a slippery surface, a non-slip underlay
must be used, e.g. rubber mats.
R do not use wooden blocks or similar
objects as a jack underlay. Otherwise, the
jack will not be able to achieve its load-
bearing capacity due to the restricted
height.
R make sure that the distance between the
underside of the tyres and the ground does
not exceed 3 cm.
R never place your hands and feet under the
raised vehicle.
R never lie under the raised vehicle.
R never start the engine when the vehicle is
raised.
R never open or close a door or the boot lid
when the vehicle is raised.
R make sure that no persons are present in
the vehicle when the vehicle is raised. X
Using wheel wrench :, loosen the bolts on
the wheel you wish to change by about one
full turn. Do not unscrew the bolts com-
pletely.
The jacking points are located just behind the
front wheel arches and just in front of the rear
wheel arches (arrows). 268
Flat tyreBreakdown assistance
Page 273 of 321
Fitting
anew wheel G
WARNING
Oiled or greased wheel bolts or damaged
wheel bolts/hub threads can cause the wheel
bolts to come loose .As a result, you could
lose a wheel while driving. There is a risk of
accident.
Never oil or grease wheel bolts. In the event
of damage to the threads, contact a qualified
specialist workshop immediately.H ave the
damaged wheel bolts or hub threads
replaced/renewed. Do no tcontinue driving. G
WARNING
If you tighten the wheel bolts or wheel nuts
when the vehicle is raised, the jack could tip
over. There is a risk of injury.
Only tighten the wheel bolts or wheel nuts
when the vehicle is on the ground.
Always pay attention to the instructions and
safety notices in "Changing a wheel"
(Y page 294).
Only use wheel bolts that have been designed
for the wheel and the vehicle. For safety rea-
sons, Mercedes-Benz recommends that you
only use wheel bolts which have been
approved for Mercedes-Benz vehicles and the
respective wheel.
Be sure to use the original-length wheel bolts
when refitting the original wheel after it has
been repaired.
X Clean the wheel and wheel hub contact
surfaces. X
Slide the emergency spare wheel onto the
centring pin and push it on.
X Tighten the wheel bolts until they are fin-
ger-tight.
X Unscrew the centring pin.
X Tighten the last wheel bolt until it is finger-
tight.
X Inflate the collapsible emergency spare
wheel (Y page 270).
Inflating the collapsible emergency
spare wheel !
Inflate the collapsible emergency spare
wheel using the tyre inflation compressor
before lowering the vehicle. The wheel rim
could otherwise be damaged. X
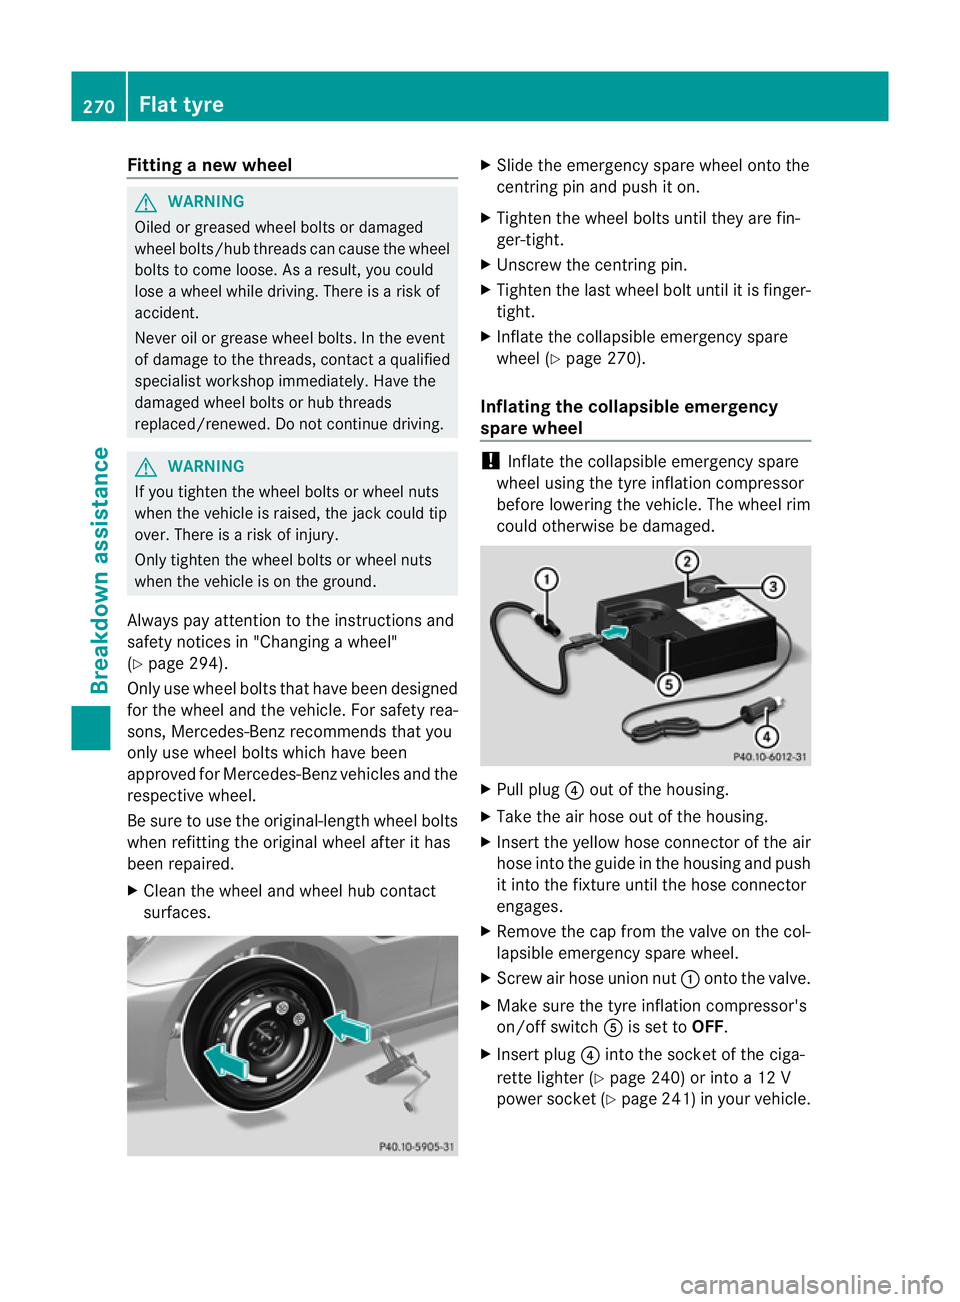
Pull plug ?out of the housing.
X Take the air hose out of the housing.
X Insert the yellow hose connector of the air
hose into the guide in the housing and push
it into the fixture until the hose connector
engages.
X Remove the cap from the valve on the col-
lapsible emergency spare wheel.
X Screw air hose union nut :onto the valve.
X Make sure the tyre inflation compressor's
on/off switch Ais set to OFF.
X Insert plug ?into the socket of the ciga-
rette lighter (Y page 240) or into a 12 V
power socket (Y page 241) in your vehicle.270
Flat tyreBreakdown assistance
Page 293 of 321
Follow recommended tyre inflation pressures
and check the pressure of all the tyres includ-
ing the spare wheel:
R at least every two weeks
R if the load changes
R before beginning a long journey
R for changed operating conditions, e.g. off-
road driving
If necessary, correct the tyre pressure.
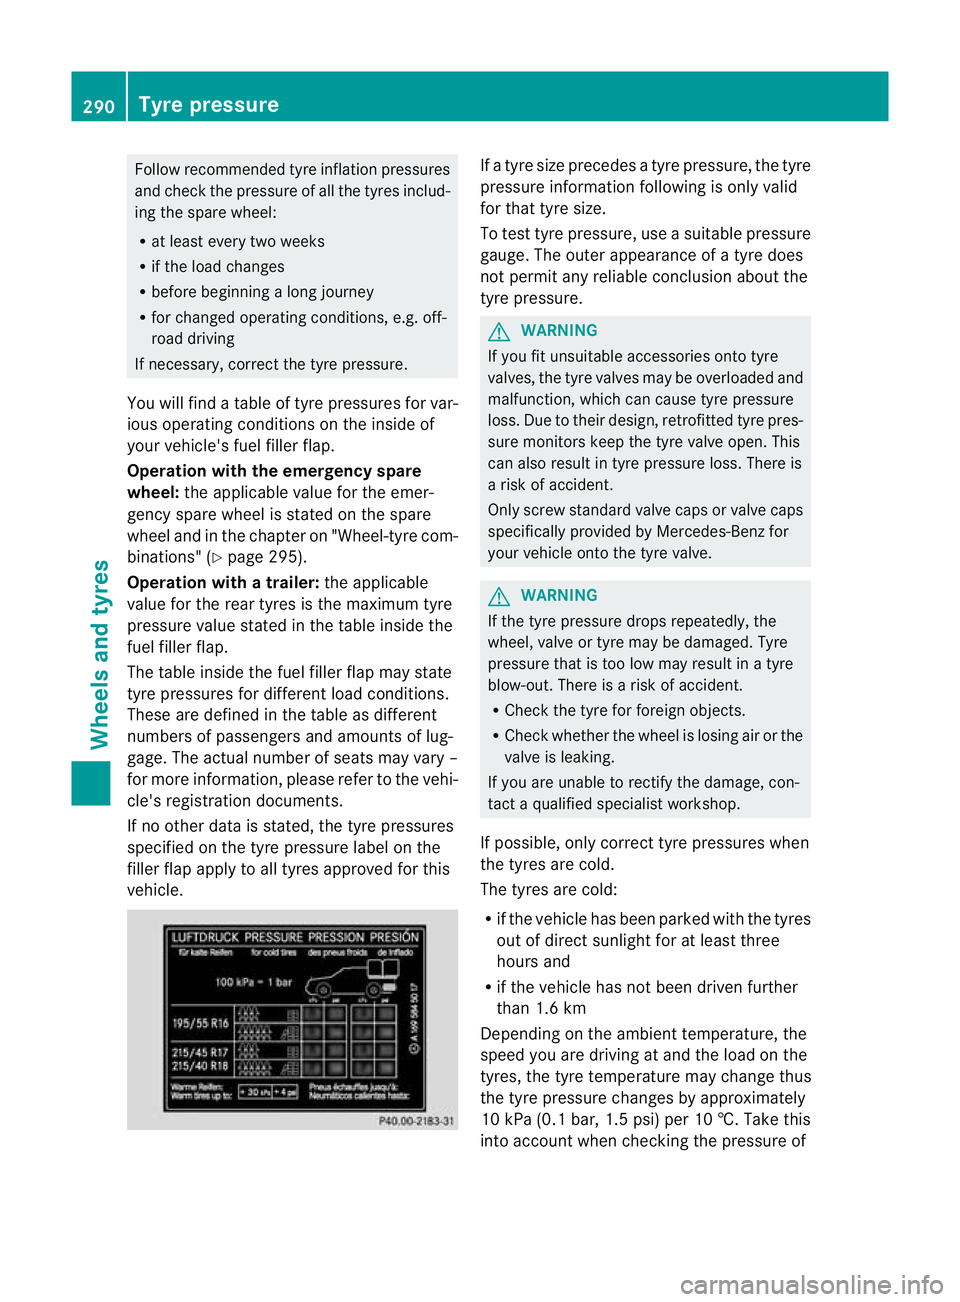
You will find a table of tyre pressures for var-
ious operating conditions on the inside of
your vehicle's fuel filler flap.
Operation with the emergency spare
wheel: the applicable value for the emer-
gency spare wheel is stated on the spare
wheel and in the chapter on "Wheel-tyre com-
binations" (Y page 295).
Operation with a trailer: the applicable
value for the rear tyres is the maximum tyre
pressure value stated in the table inside the
fuel filler flap.
The table inside the fuel filler flap may state
tyre pressures for different load conditions.
These are defined in the table as different
numbers of passengers and amounts of lug-
gage. The actual number of seats may vary –
for more information, please refe rto the vehi-
cle's registration documents.
If no other data is stated, the tyre pressures
specified on the tyre pressure label on the
filler flap apply to all tyres approved for this
vehicle. If a tyre size precedes a tyre pressure, the tyre
pressure information following is only valid
for that tyre size.
To test tyre pressure, use a suitable pressure
gauge. The outer appearance of a tyre does
not permit any reliable conclusion about the
tyre pressure. G
WARNING
If you fit unsuitable accessories onto tyre
valves, the tyre valves may be overloaded and
malfunction, which can cause tyre pressure
loss. Due to their design, retrofitted tyre pres-
sure monitors keep the tyre valve open. This
can also result in tyre pressure loss. There is
a risk of accident.
Only screw standard valve caps or valve caps
specifically provided by Mercedes-Benz for
your vehicle onto the tyre valve. G
WARNING
If the tyre pressure drops repeatedly, the
wheel, valve or tyre may be damaged. Tyre
pressure that is too low may result in a tyre
blow-out. There is a risk of accident.
R Check the tyre for foreign objects.
R Check whether the wheel is losing air or the
valve is leaking.
If you are unable to rectify the damage, con-
tact a qualified specialist workshop.
If possible, only correc ttyre pressures when
the tyres are cold.
The tyres are cold:
R if the vehicle has been parked with the tyres
out of direc tsunlight for at least three
hours and
R if the vehicle has no tbeen driven further
than 1.6 km
Depending on the ambient temperature, the
speed you are driving at and the load on the
tyres, the tyre temperature may change thus
the tyre pressure changes by approximately
10 kPa (0.1 bar, 1.5 psi) per 10 †. Take this
into accoun twhen checking the pressure of 290
Tyre pressureWheels and tyres