2012 MERCEDES-BENZ SLK ROADSTER lights
[x] Cancel search: lightsPage 233 of 321
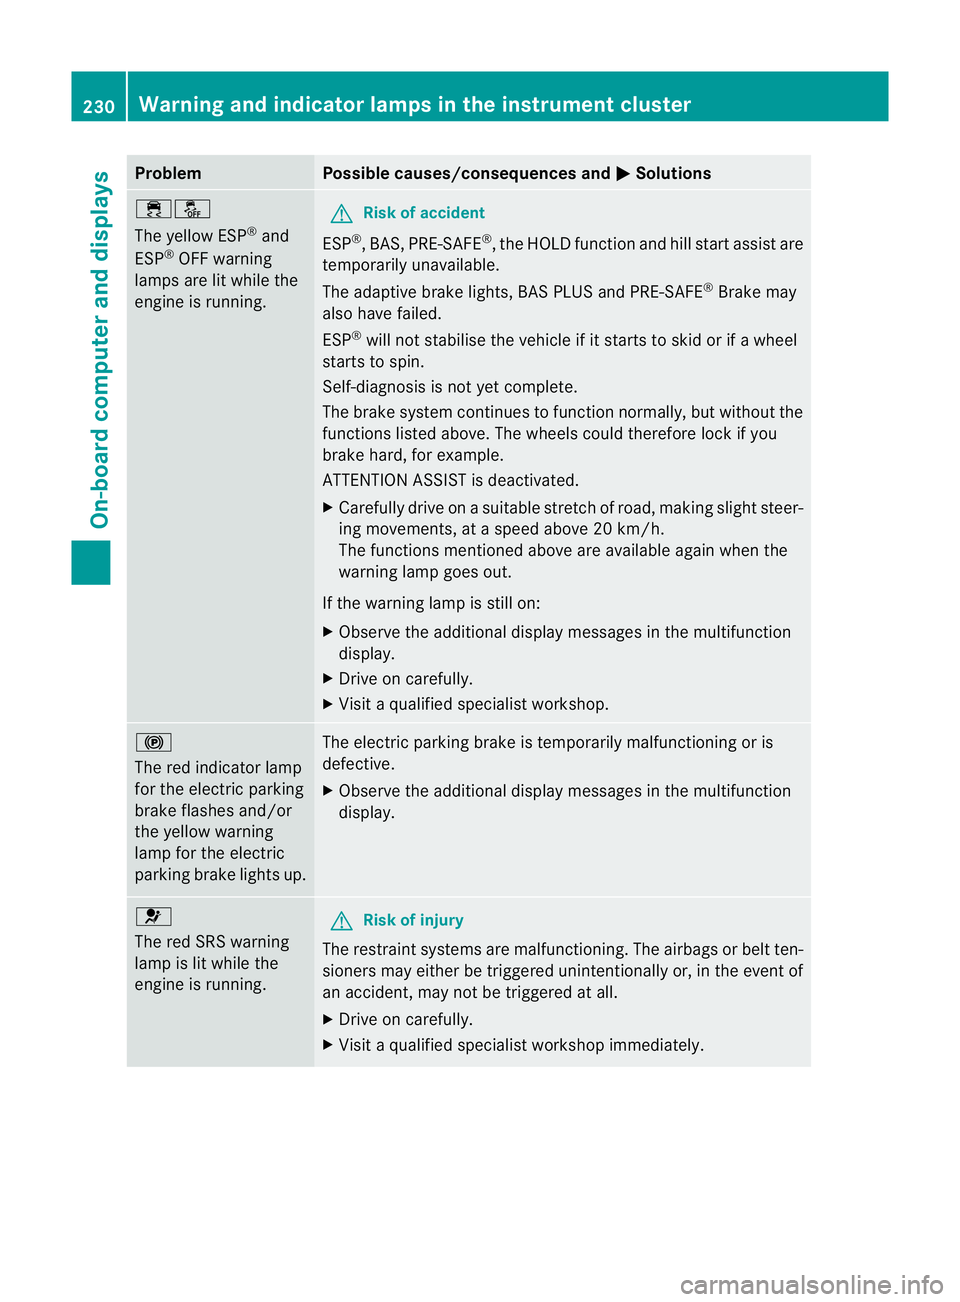
Problem Possible causes/consequences and
M Solutions
֌
The yellow ESP
®
and
ESP ®
OFF warning
lamps are lit while the
engine is running. G
Risk of accident
ESP ®
,B AS, PRE-SAFE ®
, the HOLD functio nand hill start assist are
temporarily unavailable.
The adaptive brake lights, BAS PLUS and PRE-SAFE ®
Brake may
also have failed.
ESP ®
will not stabilise the vehicle if it starts to ski dorifawheel
starts to spin.
Self-diagnosis is not yet complete.
The brake system continues to function normally, but without the
functions listed above .The wheels could therefore lock if you
brake hard, for example.
ATTENTION ASSIST is deactivated.
X Carefully drive on a suitable stretch of road, making slight steer-
ing movements, at a speed above 20 km/h.
The functions mentioned above are available again when the
warning lamp goes out.
If the warning lamp is still on:
X Observe the additional display messages in the multifunction
display.
X Drive on carefully.
X Visit a qualified specialist workshop. !
The red indicator lamp
for the electric parking
brake flashes and/or
the yellow warning
lamp for the electric
parking brake lights up.
The electric parking brake is temporarily malfunctioning or is
defective.
X
Observe the additional display messages in the multifunction
display. 6
The red SRS warning
lamp is lit while the
engine is running.
G
Risk of injury
The restraint systems are malfunctioning. The airbags or belt ten-
sioners may either be triggered unintentionally or, in the event of
an accident, may not be triggered at all.
X Drive on carefully.
X Visit a qualified specialist workshop immediately. 230
Warning and indicator lamps in the instrument clusterOn-board computer and displays
Page 234 of 321
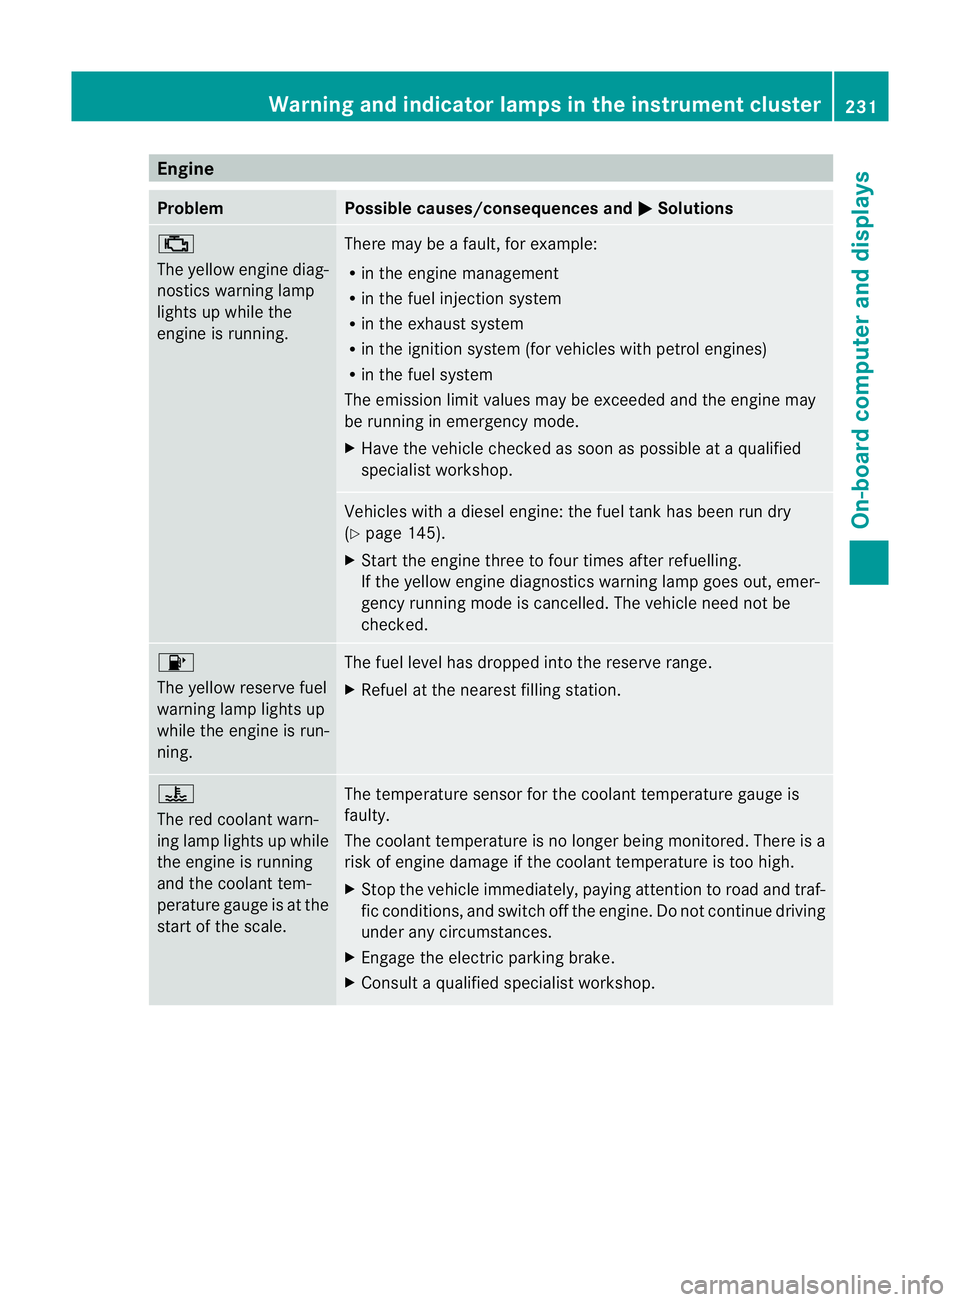
Engine
Problem Possible causes/consequences and
M Solutions
;
The yellow engine diag-
nostics warning lamp
lights up while the
engine is running.
There may be a fault, for example:
R in the engine management
R in the fuel injection system
R in the exhaust system
R in the ignition system (for vehicles with petrol engines)
R in the fuel system
The emission limit values may be exceeded and the engin emay
be running in emergency mode.
X Have the vehicle checked as soon as possible at a qualified
specialist workshop. Vehicles with a diesel engine: the fuel tan
khas been run dry
(Y page 145).
X Start the engine three to four times after refuelling.
If the yellow engine diagnostics warning lamp goes out, emer-
gency running mode is cancelled. The vehicle need no tbe
checked. 8
The yellow reserve fuel
warning lamp lights up
while the engine is run-
ning.
The fuel level has dropped into the reserve range.
X
Refuel at the nearest filling station. ?
The red coolant warn-
ing lamp lights up while
the engine is running
and the coolant tem-
perature gauge is at the
star toft he scale. The temperature sensor for the coolant temperature gauge is
faulty.
The coolant temperature is no longer being monitored. There is a
risk of engine damage if the coolant temperature is too high.
X Stop the vehicle immediately, paying attention to road and traf-
fic conditions, and switch off the engine. Do not continue driving
under any circumstances.
X Engage the electric parking brake.
X Consult a qualified specialist workshop. Warning and indicator lamps in the instrument cluster
231On-board computer and displays Z
Page 236 of 321
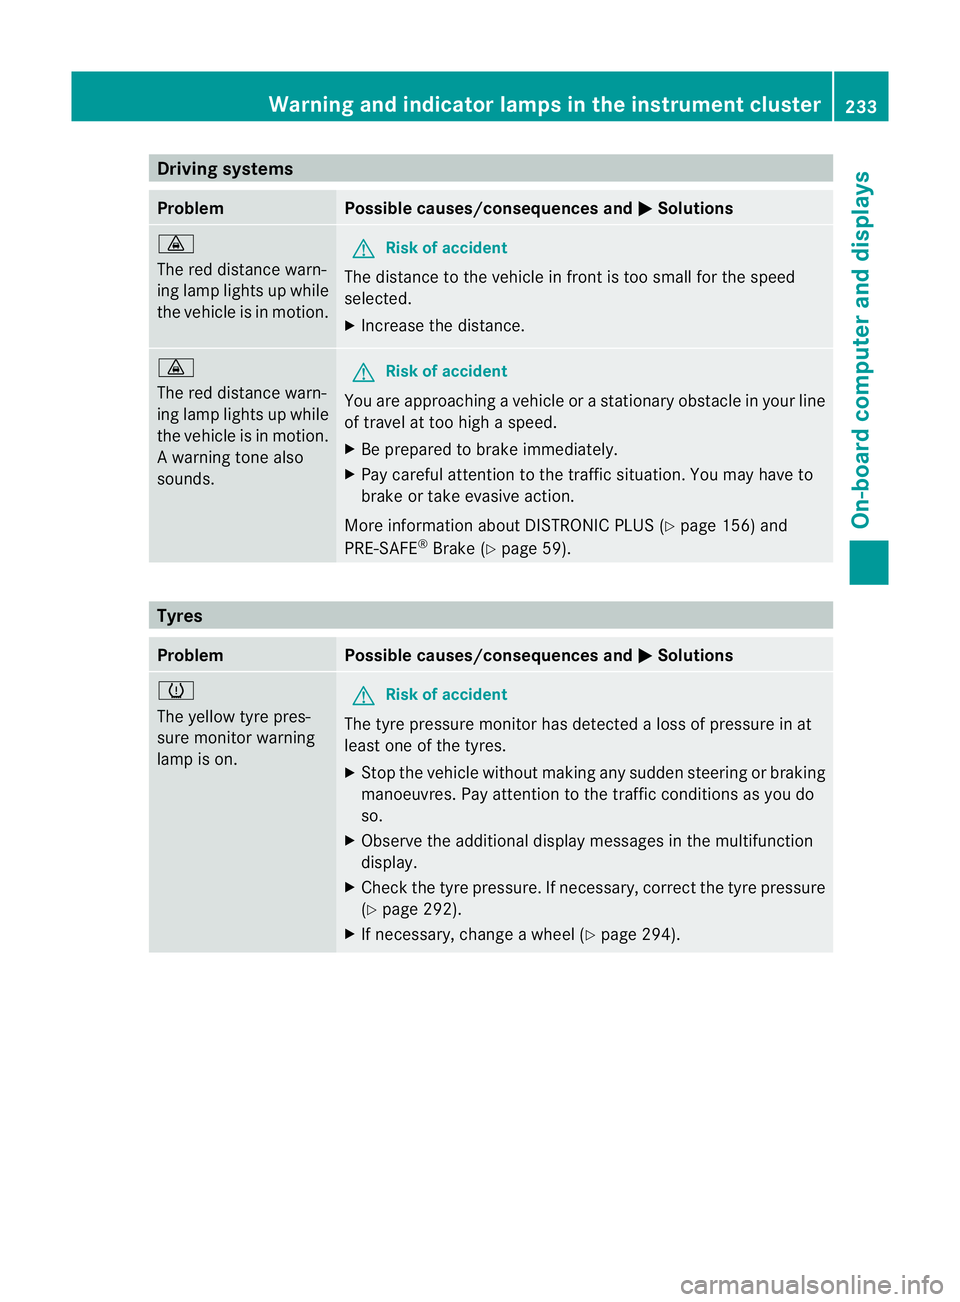
Driving systems
Problem Possible causes/consequences and
M Solutions
·
The red distance warn-
ing lamp lights up while
the vehicle is in motion.
G
Risk of accident
The distance to the vehicle in fron tis too small for the speed
selected.
X Increase the distance. ·
The red distance warn-
ing lamp lights up while
the vehicle is in motion.
Aw
arning tone also
sounds. G
Ris
kofa ccident
You are approaching a vehicle or a stationary obstacle in your line
of travel at too high a speed.
X Be prepared to brake immediately.
X Pay careful attention to the traffic situation. You may have to
brake or take evasive action.
More information about DISTRONIC PLUS (Y page 156) and
PRE-SAFE ®
Brake (Y page 59). Tyres
Problem Possible causes/consequences and
M Solutions
h
The yellow tyre pres-
sure monitor warning
lamp is on.
G
Ris
kofa ccident
The tyre pressure monito rhas detected a loss of pressure in at
least one of the tyres.
X Stop the vehicle without making any sudde nsteering or braking
manoeuvres .Pay attentio nto the traffic conditions as you do
so.
X Observe the additional display messages in the multifunction
display.
X Check the tyre pressure. If necessary, correc tthe tyre pressure
(Y page 292).
X If necessary, change a wheel (Y page 294). Warning and indicator lamps in the instrument cluster
233On-board computer and displays Z
Page 247 of 321
X
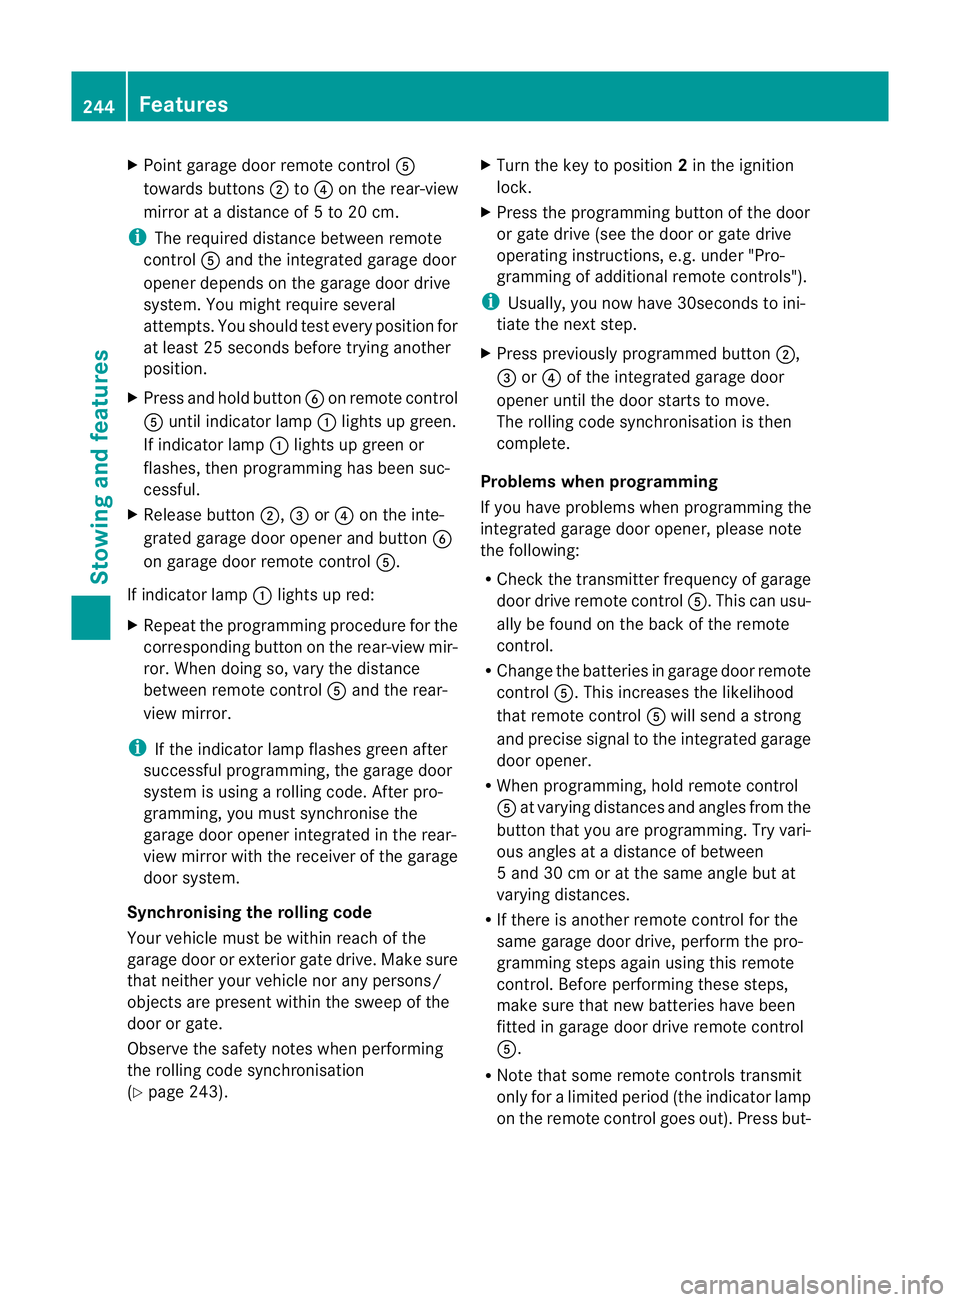
Point garage door remote control A
towards buttons ;to? on the rear-view
mirror at a distance of 5 to 20 cm.
i The required distance between remote
control Aand the integrated garage door
opener depends on the garage door drive
system. You might require several
attempts. You should test every position for
at least 25 seconds before trying another
position.
X Press and hold button Bon remot econtrol
A until indicator lamp :lights up green.
If indicator lamp :lights up green or
flashes, then programming has been suc-
cessful.
X Release button ;,=or? on the inte-
grated garage door opener and button B
on garage door remote control A.
If indicator lamp :lights up red:
X Repeat the programming procedure for the
corresponding button on the rear-view mir-
ror. When doing so, vary the distance
between remote control Aand the rear-
view mirror.
i If the indicator lamp flashes green after
successful programming, the garage door
system is using a rolling code. After pro-
gramming, you must synchronise the
garage door opener integrated in the rear-
view mirror with the receiver of the garage
door system.
Synchronising the rolling code
Your vehicle must be within reach of the
garage door or exterior gate drive. Make sure
that neither your vehicle nor any persons/
objects are present within the sweep of the
door or gate.
Observe the safety notes when performing
the rolling code synchronisation
(Y page 243). X
Turn the key to position 2in the ignition
lock.
X Press the programming button of the door
or gate drive (see the door or gate drive
operating instructions, e.g. under "Pro-
gramming of additional remote controls").
i Usually, you now have 30seconds to ini-
tiate the next step.
X Press previously programmed button ;,
= or? of the integrated garage door
opener until the door starts to move.
The rolling code synchronisation is then
complete.
Problems when programming
If you have problems when programming the
integrated garage door opener, please note
the following:
R Check the transmitter frequency of garage
door drive remote control A.This can usu-
ally be found on the back of the remote
control.
R Change the batteries in garage door remote
control A.This increases the likelihood
that remote control Awill send a strong
and precise signal to the integrated garage
door opener.
R When programming, hold remote control
A at varying distances and angles from the
button that you are programming. Try vari-
ous angles at a distance of between
5 and 30 cm or at the same angle but at
varying distances.
R If there is another remote control for the
same garage door drive, perform the pro-
gramming steps again using this remote
control. Before performing these steps,
make sure that new batteries have been
fitted in garage door drive remote control
A.
R Note that some remote controls transmit
only for a limited period (the indicator lamp
on the remote control goes out). Press but- 244
FeaturesStowing and features
Page 248 of 321
ton
Bon remote control Aagai nbefore
transmission ends.
R Align the aerial cable of the garage door
opener unit. This can improve signal recep-
tion/transmission.
Opening or closing the garage door Once programmed, the integrated garage
door opener will assume the function of the
garage door system's remote control. Please
also read the operating instructions for the
garage door system.
X Turn the key to position 2in the ignition
lock.
X Press button ;,=or? that you have
programmed to operate the garage door.
Garage door system with a fixed code: indi-
cator lamp :lights up green.
Garage door system with a rolling code:
indicator lamp :flashes green.
i The transmitter will transmit a signal for
as long as the button is pressed. The trans-
mission is halted after a maximum of ten
seconds and indicator lamp :flashes yel-
low. Press button ;,=or? again if nec-
essary.
Clearing the memory of the integrated
garage door opener in the rear-view mir-
ror X
Turn the key to position 2in the ignition
lock.
X Press buttons ;and ?.
The indicator lamp lights up yellow.
X Press and hold buttons ;and ?until the
indicator lamp turns green.
i Make sure that you clear the memory of
the integrated garage door opener before
selling the vehicle. Features
245Stowing and features Z
Page 258 of 321
the correct distance is available fro
mthe
equipment manufacturer.
Move the high-pressure cleaner nozzle
around when cleaning your vehicle.
Do not aim directly at any of the following:
R tyres
R door gaps, roof gaps, joints etc.
R electrical components
R battery
R connectors
R lights
R seals
R trim elements
R ventilation slots
Damaged seals or electrical components
can lead to leaks or failures.
! Do not use high-pressure cleaning equip-
ment to clean the tank recess when it is
open. This can damage the seals or other
components.
Cleaning the wheels !
Do not use acidic wheel cleaning products
to remove brake dust. This could damage
wheel bolts and brake components.
! Do not park up the vehicle for an extended
period straight after cleaning it, particularly
after having cleaned the wheels with wheel
cleaner. Wheel cleaners could cause
increased corrosion of the brake discs and
brake pads/linings. For this reason, you
should drive for a few minutes after clean-
ing. Braking heats the brake discs and the
brake pads/linings, thus drying them. The
vehicle can then be parked up.
Cleaning the paintwork Scratches, corrosive deposits, areas affected
by corrosion and damage caused by inade-
quate care cannot always be completely
repaired. In such cases, visit a qualified spe-
cialist workshop. X
Remove impurities immediately, where
possible, whilst avoiding rubbing too hard.
X Soak insect remains with insect remover
and rinse off the treated areas afterwards.
X Soak bird droppings with water and rinse
off the treated areas afterwards.
X Remove coolant, brake fluid, tree resin,
oils, fuels and greases by rubbing gently
with a cloth soaked in petroleum ether or
lighter fluid.
X Use tar remover to remove tar stains.
X Use silicone remover to remove wax.
! Do not affix:
R stickers
R films
R magnetic plates or similar items
to painted surfaces. You could otherwise
damage the paintwork.
Care and treatment of matt paintwork If your vehicle has a clear matt finish, observe
the following instructions in order to avoid
damage to the paintwork due to incorrect
care.
These notes also apply to light-alloy wheels
with a clear matt finish.
!
Never polish the vehicle or the light alloy
wheels. Polishing makes the paintwork
shiny.
! The following may cause the paint to
become shiny and thus reduce the matt
effect:
R Vigorous rubbing with unsuitable mate-
rials.
R Frequent use of car washes.
R Washing the vehicle in direct sunlight.
! Never use paint cleaner, buffing or pol-
ishing products, or gloss preserver, e.g.
wax. These products are only suitable for
high-gloss surfaces. Their use on vehicles
with matt finish leads to considerable sur-
face damage (shiny, spotted areas). Care
255Maintenance and care Z
Page 296 of 321
Checking tyre pressure electronically
X
Make sure that the key is in posi-
tion 2(Ypage 127) in the ignition lock.
X Press the =or; buttononthe steer-
ing wheel to select the Serv. menu.
X Press the 9or: button to select
Tyre pressure .
X Press the abutton.
The current tyre pressure for each wheel
will be displayed in the multifunction dis-
play.
If the vehicle has been parked for longer than
20minutes, the Tyre pressures will be displayed after a few minutes of
driving message appears.
After a teach-in period, the tyre pressure
monitor automatically recognises new
wheels or new sensors. As long as a clear
allocation of the tyre pressure values to the
individual wheels is not possible, the Tyrepressure monitor active display mes-
sage is shown instead of the tyre pressure
display. The tyre pressures are already being
monitored.
i If a spare wheel/emergency spare wheel
is fitted, the system may continue to show
the tyre pressure of the wheel that has
been removed for a few minutes. If this
occurs, note that the value displayed for
the position where the spare wheel/emer-
gency spare wheel is fitted is not the same
as the spare wheel/emergency spare
wheel's current tyre pressure.
Warning messages of the tyre pressure
monitor If the tyre pressure monitor detects a signifi-
cant pressure loss on one or more tyres, a
warning message is shown in the multifunc-
tion display. Awarning tone also sounds and
the tyre pressure warning lamp lights up in
the instrument cluster. Each tyre that is affected by a significant loss
of pressure is highlighted in the pressure dis-
play.
If the
Please correct tyre pressure message appears in the multifunction dis-
play:
X
Chec kthe tyre pressure on all four wheels
and correct it if necessary.
i If the wheel positions on the vehicle are
interchanged, the tyre pressures may be
displayed for the wrong positions for a
short time. This is rectified after a few
minutes of driving, and the tyre pressures
are displayed for the correct positions.
Restarting the tyre pressure monitor When you restart the tyre pressure monitor,
all existing warning messages are deleted and
the warning lamps go out. The monitor uses
the currently set tyre pressures as the refer-
ence values for monitoring. In most cases, the
tyre pressure monitor will automatically
detect the new referencev
alues after you
have changed the tyre pressure.
i For an overview of th emenus, see
(Y page 182).
If you wish to define the new reference values
manually:
X Use the table on the inside of the fuel filler
flap to ensure that the tyre pressure is set
correctly in all four tyres for the current
operating conditions.
Also observe the notes in the section on
tyre pressures (Y page 289).
X Make sure that the key is in position 2in
the ignition lock.
X Press the =or; button on the steer-
ing wheel to select the Serv. menu.
X Press the 9or: button to select
Tyre pressure .
X Press the abutton.
The multifunction display shows the cur-
rent tyre pressure of the individual tyres or Tyre pressure
293Wheels and tyres Z