2012 MERCEDES-BENZ SLK-CLASS ROADSTER steering
[x] Cancel search: steeringPage 176 of 336
GWARNING
Objects located above the height range of
Parking Guidance will not be detected when
the parking space is measured. These objects
are not taken into account when the parking
procedure is calculated, e.g. overhanging
loads, tail sections or loading ramps of goods
vehicles. Under some circumstances, Parking
Guidance might therefore issue steering
instructions too soon. This may lead to a
collision. For this reason, you should avoid
using Parking Guidance in such situations.
GWARNING
Make sure that no persons or animals are in
the maneuvering range. Otherwise, they
could be injured.
! Pay particular attention to low objects or
objects with flat surfaces, such as trailer
drawbars, posts, cross beams and curbs.
These types of objects cannot be detected
by Parking Guidance and may damage the
vehicle.
When PARKTRONIC is deactivated, Parking
Guidance is also unavailable.
Use Parking Guidance for parking spaces:
R that are parallel to the direction of travel
R that are on straight roads, not bends
R that are on the same level as the road, i.e.
not on the pavement, for example. Parking
Guidance may not detect flat curbs
Parking tips:
R on narrow roads, drive past the parking
space as close as possible.
R parking spaces that are littered, overgrown
or partially occupied by trailer drawbars
might be identified incorrectly or not at all.
R snowfall or heavy rain may lead to a parking
space being measured inaccurately.
R pay attention to the PARKTRONIC
( Y page 171) warning messages during the
parking procedure.
R when transporting a load which protrudes
from your vehicle, you must not use Parking
Guidance.
R never use Parking Guidance with snow
chains or an emergency spare wheel
mounted.
R make sure that the tire pressures are
always correct. This has a direct effect on
the steering instructions.
R the way your vehicle is positioned in the
parking space after parking is dependent
on various factors. These include the
position and shape of the vehicles parked
in front and behind it and the conditions of
the location. In some cases, Parking
Guidance may guide you too far or not far
enough into a parking space. In some
cases, it may also lead you across or onto
the curb. If necessary, cancel the parking
procedure with Parking Guidance.
! If unavoidable, you should drive over
obstacles such as curbs slowly and not at
a sharp angle. Otherwise, you may damage
the wheels or tires.
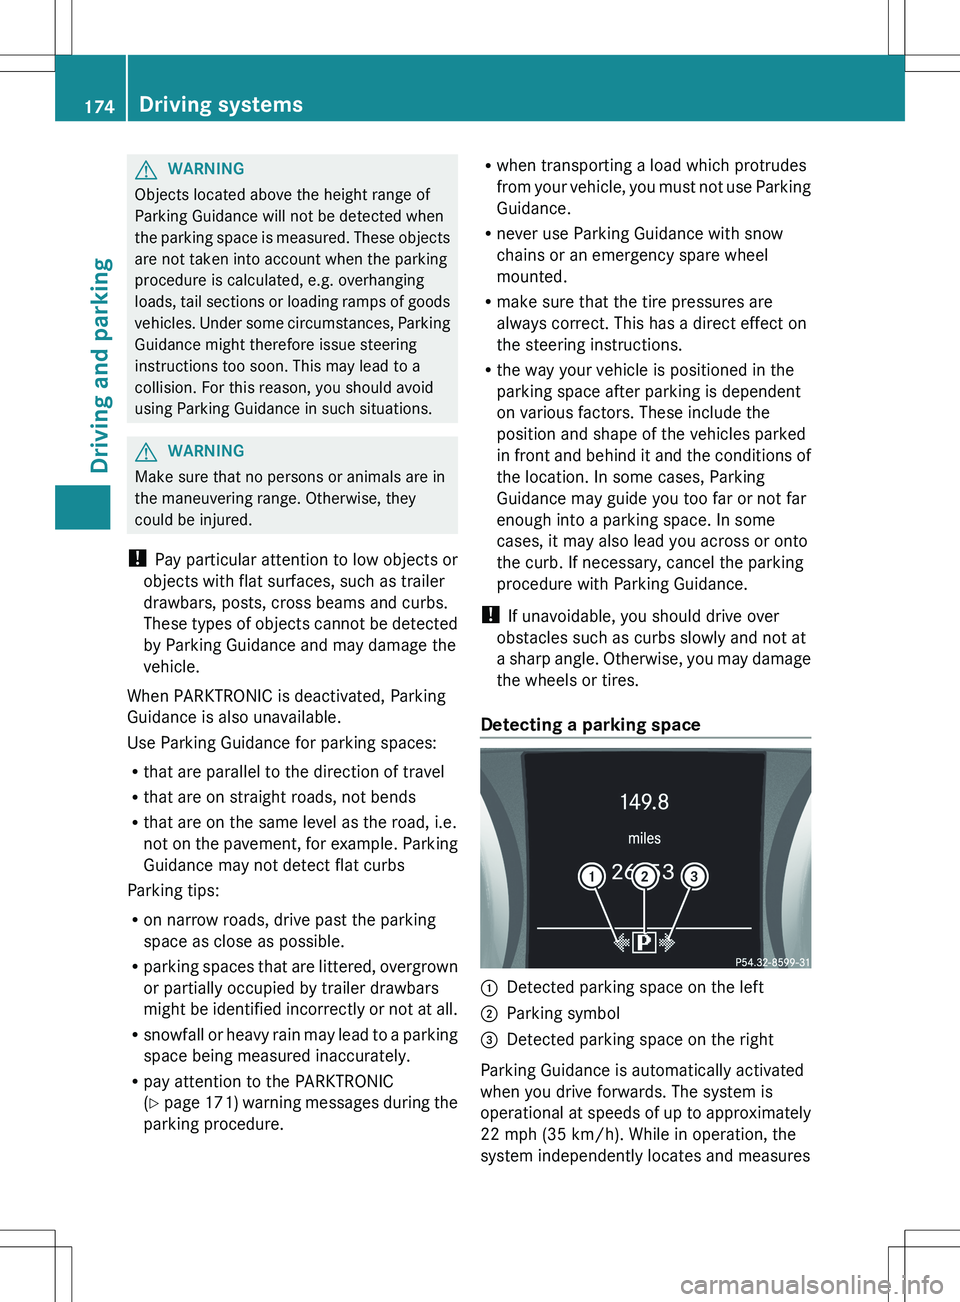
Detecting a parking space:Detected parking space on the left;Parking symbol=Detected parking space on the right
Parking Guidance is automatically activated
when you drive forwards. The system is
operational at speeds of up to approximately
22 mph (35 km/h). While in operation, the
system independently locates and measures
174Driving systemsDriving and parking
Page 177 of 336
parking spaces on both sides of the vehicle.
When driving at speeds below 19 mph
(30 km/h), you will see parking symbol ; as
a status indicator in the instrument cluster.
When a parking space has been detected, an
arrow towards the right = or the left : also
appears. Parking Guidance only displays
parking spaces on the front-passenger side
as standard. Parking spaces on the driver's
side are displayed as soon as the turn signal
on the driver's side is activated. To park on
the driver's side, you must leave the driver's
side turn signal switched on until you have
engaged reverse gear.
Parking Guidance will only detect parking
spaces:
R that are parallel to the direction of travel
R that are at least 5 ft (1.5 m) wide
R that are at least 4.3 ft (1.3 m) longer than
your vehicle
A parking space is displayed while you are
driving past it, and until you are
approximately 50 ft (15 m) away from it.
ParkingGWARNING
The Parking Guidance is only an aid and may
not detect all obstacles. The Parking
Guidance does not relieve you of the
responsibility to pay attention. You are always
responsible for safety and must continue to
pay attention to your immediate surroundings
when parking and maneuvering. Otherwise,
you could endanger yourself and others.
XStop the vehicle when the parking space
symbol shows the desired parking space in
the instrument cluster.XVehicles with manual transmission: shift to
reverse gear.Vehicles with automatic transmission: shift
into position R.
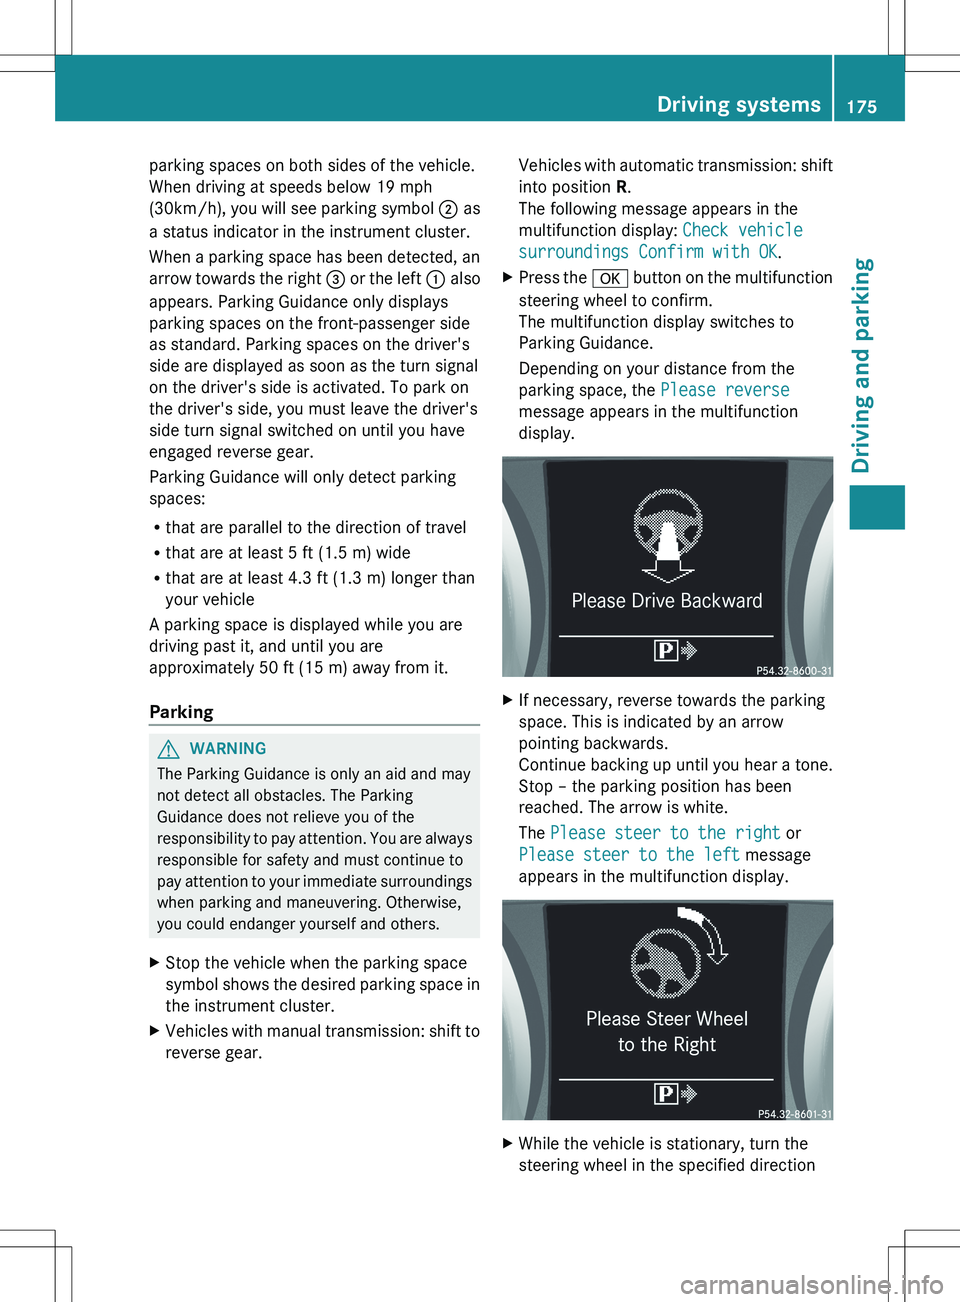
The following message appears in the
multifunction display: Check vehicle
surroundings Confirm with OK .XPress the a button on the multifunction
steering wheel to confirm.
The multifunction display switches to
Parking Guidance.
Depending on your distance from the
parking space, the Please reverse
message appears in the multifunction
display.XIf necessary, reverse towards the parking
space. This is indicated by an arrow
pointing backwards.
Continue backing up until you hear a tone.
Stop – the parking position has been
reached. The arrow is white.
The Please steer to the right or
Please steer to the left message
appears in the multifunction display.XWhile the vehicle is stationary, turn the
steering wheel in the specified directionDriving systems175Driving and parkingZ
Page 178 of 336
until the arrow is white and a warning tone
sounds.XTo reverse into the parking space:
maintain the steering wheel angle and
reverse carefully.XStop as soon as you hear a warning tone,
The vehicle has reached the position in
which you need to countersteer.
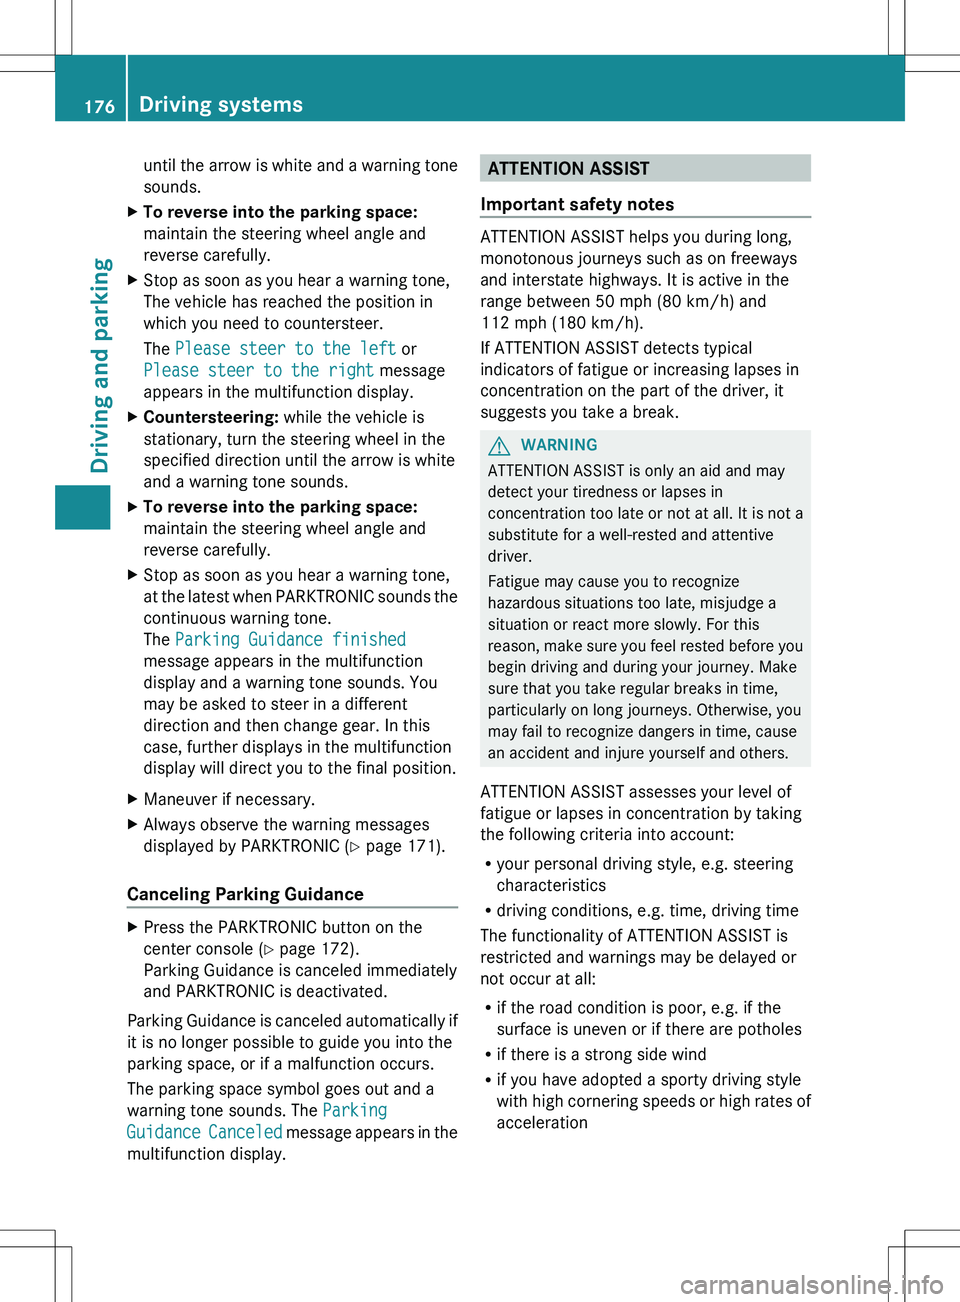
The Please steer to the left or
Please steer to the right message
appears in the multifunction display.XCountersteering: while the vehicle is
stationary, turn the steering wheel in the
specified direction until the arrow is white
and a warning tone sounds.XTo reverse into the parking space:
maintain the steering wheel angle and
reverse carefully.XStop as soon as you hear a warning tone,
at the latest when PARKTRONIC sounds the
continuous warning tone.
The Parking Guidance finished
message appears in the multifunction
display and a warning tone sounds. You
may be asked to steer in a different
direction and then change gear. In this
case, further displays in the multifunction
display will direct you to the final position.XManeuver if necessary.XAlways observe the warning messages
displayed by PARKTRONIC ( Y page 171).
Canceling Parking Guidance
XPress the PARKTRONIC button on the
center console ( Y page 172).
Parking Guidance is canceled immediately
and PARKTRONIC is deactivated.
Parking Guidance is canceled automatically if
it is no longer possible to guide you into the
parking space, or if a malfunction occurs.
The parking space symbol goes out and a
warning tone sounds. The Parking
Guidance Canceled message appears in the
multifunction display.
ATTENTION ASSIST
Important safety notes
ATTENTION ASSIST helps you during long,
monotonous journeys such as on freeways
and interstate highways. It is active in the
range between 50 mph (80 km/h) and
112 mph (180 km/h).
If ATTENTION ASSIST detects typical
indicators of fatigue or increasing lapses in
concentration on the part of the driver, it
suggests you take a break.
GWARNING
ATTENTION ASSIST is only an aid and may
detect your tiredness or lapses in
concentration too late or not at all. It is not a
substitute for a well-rested and attentive
driver.
Fatigue may cause you to recognize
hazardous situations too late, misjudge a
situation or react more slowly. For this
reason, make sure you feel rested before you
begin driving and during your journey. Make
sure that you take regular breaks in time,
particularly on long journeys. Otherwise, you
may fail to recognize dangers in time, cause
an accident and injure yourself and others.
ATTENTION ASSIST assesses your level of
fatigue or lapses in concentration by taking
the following criteria into account:
R your personal driving style, e.g. steering
characteristics
R driving conditions, e.g. time, driving time
The functionality of ATTENTION ASSIST is
restricted and warnings may be delayed or
not occur at all:
R if the road condition is poor, e.g. if the
surface is uneven or if there are potholes
R if there is a strong side wind
R if you have adopted a sporty driving style
with high cornering speeds or high rates of
acceleration
176Driving systemsDriving and parking
Page 182 of 336

Useful information
i This Operator's Manual describes all
models and all standard and optional
equipment of your vehicle available at the
time of publication of the Operator's
Manual. Country-specific differences are
possible. Please note that your vehicle may
not be equipped with all features
described. This also applies to safety-
related systems and functions.
i Please read the information on qualified
specialist workshops ( Y page 23).
Important safety notes
You will find an illustration of the instrument
cluster in the "At a glance" section
( Y page 27).
GWARNING
The driver's concentration must always be
directed primarily at road traffic.
For your safety and the safety of others,
selecting features through the multifunction
steering wheel should only be done by the
driver when traffic and road conditions permit
it to be done safely.
Bear in mind that at a speed of only 30 mph
(approximately 50 km/h), the vehicle covers
a distance of 44 feet (approximately 14 m) per
second.
GWARNING
No messages will be displayed if either the
instrument cluster or the multifunction
display is inoperative.
As a result, you will not be able to see
information about your driving conditions,
such as
R speed
R outside temperature
R warning/indicator lamps
Rmalfunction/warning messages
R failure of any systems
Driving characteristics may be impaired.
If you must continue to drive, do so with added
caution. Contact an authorized Mercedes-
Benz Center as soon as possible.GWARNING
Malfunction and warning messages are only
indicated for certain systems and are
intentionally not very detailed. The
malfunction and warning messages are
simply a reminder with respect to the
operation of certain systems. They do not
replace the owner's and/or driver's
responsibility to maintain the vehicle's
operating safety. Have all required
maintenance and safety checks performed on
the vehicle. Bring the vehicle to an authorized
Mercedes-Benz Center to address the
malfunction and warning messages.
Displays and operation
Instrument lighting
The brightness control knob is located on the
bottom left of the instrument cluster
( Y page 27).
XTurn the brightness control knob clockwise
or counter-clockwise.
Instrument cluster: if the light switch is set
to à , T or L , brightness control
takes ambient light into account.
i The light sensor in the instrument cluster
automatically controls the brightness of
the multifunction display.
In daylight, the displays in the instrument
cluster are not illuminated.
Displays and switches in the vehicle
interior: if the light switch is set to Ã,
brightness control takes ambient light into
account. If the light switch is set to T or
L , brightness control does not take
ambient light into account.
180Displays and operationOn-board computer and displays
Page 183 of 336
Coolant temperature displayGWARNING
Driving when your engine is overheated can
cause some fluids which may have leaked into
the engine compartment to catch fire. You
could be seriously burned.
Steam from an overheated engine can cause
serious burns which can occur just by opening
the engine hood. Stay away from the engine
if you see or hear steam coming from it.
Stop the vehicle in a safe location away from
other traffic. Turn off the engine, get out of the
vehicle and do not stand near the vehicle until
the engine has cooled down.
The coolant temperature gauge is in the
instrument cluster on the right-hand side.
Under normal operating conditions and with
the specified coolant level, the coolant
temperature may rise to 248 ‡ (120 †).
! A display message is shown if the coolant
temperature is too high.
If the coolant temperature is over
248 ‡(120 †), do not continue driving. The
engine will otherwise be damaged.
Tachometer
The red band in the tachometer indicates the
engine's overrevving range.
! Do not drive in the overrevving range, as
this could damage the engine.
The fuel supply is interrupted to protect the
engine when the red band is reached.
Outside temperature display
The outside temperature display is in the
multifunction display ( Y page 183).
GWARNING
The outside temperature indicator is not
designed to serve as an ice-warning device
and is therefore unsuitable for that purpose.
Indicated temperatures just above the
freezing point do not guarantee that the road
surface is free of ice. The road may still be icy,
especially in wooded areas or on bridges.
Changes in the outside temperature are
displayed after a short delay.
Speedometer with segments
The segments in the speedometer indicate
which speed range is available.
Cruise control ( Y page 156) activated:
The segments light up from the stored speed
to the maximum speed.
DISTRONIC PLUS ( Y page 158) activated:
One or two segments in the set speed range
light up.
DISTRONIC PLUS detects a vehicle in front:
The segments between the speed of the
vehicle in front and the stored speed light up.
Operating the on-board computer
Overview
The on-board computer is activated as soon
as you turn the SmartKey to position 1 in the
ignition lock.
You can control the multifunction display and
the settings in the on-board computer using
the buttons on the multifunction steering
wheel.
Displays and operation181On-board computer and displaysZ
Page 185 of 336
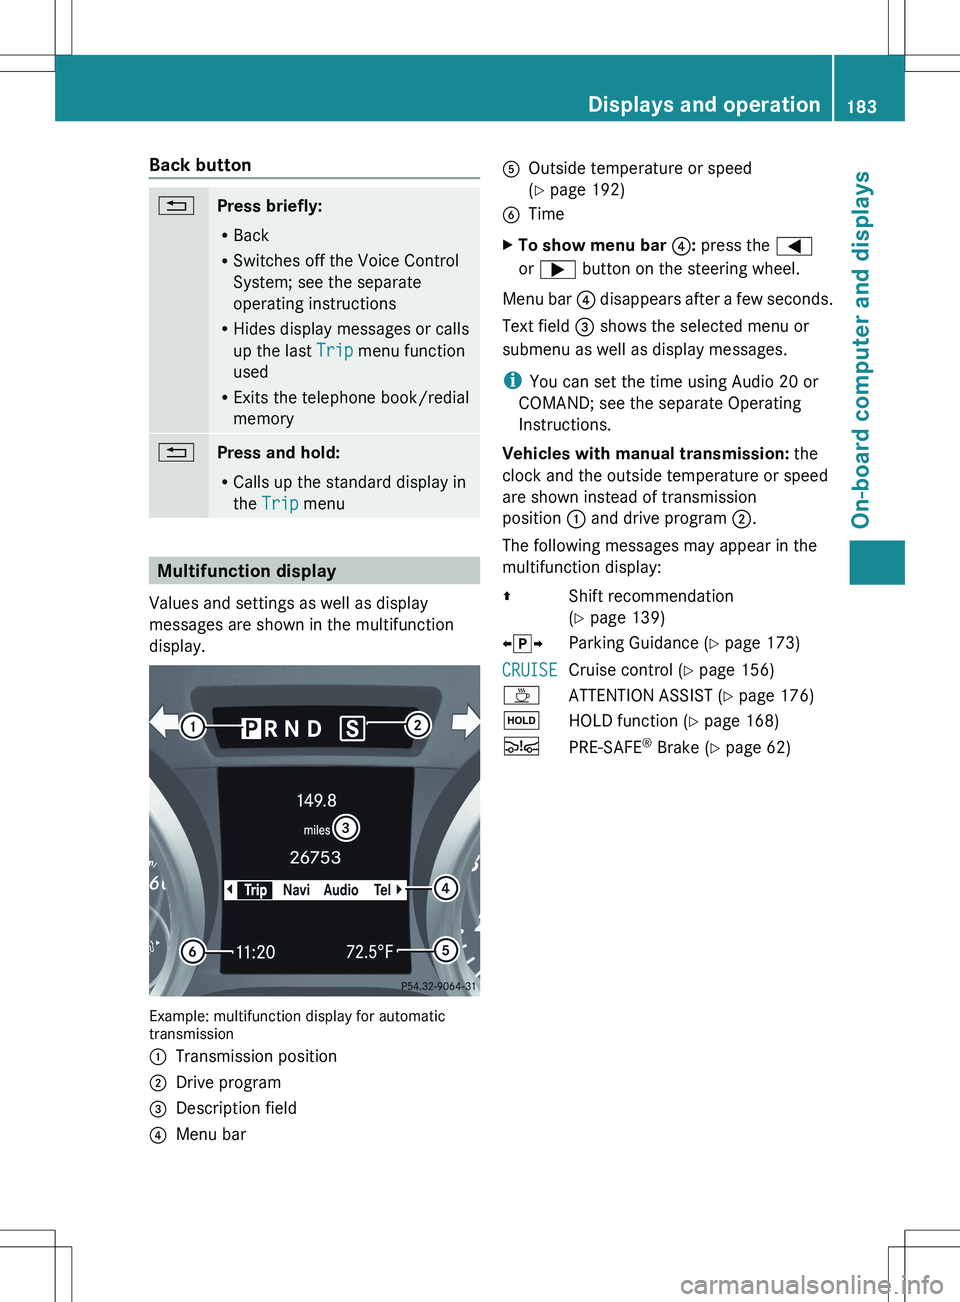
Back button%Press briefly:
R Back
R Switches off the Voice Control
System; see the separate
operating instructions
R Hides display messages or calls
up the last Trip menu function
used
R Exits the telephone book/redial
memory%Press and hold:
R Calls up the standard display in
the Trip menu
Multifunction display
Values and settings as well as display
messages are shown in the multifunction
display.
Example: multifunction display for automatic
transmission
:Transmission position;Drive program=Description field?Menu barAOutside temperature or speed
( Y page 192)BTimeXTo show menu bar ?: press the =
or ; button on the steering wheel.
Menu bar ? disappears after a few seconds.
Text field = shows the selected menu or
submenu as well as display messages.
i You can set the time using Audio 20 or
COMAND; see the separate Operating
Instructions.
Vehicles with manual transmission: the
clock and the outside temperature or speed
are shown instead of transmission
position : and drive program ;.
The following messages may appear in the
multifunction display:
ZShift recommendation
( Y page 139)Xj YParking Guidance ( Y page 173)CRUISECruise control ( Y page 156)ÀATTENTION ASSIST ( Y page 176)ëHOLD function ( Y page 168)ÄPRE-SAFE ®
Brake ( Y page 62)Displays and operation183On-board computer and displaysZ
Page 187 of 336
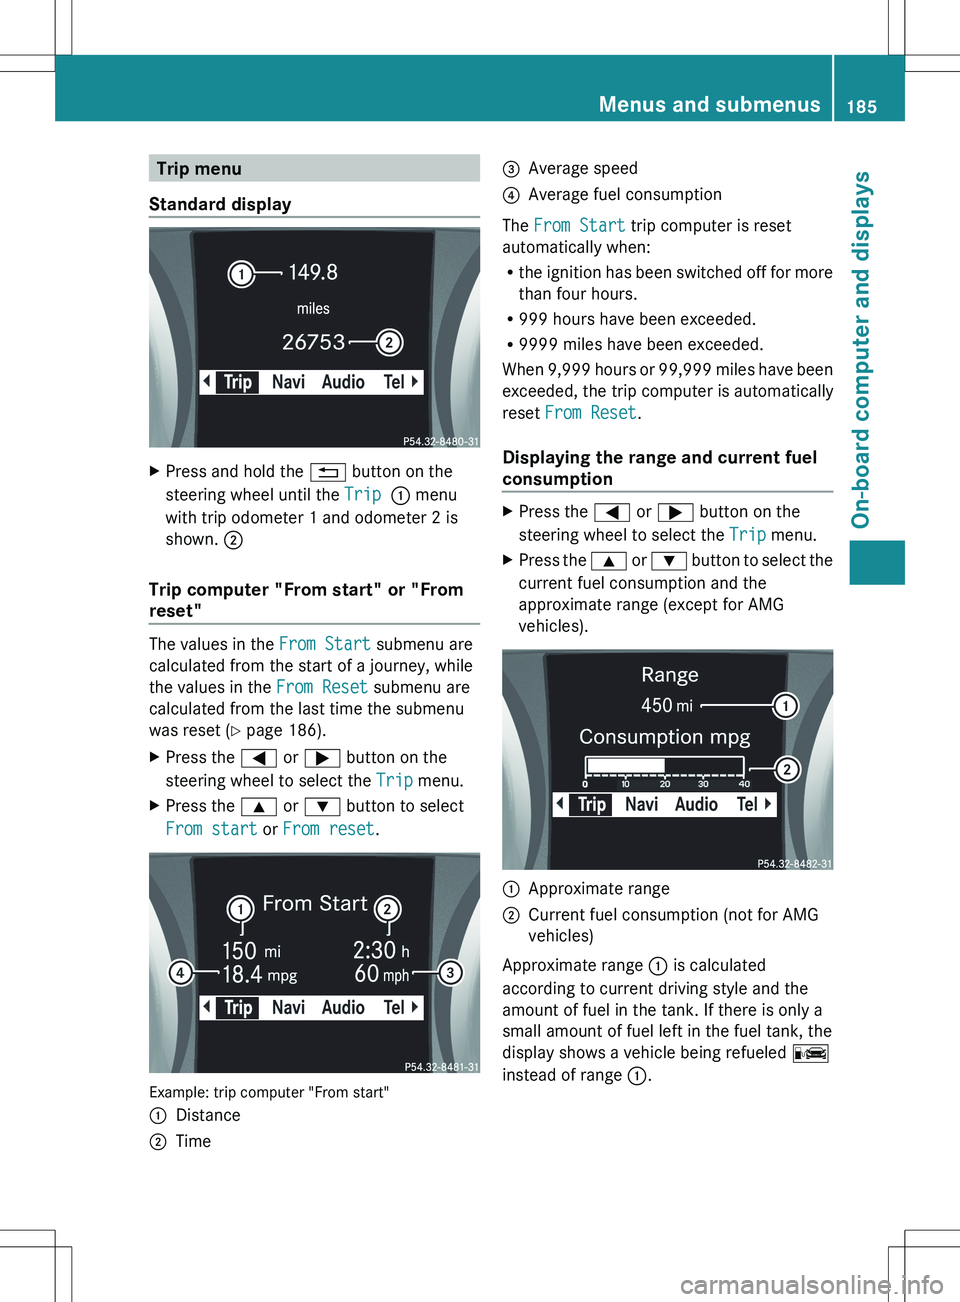
Trip menu
Standard displayXPress and hold the % button on the
steering wheel until the Trip : menu
with trip odometer 1 and odometer 2 is
shown. ;
Trip computer "From start" or "From
reset"
The values in the From Start submenu are
calculated from the start of a journey, while
the values in the From Reset submenu are
calculated from the last time the submenu
was reset ( Y page 186).
XPress the = or ; button on the
steering wheel to select the Trip menu.XPress the 9 or : button to select
From start or From reset .
Example: trip computer "From start"
:Distance;Time=Average speed?Average fuel consumption
The From Start trip computer is reset
automatically when:
R the ignition has been switched off for more
than four hours.
R 999 hours have been exceeded.
R 9999 miles have been exceeded.
When 9,999 hours or 99,999 miles have been
exceeded, the trip computer is automatically
reset From Reset .
Displaying the range and current fuel
consumption
XPress the = or ; button on the
steering wheel to select the Trip menu.XPress the 9 or : button to select the
current fuel consumption and the
approximate range (except for AMG
vehicles).:Approximate range;Current fuel consumption (not for AMG
vehicles)
Approximate range : is calculated
according to current driving style and the
amount of fuel in the tank. If there is only a
small amount of fuel left in the fuel tank, the
display shows a vehicle being refueled C
instead of range :.
Menus and submenus185On-board computer and displaysZ
Page 188 of 336
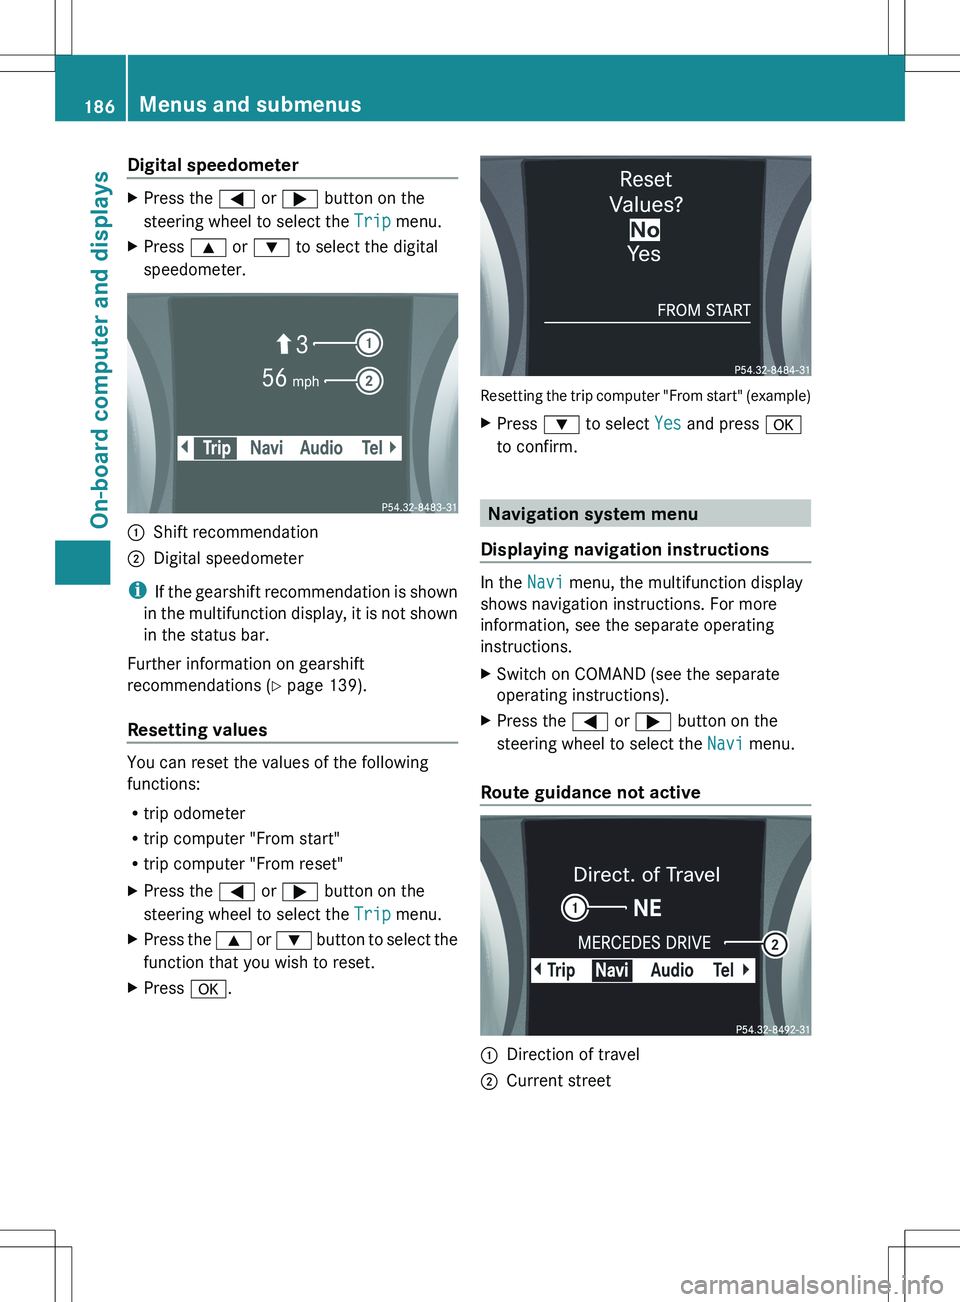
Digital speedometerXPress the = or ; button on the
steering wheel to select the Trip menu.XPress 9 or : to select the digital
speedometer.:Shift recommendation;Digital speedometer
i If the gearshift recommendation is shown
in the multifunction display, it is not shown
in the status bar.
Further information on gearshift
recommendations ( Y page 139).
Resetting values
You can reset the values of the following
functions:
R trip odometer
R trip computer "From start"
R trip computer "From reset"
XPress the = or ; button on the
steering wheel to select the Trip menu.XPress the 9 or : button to select the
function that you wish to reset.XPress a.
Resetting the trip computer "From start" (example)
XPress : to select Yes and press a
to confirm.
Navigation system menu
Displaying navigation instructions
In the Navi menu, the multifunction display
shows navigation instructions. For more
information, see the separate operating
instructions.
XSwitch on COMAND (see the separate
operating instructions).XPress the = or ; button on the
steering wheel to select the Navi menu.
Route guidance not active
:Direction of travel;Current street186Menus and submenusOn-board computer and displays