2012 MERCEDES-BENZ SL-Class ESP
[x] Cancel search: ESPPage 159 of 210

Aud
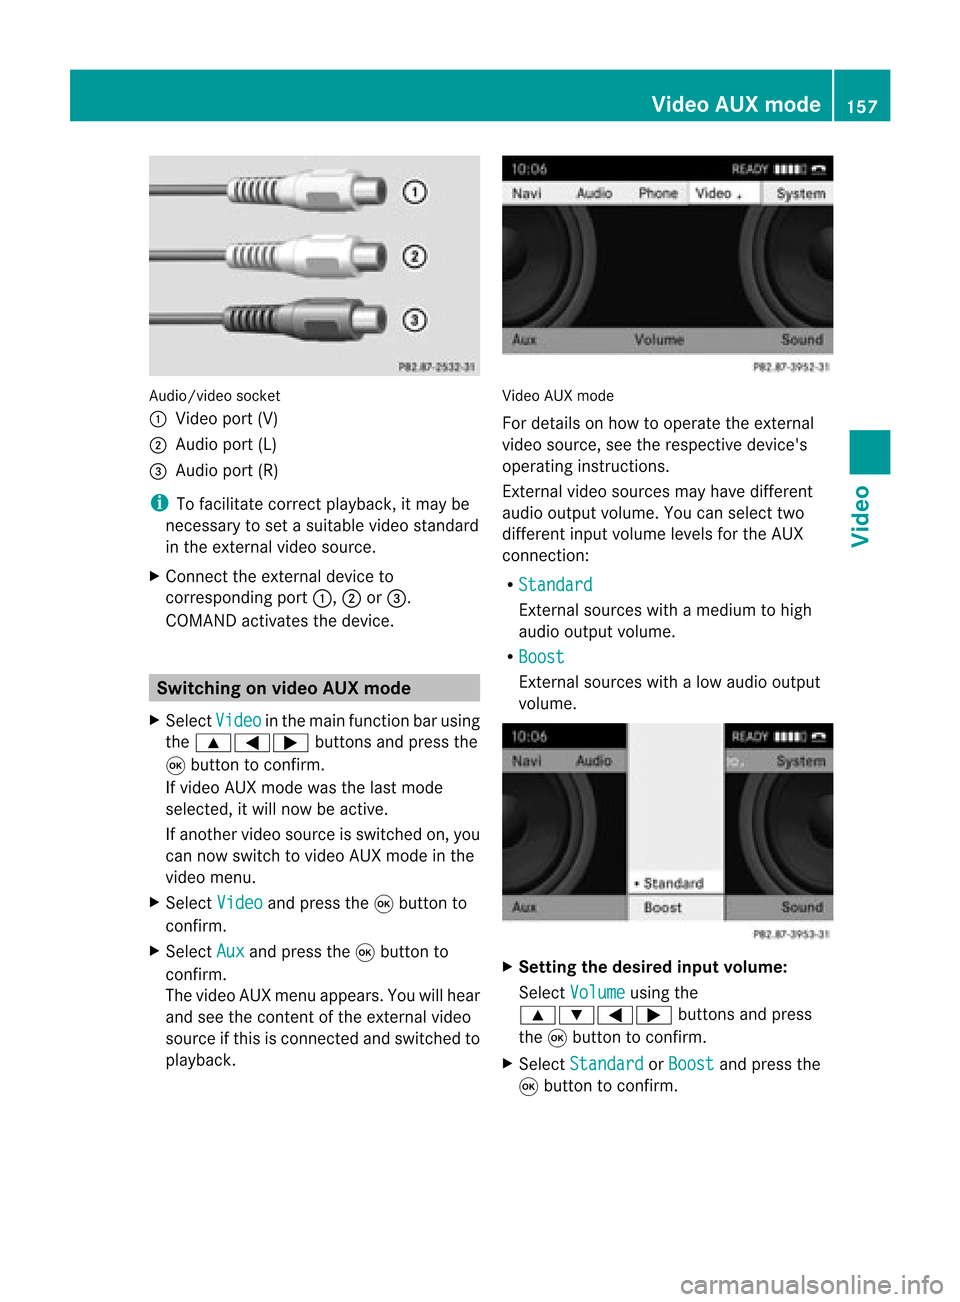
io/vid eosocke t
: Videopor t(V)
; Audio port(L)
= Audio port(R)
i Tofacilitate correctplayback, itmay be
necessary toset asuitab levideo standard
in the external videosource.
X Connect theexternal deviceto
corresponding port:,;or=.
COMAND activatesthedevice. Switchi
ngon video AUXmode
X Select Video in
the main function barusing
the 9=; buttonsandpress the
9 button toconfirm.
If video AUXmode wasthelast mode
selected, itwill now beactive.
If another videosource isswitched on,you
can now switch tovideo AUXmode inthe
video menu.
X Select Video and
press the9button to
confirm.
X Select Aux and
press the9button to
confirm.
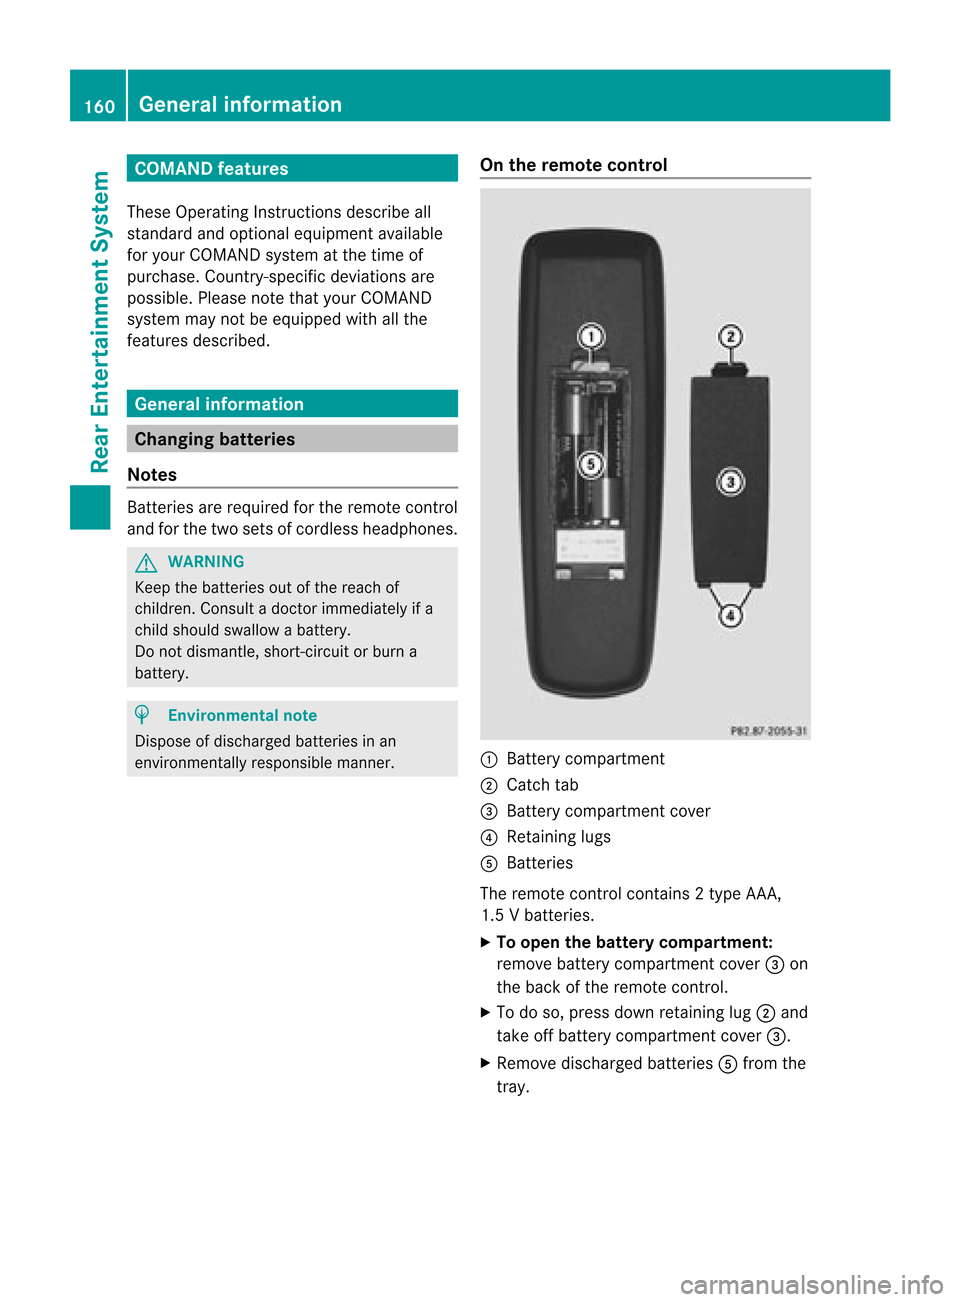
The video AUXmenu appears.You willhear
and seetheconten tof the external video
source ifthis isconnect edand switched to
play back. Video
AUXmode
For detail son how tooperate theexternal
video source, seetherespective device's
operating instructions.
Ext ernal video sources mayhave different
aud iooutput volume. Youcanselect two
different inputvolume levelsforthe AUX
connect ion:
R Standard Ext
ernal sources withamediu mtohigh
audio output volume.
R Boost Ex
tern alsources withalow audio output
volume. X
Setting thedesired inputvolume:
Select Volume using
the
9:=; buttonsand press
the 9button toconf irm.
X Select Standard or
Boost and
press the
9 button toconf irm. Video
AUXmode
157Video Z
Page 162 of 210

COMAN
Dfea tures
Thes eOper atingIn st ruc tions desc ribeall
st andar dand optionalequipm enta vail able
for you rCOMAND systematthe time of
purcha se.Cou ntry-specifi cdeviation sare
possible. Pleasenotethat your COMAND
system maynotbeequipped withallthe
features described. General
information Changing
batteries
Notes Batt
eries arerequired forthe remot econ trol
and forthe two sets ofcordless headphones. G
WARN
ING
Keep thebatter iesout ofthe reach of
children .Consult adoctor immediately ifa
child should swallow abattery.
Do not dismantle, short-circuit orburn a
battery. H
Environmental
note
Dispose ofdischarged batteriesinan
environ mentallyresponsible manner. On
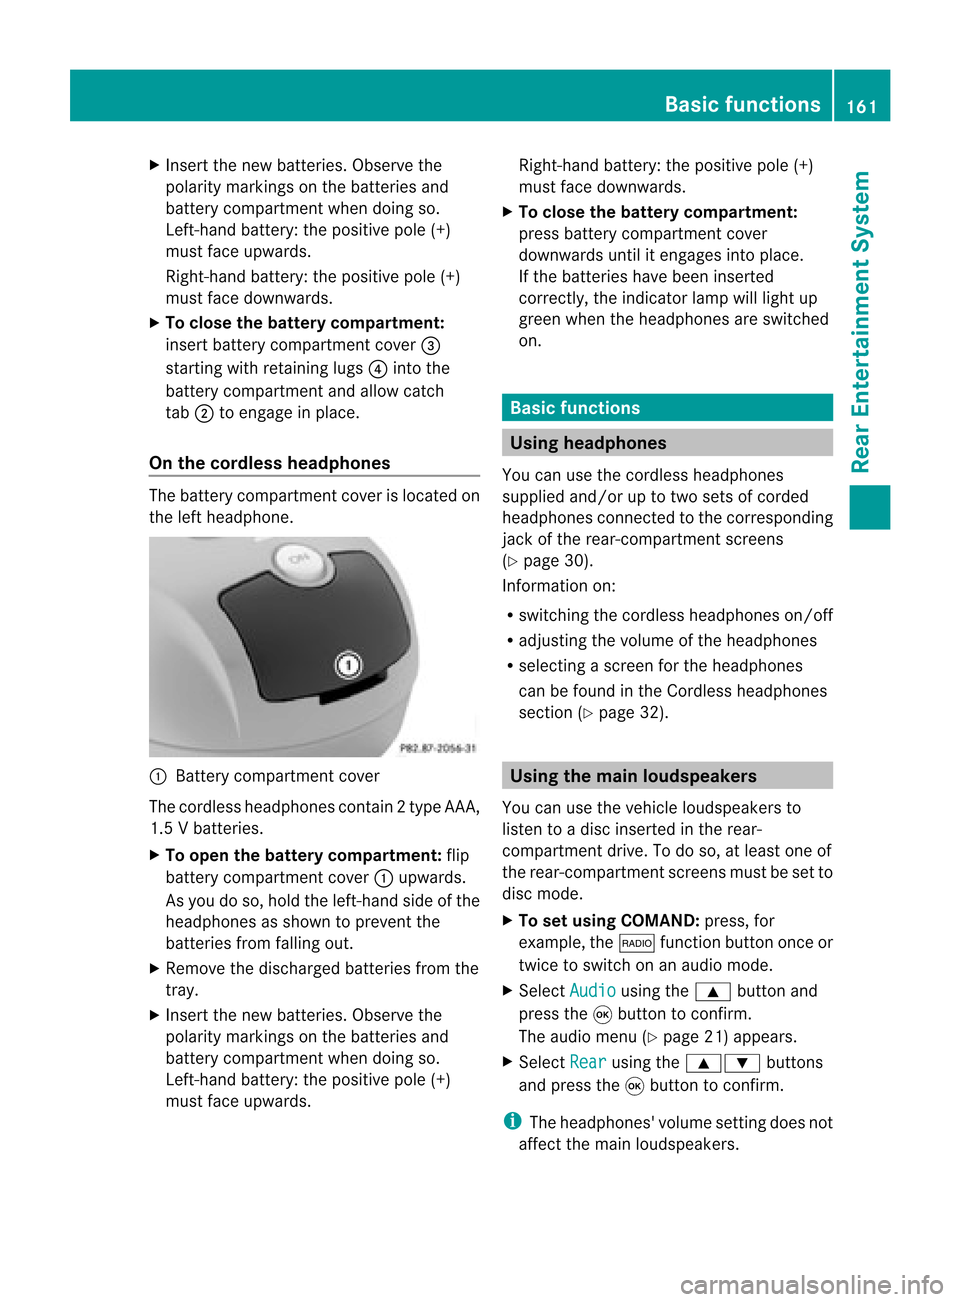
the remot econtrol :
Batt erycompartm ent
; Catch tab
= Batt erycompartm entcover
? Retaining lugs
A Batt eries
The remote controlcont ains 2type AAA,
1.5 Vbatteries.
X To open thebatt erycompar tment:
remove batterycompartm entcover =on
the back ofthe remote control.
X To do so, press downretaining lug;and
take offbattery compartm entcover =.
X Remove discharged batteriesAfrom the
tray. 160
General
informationRearEntert ainment System
Page 163 of 210

X
Insert thenew batteries. Observethe
pola ritymarkings onthe batteries and
battery compartment whendoing so.
Left-hand battery:thepositive pole(+)
must faceupwards.
Rig ht-hand battery: thepositive pole(+)
must facedownwa rds.
X To clo sethe battery compartment:
insert battery compartment cover=
starting withretaining lugs? into the
battery compartment andallow catch
tab ;toengage inpla ce.
On the cordle ssheadphones The
battery compartment coverislocated on
the left head phone. :
Battery compartment cover
The cordless headphones contain 2type AAA,
1. 5V bat terie s.
X To ope nth ebat tery com partme nt:fli p
bat tery compar tmentco ver :upwar ds.
As you doso, holdth elef t-han dside ofthe
head phonesas sho wntopre ven tthe
batteries fromfalling out.
X Remove thedischarged batteriesfromthe
tray.
X Insert thenew batteries. Observethe
polarity markings onthe batteries and
battery compartmen twhen doing so.
Left- hand battery: thepositive pole(+)
must faceupwa rds. Right-hand
battery:thepositive pole(+)
must facedownwards.
X To close thebatt erycompart ment:
press battery compartmen tcover
downwards untilitengages intoplace.
If the batteries havebeen inserted
correct ly,the indicator lampwilllight up
green whentheheadphones areswitched
on. Basic
functions Using
headph ones
You canusethecordless headphones
suppli edand/or uptotwo sets ofcorded
headphones connected tothe corresponding
jack ofthe rear-compart mentscreens
(Y page 30).
Inform ationon:
R switching thecordless headphones on/off
R adjusting thevolume ofthe headphones
R selecting ascreen forthe headphones
can befound inthe Cordless headphones
section (Ypage 32). Using
themain loudspeakers
You canusethevehicle loudspe akersto
listen toadisc inserted inthe rear-
compartmen tdrive. Todo so, atlea stone of
the rear-compa rtmentscreens mustbeset to
disc mode.
X To set using COMA ND:press, for
exampl e,the $ function buttononceor
twice toswi tch onanaudio mode.
X Select Audio usi
ng the 9 button and
press the9button toconfirm.
The audio menu (Ypag e21) appears.
X Select Rear usi
ng the 9: buttons
and press the9button toconfirm.
i The headpho nes'volumesetting doesnot
affect themain loudspe akers. Basic
functio ns
161Rear Entertainmen tSystem Z
Page 167 of 210

print
ed,the side youwish toplay must face
downwards.
The CD/D VDdrive draws inthe disc. The
CD/D VDdrive plays thedisc:
R ifit has been insert edcorr ectlyand isa
permissible disc,and
R ifyou have switchedtodisc mode (audio
CD, audio DVDandMP3 mode)
(Y page 165)
Dat aon anMP3 CDfirst needs tobe loaded
by the drive. Loading maytakesome time,
dependin gon the number offolders and
trac ks. Removing
aCD/DV D
X Press theþ ejec tbut ton.
The drive ejec ts thedis c.
X Tak eth edis co utofthes lot.
If you donot takethe disc outofthe slot,
the drive willdraw itin again autom atically
aft erashor twhile. Switching
toaudio CD,audio DVDor
MP3 mode
X Insert aCD/DV D(Y page 164).
The Rear SeatEntertainment Systemloads
the inserted disc.
X Select Disc in
the menu usingthe
9=; buttonsonthe remote cont
roland confirm bypressing the9
button.
The corresponding modeisswitched on.
The Rear SeatEntertainment Systemplays
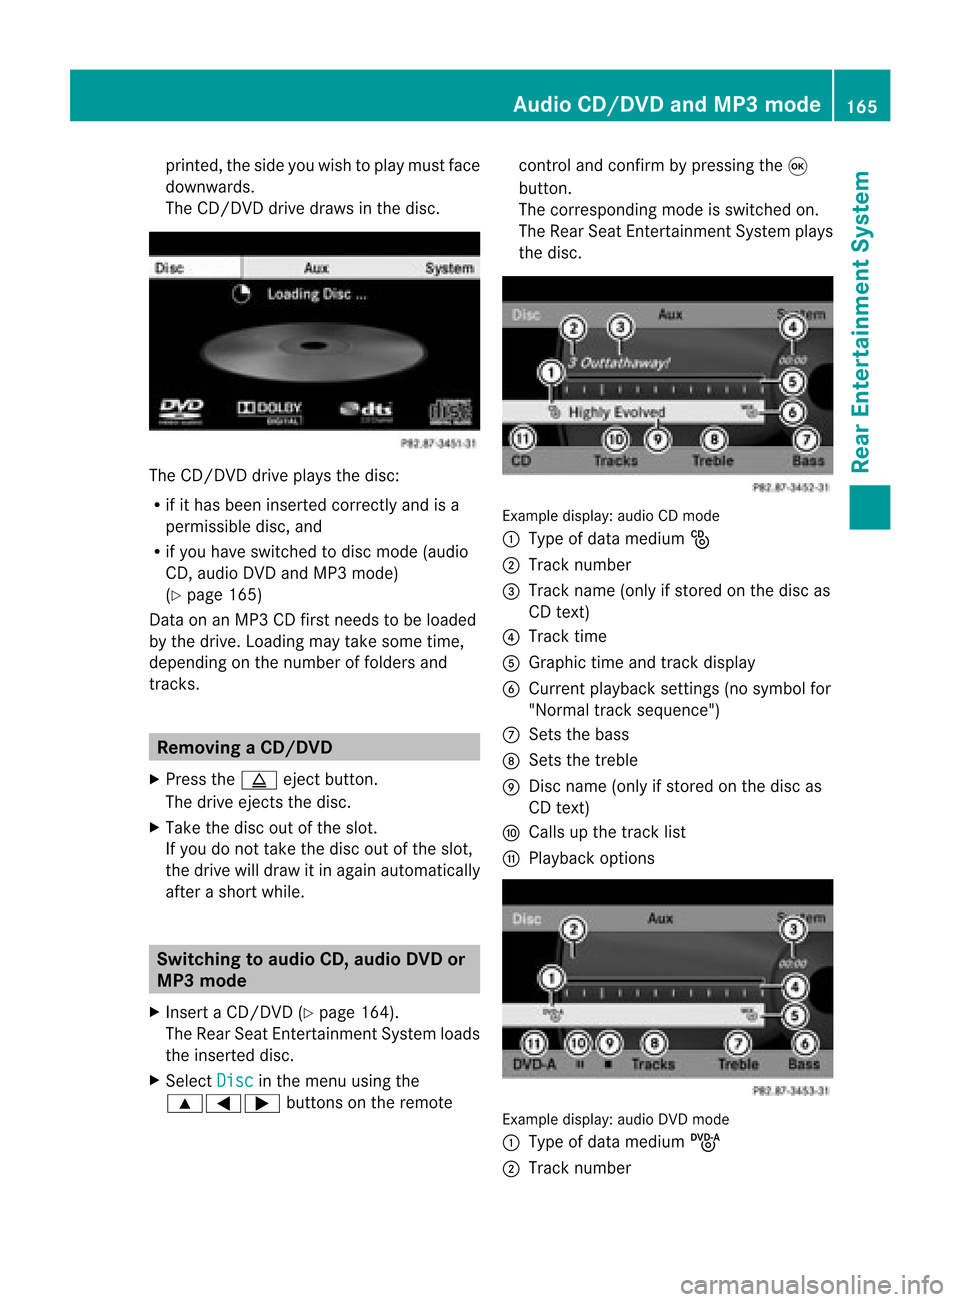
the disc. Example
display:audio CDmod e
: Type ofdat amedi um_
; Trac knum ber
= Trac kname (onlyifstore don thedisc as
CD text)
? Trac ktim e
A Graph ictim eand track displ ay
B Curr entp layback settings (no symbol for
"Norm altrack sequen ce")
C Setsthe bass
D Setsthe treble
E Disc name (onlyifstored onthe disc as
CD text)
F Calls upthe track list
G Playback options Ex
ample display: audioDVDmode
: Type ofdata medium ü
; Trac knumb er Audio
CD/DVD andMP3 mode
165Rea rEnter tainment System Z
Page 169 of 210

Making
aselection byenter ingthetr ack
num berdirectly X
Pres sth eh buttonontherem ote
con trol.
The track entrydisplay appears .
Ex ample: track 2
X Pres sth el numberkey.
Ex ample: track 12
X Pres sth ecor respon ding numberkeys in
rapid successio n.
i Itis no tp ossible toenter numbers that
exceed thenumber oftrack son the CDor
in the current lyactive folder.
X Wait forapproximately threeseconds after
making anentr y.
You willhear thetrack which hasbeen
enter ed.The correspon dingbasic menu
then reappears. Fast
forward ing/rewinding
X With thedisplay /select ionwindow active,
press the= or; button onthe
remote controlrepeatedly untilyoureach
the desired position.
or
X Press andhold theE orF button
until thedesired position isreached. Selecting
afolder
This function ison lyavailable inMP3 mode .
X Sele ctFol der usin
gth e:=;
butt onson therem otecon trol and pres s
th e9 butt ontocon firm.
or
X Pres sth e9 butt onwhen thedisplay/
selec tionw indow isselec ted.
The folder contentappears. :
Folder selectionsymbol
; Current foldername
= Track symbol
X To switc hto the nextfolder up:select
symbol :.
The display showsthenext folder up. :
Folder selection symbol
; Folder icon
X Select afolder usingthe9: buttons
and press the9button toconf irm.
You willsee thetrack sin the folder.
X Select atrack using the9: buttons
and press the9button toconf irm.
The track isplaye dand thecorrespon ding
folder isnow theactive folder. Pause
function
This funct ionisonly availa bleinaudio DVD
mode. Audio
CD/DVD andMP3 mode
167RearEntert ainment System Z
Page 170 of 210

X
To paus eplay back:sel ect «using
the :=; buttons onthe rem ote
contro land pressthe 9button toconfi rm.
The «displ aycha nge sto M.
X To conti nue play back:sel ect Mand press
the 9button toconfi rm.
The Mdispl aycha nge sto «. Sto
pfuncti on
This function isonly available inaudio DVD
mode.
X To inte rrupt playbac k:sele ct± using
the :=; buttonsonthe remote
control andpress the9button toconfirm.
The «disp laychange sto M.
X To continue playbac k:sele ctM and press
the 9button toconfirm.
Pla yback continues fromthepointwhe reit
wa sinterrup ted.
X To stop playbac k:whi lepla yback is
interrup ted,select± aga inand press the
9 button toconfirm.
Pla yback stops andreturns tothe
begi nning ofthe DVD. Mishigh lighted.
X To restart playbac k:sele ctM and press
the 9button toconfirm.
Pla yback starts fromthebegi nning ofthe
DVD. Settin
gthe audio format
Further informationonaudio formats is
ava ilable inthe "Aud io"section
(Y pag e135).
X Select DVD-A usi
ng the :=;
buttons onthe remote controlandpress
the 9button toconfirm.
X Select Group usi
ng the 9: buttons
and press the9button toconfirm.
The listo favail ableau dio formats appears.
The #dot indica testhe format currently
sele cted. X
Select anaudio format using the
9: buttonsandpress the9button
to confirm.
X To exit themenu: pressthe= or;
button. Playbac
koptio ns
Fur ther informa tion onplay ba ck opti ons is
ava ilab lein the "Audio" secti on
(Y page 135) .
X Sel ect CD ,
DVD -A or
MP3 us
ing
the :=; buttons onthe remo te
control andpressthe 9button toconfi rm.
The options list appe ars .The # dot
indicates theoption current lyselected.
X Select Normal Track Sequence ,
Random Tracks or
Random Folder using
the
9: buttonsandpress the9button
to confirm .
The option isswitched on.For alloptions
except Normal TrackSequence ,
you will
see acorresponding displayin the displa y/
selection window.
i Ifyou change thedisc, theNormal Track
Sequence option
isactivated
automatically .Ifa no ption isselect ed,it
remains selectedafter theRear Seat
En tert ainmen tSyst emisswitc hedonor
off. Switching
track inform ationon/off
(MP3 mode only)
If the func tionisswitc hedon,folder andtrack
names aredisplayed.
If the func tion isswitc hedoff,disc andfile
names aredisplayed.
X Select Displa yTrack Information using
the9: buttonsonthe remot e
con troland press the9butt ontocon firm.
The func tion isswitc hedonO oroff ª,
dependin gon the previous status. 168
Audio
CD/DVDand MP3 modeRear Entert ainmentSyst em
Page 171 of 210

Vide
oDVD mode Gen
eral notes
Here youwi llfind further informa tionon the
fol lowi ng topi cs:
R sa fety notes (Ypage 126)
R notes onCDs /DVDs (Ypage 137) DVD
playbackcondit ions
Playback problems mayoccurwhen playing
cop ieddisc s.Ther eis alarge varietyof disc s,
DV Da uth oring sof twar e,writ ingsoftwar eand
writ ersavailab le.This varietymean sth at
th ere isno guaran teeth at theRear Seat
En tertainm entS yst em will beable toplay
vid eo DVDs that you havecopied yourself.
You willfind further informationinthe "Video"
section (Ypage 151). Information regarding
COMAND alsoapplies tothe Rear Seat
En tert ainment System. Function
restrictions
Dependin gon the DVD ,it is possible that
cert ainfunct ionsoractions described inthis
section willbetemporarily blockedormay not
funct ionatall. Assoon asyou trytoactivate
these functionsoractions ,you willsee the
K symbol inthe display . Inserting
andremoving aCD/DV D
X Proc eed asdes cribed inthe"Au dio CD/
DV Da ndMP3 mode"sec tion
(Y page 127) . Sw
itchin gto video DVD mode
X Inse rtavid eo DVD.
The RearSea tEnterta inmentSys tem load s
the disc.
If disc mod ewa sthe last mod esel ecte d,it
wi llnow beacti ve. If
it wa snot, switch onvideo DVD modeas
de scri bedin the followi ng instructio n.
X Sel ect Disc us
ing the 9=;
bu ttons onthe rem otecontro land press
the 9button toconfi rm.
If the video DVD fulfills the play ba ck
cri teri a,the filme ithe rstar tsautoma tically
or the menu saved onthe DVD appe ars. If
the DVD menu appe ars, yo umu ststa rtthe
fi lm ma nua lly.
X Sel ect the corr espo ndi ngmenu itemi nthe
DVD menu (Ypage 171). Hiding/show
ingthe navigation menu
X To show: pressthe9 or: button.
X To hide: press the9 or: button.
or
X Wait forapproximately eightseconds. Navigation
menu
: Disc type
; Current track
= Current scene
? Track time
A Shows themenu Video
DVDmode
169RearEnterta inment System Z
Page 173 of 210

Selec
tingascene/ch apter directl y The
example sillust ratehow tosele ctscen e/
ch apt er5.
X Op tion1: while thefilm isplayin g,pre ss
th eh button.
X Pre sstheco rrespo nding num berkey,suc h
as o.
X Op tion2: sho wthemen u(Y page 170).
X Se lec tDVD -Video and
pressthe9 but ton
to confirm .
X Se lec tDVD Functions and
pressthe9
but tonto confirm .
X Se lec tSce ne Selection and
pressthe
9 buttonto confirm .
X Se lec t5 usin
gth e9 or: buttona nd
pre ssthe 9button toconfi rm.
In bo th cas es, play ba ck willbe ginf rom the
fifth scene/chap terafter abrie fpause. Select
ingafilm/t itle
Not e Furt
herinformat iononthis func tion is
available inthe "Video" section
(Y page 154).
Opt ion 1 X
Show themen u(Y page 170).
X Selec tDVD- Video and
press the9
butt ononthe remo tecon trol to con firm . X
Selec tDVD Functions and
press the9
butt ontocon firm .
X Selec tTitl eSele ction and
press the
9 butt ontocon firm .
X To call upthe selec tionlist:press the9
butt on.
X Selec ta film/ track .
Opt ion 2: Ex
ample: selectingfilm 2
X Press thel button.
Af ter abrief pause, theseco ndfilm is
played. DVD
menu
Not e You
willfindfurt her informat iononthe DVD
men uin the "Video" section(Ypage 154).
Calling uptheDVD menu X
Show themen u(Y page 170).
X Selec tDVD- Video and
press the9
butt onon the remo tecon trol to con firm .
X Selec tDVD Functions and
press the9
butt ontocon firm .
X Selec tMenu and
press the9butt onto
con firm .
The DVD menuappears.
Selecting menuitemsin theD VD men u X
Sel ect amenu itemusing the
9:= ;buttons onthe
remo tecontro land pressthe 9button to
confi rm.
Am enu appears.
i Menu itemswhich cannotbe select edare
shown ingray. Vid
eoDVD mode
171Rear Entert ainment System Z