2012 MERCEDES-BENZ S-CLASS SEDAN instrument panel
[x] Cancel search: instrument panelPage 10 of 536

Climate controlAutomatic climate control .............295
COMAND ....................................... 269
Controlling automatically ...............297
Controlling centrally (COMAND) ....272
Cooling with air dehumidification ..297
Cooling with air dehumidification
(COMAND) ..................................... 271
Defrosting the windows .................300
Defrosting the windshield ..............300
Important safety notes ..................294
Indicator lamp ................................ 297
Main menu ..................................... 271
Maximum cooling .......................... 300
Notes on using automatic climate
control ........................................... 296
Overview of systems ......................294
Problems with cooling with air
dehumidification ............................ 297
Problem with the rear window
defroster ........................................ 301
Rear compartment (COMAND) ......273
Rear control panel .........................295
Setting the air distribution .............299
Setting the airflow .........................299
Setting the airflow (COMAND) .......273
Setting the air vents ......................302
Setting the footwell temperature
(COMAND) ..................................... 272
Setting the temperature ................298
Switching air-recirculation mode
on/off ............................................ 301
Switching on/off ........................... 296
Switching residual heat on/off ......302
Switching the rear window
defroster on/off ............................ 301
Coat hooks ......................................... 436
Cockpit Overview .......................................... 36
see Instrument cluster
Color, setting (TV, video) .................. 244
COMAND At a glance (overview) .................... 122
Back button ................................... 123
Basic functions .............................. 137
Components .................................. 122
Display ........................................... 125
Example of operation .....................132Function buttons ........................... 123
Menu overview .............................. 125
Remote control .............................. 129
Switching on/off ........................... 137
System settings ............................. 147
COMAND controller ........................... 122
COMAND display Cleaning instructions .....................129
Folding in and swiveling .................128
Setting ........................................... 147
COMAND operating system .............. 122
Combination switch .......................... 283
Compass function ............................. 192
Conference connection ..................... 205
Consumption statistics (on-board
computer) .......................................... 378
Contrast, setting (TV, video) ............ 244
Convenience closing feature .............. 97
Convenience opening feature ............ 96
Convenience telephone Importing contacts ........................208
Convenience telephony .................... 197
Introduction ................................... 197
Coolant (engine)
Checking the level .........................463
Display message ............................ 406
Filling capacity ............................... 530
Notes ............................................. 530
Temperature (on-board computer) . 381
Temperature gauge ........................ 374
Cooling
see Climate control
Copy protection (CD/DVD) ............... 234
Cornering light function Display message ............................ 403
Function/notes ............................. 284
Cruise control
Cruise control lever .......................335
Deactivating ................................... 336
Display message ............................ 417
Driving system ............................... 334
Function/notes ............................. 334
Important safety notes ..................334
Setting a speed .............................. 335
Storing and maintaining current
speed ............................................. 3358Index
Page 37 of 536

Cockpit ................................................. 36
Instrument cluster ..............................37
On-board computer and COMAND .....39
Center console .................................... 41
Overhead control panel ......................42
Door control panel .............................. 43
Rear seats ............................................ 4535At a glance
Page 38 of 536

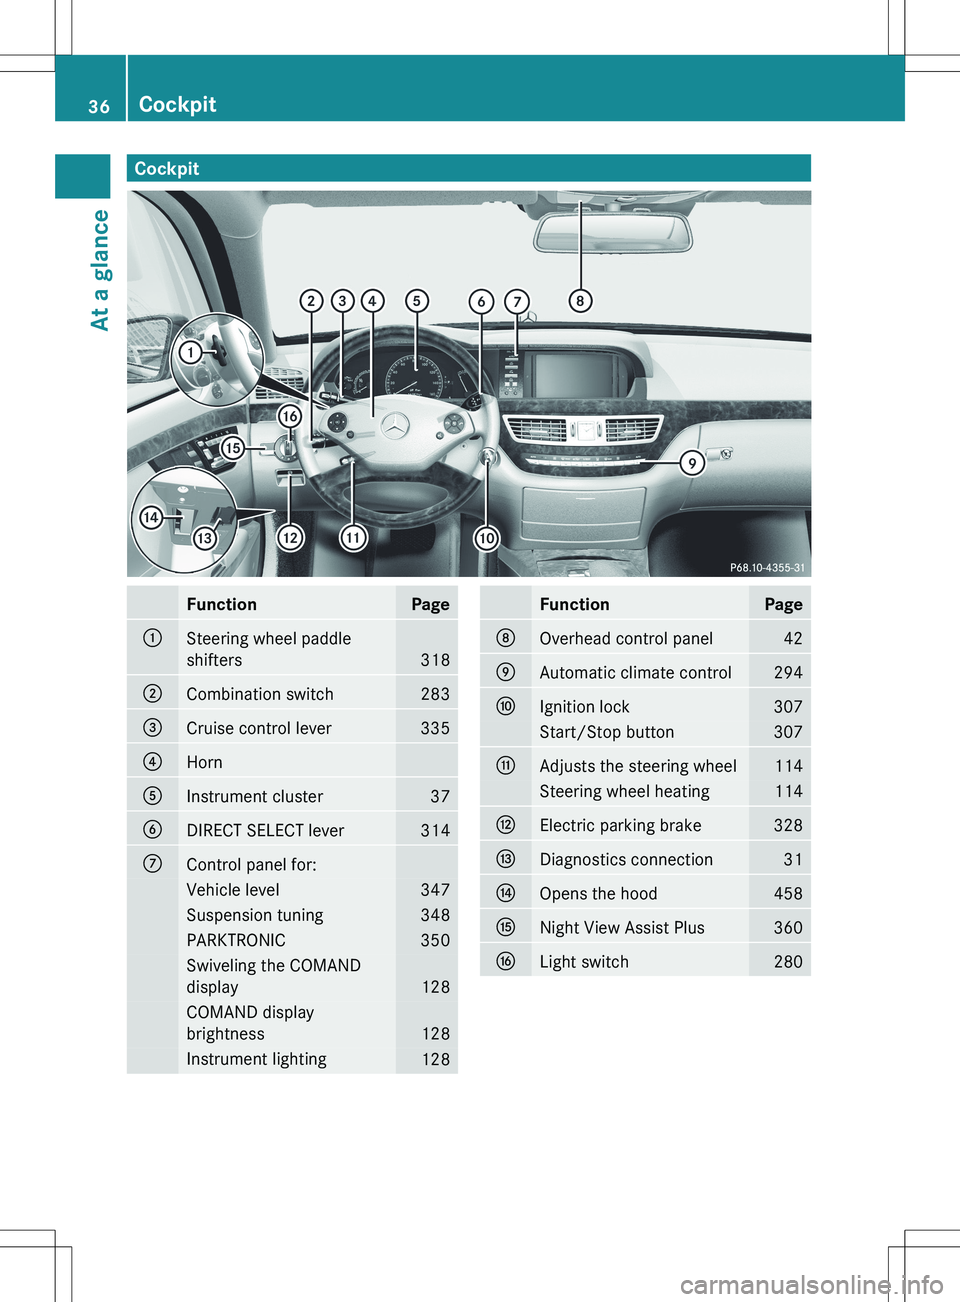
CockpitFunctionPage:Steering wheel paddle
shifters
318
;Combination switch283=Cruise control lever335?HornAInstrument cluster37BDIRECT SELECT lever314CControl panel for:Vehicle level347Suspension tuning348PARKTRONIC350Swiveling the COMAND
display
128
COMAND display
brightness
128
Instrument lighting128FunctionPageDOverhead control panel42EAutomatic climate control294FIgnition lock307Start/Stop button307GAdjusts the steering wheel114Steering wheel heating114HElectric parking brake328IDiagnostics connection31JOpens the hood458KNight View Assist Plus360LLight switch28036CockpitAt a glance
Page 52 of 536

injuries when the window curtain air bag is
deployed.
R Air bag system components will be hot after
an air bag has inflated. Do not touch them.
R Never place your feet on the instrument
panel, dashboard, or on the seat. Always
keep both feet on the floor in front of the
seat.
R Improper repair work on the SRS creates a
risk of rendering the SRS inoperative or
causing unintended air bag deployment.
Work on the SRS must therefore only be
performed by qualified technicians.
Contact an authorized Mercedes-Benz
Center.
R For your protection and the protection of
others, when scrapping the air bag unit or
ETD, our safety instructions must be
followed. These instructions are available
from any authorized Mercedes-Benz
Center.
R Given the considerable deployment speed,
required inflation volume, and the material
of the air bags, there is the possibility of
abrasions or other, potentially more serious
injuries resulting from air bag deployment.
If you sell your vehicle, Mercedes-Benz
strongly recommends that you inform the
subsequent owner that the vehicle is
equipped with SRS. Also, refer them to the
applicable section in the Operator's Manual.
Air bags
Important safety notes
GWARNING
Air bags are designed to reduce the incidence
of injuries and fatalities in certain situations:
R frontal impacts (driver's and front-
passenger front air bags)
R side impacts (side impact air bags and
window curtain air bags)
R rollover (window curtain air bags)
However, no system available today can
completely eliminate injuries and fatalities.
When the air bags are deployed, a small
amount of powder is released. The powder
generally does not constitute a health hazard
and does not indicate that there is a fire in the
vehicle. In order to prevent potential
breathing difficulties, you should leave the
vehicle as soon as it is safe to do so. If you
have any breathing difficulty but cannot get
out of the vehicle after the air bag inflates,
then get fresh air by opening a window or
door.GWARNING
In order to reduce the potential danger of
injuries caused during the deployment of the
front air bags, the driver and front passenger
must always be correctly seated and wear
their seat belts.
For maximum protection in the event of a
collision, you must always be in the normal
seat position with your back against the
backrest. Fasten your seat belt and make sure
that it is correctly positioned on your body.
As the air bag inflates with considerable
speed and force, a proper seating position
and correct positioning of the hands on the
steering wheel will help to keep you at a safe
distance from the air bag. Occupants who are
not wearing their seat belt, are not seated
properly or are too close to the air bag can be
seriously injured or killed by an air bag, as it
inflates with great force instantaneously:
R sit with the seat belt fastened correctly and
in a position that is as upright as possible
with your back against the backrest.
R move the driver's seat as far back as
possible, still permitting proper operation
of vehicle controls. The distance from the
center of the driver's chest to the center of
the air bag cover on the steering wheel
must be at least 10 inches (25 cm). You
should be able to accomplish this by
adjusting the seat and steering wheel. If
50Occupant safetySafety
Page 64 of 536

be replaced and their anchoring points must
also be checked.
Only use seat belts which have been approved
by Mercedes-Benz.
Do not make any modifications to the seat
belts. This can lead to unintended activation
of the ETDs or to their failure to activate when
necessary.
Do not bleach or dye seat belts as this may
severely weaken them. In a crash they may
not be able to provide adequate protection.
Have all work carried out only by qualified
technicians. Contact an authorized
Mercedes-Benz Center.
Correct use of the seat beltsGWARNING
USE SEAT BELTS PROPERLY
R Seat belts can only work when used
properly. Never wear seat belts in any other
way than as described in this section, as
that could result in serious injuries in the
event of an accident.
R Each occupant should wear their seat belt
at all times, because seat belts help reduce
the likelihood of and potential severity of
injuries in accidents, including rollovers.
The integrated restraint system includes
SRS (driver front air bag, front-passenger
front air bag, side impact air bags, window
curtain air bags for the side windows),
Emergency Tensioning Devices, seat belt
force limiters, and front seat knee bolsters.
The system is designed to enhance the
protection offered to properly belted
occupants in certain frontal (front air bags
and ETDs) and side (side impact air bags,
window curtain air bags, and ETDs) impacts
which exceed preset deployment
thresholds and in certain rollovers (window
curtain air bags and ETDs).
R Never wear the shoulder belt under your
arm, across your neck or off your shoulder.
In a frontal crash, your body would move
too far forward. That would increase the
chance of head and neck injuries. The seat
belt would also apply too much force to the
ribs or abdomen, which could severely
injure internal organs such as your liver or
spleen.
Adjust the seat belt so that the shoulder
section is located as close as possible to
the middle of the shoulder. It should not
touch the neck. Never pass the shoulder
portion of the seat belt under your arm. For
this purpose, you can adjust the height of
the seat belt outlet.
R Position the lap belt as low as possible on
your hips and not across the abdomen. If
the lap belt is positioned across your
abdomen, it could cause serious injuries in
a crash.
R Never wear seat belts over rigid or
breakable objects in or on your clothing,
such as eyeglasses, pens, keys etc., as
these might cause injuries.
R Make sure the seat belt is always routed
snugly. Take special care of this when
wearing loose clothing.
R Never use a seat belt for more than one
person at a time. Do not fasten a seat belt
around a person and another person or
other objects at the same time.
R Seat belts should not be worn twisted. In a
crash, you would not have the full width of
the seat belt to distribute impact forces.
The twisted seat belt against your body
could cause injuries.
R Pregnant women should also always use a
lap-shoulder belt. The lap belt portion
should be positioned as low as possible on
the hips to avoid any possible pressure on
the abdomen.
R Place the seat backrest in a position that is
as upright as possible.
R Check your seat belt during travel to make
sure it is properly positioned.
R Never place your feet on the instrument
panel, dashboard, or on the seat. Always62Occupant safetySafety
Page 286 of 536

Cornering light function
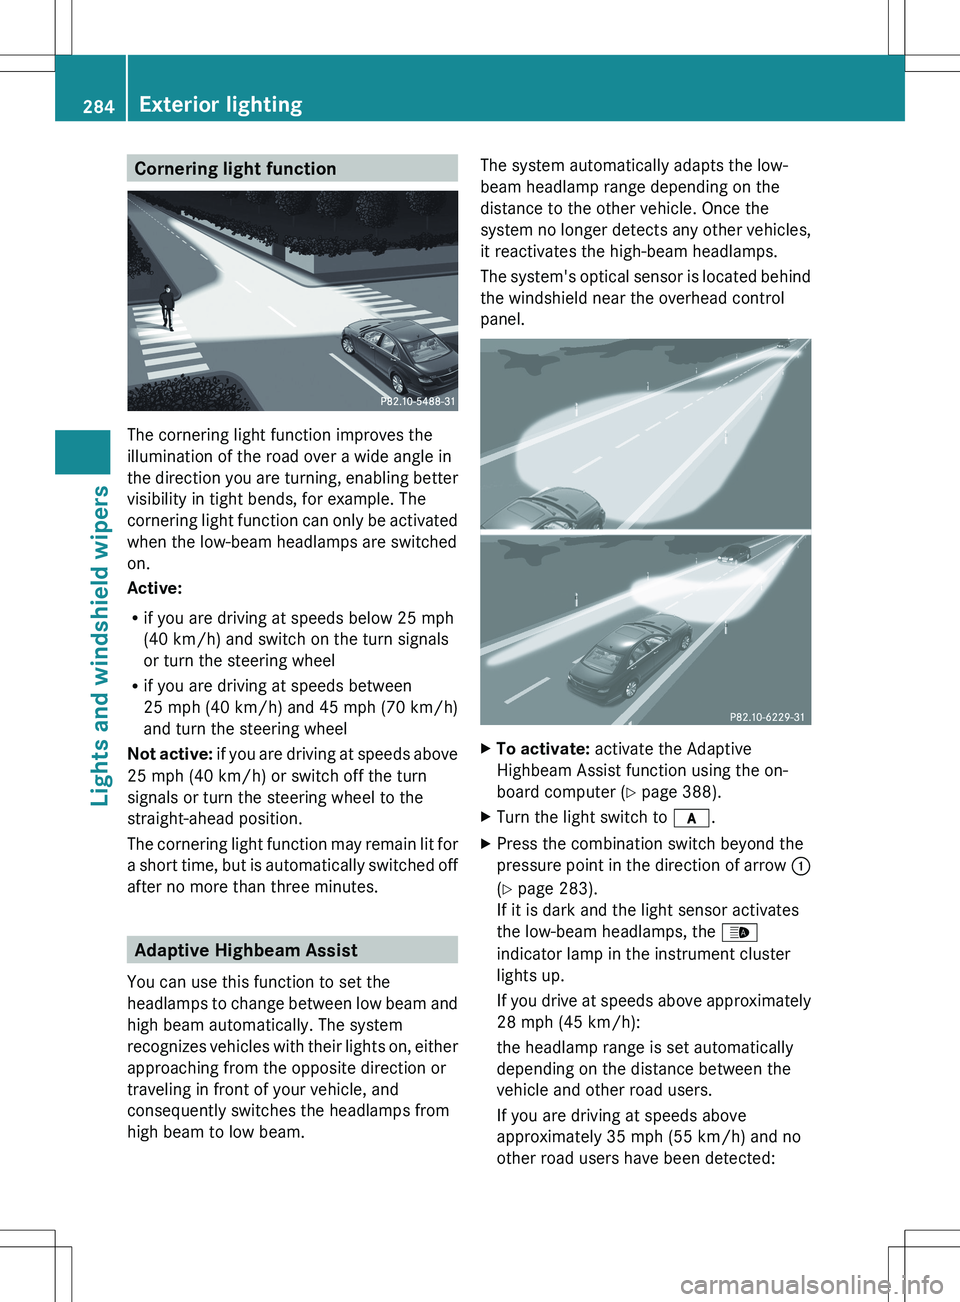
The cornering light function improves the
illumination of the road over a wide angle in
the direction you are turning, enabling better
visibility in tight bends, for example. The
cornering light function can only be activated
when the low-beam headlamps are switched
on.
Active:
R if you are driving at speeds below 25 mph
(40 km/h) and switch on the turn signals
or turn the steering wheel
R if you are driving at speeds between
25 mph (40 km/h) and 45 mph (70 km/h)
and turn the steering wheel
Not active: if you are driving at speeds above
25 mph (40 km/h) or switch off the turn
signals or turn the steering wheel to the
straight-ahead position.
The cornering light function may remain lit for
a short time, but is automatically switched off
after no more than three minutes.
Adaptive Highbeam Assist
You can use this function to set the
headlamps to change between low beam and
high beam automatically. The system
recognizes vehicles with their lights on, either
approaching from the opposite direction or
traveling in front of your vehicle, and
consequently switches the headlamps from
high beam to low beam.
The system automatically adapts the low-
beam headlamp range depending on the
distance to the other vehicle. Once the
system no longer detects any other vehicles,
it reactivates the high-beam headlamps.
The system's optical sensor is located behind
the windshield near the overhead control
panel.XTo activate: activate the Adaptive
Highbeam Assist function using the on-
board computer ( Y page 388).XTurn the light switch to c.XPress the combination switch beyond the
pressure point in the direction of arrow :
( Y page 283).
If it is dark and the light sensor activates
the low-beam headlamps, the _
indicator lamp in the instrument cluster
lights up.
If you drive at speeds above approximately
28 mph (45 km/h):
the headlamp range is set automatically
depending on the distance between the
vehicle and other road users.
If you are driving at speeds above
approximately 35 mph (55 km/h) and no
other road users have been detected:284Exterior lightingLights and windshield wipers
Page 287 of 536

the high-beam headlamps are switched on
automatically. The K indicator lamp in
the instrument cluster also lights up.
If you drive at speeds below approximately
30 mph (45 km/h) or if other road users
are identified or if the roads are sufficiently
illuminated:
the high-beam headlamps are switched off
automatically. The K indicator lamp in
the instrument cluster goes out. The _
indicator lamp in the instrument cluster
stays on.XTo deactivate: move the combination
switch back to its normal position.
The _ indicator lamp in the instrument
cluster goes out.GWARNING
The Adaptive Highbeam Assist is only an aid
intended to support you while driving. The
driver is and remains responsible for proper
vehicle lighting in accordance with the
prevailing light, sight and traffic conditions.
The system may be impaired or unavailable
when
R visibility is poor, e.g. due to snow, rain, fog,
or heavy spray
R the optical sensor area of the windshield is
dirty, fogged up, or covered by a sticker for
example
The system cannot recognize the following
road users:
R Road users without a lighting system of
their own, e.g. pedestrians
R Road users with dim lighting of their own,
e.g. cyclists
R Road users whose lighting is obstructed,
e.g. road users behind a guardrail
R In some seldom cases, even road users with
a lighting system of their own may be
recognized too late or not at all.
The automatic high-beam headlamps will then
not be deactivated or it will be activated in
spite of preceding or oncoming road users.
This could endanger you and/or others and
cause an accident. Always pay close attention
to the traffic situation and switch off the high
beam manually if necessary.
Headlamps fogged up on the inside
The headlamps may fog up on the inside if
there is high atmospheric humidity.
XDrive with the headlamps switched on.
The level of moisture diminishes,
depending on the length of the journey and
the weather conditions (humidity and
temperature).
If the level of moisture does not diminish:
XHave the headlamps checked at a qualified
specialist workshop.
Interior lighting
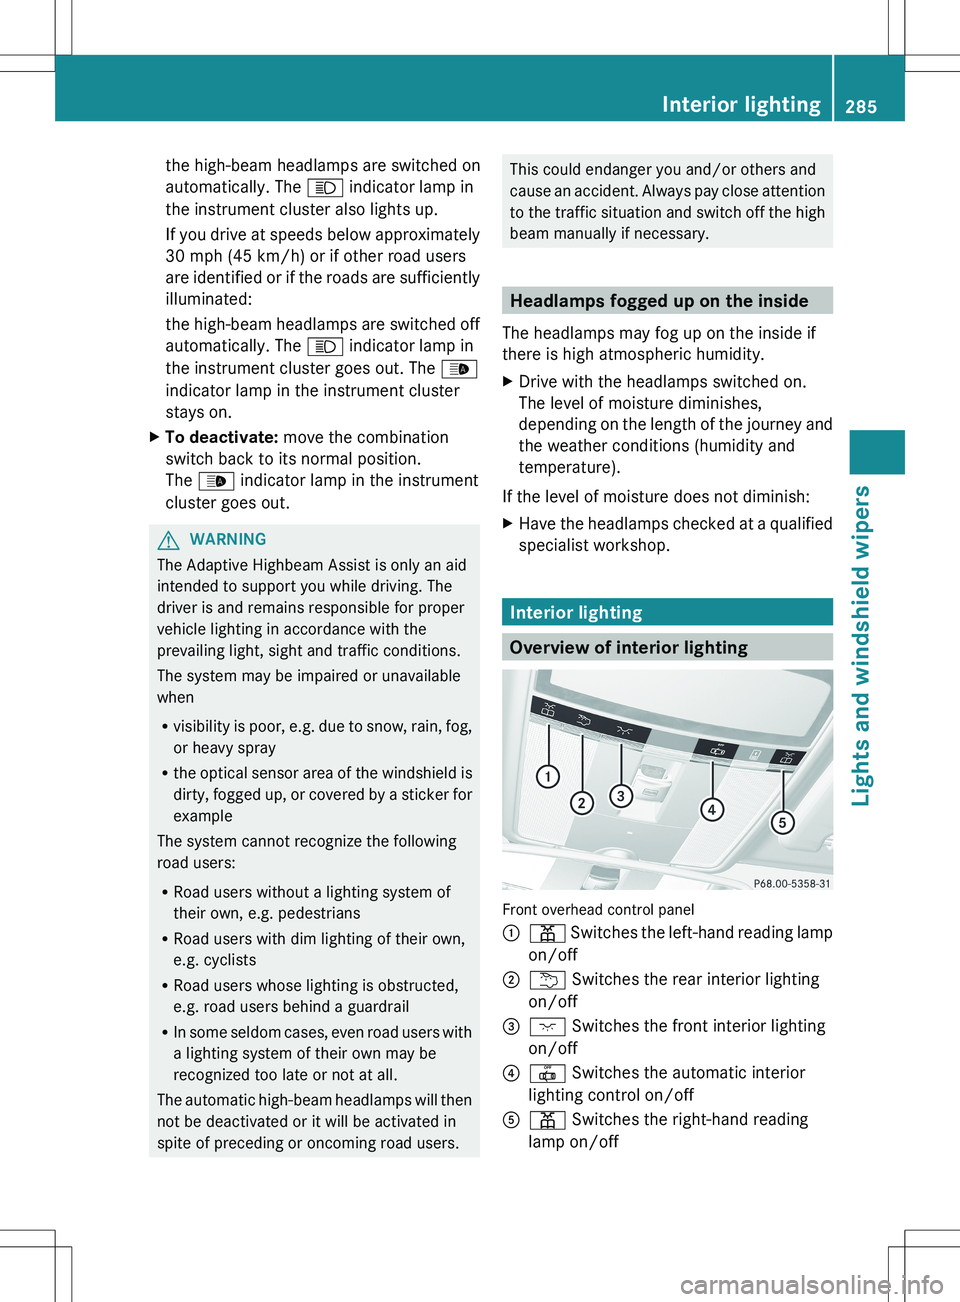
Overview of interior lighting
Front overhead control panel
:p Switches the left-hand reading lamp
on/off;u Switches the rear interior lighting
on/off=c Switches the front interior lighting
on/off?| Switches the automatic interior
lighting control on/offAp Switches the right-hand reading
lamp on/offInterior lighting285Lights and windshield wipersZ
Page 461 of 536

When the hood is open, you or others could
be injured by the wiper linkage.
Make sure that the windshield wipers are
switched off. Remove the SmartKey or make
sure that no ignition position has been
selected with KEYLESS-GO. All indicator
lamps must be off in the instrument panel.XPull release lever : for the hood.
The hood is released.
! Make sure that the windshield wipers are
not folded away from the windshield. You
could otherwise damage the windshield
wipers or the hood.
XPull hood catch handle ; outwards from
the radiator grill as far as it will go and lift
the hood from underneath by the radiator
grill.
Once you have lifted the hood about
15 inches (40cm), it is automatically
opened the rest of the way and held open
by the gas-filled struts.! Do not lift the hood by hood catch
handle ;. The handle may otherwise be
damaged.
Closing the hoodGWARNING
When closing the hood, use extreme caution
not to catch hands or fingers. Be careful that
you do not close the hood on anyone.
Make sure the hood is securely engaged
before driving off. Do not continue driving if
the hood can no longer engage after an
accident, for example. The hood could
otherwise come loose while the vehicle is in
motion and injure you and/or others.
XLower the hood and let it fall from a height
of approximately 8 inches (20cm).XCheck that the hood has engaged properly.
If the hood can be raised slightly, it is not
properly engaged. Open it again and close
it with a little more force.
Radiator
i Vehicles with a diesel engine: do not
cover the radiator, for example with a
winter front or bug cover. The readings of
the on-board-diagnostic system may
otherwise be inaccurate. Some of these
readings are required by law and must be
accurate at all times.
Engine oil
Notes on the oil level
GWARNING
Hybrid vehicles: be sure to read the "HYBRID"
supplement. Otherwise, you could fail to
recognize dangers.
Depending on the driving style, the vehicle
consumes up to 0.9 US qts (0.8 l) of oil over
a distance of 600 miles (1,000 km). The oil
Engine compartment459Maintenance and careZ