2012 MERCEDES-BENZ S-CLASS SEDAN lights
[x] Cancel search: lightsPage 424 of 536

Display messagesPossible causes/consequences and M SolutionsÂ
Key Not
Detected (White
display message)The KEYLESS-GO key cannot be detected at present.XChange the location of the key with the KEYLESS-GO functions
in the vehicle.
If the KEYLESS-GO key is still not detected:
XOperate the vehicle with the SmartKey in the ignition lock.Â
Key Detected In
VehicleThe KEYLESS-GO key has been detected inside the vehicle during
locking.XRemove the KEYLESS-GO key from the vehicle.Â
Remove 'Start'
Button and Insert
KeyKEYLESS-GO is temporarily malfunctioning or is defective.XInsert the SmartKey into the ignition lock and turn it to the
desired position.XVisit a qualified specialist workshop.Â
Close Doors to
Lock VehicleAt least one door is open. A warning tone also sounds.XClose all doors and lock the vehicle again.
Warning and indicator lamps in the instrument cluster
Seat belts
ProblemPossible causes/consequences and M Solutions7
After starting the
engine, the red seat
belt warning lamp lights
up for six seconds.The seat belt warning lamp reminds the driver and front passenger
to fasten their seat belts.XFasten your seat belt ( Y page 61).7
After starting the
engine, the red seat
belt warning lamp lights
up. In addition, a
warning tone sounds
for up to six seconds.GRisk of injury
The driver's seat belt is not fastened.
XFasten your seat belt ( Y page 61).
The warning tone ceases.422Warning and indicator lamps in the instrument clusterOn-board computer and displays
Page 425 of 536
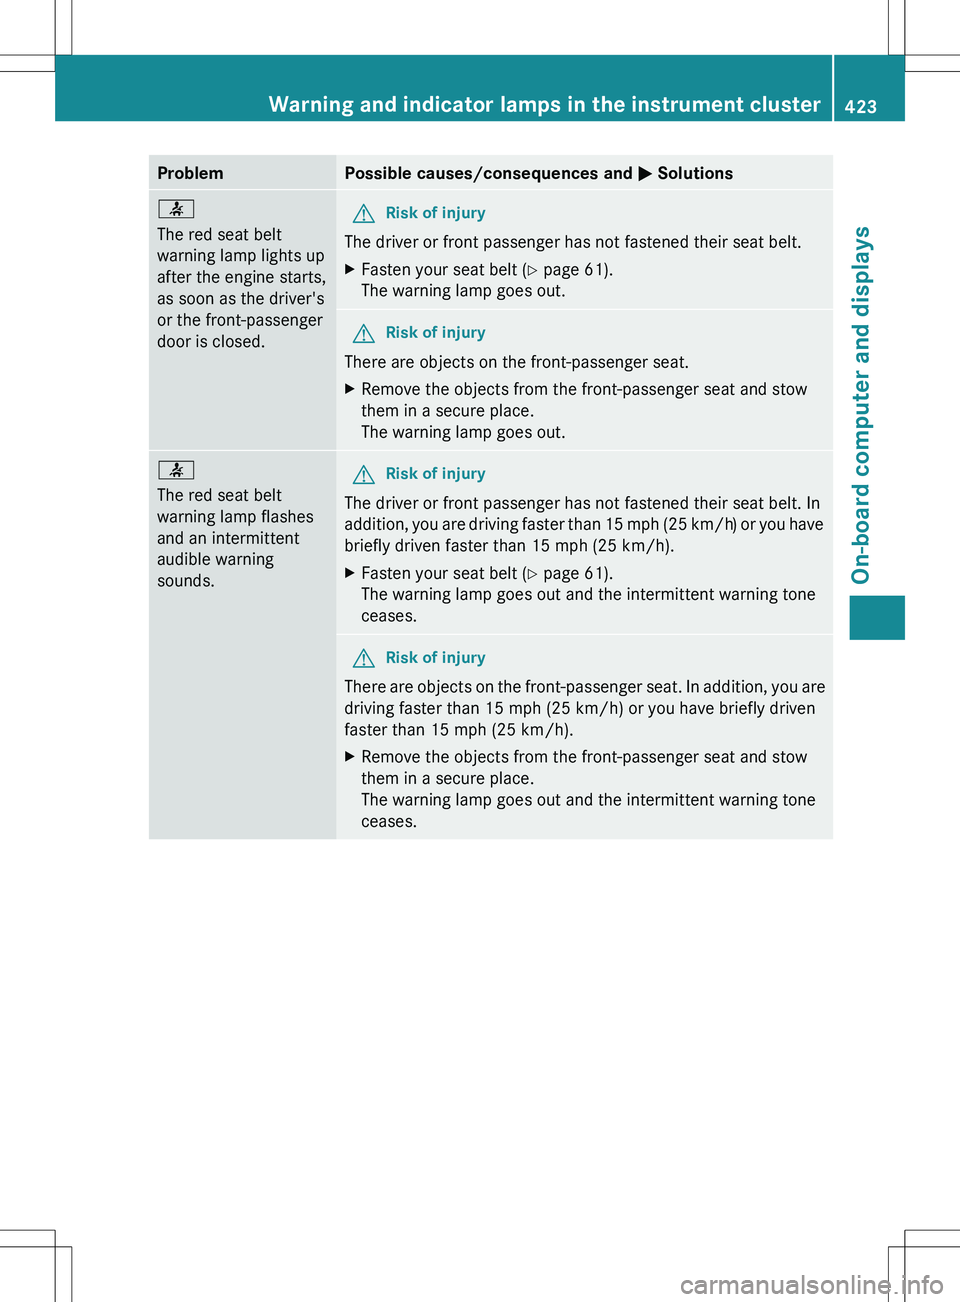
ProblemPossible causes/consequences and M Solutions7
The red seat belt
warning lamp lights up
after the engine starts,
as soon as the driver's
or the front-passenger
door is closed.GRisk of injury
The driver or front passenger has not fastened their seat belt.
XFasten your seat belt ( Y page 61).
The warning lamp goes out.GRisk of injury
There are objects on the front-passenger seat.
XRemove the objects from the front-passenger seat and stow
them in a secure place.
The warning lamp goes out.7
The red seat belt
warning lamp flashes
and an intermittent
audible warning
sounds.GRisk of injury
The driver or front passenger has not fastened their seat belt. In
addition, you are driving faster than 15 mph (25 km/h) or you have
briefly driven faster than 15 mph (25 km/h).
XFasten your seat belt ( Y page 61).
The warning lamp goes out and the intermittent warning tone
ceases.GRisk of injury
There are objects on the front-passenger seat. In addition, you are
driving faster than 15 mph (25 km/h) or you have briefly driven
faster than 15 mph (25 km/h).
XRemove the objects from the front-passenger seat and stow
them in a secure place.
The warning lamp goes out and the intermittent warning tone
ceases.Warning and indicator lamps in the instrument cluster423On-board computer and displaysZ
Page 430 of 536
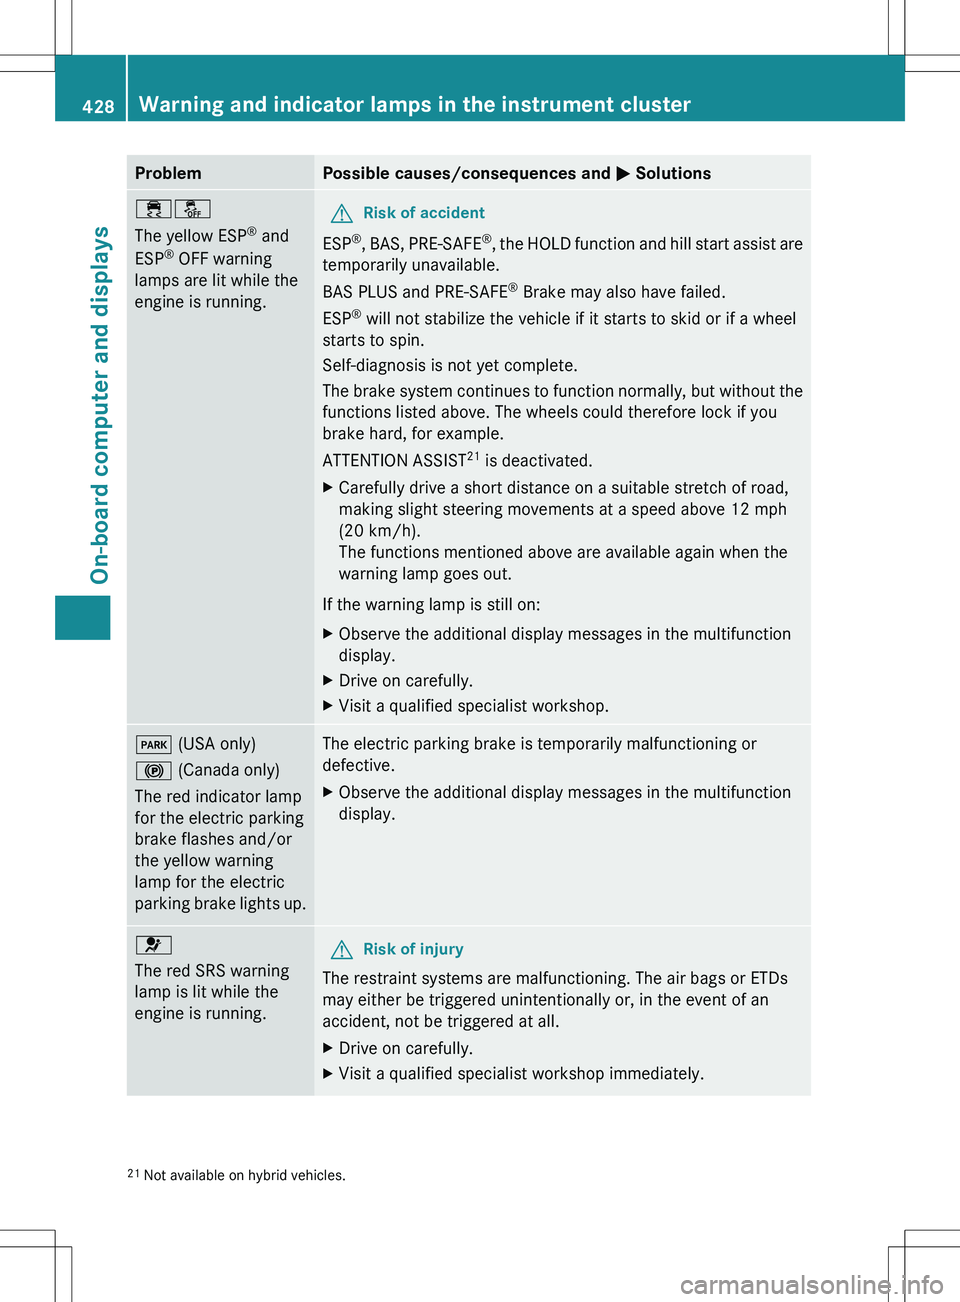
ProblemPossible causes/consequences and M Solutions֌
The yellow ESP ®
and
ESP ®
OFF warning
lamps are lit while the
engine is running.GRisk of accident
ESP ®
, BAS, PRE-SAFE ®
, the HOLD function and hill start assist are
temporarily unavailable.
BAS PLUS and PRE-SAFE ®
Brake may also have failed.
ESP ®
will not stabilize the vehicle if it starts to skid or if a wheel
starts to spin.
Self-diagnosis is not yet complete.
The brake system continues to function normally, but without the
functions listed above. The wheels could therefore lock if you
brake hard, for example.
ATTENTION ASSIST 21
is deactivated.
XCarefully drive a short distance on a suitable stretch of road,
making slight steering movements at a speed above 12 mph
(20 km/h).
The functions mentioned above are available again when the
warning lamp goes out.
If the warning lamp is still on:
XObserve the additional display messages in the multifunction
display.XDrive on carefully.XVisit a qualified specialist workshop.F (USA only)
! (Canada only)
The red indicator lamp
for the electric parking
brake flashes and/or
the yellow warning
lamp for the electric
parking brake lights up.The electric parking brake is temporarily malfunctioning or
defective.XObserve the additional display messages in the multifunction
display.6
The red SRS warning
lamp is lit while the
engine is running.GRisk of injury
The restraint systems are malfunctioning. The air bags or ETDs
may either be triggered unintentionally or, in the event of an
accident, not be triggered at all.
XDrive on carefully.XVisit a qualified specialist workshop immediately.21 Not available on hybrid vehicles.428Warning and indicator lamps in the instrument clusterOn-board computer and displays
Page 431 of 536
GWARNING
In the event a malfunction of the SRS is indicated as outlined above, the SRS may not be
operational.
For your safety, we strongly recommend that you contact an authorized Mercedes-Benz Center
immediately to have the system checked. Otherwise the SRS may not be activated when needed
in an accident, which could result in serious or fatal injury, or it might deploy unexpectedly and
unnecessarily which could also result in injury.
Engine
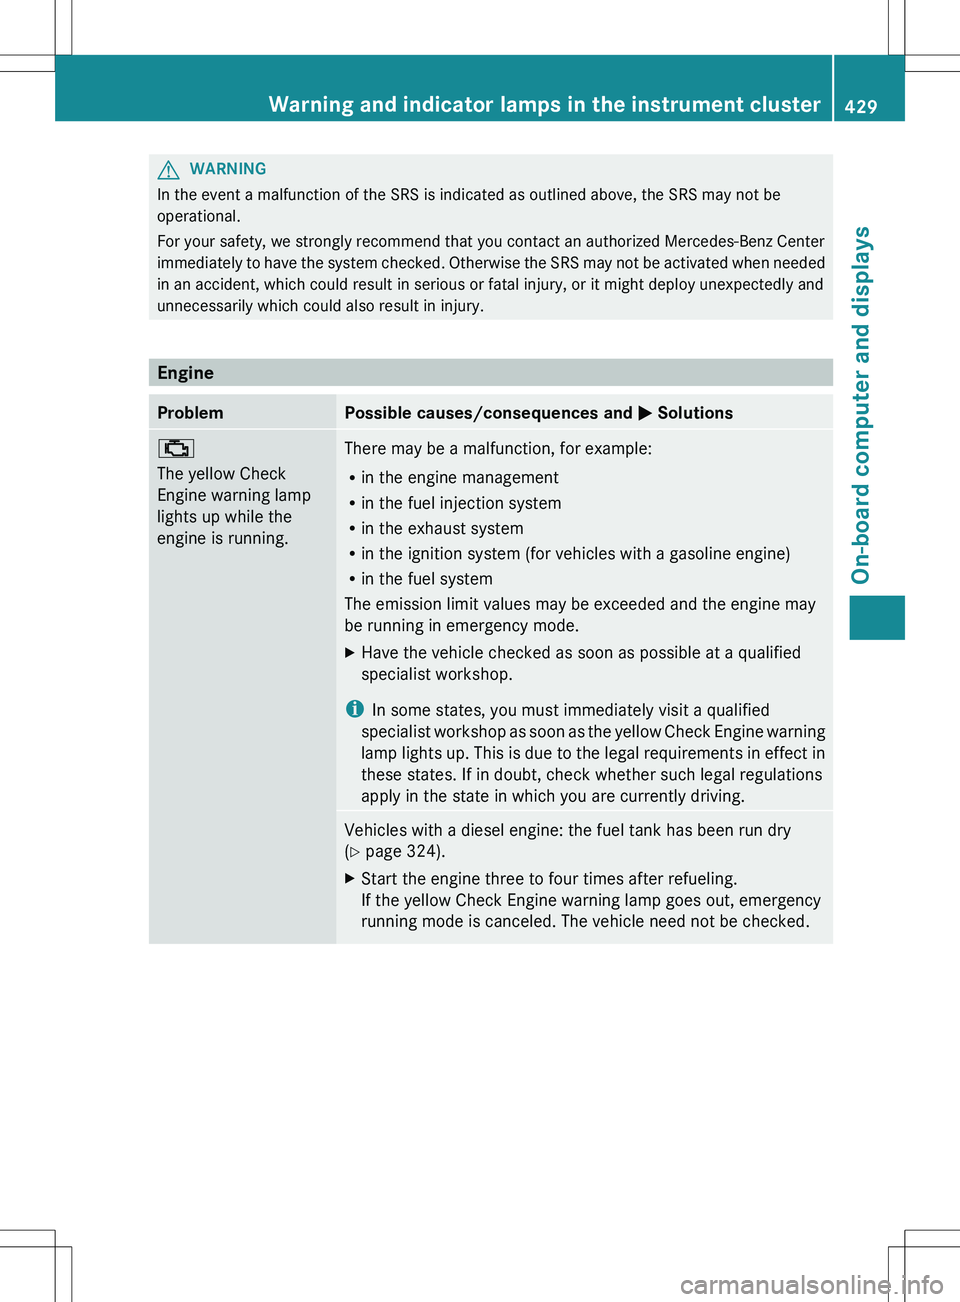
ProblemPossible causes/consequences and M Solutions;
The yellow Check
Engine warning lamp
lights up while the
engine is running.There may be a malfunction, for example:
R in the engine management
R in the fuel injection system
R in the exhaust system
R in the ignition system (for vehicles with a gasoline engine)
R in the fuel system
The emission limit values may be exceeded and the engine may
be running in emergency mode.XHave the vehicle checked as soon as possible at a qualified
specialist workshop.
i In some states, you must immediately visit a qualified
specialist workshop as soon as the yellow Check Engine warning
lamp lights up. This is due to the legal requirements in effect in
these states. If in doubt, check whether such legal regulations
apply in the state in which you are currently driving.
Vehicles with a diesel engine: the fuel tank has been run dry
( Y page 324).XStart the engine three to four times after refueling.
If the yellow Check Engine warning lamp goes out, emergency
running mode is canceled. The vehicle need not be checked.Warning and indicator lamps in the instrument cluster429On-board computer and displaysZ
Page 432 of 536
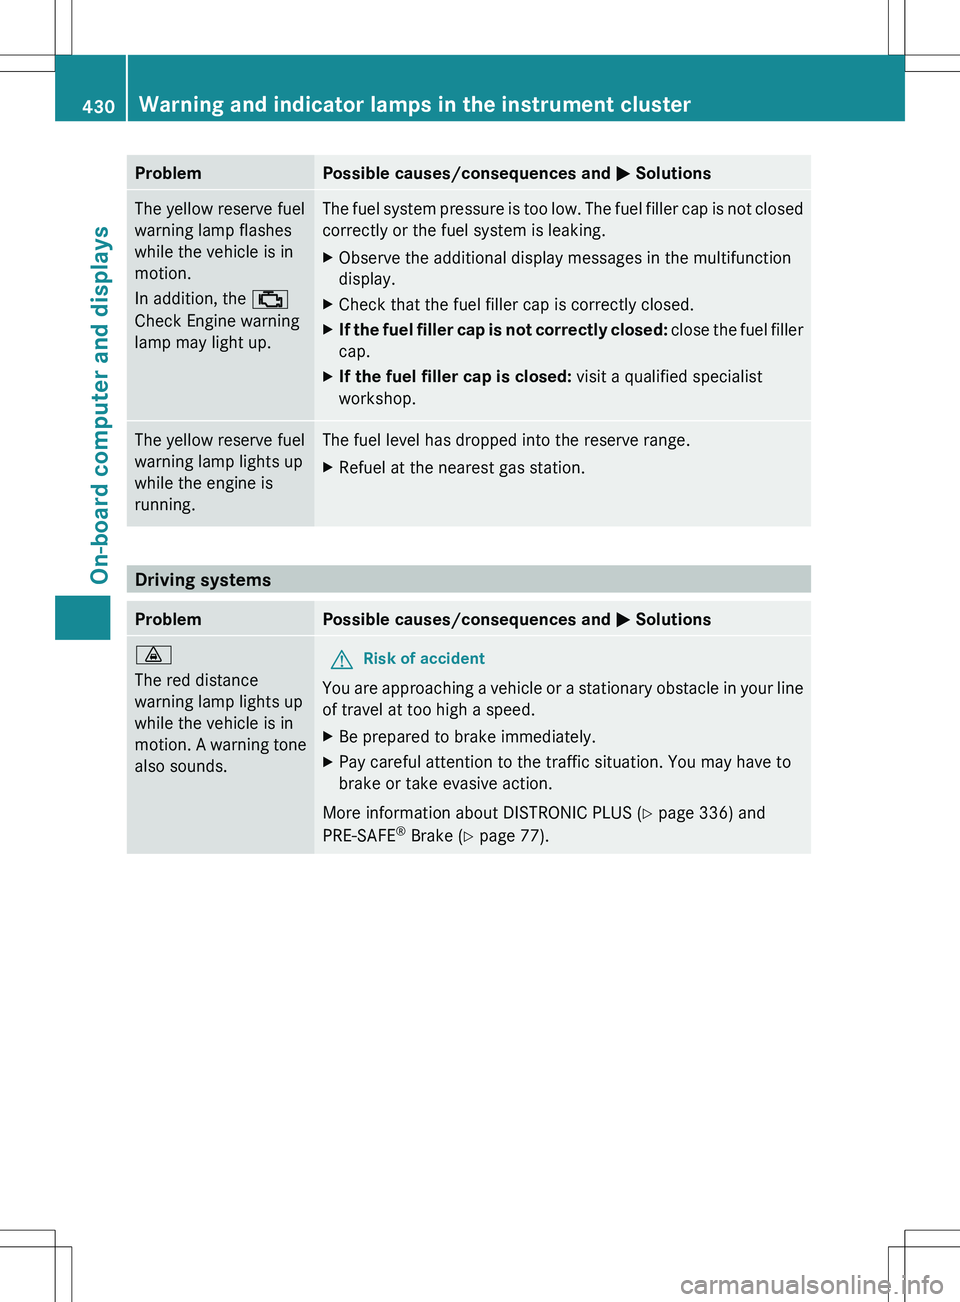
ProblemPossible causes/consequences and M SolutionsThe yellow reserve fuel
warning lamp flashes
while the vehicle is in
motion.
In addition, the ;
Check Engine warning
lamp may light up.The fuel system pressure is too low. The fuel filler cap is not closed
correctly or the fuel system is leaking.XObserve the additional display messages in the multifunction
display.XCheck that the fuel filler cap is correctly closed.XIf the fuel filler cap is not correctly closed: close the fuel filler
cap.XIf the fuel filler cap is closed: visit a qualified specialist
workshop.The yellow reserve fuel
warning lamp lights up
while the engine is
running.The fuel level has dropped into the reserve range.XRefuel at the nearest gas station.
Driving systems
ProblemPossible causes/consequences and M Solutions·
The red distance
warning lamp lights up
while the vehicle is in
motion. A warning tone
also sounds.GRisk of accident
You are approaching a vehicle or a stationary obstacle in your line
of travel at too high a speed.
XBe prepared to brake immediately.XPay careful attention to the traffic situation. You may have to
brake or take evasive action.
More information about DISTRONIC PLUS ( Y page 336) and
PRE-SAFE ®
Brake ( Y page 77).
430Warning and indicator lamps in the instrument clusterOn-board computer and displays
Page 447 of 536
115 V socket : provides an alternating
voltage of 115 V, so that small electronic
devices can be connected. These devices,
such as game consoles, chargers and
laptops, together should not consume more
than a maximum of 150 W.
Requirements for operation of these devices:
R the plug of the electronic device must be
inserted fully into 115 V power socket :.
R the maximum wattage of the device to be
connected must not exceed 150 W.
R the on-board power supply is within a
permissible voltage range.
R the 12 V socket in the trunk is operational
( Y page 443).XOpen flap =.XInsert the plug of the electronic device into
115 V power socket :.
Indicator lamp ; lights up.
If indicator lamp ; does not light up,
consult the section on malfunctions.XTo turn off: disconnect the plug from
115 V power socket :.
Ensure that you do not pull on the cord.
Possible causes of malfunction:
R the on-board power supply is not within a
permissible voltage range.
R the temperature of the DC/AC converter is
temporarily too high.
R some small electronic devices have a
constant nominal power of less than
150 W, but a very high inrush current.
These devices will not work. If you connect
such a device, 115 V power socket : will
not supply it with power.
If indicator lamp ; still does not light up,
contact a specialist workshop.
mbrace
Important safety notes
! A license agreement must exist in order
to activate the mbrace service. Ensure that
your system is activated and ready for use,
and press the E MB Info call button to
register. If any of the steps mentioned is
not carried out, the system may not be
activated.
If you have questions about the activation,
contact one of the following telephone
assistance services:
R USA: Mercedes-Benz Customer
Assistance Center under
1-888-990-9007
R Canada: Customer Service at
1-888-923-8367
Shortly after successfully registering with the
mbrace service, a user ID and password will
be sent to you by mail. You can use this
password to log in to the mbrace section
under "Owners Online" at http://
www.mbusa.com 22
.
The mbrace system is available if:
R it has been activated and is operational.
R the corresponding mobile phone network
is available for transmitting data to the
Customer Center.
R a service subscription is available.
R the starter battery is sufficiently charged.
i Determining the location of the vehicle on
a map is only possible if there is sufficient
GPS reception and the vehicle position can
be forwarded to the Customer Center.
The mbrace system
The mbrace system provides different
services, e.g.:
R automatic and manual emergency call
R Roadside Assistance call
R MB Info call
22USA only.Features445Stowage and featuresZ
Page 456 of 536
XPress and hold button B on remote control
A until indicator lamp : lights up green.
If indicator lamp : lights up green or
flashes, then programming has been
successful.XRelease button B on remote control A for
the garage door drive system.
If indicator lamp : lights up red:
XRepeat the programming procedure for the
corresponding button on the rear-view
mirror. When doing so, vary the distance
between remote control A and the rear-
view mirror.
i If the indicator lamp flashes green after
successful programming, the garage door
system is operating on a rolling code. After
programming, you must synchronize the
garage door opener integrated in the rear-
view mirror with the receiver of the garage
door system.
Synchronizing the rolling code
Your vehicle must be within reach of the
garage door or exterior gate drive. Make sure
that neither your vehicle nor any persons/
objects are present within the sweep of the
door or gate.
Observe the safety notes when performing
the rolling code synchronization
( Y page 452).
XTurn the SmartKey to position 2 in the
ignition lock.XPress the programming button of the door
or gate drive (see the door or gate drive
operating instructions, e.g. under
"Programming of additional remote
controls").
i Usually, you now have 30seconds to
initiate the next step.
XPress previously programmed button ;,
= or ? of the integrated garage door
opener until the door starts to move.
The rolling code synchronization is then
complete.Notes on programming the remote
control
Canadian radio frequency laws require a
"break" (or interruption) of the transmission
signals after broadcasting for a few seconds.
Therefore, these signals may not last long
enough for the integrated garage door
opener. The signal is not recognized during
programming. Comparable with Canadian
law, some U.S. garage door openers are
designed to "time-out" in the same manner.
Proceed as follows:
R if you live in Canada
R if you have difficulties programming the
garage door opener (regardless of where
you live) when using the programming
stepsXPress and hold one of buttons ; to ? on
the integrated garage door opener.
After a short time, indicator lamp : starts
flashing yellow.XRelease the button.XPress button B of garage door remote
control A for two seconds, then release it
for two seconds.XPress button B again for two seconds.XRepeat this sequence on button B of
remote control A until indicator lamp :
lights up green.
If indicator lamp : turns red, repeat the
process.XContinue with the other programming
steps (see above).
Problems when programming
If you are experiencing problems
programming the integrated garage door
opener on the rear-view mirror, take note of
the following instructions:
R Check the transmitter frequency of garage
door drive remote control A. This can
usually be found on the back of the remote
control.
454FeaturesStowage and features
Page 457 of 536
The integrated garage door opener is
compatible with devices that have units
which operate in the frequency range of
280 to 390MHz.
R Replace the batteries in garage door
remote control A. This increases the
likelihood that garage door remote control
A will transmit a strong and precise signal
to the integrated garage door opener in the
rear-view mirror.
R When programming, hold remote control
A at varying distances and angles from the
button that you are programming. Try
various angles at a distance between
2 and 12 inches (5 to 30 cm) or at the same
angle but at varying distances.
R If another remote control for the same
garage door drive is available, repeat the
same programming steps with this remote
control. Before performing these steps,
make sure that new batteries have been
installed in garage door drive remote
control A.
R Note that some remote controls only
transmit for a limited amount of time (the
indicator lamp on the remote control goes
out). Press button B on remote control
A again before transmission ends.
R Align the antenna cable of the garage door
opener unit. This can improve signal
reception/transmission.
Opening/closing the garage door
After it has been programmed, the integrated
garage door opener performs the function of
the garage door system remote control.
Please also read the operating instructions
for the garage door system.
XTurn the SmartKey to position 2 in the
ignition lock.XPress button ;, = or ? that you have
programmed to operate the garage door.
Garage door system with a fixed code:
indicator lamp : lights up green.Garage door system with a rolling code:
indicator lamp : flashes green.
i
The transmitter will transmit a signal for
as long as the button is pressed. The
transmission is halted after a maximum of
ten seconds and indicator lamp : flashes
yellow. Press button ;, = or ? again if
necessary.
Clearing the memory of the integrated
garage door opener on the rear-view
mirror
XTurn the SmartKey to position 2 in the
ignition lock.XPress buttons ; and ?.
The indicator lamp lights up yellow.XPress and hold buttons ; and ? until the
indicator lamp turns green.
i Make sure that you clear the memory of
the integrated garage door opener before
selling the vehicle.
Floormat on the driver's side
GWARNING
Whenever you are using a floormat, make sure
there is enough clearance and that the
floormat is securely fastened.
The floormat should always be securely
fastened using the fastening equipment.
Before driving off, check that the floormat is
securely in place and adjust it if necessary. A
loose floormat could slip and hinder proper
functioning of the pedals.
Do not place several floormats on top of each
other as this may impair pedal movement.
Features455Stowage and featuresZ