2012 MERCEDES-BENZ S-CLASS SEDAN reset
[x] Cancel search: resetPage 104 of 536

being injured by the opening or closing
procedure.
The rear roller sunblind is equipped with
automatic operation and the anti-entrapment
feature. If the movement of the rear roller
sunblind is blocked during the closing
procedure, the rear roller sunblind will stop
and retract slightly.
The opening or closing of the rear roller
sunblind can be immediately halted by
releasing the sunblind switch or, if the
sunblind switch was moved past the
resistance point and released, by pressing or
pulling the sunblind switch again.
Door control panel in rear
XTo open/close manually: press or pull
switch : to the point of resistance and
hold it until the rear roller sunblind has
reached the desired position.XTo open/close fully: press or pull
switch : beyond the point of resistance
and release it.
i You can stop automatic operation by
operating the switch again.
Resetting the panorama roof with
power tilt/sliding panel or the front
roller sunblind
Reset the panorama roof with power tilt/
sliding panel or the front roller sunblind if the
panorama roof with power tilt/sliding panel
or the roller sunblinds do not move smoothly.
! Do not open the panorama roof with
power tilt/sliding panel until it has been
reset correctly. The panorama roof with
power tilt/sliding panel can otherwise be
locked in the open position.XTurn the SmartKey to position 1 or 2 in the
ignition lock.XPull the 3 switch repeatedly to the point
of resistance in the direction of arrow
= (Y page 100) until the panorama roof
with power tilt/sliding panel is fully closed.XKeep the 3 switch pulled for an
additional second.XPull the 3 switch in the direction of
arrow =(Y page 101) repeatedly until the
front roller sunblind is closed.XKeep the 3 switch pulled for an
additional second.XMake sure that the panorama roof with
power tilt/sliding panel ( Y page 100) and
the front roller sunblind ( Y page 101) can
be fully opened again.XIf this is not the case, repeat the steps
above again.
Resetting the rear sunblind
Door control panel in rear
XTurn the SmartKey to position 1 or 2 in the
ignition lock.XPull switch : repeatedly until the rear
roller sunblind is fully closed.XKeep switch : pulled for an additional
second.102Sliding sunroofOpening/closing
Page 110 of 536

Do not drive the vehicle without the seat head
restraints. Head restraints are intended to
help reduce injuries during an accident.
! To avoid damage to the seats and the seat
heating, observe the following information:
R keep liquids from spilling on the seats. If
liquid is spilled on the seats, dry them as
soon as possible.
R if the seat covers are damp or wet, do not
switch on the seat heating. The seat
heating should also not be used to dry
the seats.
R clean the seat covers as recommended;
see the "Interior care" section.
R do not transport heavy loads on the
seats. Do not place sharp objects on the
seat cushions, e.g. knives, nails or tools.
The seats should only be occupied by
passengers, if possible.
R when the seat heating is in operation, do
not cover the seats with insulating
materials, e.g. blankets, coats, bags,
seat covers, child seats or booster seats.
! Make sure that there are no objects in the
footwell or behind the seats when resetting
the seats. There is a risk that the seats
and/or the objects could be damaged.
i The head restraints in the front seats are
equipped with the NECK-PRO system. For
this reason, it is not possible to remove the
head restraints from the front seats.
For design reasons, the rear-compartment
head restraints cannot be removed.
For more information, contact a qualified
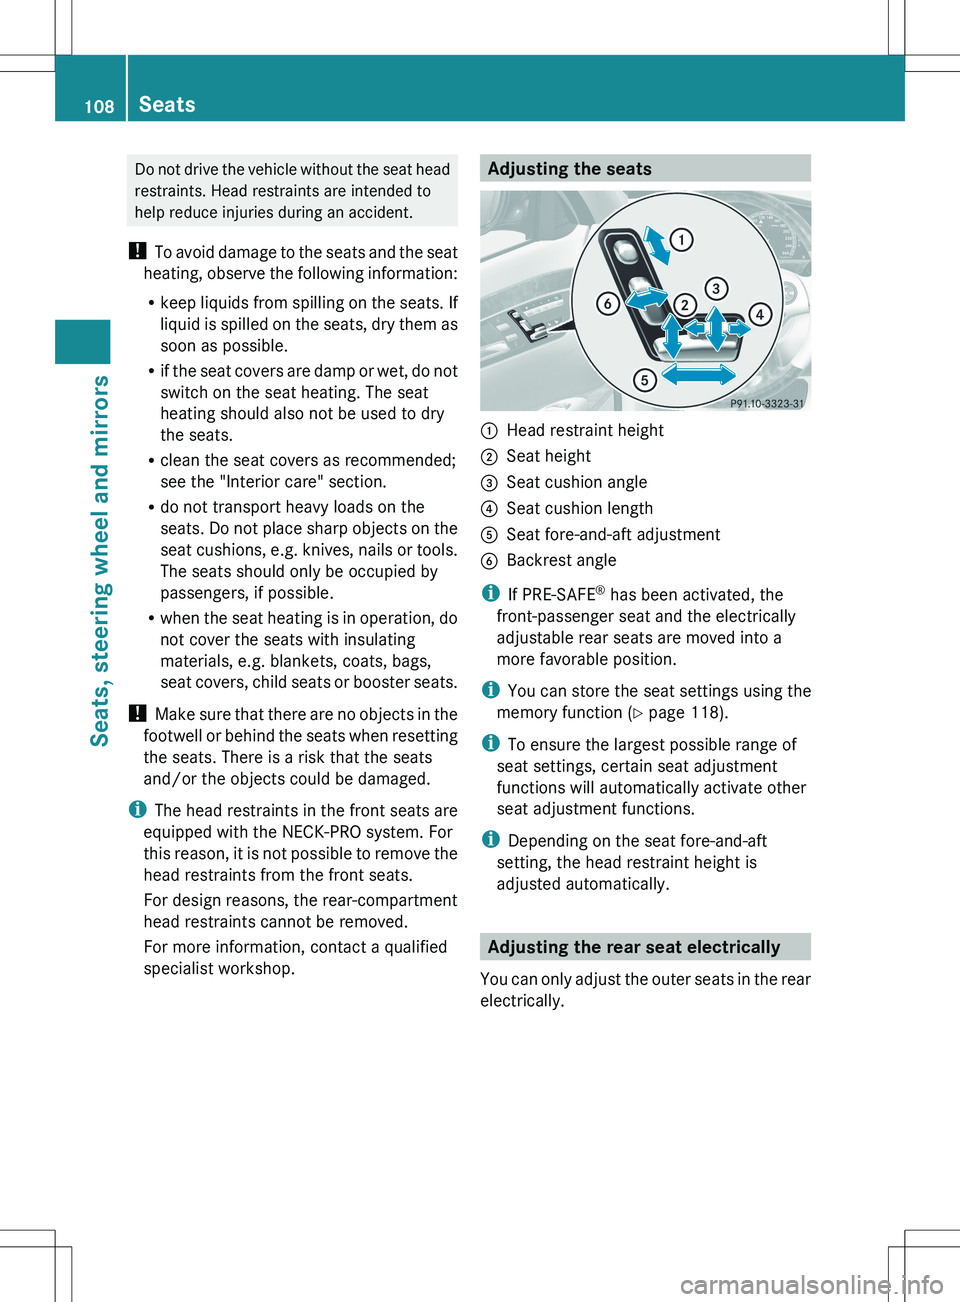
specialist workshop.Adjusting the seats:Head restraint height;Seat height=Seat cushion angle?Seat cushion lengthASeat fore-and-aft adjustmentBBackrest angle
i If PRE-SAFE ®
has been activated, the
front-passenger seat and the electrically
adjustable rear seats are moved into a
more favorable position.
i You can store the seat settings using the
memory function ( Y page 118).
i To ensure the largest possible range of
seat settings, certain seat adjustment
functions will automatically activate other
seat adjustment functions.
i Depending on the seat fore-and-aft
setting, the head restraint height is
adjusted automatically.
Adjusting the rear seat electrically
You can only adjust the outer seats in the rear
electrically.
108SeatsSeats, steering wheel and mirrors
Page 112 of 536

You can use the override button to disable
this function ( Y page 71).
The button is located in the rear door on the
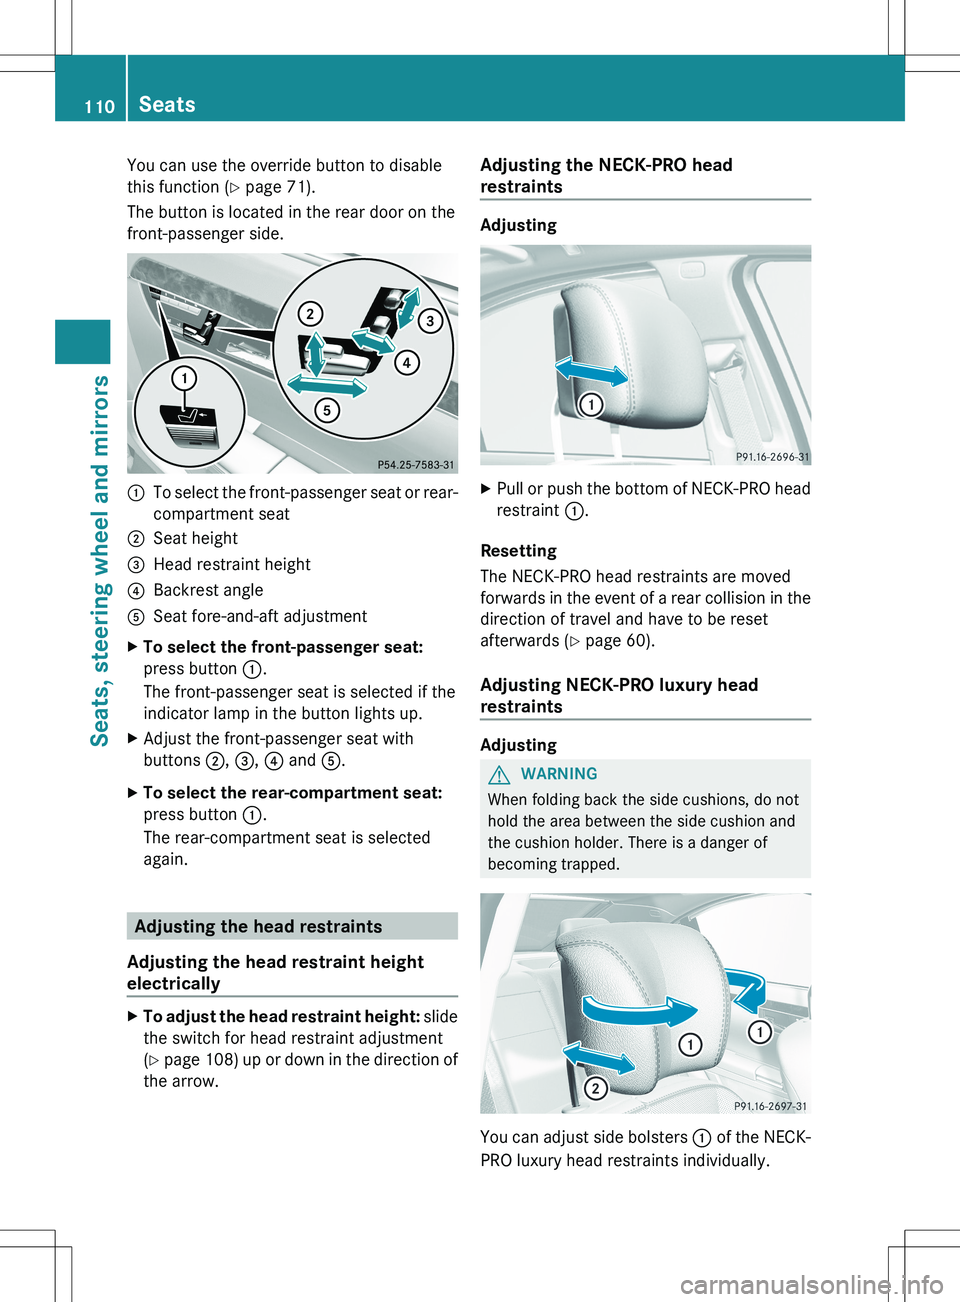
front-passenger side.:To select the front-passenger seat or rear-
compartment seat;Seat height=Head restraint height?Backrest angleASeat fore-and-aft adjustmentXTo select the front-passenger seat:
press button :.
The front-passenger seat is selected if the
indicator lamp in the button lights up.XAdjust the front-passenger seat with
buttons ;, = , ? and A.XTo select the rear-compartment seat:
press button :.
The rear-compartment seat is selected
again.
Adjusting the head restraints
Adjusting the head restraint height
electrically
XTo adjust the head restraint height: slide
the switch for head restraint adjustment
( Y page 108) up or down in the direction of
the arrow.Adjusting the NECK-PRO head
restraints
Adjusting
XPull or push the bottom of NECK-PRO head
restraint :.
Resetting
The NECK-PRO head restraints are moved
forwards in the event of a rear collision in the
direction of travel and have to be reset
afterwards ( Y page 60).
Adjusting NECK-PRO luxury head
restraints
Adjusting
GWARNING
When folding back the side cushions, do not
hold the area between the side cushion and
the cushion holder. There is a danger of
becoming trapped.
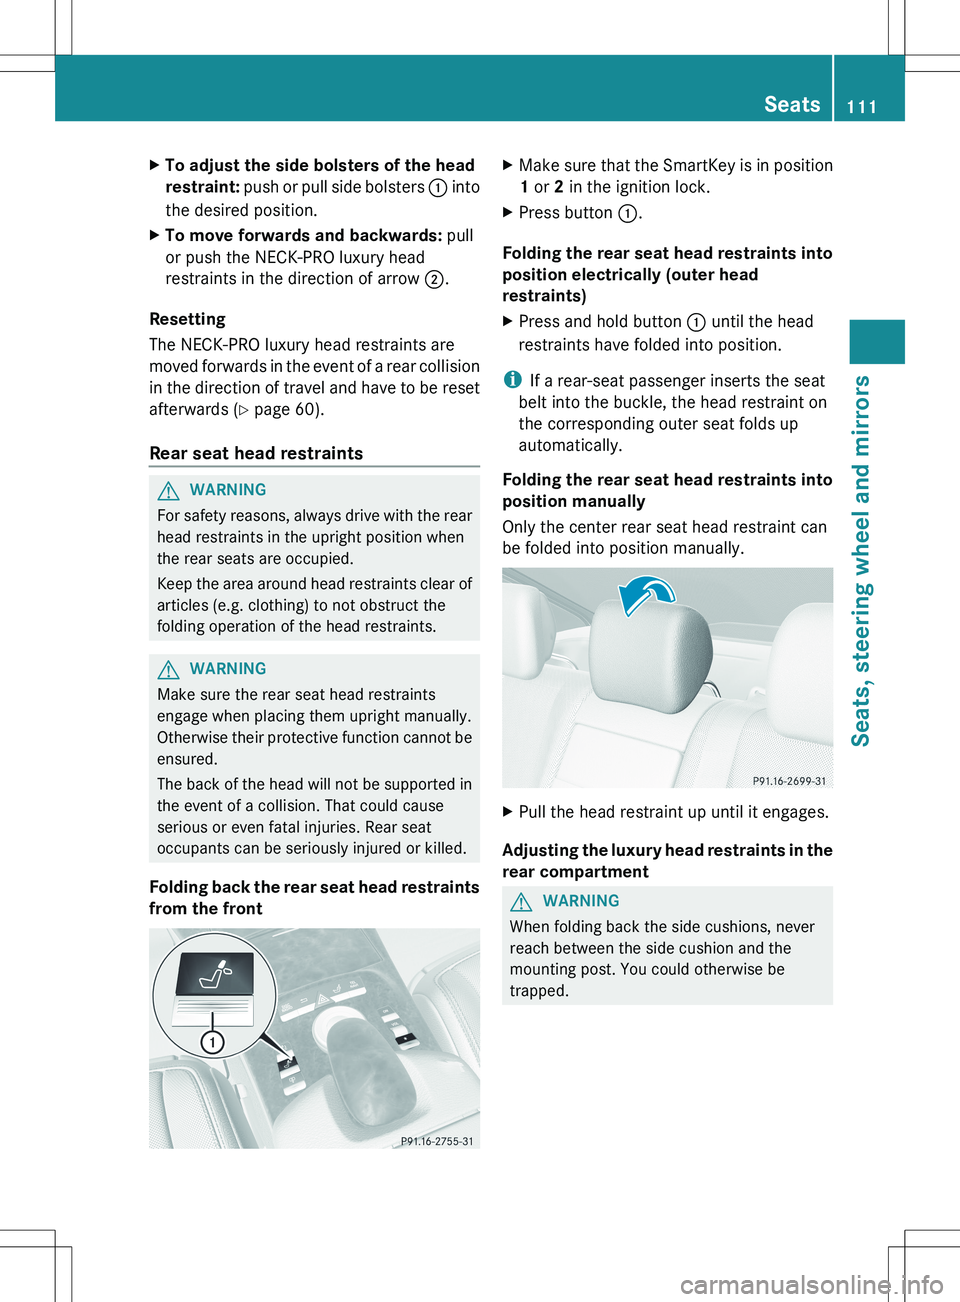
You can adjust side bolsters : of the NECK-
PRO luxury head restraints individually.
110SeatsSeats, steering wheel and mirrors
Page 113 of 536

XTo adjust the side bolsters of the head
restraint: push or pull side bolsters : into
the desired position.XTo move forwards and backwards: pull
or push the NECK-PRO luxury head
restraints in the direction of arrow ;.
Resetting
The NECK-PRO luxury head restraints are
moved forwards in the event of a rear collision
in the direction of travel and have to be reset
afterwards ( Y page 60).
Rear seat head restraints
GWARNING
For safety reasons, always drive with the rear
head restraints in the upright position when
the rear seats are occupied.
Keep the area around head restraints clear of
articles (e.g. clothing) to not obstruct the
folding operation of the head restraints.
GWARNING
Make sure the rear seat head restraints
engage when placing them upright manually.
Otherwise their protective function cannot be
ensured.
The back of the head will not be supported in
the event of a collision. That could cause
serious or even fatal injuries. Rear seat
occupants can be seriously injured or killed.
Folding back the rear seat head restraints
from the front
XMake sure that the SmartKey is in position
1 or 2 in the ignition lock.XPress button :.
Folding the rear seat head restraints into
position electrically (outer head
restraints)
XPress and hold button : until the head
restraints have folded into position.
i If a rear-seat passenger inserts the seat
belt into the buckle, the head restraint on
the corresponding outer seat folds up
automatically.
Folding the rear seat head restraints into
position manually
Only the center rear seat head restraint can
be folded into position manually.
XPull the head restraint up until it engages.
Adjusting the luxury head restraints in the
rear compartment
GWARNING
When folding back the side cushions, never
reach between the side cushion and the
mounting post. You could otherwise be
trapped.
Seats111Seats, steering wheel and mirrorsZ
Page 119 of 536

XPress the mirror-folding button
( Y page 116) repeatedly until you hear the
mirror engage in position.
The mirror housing is engaged again and
you can adjust the exterior mirrors as usual
( Y page 116).
Automatic anti-glare mirrors
GWARNING
If incident light from headlamps is prevented
from striking the sensor in the rear-view
mirror, for instance, by luggage piled too high
in the vehicle, the mirror's automatic anti-
glare function will not operate.
Incident light could then blind you. This may
distract you from the traffic conditions and,
as a result, you may cause an accident.
The rear-view mirror and the exterior mirror
on the driver's side automatically go into anti-
glare mode if the ignition is switched on and
incident light from headlamps strikes the
sensor in the rear-view mirror.
The mirrors do not go into anti-glare mode if
reverse gear is engaged or the interior lighting
is switched on.
Parking position for the exterior
mirror on the front-passenger side
Setting and storing the parking position
You can position the front-passenger side
exterior mirror in such a way that you can see
the rear wheel on that side as soon as you
engage reverse gear. You can store this
position.
XMake sure that the vehicle is stationary and
that the SmartKey is in position 2 in the
ignition lock.XPress button = for the exterior mirror on
the front-passenger side.XEngage reverse gear.
The exterior mirror on the front-passenger
side moves to the preset parking position.XUse adjustment button ; to adjust the
exterior mirror. You should see the rear
wheel and the curb in the exterior mirror.
The parking position is stored.
i If you shift the transmission to another
position, the exterior mirror on the front-
passenger side returns to the driving
position.
i You can also store the parking position
using memory button M : .
XMake sure that the SmartKey is in
position 2 in the ignition lock.XWith the exterior mirror on the front-
passenger side activated, use
adjustment button ; to adjust the
exterior mirror. You should see the
rear wheel and the curb in the exterior
mirror on the front-passenger side.XPress memory button M : and one of
the arrows on adjustment button ;
within three seconds.
The parking position is stored if the
exterior mirror does not move.
If the mirror moves out of position, repeat
the steps.
Mirrors117Seats, steering wheel and mirrorsZ
Page 120 of 536

Calling up a stored parking position
settingXTurn the SmartKey to position 2 in the
ignition lock.XAdjust the exterior mirror on the front-
passenger side with the corresponding
button ( Y page 116).XEngage reverse gear.
The exterior mirror on the front-passenger
side moves to the stored parking position.
The exterior mirror on the front-passenger
side moves back to its original position:
R as soon as you exceed a speed of 9 mph
(15 km/h)
R about ten seconds after you have
disengaged reverse gear
R if you press button ? for the exterior
mirror on the driver's side
Memory function
Storing settings
GWARNING
Do not activate the memory function while
driving. Activating the memory function while
driving could cause the driver to lose control
of the vehicle.
With the memory function, you can store up
to three different settings, e.g. for three
different people.
The following settings are stored as a single
memory preset:
R seat, backrest, head restraint position and
contour of the backrest in the lumbar
region
R active multicontour seat: activated/
deactivated
R multicontour seat: the side bolsters of the
seat cushion and the backrest as well as
the contour of the backrest in the lumbar
and shoulder regions
R driver's side: steering wheel position
R driver's side: position of the exterior
mirrors on the driver's and front-passenger
sidesXAdjust the seat ( Y page 108).XOn the driver's side, adjust the steering
wheel (Y page 114) and the exterior mirrors
( Y page 116).XBriefly press the M memory button and
then press storage position button 1, 2 or
3 within three seconds until you hear an
acknowledgment tone.
The settings are stored in the selected
storage position.
Calling up a stored setting
XPress and hold the relevant storage
position button 1, 2 or 3 until the seat,
steering wheel and exterior mirrors are in
the stored position.
i If you release the storage position button,
the seat, steering wheel and mirror setting
functions stop immediately. The
multicontour seat setting or lumbar
support adjustment is still carried out.
118Memory functionSeats, steering wheel and mirrors
Page 131 of 536

Cleaning instructions
! Do not touch the COMAND display. The
display has a very sensitive high-gloss
surface; there is a risk of scratching. If you
have to clean the screen, however, use a
mild cleaning agent and a soft, lint-free
cloth.
The display must be switched off and have
cooled down before you start cleaning. Clean
the display screen, when necessary, with a
commercially available microfiber cloth and
cleaning agent for TFT/LCD displays. Then,
dry the surface with a dry microfiber cloth.
Avoid using alcoholic thinners, gasoline or
abrasive cleaning agents. These could
damage the display surface. Do not apply
pressure to the display surface when cleaning
it, as this could cause irreversible damage.
Remote control
Overview
You can use the remote control to operate the
COMAND display, SPLITVIEW and either one
of the rear-compartment screens.
:To switch the screen on/off (Rear Seat
Entertainment System only);To switch the button lighting on/off=To select the screen for remote control
operation ( COMAND, SPLITVIEW , L
REAR and REAR R can be selected)?To select a menu or menu itemATo confirm a selection or settingBMuteCTo adjust the volume (for corded
headphones only)DCOMAND: to set the station, skip track,
fast forward/rewind, for example. Rear
Seat Entertainment System: skip track,
fast forward/rewindECOMAND: to select a station from
presets, select a track, enter directly,
enter a phone number, for example. Rear
Seat Entertainment System: to select a
track, enter directlyFTo exit a menu (back)XPoint the remote control at the
corresponding screen and execute the
functions by pressing the corresponding
buttons.
i The remote control's function may be
restricted depending on the angle at which
it is pointed at the respective screen.
Selecting the screen for the remote
control
XTurn thumbwheel = until the desired
display is highlighted in the window.
Switching the screen on/off (Rear Seat
Entertainment System only)
If the SmartKey is in the ignition lock in
position 0 or 1 or if the SmartKey is not in the
ignition lock, the rear screens will switch off
after 30 minutes. Before the screens switch
off, they show a message to this effect.
You can switch the screens back on.
However, this will discharge the starter
battery.
At a glance129COMANDZ
Page 133 of 536

Functions with the E and F button
You can use the remote control to execute the same functions as the COMAND control panel.
ModeFunctionAudio modeSelects a station using the station search function ( Y page 216)Selects a track by skipping to a track ( Y page 229)Fast forward/rewind ( Y page 230)Video modeSelects a scene or chapter (video DVD mode) ( Y page 247)Fast-forward/rewind (video DVD mode) ( Y page 247)
Functions of the number keypad
You can use the remote control to execute the same functions as the COMAND control panel.
ModeFunctionAudio modeSelects stations via the station presets ( Y page 216)Sets stations by entering the frequency manually ( Y page 217)Stores stations manually ( Y page 217)Selects a track ( Y page 229)Selects a data medium via the media list ( Y page 228)Telephone modeTelephone number entry ( Y page 204)Character entryEnters characters (direct entry) ( Y page 134)Operating COMAND
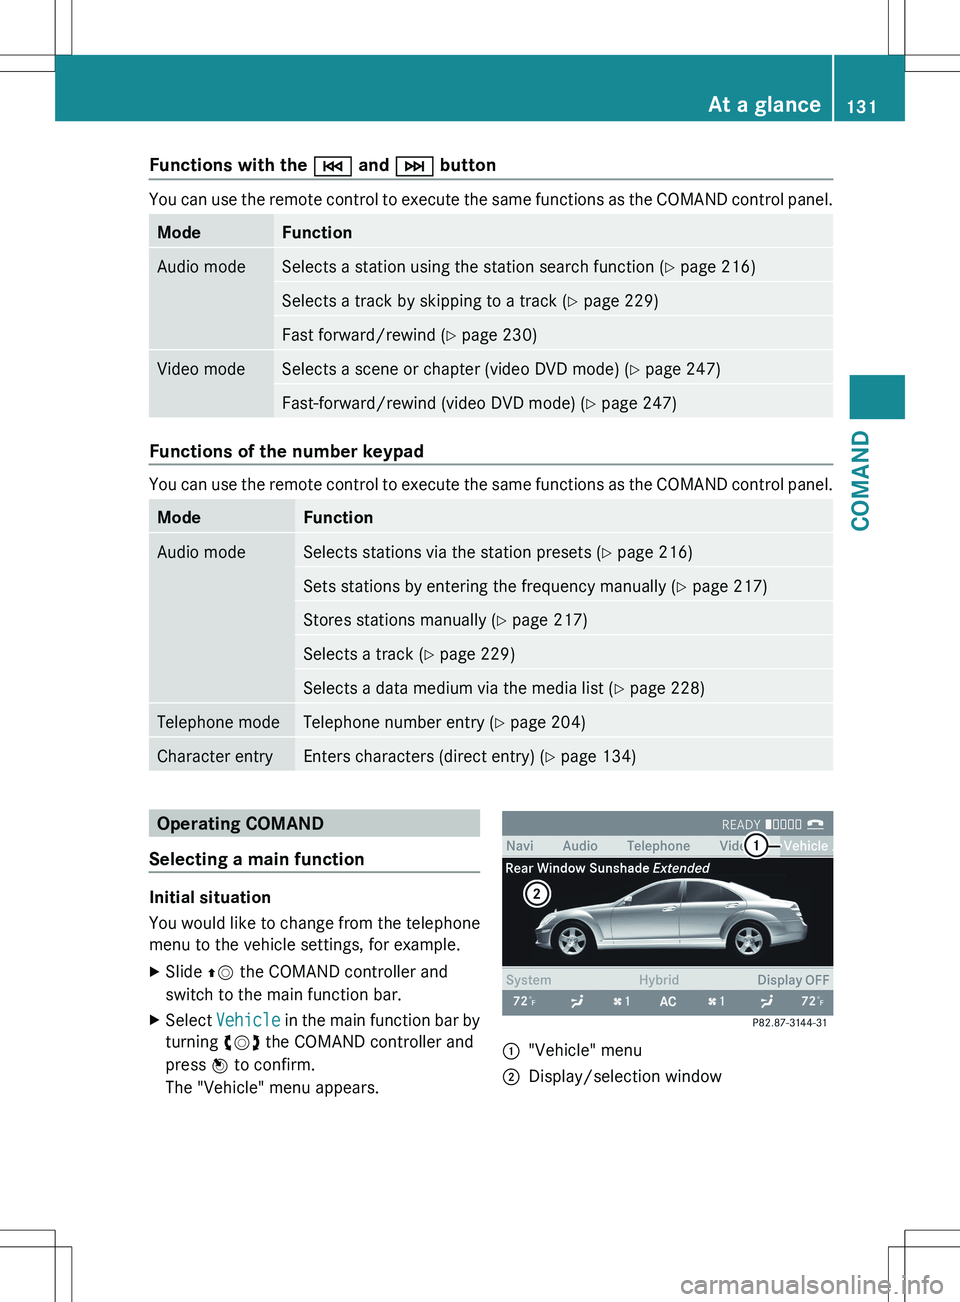
Selecting a main function
Initial situation
You would like to change from the telephone
menu to the vehicle settings, for example.
XSlide ZV the COMAND controller and
switch to the main function bar.XSelect Vehicle in the main function bar by
turning cVd the COMAND controller and
press W to confirm.
The "Vehicle" menu appears.:"Vehicle" menu;Display/selection windowAt a glance131COMANDZ