2012 MERCEDES-BENZ S-CLASS SEDAN change time
[x] Cancel search: change timePage 158 of 536

the route, changes of direction and lane
recommendations. Navigation
announcements guide you to your
destination.
"Route guidance inactive" means that no
destination has been entered and that no
route has been calculated.
Showing/hiding the menuXTo hide the menu: slide ZV the COMAND
controller over the map.
The Full Screen menu item is shown.XConfirm the Full Screen menu item
shown by pressing W.
The map can be seen in the full-screen
display.XTo show the menu: press W the COMAND
controller when the map is shown in full-
screen.
Basic settings
Route mode
Setting route type and route options
You can select the following route types:
R Fast Route : COMAND calculates the
route with the shortest (minimized) journey
time.
R Dynamic Route : same route type as Fast
Route . In addition, COMAND takes traffic
reports into account during route
guidance 6
. Thus, the navigation system is
able to guide you around a blocked section,
for example. If a faster route is determined
due to a received RDS-TMC traffic
announcement, the navigation system
changes the route. If possible, it will bypass
blocked roads.
R Eco Route : the ECO route is an economical
route that takes traffic announcements
into account (see dynamic route).
R Short Route : COMAND calculates the
route with the shortest possible
(minimized) route distance.
In addition to route types, route options can
also be set.
You can select the following route options:
R Use Carpool Lanes
R Minimize highways
R Minimize Toll Roads
R Minimize Tunnels
R Minimize Ferries
R Minimize Motorail Trains
If you select route options with a tick, the
corresponding types of roads will be avoided
in the route guidance where possible.XTo activate navigation mode: press the
S function button once or twice.XTo show the menu: press W the COMAND
controller.XSelect Navi in the main function bar by
sliding ZV and turning cVd the COMAND
controller and press W to confirm.XSelect Mode and press W to confirm.:To select the route type;To set route optionsXSelect a route type and press W to confirm.
The ä icon indicates the current setting.6
Traffic reports are not available in all countries.156NavigationCOMAND
Page 166 of 536

on the same street: call up an address
destination from the last destinations.XSelect Change by turning cVd and sliding
ZV Æ the COMAND controller and press
W to confirm.
All destination entry functions are
available.XEdit/enter the destination as described for
destination entry ( Y page 157).
Entering a destination using the map
Calling up the map
XTo activate navigation mode: press the
S function button once or twice.XTo show the menu: press W the COMAND
controller.XSelect Destination in the navigation
system menu bar by turning cVd the
COMAND controller and pressing W to
confirm.XSelect Via Map and press W to confirm.
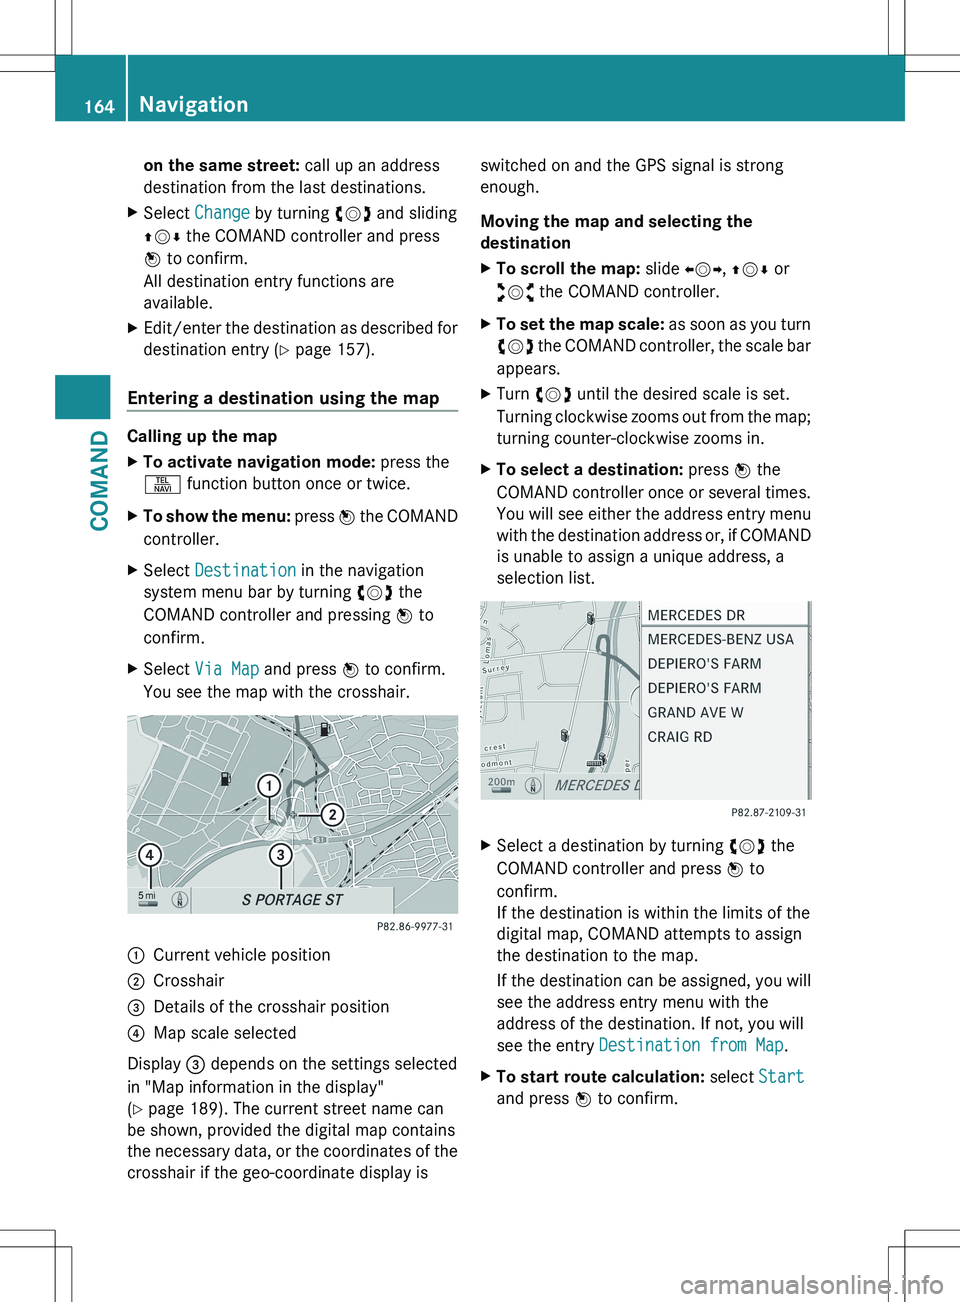
You see the map with the crosshair.:Current vehicle position;Crosshair=Details of the crosshair position?Map scale selected
Display = depends on the settings selected
in "Map information in the display"
( Y page 189). The current street name can
be shown, provided the digital map contains
the necessary data, or the coordinates of the
crosshair if the geo-coordinate display is
switched on and the GPS signal is strong
enough.
Moving the map and selecting the
destinationXTo scroll the map: slide XVY, ZV Æ or
aVb the COMAND controller.XTo set the map scale: as soon as you turn
cVd the COMAND controller, the scale bar
appears.XTurn cVd until the desired scale is set.
Turning clockwise zooms out from the map;
turning counter-clockwise zooms in.XTo select a destination: press W the
COMAND controller once or several times.
You will see either the address entry menu
with the destination address or, if COMAND
is unable to assign a unique address, a
selection list.XSelect a destination by turning cVd the
COMAND controller and press W to
confirm.
If the destination is within the limits of the
digital map, COMAND attempts to assign
the destination to the map.
If the destination can be assigned, you will
see the address entry menu with the
address of the destination. If not, you will
see the entry Destination from Map .XTo start route calculation: select Start
and press W to confirm.164NavigationCOMAND
Page 173 of 536

e.g. roads closed to through traffic and non-
residents.
R roads that have time restrictions (e.g.
closed on Sundays and public holidays) are
avoided for route guidance.
Change of direction
Introduction
Changes of direction have three phases:
R preparation phase
R announcement phase
R change-of-direction phase
Preparation phase
COMAND prepares you for the upcoming
change of direction. Based on the example
display below, the change of direction is
announced with a message. You see the full-
screen map.
Example display: preparation phase
:Next road;Route=Current vehicle position (the tip of the
triangle indicates the vehicle’s direction
of travel)?Current road
The display in ? depends on the setting
selected under "Text information on the map"
( Y page 189).
Announcement phase
COMAND announces the imminent change of
direction. With reference to the following
example display, the announcement is given
before the change of direction with the
request Please turn right in 900 ft .
The announced distance to the next change
of direction depends on the type of road and
its permissible speed limit.
The display is now split into two sectors. In
the left half, you see the normal map view.
The right half shows an enlarged section of
the area around the intersection (Crossing
Zoom) or a 3D image of the road's course with
the route indicating the next maneuver.
Example display: announcement phase
:Next road;Point at which the change of direction
takes place (light blue dot, shown in both
the left and right displays)=Graphic representation of the distance to
the next change of direction?Change of direction (turn right here)ADistance to the next change of directionBRoute (highlighted in blue, shown in both
the left and right displays)
i The filled-in section of visual display for
distance = gets shorter, the nearer you
get to the announced change of direction.
Change-of-direction phase
COMAND announces the imminent change of
direction. In the example, the Now turn
right announcement is made 100 ft. before
the change of direction. The display is split
into two halves, as in the announcement
phase.
Navigation171COMANDZ
Page 177 of 536

Avoiding a section of the route blocked
by a traffic jam
This function blocks a section of the route
ahead of you. You can set the length of the
blocked route section. If possible, COMAND
calculates a detour around the blocked
section of the route.
XTo activate navigation mode: press the
S function button once or twice.XTo show the menu: press W the COMAND
controller.XSelect Route in the navigation system
menu bar by turning cVd the COMAND
controller and press W to confirm.XSelect Detour and press W to confirm.XTo block a section of the route: select
More or Less repeatedly and confirm using
W until the desired section has been
selected.
i The total length of the section that can be
blocked is defined by the digital map. The
menu items are available accordingly.
XTo start route calculation: select Start
and press W to confirm.XTo delete the blocked section: select
Delete while the message is shown and
press W to confirm.
COMAND calculates the route without the
block.
Selecting an alternative route
With the "Alternative route" function, routes
other than the original one can be calculated.
XTo activate navigation mode: press the
S function button once or twice.XTo show the menu: press W the COMAND
controller.XSelect Route in the navigation system
menu bar by turning cVd the COMAND
controller and press W to confirm.XSelect Alternative Route and press W
to confirm.
You see the selected route. The display now
shows a split-screen view. On the left-hand
side, one or more alternative routes are
shown from start to destination. The
current route is highlighted dark blue; other
alternative routes appear light blue.:Distance, expected arrival time and
expected journey duration;Displays incidents which are on the route=Displays the selected route settingsXTo select the next or previous
alternative route: select Next or
Previous and press W to confirm.
Possible alternative routes are shown in the
following order: Current Route, Fast
Route , Eco Route , Short Route and
Alternative Route .XTo select the original route: select Back
a corresponding number of times and press
W to confirm.XTo start route guidance using the
selected alternative route: select Start
and press W to confirm.
COMAND accepts the alternative route.
i The change of route mode in the
alternative route menu only applies to the
current route guidance. For example, if the
original route was a short route, the next
route will also be calculated as a short
route. This is also the case if a dynamic
route is selected in the alternative route
menu.
Navigation175COMANDZ
Page 185 of 536

save the home address without starting
route guidance.XTo enter the home address for the first
time: select Assign Address Book
Entry and press W to confirm.XSelect Home or Work and press W to
confirm.XTo change the home address: select
Change and press W to confirm.XSelect Assign Address Book Entry and
press W to confirm.
i
If you select New Entry, you are also
offered the option of changing the home
address by entering an address. You can
then save the home address without
starting route guidance.
XSelect Home or Work and press W to
confirm.
In both cases, you will see the address book
either with the character bar or as a
selection list.XTo select an address book entry:
proceed as described in the "Searching for
an address book entry" section
( Y page 209).XTo confirm the selection: press W the
COMAND controller.
If no home address has been stored,
COMAND saves the entry. You will see a
message and then the address menu with
the selected address. Start is highlighted
automatically.
If a home address has already been stored,
you will see a prompt asking you whether
the My Address entry should be
overwritten.XSelect Yes or No and press W to confirm.
If you select Yes, COMAND overwrites the
destination. You will see a message and
then the address menu with the selected
address. Start is highlighted
automatically.
If you select No, the list will reappear.Selecting the home address for route
guidanceXProceed as described in the "Selecting a
destination from the destination memory"
section ( Y page 163).
Storing a destination in the destination
memory
Note
This function also stores the destination in
the address book.
After destination entry
XThe destination has been entered and is
shown in the address entry menu
( Y page 160).XSelect Save by sliding VÆ and turning
cVd the COMAND controller and press
W to confirm.
You can now select storage options.
During route guidance
XTo show the menu: press W the COMAND
controller.XSelect Destination in the navigation
system menu bar by turning cVd the
COMAND controller and press W to
confirm.XSelect Save Destination and press W to
confirm.
You can now select storage options.
From the list of previous destinations
XTo show the menu: press W the COMAND
controller.XSelect Destination in the navigation
system menu bar by turning cVd the
COMAND controller and press W to
confirm.XSelect From Last Destinations and
press W to confirm.
The list of last destinations appears.Navigation183COMANDZ
Page 201 of 536

Ra valid and operational SIM card must be
inserted in the mobile phone.
R the mobile phone is connected to COMAND
via Bluetooth ®
.
If you cannot make an emergency call, you
must arrange rescue measures yourself.XEnter numbers using the number keypad
( Y page 204).XPress the 6 button.
The telephone makes the connection.XWait for the emergency call center to
respond and then describe the emergency.
i If no SIM card has been inserted in a GSM
phone or if there is no service available for
a CDMA phone, the NO SERVICE message
appears in COMAND. In this case, an
emergency call can only be transmitted via
the mobile phone itself and not via
COMAND.
Telephony via the Bluetooth ®
interface
Conditions
On the mobile phone
For telephony via COMAND's Bluetooth ®
interface, a Bluetooth ®
-capable mobile
phone is required.
i Not all mobile phones available on the
market are equally suitable. More detailed
information on suitable mobile phones and
on connecting Bluetooth ®
-capable mobile
phones with COMAND can be found on the
Internet at
http://www.mbusa-mobile.com . Or call
the Mercedes-Benz Customer Assistance
Center on
1-800-FOR-MERCedes(1-800-367-6372)
(for the USA) or Customer Relations on
1-800-387-0100 (for Canada).
The battery of the mobile phone should
always be kept sufficiently charged in order
to prevent malfunctions.
In preparation for telephoning via the
Bluetooth ®
interface, you should check the
following items on your mobile phone (see the
mobile phone operating instructions):XHands-Free Profile
The mobile phone must support Hands-
Free Profile 1.0 or above.
i Certain displays and functions (e.g. signal
strength display, conference connection)
are available, depending on the supported
version of the Hands-Free Profile.
XBluetooth ®
visibility
On certain mobile phones, the device itself
must be made "visible" for other devices,
as well as activating the Bluetooth ®
function (see the mobile phone operating
instructions).XBluetooth ®
device name
Every Bluetooth ®
device has its own
Bluetooth ®
device name. This device name
is freely definable, but can be identical for
all devices from the same manufacturer. It
is therefore recommended that you change
this name so that you can easily recognize
your mobile phone (see the mobile phone
operating instructions).XSwitch on the mobile phone and enter the
PIN when prompted to do so (see the
mobile phone operating instructions).XActivate Bluetooth ®
functions and, where
necessary, Bluetooth ®
visibility on the
mobile phone (see the mobile phone
operating instructions).
In COMAND
XActivate the Bluetooth ®
function in
COMAND ( Y page 151).
Connecting a mobile phone
General information
Before using your mobile phone with
COMAND for the first time, you will need to
connect it.
Telephone199COMANDZ
Page 228 of 536

XRemove the CD/DVD from slot :.
The DVD changer switches to the next
loaded magazine tray and ejects the CD/
DVD.XRepeat the last step until the magazine is
empty.
Loading and removing SD cards
i Not all SD memory cards are designed for
the temperatures which may be reached in
the vehicle.
Due to the wide range of SD cards available
on the market, Mercedes-Benz cannot
guarantee playback for all brands of SD
memory card.
XTo load an SD card: press the SD card into
slot :. The tapered side must point
towards the right.
If the SD card contains MP3 tracks,
COMAND will play them back.XTo remove the SD card: press the SD card
into slot : as far as it will go and then
release it again.XPull out the card.
Activating audio CD/DVD or MP3 mode
Option 1
XInsert a CD/DVD ( Y page 225) or an SD
card (Y page 226) or connect a USB device
( Y page 238).
COMAND loads the medium inserted and
starts to play it.Option 2XPress the R function button once or
twice.XSelect an audio medium from the media list
( Y page 228).
Option 3
XSelect Audio in the main function bar by
sliding ZV and turning cVd the COMAND
controller and press W to confirm.
The last active audio source is now
activated.
If another audio source is switched on, you
can now switch to disc mode in the audio
menu.XSelect Audio by sliding ZV and turning
cVd the COMAND controller and press
W to confirm.
The audio menu appears.XSelect Disc, Memory Card , MUSIC
REGISTER , Media Interface or USB and
press W to confirm.
This switches to the desired audio source.XSelect an audio medium from the media list
( Y page 228).
Example display: audio CD mode
:Disc type;Track number=Disc number?Disc name (only if stored on the disc)ATrack name (only if stored on the disc)BTrack time226AudioCOMAND
Page 237 of 536

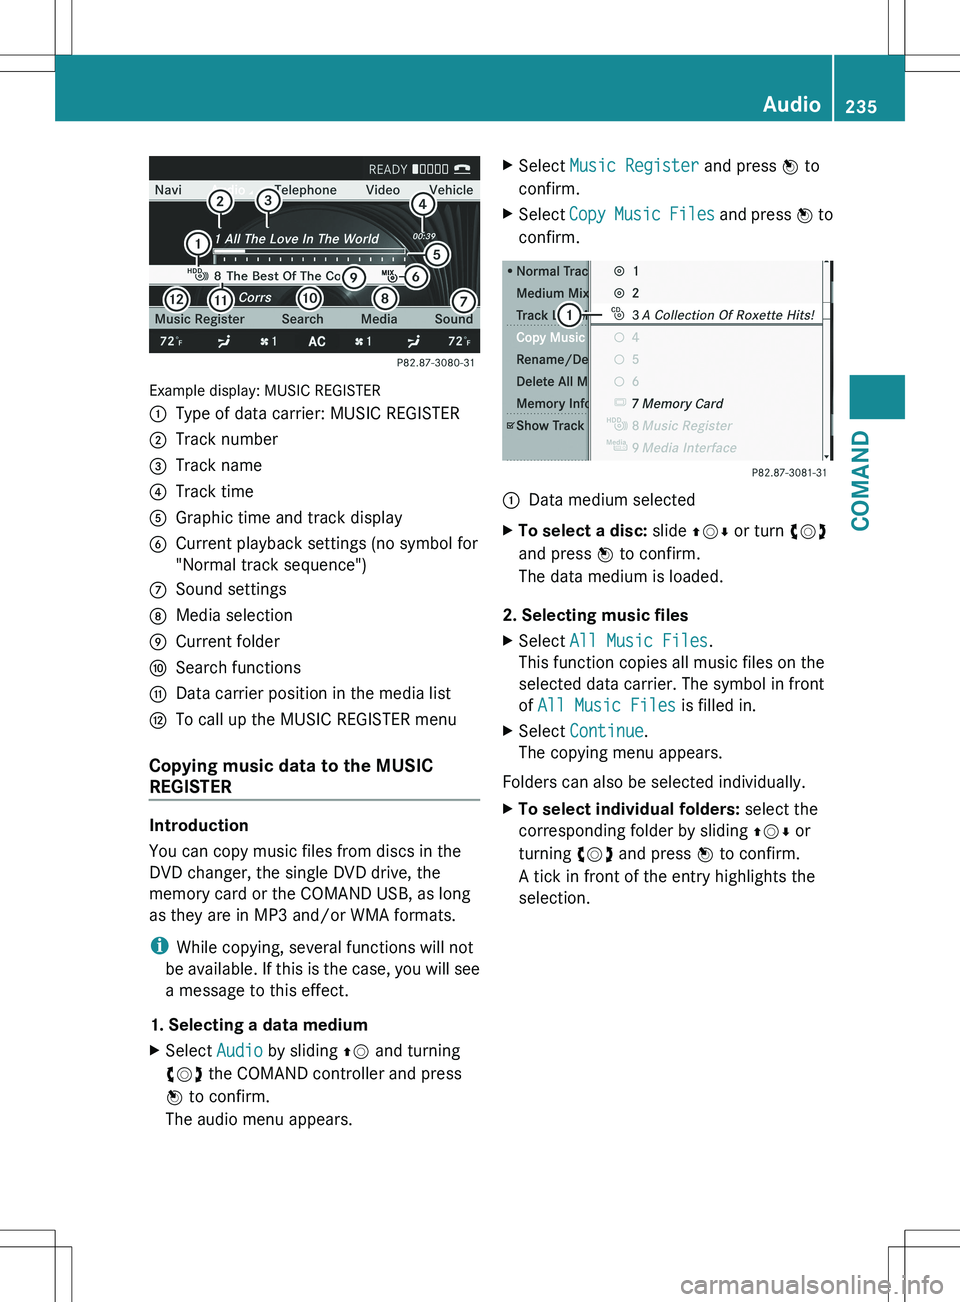
Example display: MUSIC REGISTER
:Type of data carrier: MUSIC REGISTER;Track number=Track name?Track timeAGraphic time and track displayBCurrent playback settings (no symbol for
"Normal track sequence")CSound settingsDMedia selectionECurrent folderFSearch functionsGData carrier position in the media listHTo call up the MUSIC REGISTER menu
Copying music data to the MUSIC
REGISTER
Introduction
You can copy music files from discs in the
DVD changer, the single DVD drive, the
memory card or the COMAND USB, as long
as they are in MP3 and/or WMA formats.
i While copying, several functions will not
be available. If this is the case, you will see
a message to this effect.
1. Selecting a data medium
XSelect Audio by sliding ZV and turning
cVd the COMAND controller and press
W to confirm.
The audio menu appears.XSelect Music Register and press W to
confirm.XSelect Copy Music Files and press W to
confirm.:Data medium selectedXTo select a disc: slide ZVÆ or turn cVd
and press W to confirm.
The data medium is loaded.
2. Selecting music files
XSelect All Music Files .
This function copies all music files on the
selected data carrier. The symbol in front
of All Music Files is filled in.XSelect Continue .
The copying menu appears.
Folders can also be selected individually.
XTo select individual folders: select the
corresponding folder by sliding ZVÆ or
turning cVd and press W to confirm.
A tick in front of the entry highlights the
selection.Audio235COMANDZ