2012 MERCEDES-BENZ S-CLASS SEDAN lights
[x] Cancel search: lightsPage 75 of 536
RADAPTIVE BRAKE
R PRE-SAFE ®
Brake
Important safety notes
GWARNING
The following factors increase the risk of
accidents:
R Excessive speed, especially in turns
R Wet and slippery road surfaces
R Following another vehicle too closely
The driving safety systems described in this
section cannot reduce these risks or prevent
the natural laws of physics from acting on the
vehicle. They cannot increase braking or
steering efficiency beyond that afforded by
the condition of the vehicle brakes and tires
or the traction afforded.
Only a safe, attentive, and skillful driver can
prevent accidents.
The capabilities of a vehicle equipped with the
driving safety systems described in this
section must never be exploited in a reckless
or dangerous manner which could jeopardize
the user's safety or the safety of others.
Always adjust your driving style to the
prevailing road and weather conditions and
keep a safe distance to other road users and
objects on the street.
If a driving system malfunctions, other driving
safety systems may also switch off. Observe
indicator and warning lamps that may come
on as well as messages in the multifunction
display that may appear.
GWARNING
HYBRID vehicles: It is imperative that you read
the HYBRID Supplemental Operating
Instructions included in your vehicle literature
portfolio. You may otherwise not receive all
necessary safety information and warning for
the operation of your vehicle.
i Please note that the driving safety
systems described only work as effectively
as possible when there is adequate contact
between the tires and the road surface. Pay
particular attention to the information
regarding tires, recommended minimum
tire tread depths etc. in the "Wheels and
tires" section ( Y page 492).
In wintry driving conditions, always use
winter tires (M+S tires) and if necessary,
snow chains. Only in this way will the
driving safety systems described in this
section work as effectively as possible.
ABS (Anti-lock Braking System)
Important safety notes
i Observe the "Important safety notes"
section ( Y page 73).
ABS regulates brake pressure in such a way
that the wheels do not lock when you brake.
This allows you to continue steering the
vehicle when braking.
ABS works from a speed of about 5 mph
( 8 km/h) upwards, regardless of road-surface
conditions. ABS works on slippery surfaces,
even if you only brake gently.
GWARNING
If the ABS malfunctions, other driving systems
such as the BAS or the ESP ®
are also switched
off. Observe indicator and warning lamps that
may come on as well as messages in the
multifunction display that may appear.
If the ABS malfunctions, the wheels may lock
during hard braking, reducing the steering
capability and extending the braking distance.
The ! warning lamp in the instrument
cluster lights up when the ignition is switched
on. It goes out when the engine is running.
Brakes
If ABS intervenes when braking, you will feel
a pulsing in the brake pedal.
Driving safety systems73SafetyZ
Page 79 of 536

Rtraction control is still activated.
R ESP ®
still provides support when you
brake.
If ESP ®
is deactivated and one or more wheels
start to spin, the ÷ ESP®
warning lamp in
the instrument cluster flashes. In such
situations, ESP ®
will not stabilize the vehicle.XTo deactivate: (Y page 386).
The å ESP®
OFF warning lamp in the
instrument cluster lights up.GWARNING
When the å ESP®
OFF warning lamp is lit,
ESP ®
is deactivated.
If the ÷ ESP®
warning lamp and the
å ESP®
OFF warning lamp remain lit,
ESP ®
is not available due to a malfunction.
When ESP ®
is deactivated or not operational,
vehicle stability in standard driving
maneuvers is reduced.
Adapt your speed and driving to the prevailing
road conditions and to the non-operating
status of the ESP ®
.
! Avoid spinning the driven wheels for an
extended period with ESP ®
deactivated.
You could otherwise damage the drivetrain.
XTo activate: (Y page 386).
The å ESP®
OFF warning lamp in the
instrument cluster goes out.
EBD (electronic brake force
distribution)
i Observe the "Important safety notes"
section ( Y page 73).
EBD monitors and controls the brake
pressure on the rear wheels to improve
driving stability while braking.
GWARNING
If EBD has malfunctioned, the braking system
remains available with full brake boosting
effect. However, the rear wheels can still lock,
e.g. under full braking. This could cause you
to lose control of your vehicle and cause an
accident. You should therefore adapt your
driving style to the different handling
characteristics.XObserve the notes on warning and indicator
lamps ( Y page 425) as well as display
messages ( Y page 394).
ADAPTIVE BRAKE
ADAPTIVE BRAKE enhances braking safety
and offers increased braking comfort. In
addition to the braking function, ADAPTIVE
BRAKE also has the HOLD function
( Y page 346) and hill start assist
( Y page 310). For further information, see
Driving tips ( Y page 331).
PRE-SAFE ®
Brake
PRE-SAFE ®
Brake is only available in vehicles
with DISTRONIC PLUS.
i Observe the "Important safety notes"
section ( Y page 73).
PRE-SAFE ®
Brake can help you to minimize
the risk of a frontal collision with a vehicle
ahead or reduce the effects of such a
collision. If PRE-SAFE ®
Brake has detected a
risk of collision, you will be warned visually
and acoustically as well as by automatic
braking. PRE-SAFE ®
Brake cannot prevent a
collision without your intervention.
At speeds above approximately
4 mph (7 km/h), this function warns you
when you are rapidly approaching the vehicle
in front. An intermittent warning tone will
then sound and the · distance warning
lamp in the instrument cluster will light up.
Driving safety systems77SafetyZ
Page 87 of 536
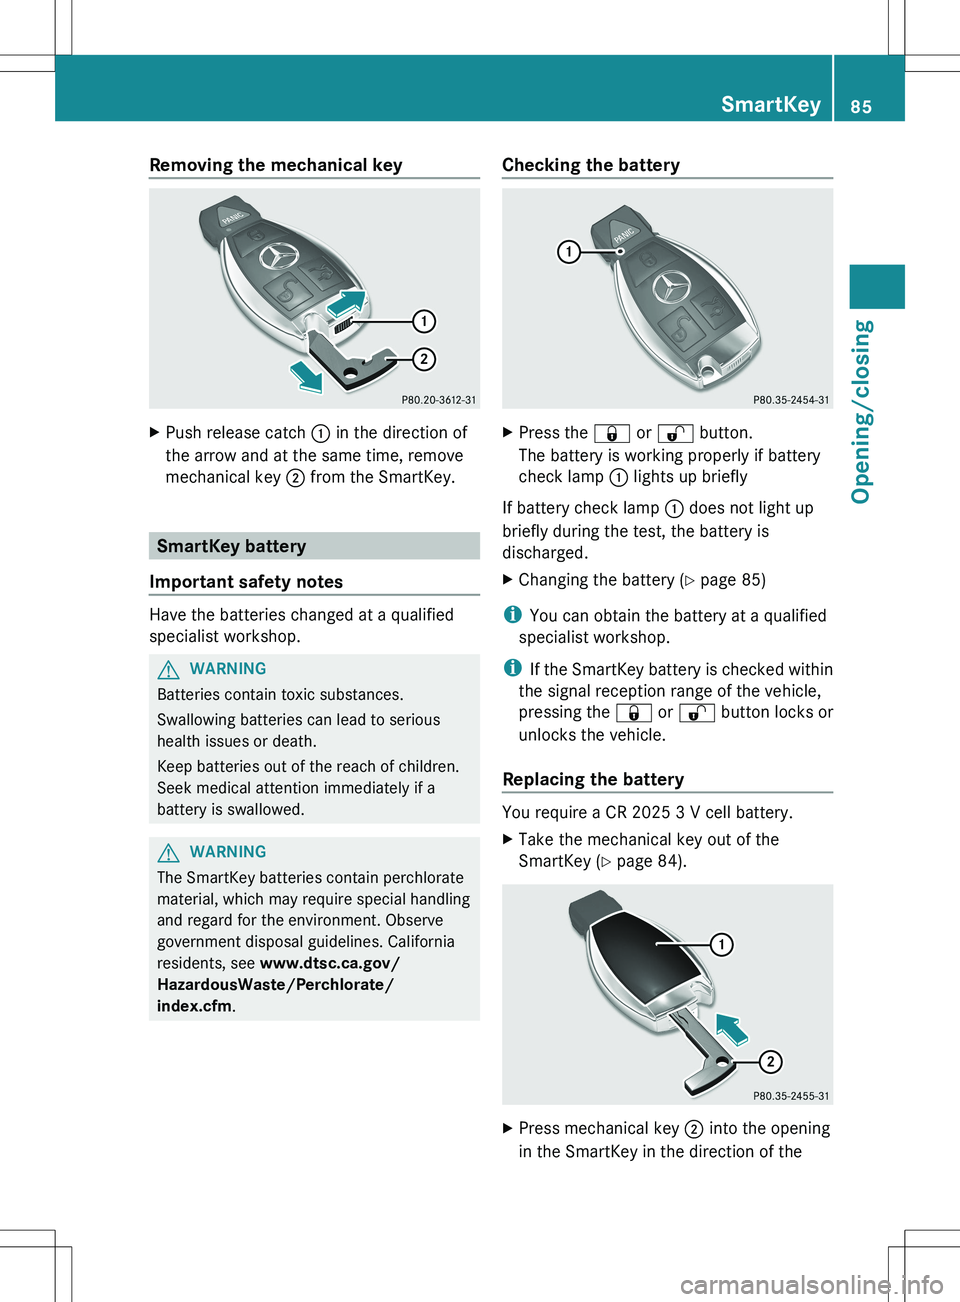
Removing the mechanical keyXPush release catch : in the direction of
the arrow and at the same time, remove
mechanical key ; from the SmartKey.
SmartKey battery
Important safety notes
Have the batteries changed at a qualified
specialist workshop.
GWARNING
Batteries contain toxic substances.
Swallowing batteries can lead to serious
health issues or death.
Keep batteries out of the reach of children.
Seek medical attention immediately if a
battery is swallowed.
GWARNING
The SmartKey batteries contain perchlorate
material, which may require special handling
and regard for the environment. Observe
government disposal guidelines. California
residents, see www.dtsc.ca.gov/
HazardousWaste/Perchlorate/
index.cfm .
Checking the batteryXPress the & or % button.
The battery is working properly if battery
check lamp : lights up briefly
If battery check lamp : does not light up
briefly during the test, the battery is
discharged.
XChanging the battery ( Y page 85)
i
You can obtain the battery at a qualified
specialist workshop.
i If the SmartKey battery is checked within
the signal reception range of the vehicle,
pressing the & or % button locks or
unlocks the vehicle.
Replacing the battery
You require a CR 2025 3 V cell battery.
XTake the mechanical key out of the
SmartKey ( Y page 84).XPress mechanical key ; into the opening
in the SmartKey in the direction of theSmartKey85Opening/closingZ
Page 112 of 536
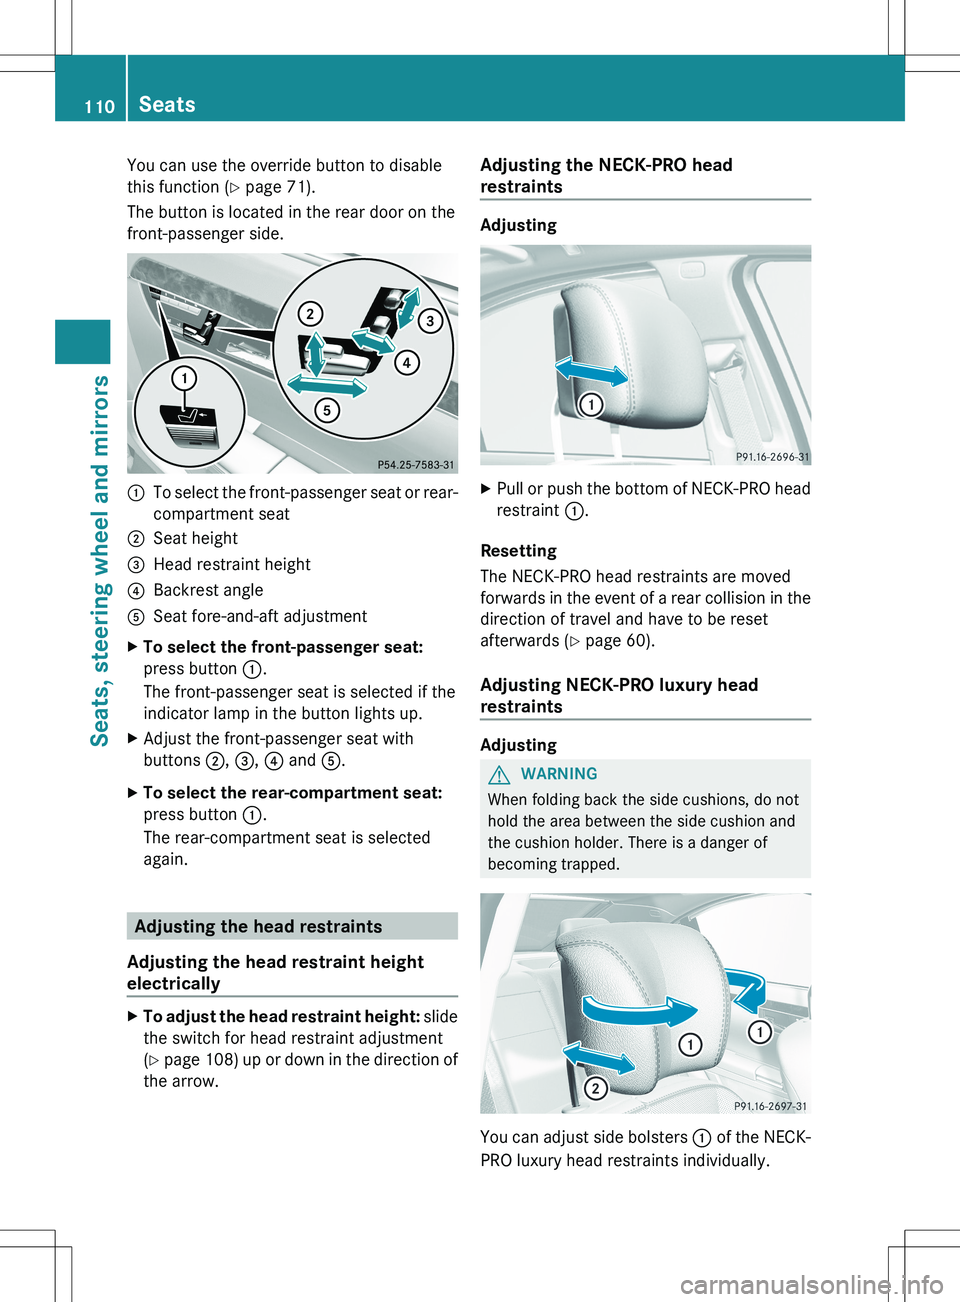
You can use the override button to disable
this function ( Y page 71).
The button is located in the rear door on the
front-passenger side.:To select the front-passenger seat or rear-
compartment seat;Seat height=Head restraint height?Backrest angleASeat fore-and-aft adjustmentXTo select the front-passenger seat:
press button :.
The front-passenger seat is selected if the
indicator lamp in the button lights up.XAdjust the front-passenger seat with
buttons ;, = , ? and A.XTo select the rear-compartment seat:
press button :.
The rear-compartment seat is selected
again.
Adjusting the head restraints
Adjusting the head restraint height
electrically
XTo adjust the head restraint height: slide
the switch for head restraint adjustment
( Y page 108) up or down in the direction of
the arrow.Adjusting the NECK-PRO head
restraints
Adjusting
XPull or push the bottom of NECK-PRO head
restraint :.
Resetting
The NECK-PRO head restraints are moved
forwards in the event of a rear collision in the
direction of travel and have to be reset
afterwards ( Y page 60).
Adjusting NECK-PRO luxury head
restraints
Adjusting
GWARNING
When folding back the side cushions, do not
hold the area between the side cushion and
the cushion holder. There is a danger of
becoming trapped.
You can adjust side bolsters : of the NECK-
PRO luxury head restraints individually.
110SeatsSeats, steering wheel and mirrors
Page 114 of 536
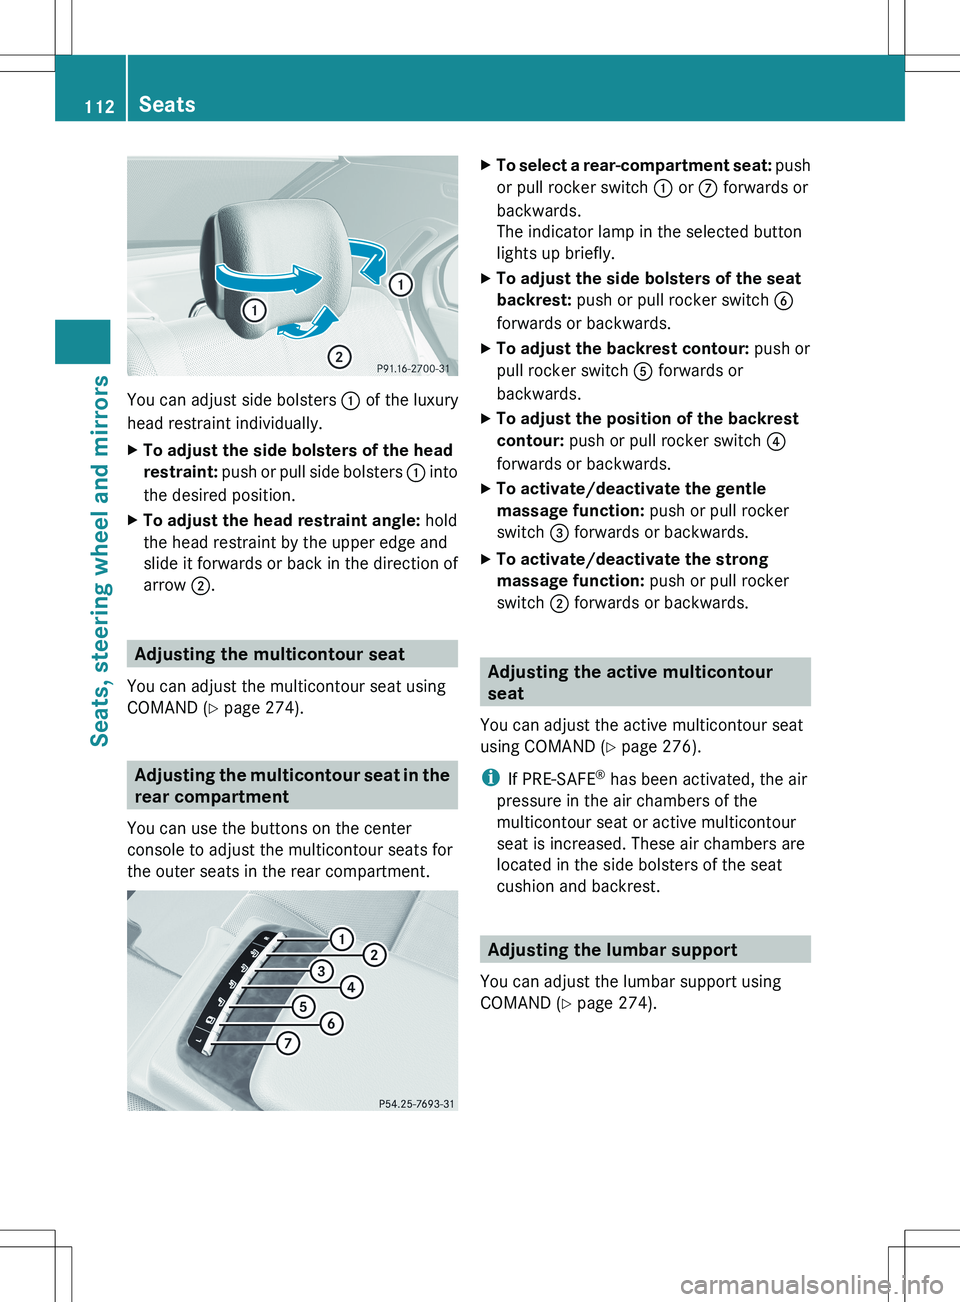
You can adjust side bolsters : of the luxury
head restraint individually.
XTo adjust the side bolsters of the head
restraint: push or pull side bolsters : into
the desired position.XTo adjust the head restraint angle: hold
the head restraint by the upper edge and
slide it forwards or back in the direction of
arrow ;.
Adjusting the multicontour seat
You can adjust the multicontour seat using
COMAND ( Y page 274).
Adjusting the multicontour seat in the
rear compartment
You can use the buttons on the center
console to adjust the multicontour seats for
the outer seats in the rear compartment.
XTo select a rear-compartment seat: push
or pull rocker switch : or C forwards or
backwards.
The indicator lamp in the selected button
lights up briefly.XTo adjust the side bolsters of the seat
backrest: push or pull rocker switch B
forwards or backwards.XTo adjust the backrest contour: push or
pull rocker switch A forwards or
backwards.XTo adjust the position of the backrest
contour: push or pull rocker switch ?
forwards or backwards.XTo activate/deactivate the gentle
massage function: push or pull rocker
switch = forwards or backwards.XTo activate/deactivate the strong
massage function: push or pull rocker
switch ; forwards or backwards.
Adjusting the active multicontour
seat
You can adjust the active multicontour seat
using COMAND ( Y page 276).
i If PRE-SAFE ®
has been activated, the air
pressure in the air chambers of the
multicontour seat or active multicontour
seat is increased. These air chambers are
located in the side bolsters of the seat
cushion and backrest.
Adjusting the lumbar support
You can adjust the lumbar support using
COMAND ( Y page 274).
112SeatsSeats, steering wheel and mirrors
Page 116 of 536
Problems with the seat ventilation
The seat ventilation has switched off
prematurely. The vehicle's electrical system
voltage is too low because too many electrical
consumers are switched on.
XSwitch off electrical consumers which you
do not need, such as the rear window
defroster or interior lighting.
Steering wheel
Important safety notes
GWARNING
Do not adjust the steering wheel while driving.
Adjusting the steering wheel while driving
could cause the driver to lose control of the
vehicle.
The electrical steering wheel adjustment
feature can be operated at any time.
Therefore, do not leave children unattended
in the vehicle, or with access to an unlocked
vehicle. A child's unsupervised access to a
vehicle could result in an accident and/or
serious personal injury.
Adjusting the steering wheel
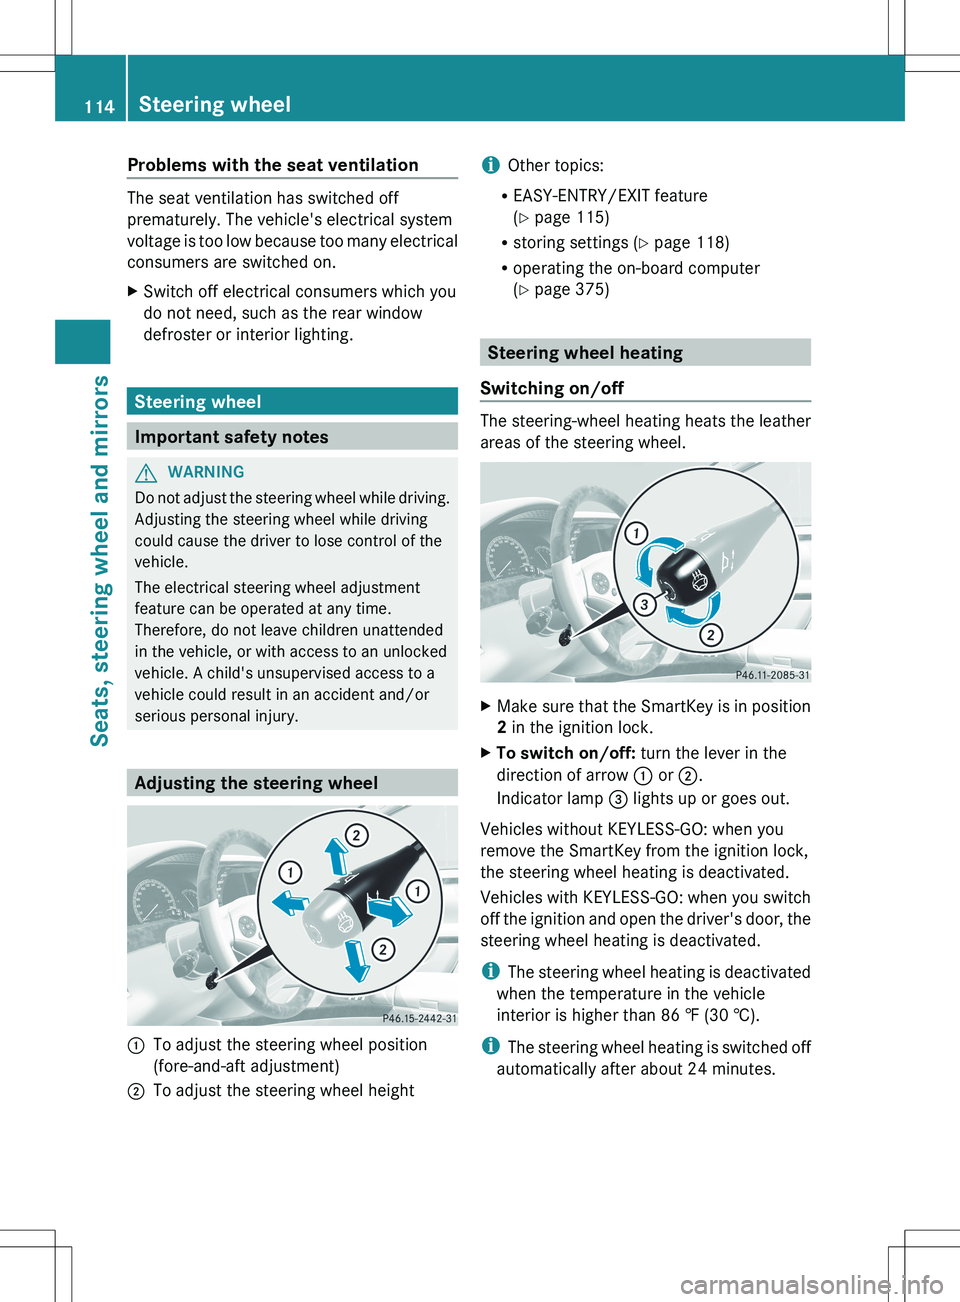
:To adjust the steering wheel position
(fore-and-aft adjustment);To adjust the steering wheel heighti Other topics:
R EASY-ENTRY/EXIT feature
( Y page 115)
R storing settings ( Y page 118)
R operating the on-board computer
( Y page 375)
Steering wheel heating
Switching on/off
The steering-wheel heating heats the leather
areas of the steering wheel.
XMake sure that the SmartKey is in position
2 in the ignition lock.XTo switch on/off: turn the lever in the
direction of arrow : or ;.
Indicator lamp = lights up or goes out.
Vehicles without KEYLESS-GO: when you
remove the SmartKey from the ignition lock,
the steering wheel heating is deactivated.
Vehicles with KEYLESS-GO: when you switch
off the ignition and open the driver's door, the
steering wheel heating is deactivated.
i The steering wheel heating is deactivated
when the temperature in the vehicle
interior is higher than 86 ‡ (30 †).
i The steering wheel heating is switched off
automatically after about 24 minutes.
114Steering wheelSeats, steering wheel and mirrors
Page 118 of 536
Mirrors
Exterior mirrors
Adjusting the exterior mirrors
GWARNING
Exercise care when using the passenger-side
exterior rear view mirror. The mirror surface
is convex (outwardly curved surface for a
wider field of view). Objects in mirror are
closer than they appear. Check your interior
rear view mirror and glance over your
shoulder before changing lanes.
The exterior mirrors are automatically heated
if the rear window defroster is switched on
and the outside temperature is low.
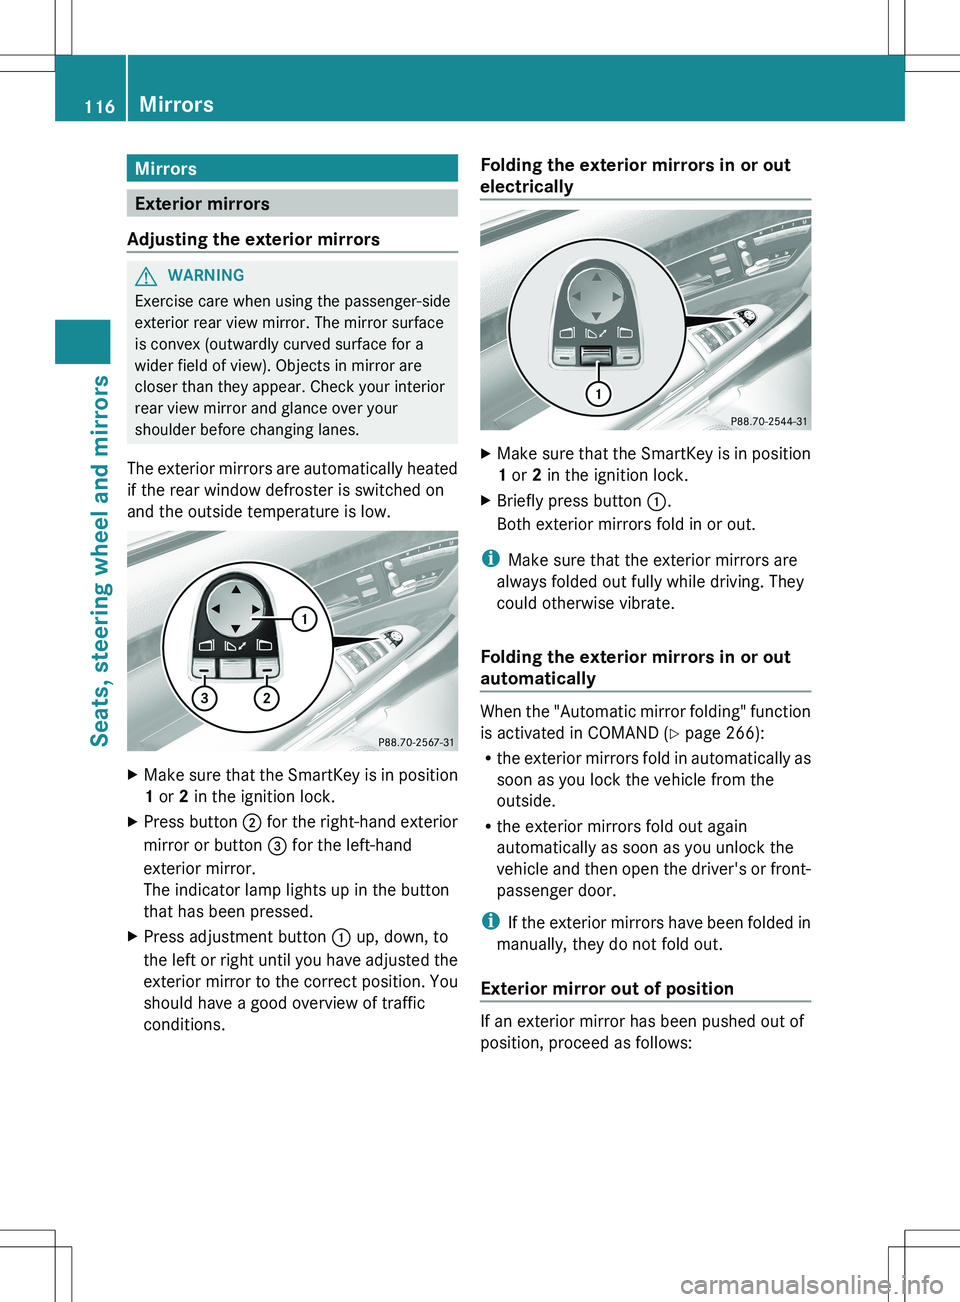
XMake sure that the SmartKey is in position
1 or 2 in the ignition lock.XPress button ; for the right-hand exterior
mirror or button = for the left-hand
exterior mirror.
The indicator lamp lights up in the button
that has been pressed.XPress adjustment button : up, down, to
the left or right until you have adjusted the
exterior mirror to the correct position. You
should have a good overview of traffic
conditions.Folding the exterior mirrors in or out
electricallyXMake sure that the SmartKey is in position
1 or 2 in the ignition lock.XBriefly press button :.
Both exterior mirrors fold in or out.
i Make sure that the exterior mirrors are
always folded out fully while driving. They
could otherwise vibrate.
Folding the exterior mirrors in or out
automatically
When the "Automatic mirror folding" function
is activated in COMAND ( Y page 266):
R the exterior mirrors fold in automatically as
soon as you lock the vehicle from the
outside.
R the exterior mirrors fold out again
automatically as soon as you unlock the
vehicle and then open the driver's or front-
passenger door.
i If the exterior mirrors have been folded in
manually, they do not fold out.
Exterior mirror out of position
If an exterior mirror has been pushed out of
position, proceed as follows:
116MirrorsSeats, steering wheel and mirrors
Page 156 of 536
change accordingly. If the selected language
is not supported by the Voice Control System,
"English" will be selected.XSelect Vehicle by turning cVd the
COMAND controller and press W to
confirm.XSelect System and press W to confirm.XSelect Language and press W to confirm.
The list of languages appears. The # dot
indicates the current setting.XSelect the language by turning cVd the
COMAND controller and press W to
confirm.
COMAND loads the selected language and
sets it.
Reset function
You can reset COMAND to the factory
settings. Amongst other things, this will
delete all personal data (e.g. station presets,
address book entries, entries in the
destination memory and in the list of previous
destinations in the navigation system).
Resetting is recommended before selling or
transferring ownership of your vehicle, for
example.
XSelect Vehicle in the main function bar by
turning cVd the COMAND controller and
press W to confirm.XSelect System by turning cVd the
COMAND controller and press W to
confirm.XSelect Reset and press W to confirm.
A prompt appears asking whether you wish
to reset.XSelect Yes or No and press W to confirm.
If you select No, the process will be aborted.
If you select Yes, another prompt appears
asking whether you really wish to reset.XSelect Yes or No and press W to confirm.
If you select Yes, a message will be shown.
COMAND is reset and restarted.If you select No, the process will be aborted.
Navigation
Introduction
Safety notes
GWARNING
For safety reasons, only enter a destination
when the vehicle is stationary. When the
vehicle is in motion, a passenger should enter
the destination. Study manual and select
route before driving.
Bear in mind that at a speed of just 30 mph
(approximately 50 km/h), your vehicle is
covering a distance of 44 feet (approximately
14 m) every second.
COMAND calculates the route to the
destination without taking account of the
following:
R Traffic lights
R Stop and right-of-way-signs
R Lane merging
R Parking or stopping prohibited areas
R Other road and traffic rules and regulations
R Narrow bridges
GWARNING
COMAND may give incorrect navigation
commands if the data in the digital map does
not correspond with the actual road/traffic
situation. Digital maps do not cover all areas
nor all routes within an area. For example, if
the traffic routing has been changed or the
direction of a one-way road has been
reversed.
For this reason, you must always observe
applicable road and traffic rules and
regulations during your journey. Road and
traffic rules and regulations always have
priority over the navigation commands
generated by the system.
154NavigationCOMAND