2012 MERCEDES-BENZ S-CLASS SEDAN height
[x] Cancel search: heightPage 94 of 536

gases may enter the vehicle interior resulting
in unconsciousness and death.
! The trunk lid swings upwards when
opened. Therefore, make sure that there is
sufficient clearance above the trunk lid.
You can limit the opening angle of the trunk
lid. This could be useful, for example, if there
is insufficient space above the trunk lid. You
can switch the Trunk Opening-height
Restriction function on or off via COMAND
( Y page 269).
To open the trunk lid completely, a minimum
clearance of 5.90 ft (1.80 m) above the
ground is necessary.
Vehicles without trunk lid remote closing
feature: the trunk lid can be:
R opened and closed manually from outside
R opened automatically from outside
R opened automatically from inside
R locked separately
R unlocked with the mechanical key
R opened with the emergency release button
Vehicles with trunk lid remote closing
feature: the trunk lid can be:
R opened and closed manually from outside
R opened and closed automatically from
outside
R opened and closed automatically from
inside
R locked separately
R unlocked with the mechanical key
R opened with the emergency release button
Opening and closing manually
Opening
XPress the % button on the SmartKey.XPull handle :.XRaise the trunk lid.
Closing
GWARNING
To prevent possible personal injury, always
keep hands and fingers away from the trunk
opening when closing the trunk lid. Be
especially careful when small children are
around.
XPull the trunk lid down using recess :.XIf necessary, lock the vehicle with
the & button on the SmartKey
( Y page 82) or with KEYLESS-GO
( Y page 83).
i
If a KEYLESS-GO key is detected in the
trunk, the trunk lid cannot be locked and
then opens again.
92TrunkOpening/closing
Page 110 of 536
Do not drive the vehicle without the seat head
restraints. Head restraints are intended to
help reduce injuries during an accident.
! To avoid damage to the seats and the seat
heating, observe the following information:
R keep liquids from spilling on the seats. If
liquid is spilled on the seats, dry them as
soon as possible.
R if the seat covers are damp or wet, do not
switch on the seat heating. The seat
heating should also not be used to dry
the seats.
R clean the seat covers as recommended;
see the "Interior care" section.
R do not transport heavy loads on the
seats. Do not place sharp objects on the
seat cushions, e.g. knives, nails or tools.
The seats should only be occupied by
passengers, if possible.
R when the seat heating is in operation, do
not cover the seats with insulating
materials, e.g. blankets, coats, bags,
seat covers, child seats or booster seats.
! Make sure that there are no objects in the
footwell or behind the seats when resetting
the seats. There is a risk that the seats
and/or the objects could be damaged.
i The head restraints in the front seats are
equipped with the NECK-PRO system. For
this reason, it is not possible to remove the
head restraints from the front seats.
For design reasons, the rear-compartment
head restraints cannot be removed.
For more information, contact a qualified
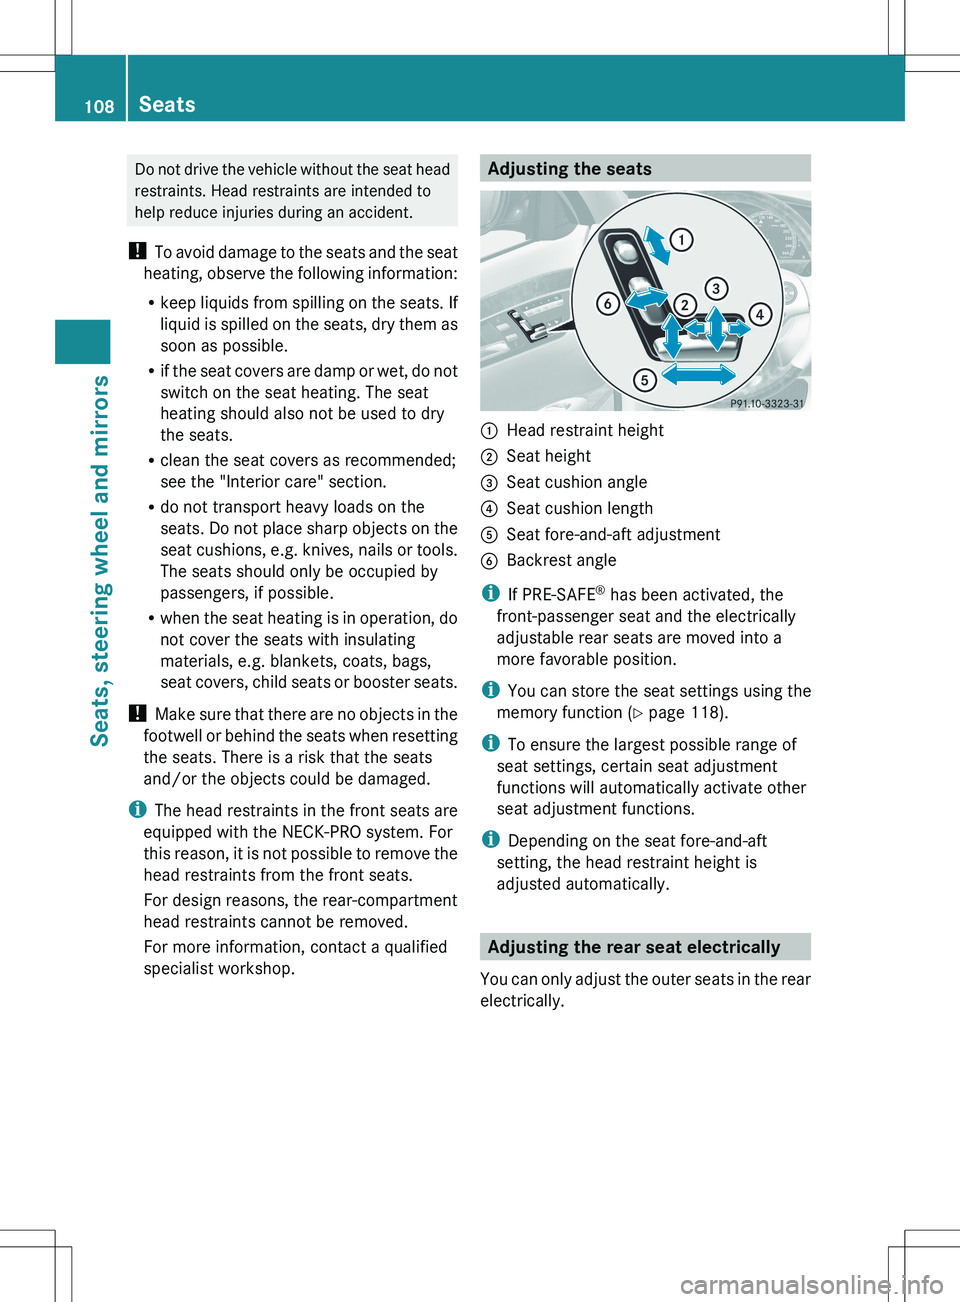
specialist workshop.Adjusting the seats:Head restraint height;Seat height=Seat cushion angle?Seat cushion lengthASeat fore-and-aft adjustmentBBackrest angle
i If PRE-SAFE ®
has been activated, the
front-passenger seat and the electrically
adjustable rear seats are moved into a
more favorable position.
i You can store the seat settings using the
memory function ( Y page 118).
i To ensure the largest possible range of
seat settings, certain seat adjustment
functions will automatically activate other
seat adjustment functions.
i Depending on the seat fore-and-aft
setting, the head restraint height is
adjusted automatically.
Adjusting the rear seat electrically
You can only adjust the outer seats in the rear
electrically.
108SeatsSeats, steering wheel and mirrors
Page 112 of 536
You can use the override button to disable
this function ( Y page 71).
The button is located in the rear door on the
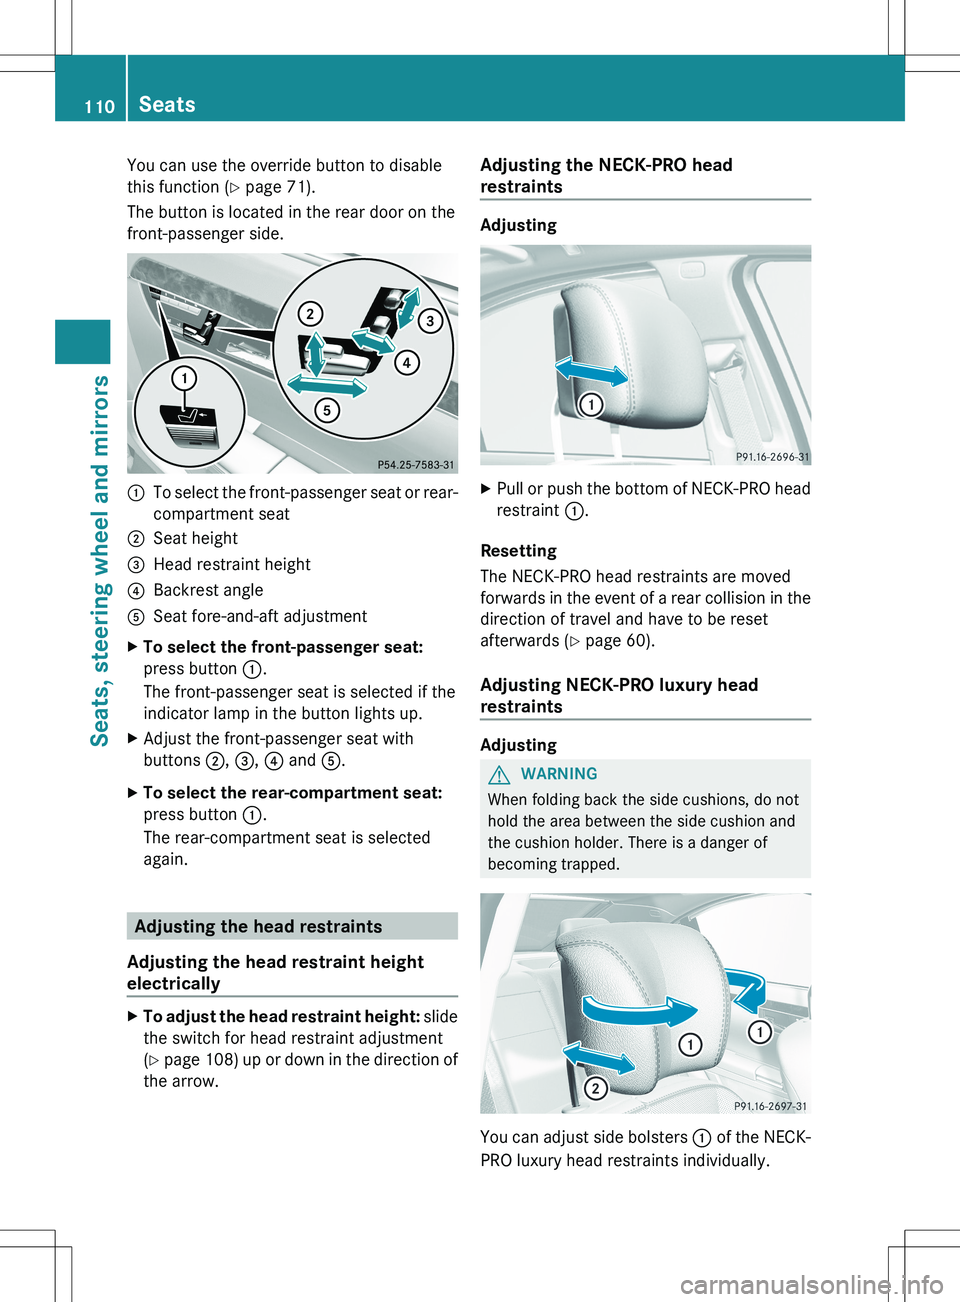
front-passenger side.:To select the front-passenger seat or rear-
compartment seat;Seat height=Head restraint height?Backrest angleASeat fore-and-aft adjustmentXTo select the front-passenger seat:
press button :.
The front-passenger seat is selected if the
indicator lamp in the button lights up.XAdjust the front-passenger seat with
buttons ;, = , ? and A.XTo select the rear-compartment seat:
press button :.
The rear-compartment seat is selected
again.
Adjusting the head restraints
Adjusting the head restraint height
electrically
XTo adjust the head restraint height: slide
the switch for head restraint adjustment
( Y page 108) up or down in the direction of
the arrow.Adjusting the NECK-PRO head
restraints
Adjusting
XPull or push the bottom of NECK-PRO head
restraint :.
Resetting
The NECK-PRO head restraints are moved
forwards in the event of a rear collision in the
direction of travel and have to be reset
afterwards ( Y page 60).
Adjusting NECK-PRO luxury head
restraints
Adjusting
GWARNING
When folding back the side cushions, do not
hold the area between the side cushion and
the cushion holder. There is a danger of
becoming trapped.
You can adjust side bolsters : of the NECK-
PRO luxury head restraints individually.
110SeatsSeats, steering wheel and mirrors
Page 116 of 536
Problems with the seat ventilation
The seat ventilation has switched off
prematurely. The vehicle's electrical system
voltage is too low because too many electrical
consumers are switched on.
XSwitch off electrical consumers which you
do not need, such as the rear window
defroster or interior lighting.
Steering wheel
Important safety notes
GWARNING
Do not adjust the steering wheel while driving.
Adjusting the steering wheel while driving
could cause the driver to lose control of the
vehicle.
The electrical steering wheel adjustment
feature can be operated at any time.
Therefore, do not leave children unattended
in the vehicle, or with access to an unlocked
vehicle. A child's unsupervised access to a
vehicle could result in an accident and/or
serious personal injury.
Adjusting the steering wheel
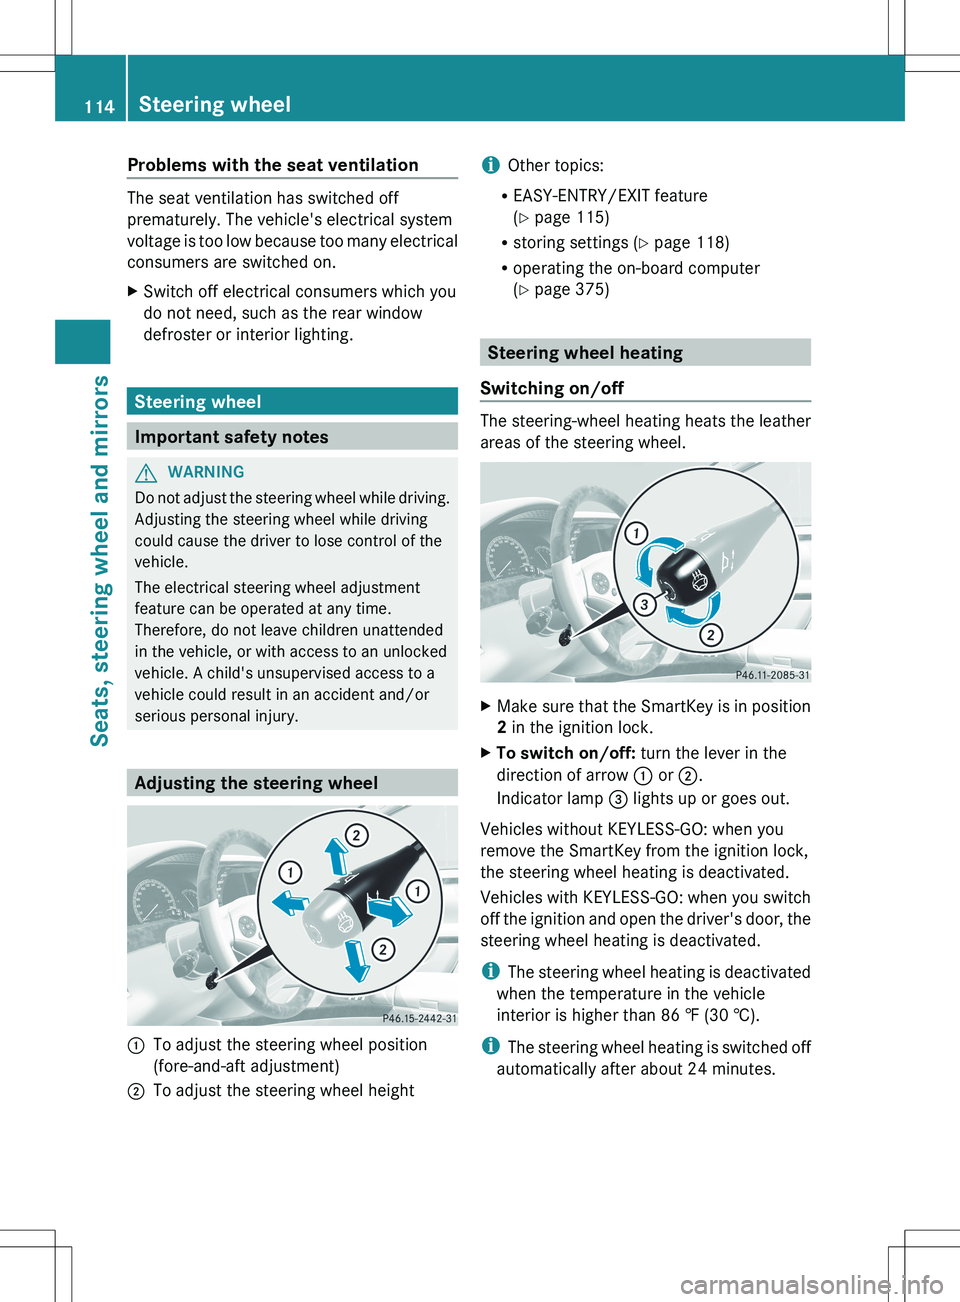
:To adjust the steering wheel position
(fore-and-aft adjustment);To adjust the steering wheel heighti Other topics:
R EASY-ENTRY/EXIT feature
( Y page 115)
R storing settings ( Y page 118)
R operating the on-board computer
( Y page 375)
Steering wheel heating
Switching on/off
The steering-wheel heating heats the leather
areas of the steering wheel.
XMake sure that the SmartKey is in position
2 in the ignition lock.XTo switch on/off: turn the lever in the
direction of arrow : or ;.
Indicator lamp = lights up or goes out.
Vehicles without KEYLESS-GO: when you
remove the SmartKey from the ignition lock,
the steering wheel heating is deactivated.
Vehicles with KEYLESS-GO: when you switch
off the ignition and open the driver's door, the
steering wheel heating is deactivated.
i The steering wheel heating is deactivated
when the temperature in the vehicle
interior is higher than 86 ‡ (30 †).
i The steering wheel heating is switched off
automatically after about 24 minutes.
114Steering wheelSeats, steering wheel and mirrors
Page 128 of 536
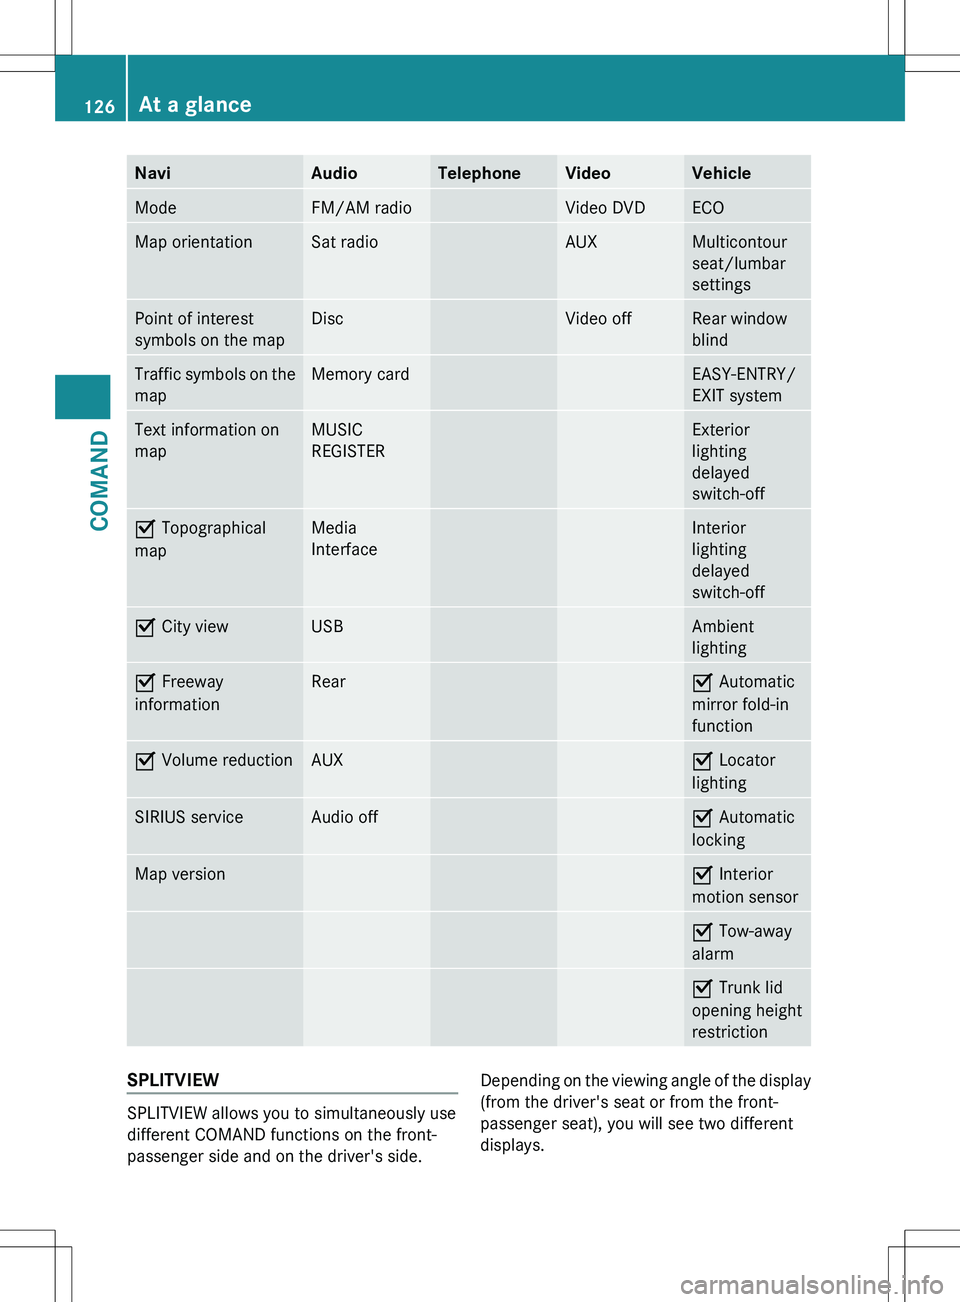
NaviAudioTelephoneVideoVehicleModeFM/AM radioVideo DVDECOMap orientationSat radioAUXMulticontour
seat/lumbar
settingsPoint of interest
symbols on the mapDiscVideo offRear window
blindTraffic symbols on the
mapMemory cardEASY-ENTRY/
EXIT systemText information on
mapMUSIC
REGISTERExterior
lighting
delayed
switch-offO Topographical
mapMedia
InterfaceInterior
lighting
delayed
switch-offO City viewUSBAmbient
lightingO Freeway
informationRearO Automatic
mirror fold-in
functionO Volume reductionAUXO Locator
lightingSIRIUS serviceAudio offO Automatic
lockingMap versionO Interior
motion sensorO Tow-away
alarmO Trunk lid
opening height
restrictionSPLITVIEW
SPLITVIEW allows you to simultaneously use
different COMAND functions on the front-
passenger side and on the driver's side.
Depending on the viewing angle of the display
(from the driver's seat or from the front-
passenger seat), you will see two different
displays.126At a glanceCOMAND
Page 192 of 536

Geo-coordinate display
Geo-coordinate display active
:Current height above average sea level,
rounded;Current vehicle position: latitude
coordinates=Current vehicle position: longitude
coordinates?Number of GPS satellites currently being
used
There must be sufficient GPS reception for all
displays to be shown. If this is not the case,
the display will be grayed out. Height
display : may vary from the actual value,
because the navigation system uses the GPS
signals for the calculation.
While scrolling the map (Y page 187), you will
see the geo-coordinates of the crosshair
position. Height display : and number of
satellites used ? are not displayed.
"None" menu option
Display switched off
:Current map orientation
i During the "Move map" function you can
see additional information depending on
the position of the crosshair, such as a road
name, if the digital map supports this data.
Switching the topographical map on/
off
The topographical map uses different colors
to depict elevation. The color key generally
reflects the topography's dominant
vegetation or the ground's perceived color
when seen from the air, for example:
R green for lowland
R yellow or brown for hills
R gray or white for mountains
XTo show the menu: press W the COMAND
controller.XSelect Navi in the main function bar by
sliding ZV and turning cVd the COMAND
controller and press W to confirm.XSelect Topographical Map and confirm
with W.
Depending on the previous state, switch
the option on O or off ª.
Switching the city model on/off
When the city model is switched on, the map
shows buildings as 3D models.
i The city model is only shown in the "3D
map" map orientation.
It is available for map scales 50 m and
100 m.
The data required for displaying buildings
is not available for all cities.
XTo show the menu: press W the COMAND
controller.XSelect Navi in the main function bar by
sliding ZV and turning cVd the COMAND
controller and press W to confirm.XSelect City (3D) and press W to confirm.
Depending on the previous state, switch
the option on O or off ª.190NavigationCOMAND
Page 194 of 536
XSelect Navi in the main function bar by
sliding ZV and turning cVd the COMAND
controller and press W to confirm.XSelect Highway information and press
W to confirm.
Depending on the previous state, switch
the option on O or off ª.
SIRIUS XM service
Displaying SIRIUS XM service information
You can display the SIRIUS XM service
information.
XTo show the menu: press W the COMAND
controller.XSelect Navi in the main function bar by
sliding ZV and turning cVd the COMAND
controller and press W to confirm.XSelect SIRIUS Service and press W to
confirm.
Registering for the SIRIUS XM traffic
report service
XCall the traffic report provider's phone
number shown on the screen.
i You can also have the satellite service
activated online. To do so, visit the SIRIUS
XM Radio website at
http://www.sirius.com (USA) or
http://www.siriuscanada.com
(Canada).
Once the connection has been established:
XFollow the instructions of the operator.
The activation process may take up to ten
minutes.
If registration is not included when
purchasing the system, your credit card
details will be required to activate your
account.
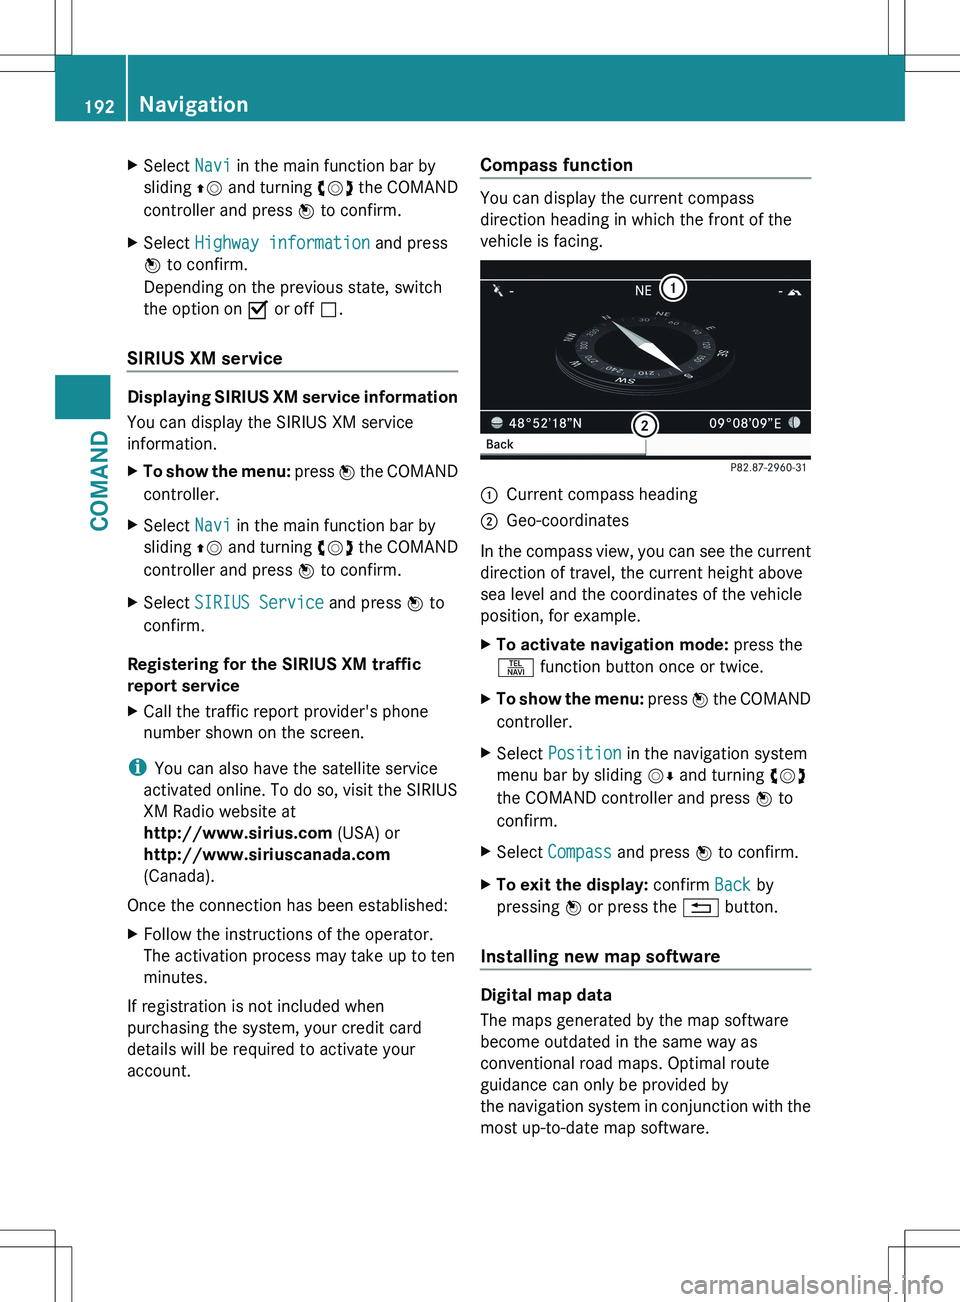
Compass function
You can display the current compass
direction heading in which the front of the
vehicle is facing.
:Current compass heading;Geo-coordinates
In the compass view, you can see the current
direction of travel, the current height above
sea level and the coordinates of the vehicle
position, for example.
XTo activate navigation mode: press the
S function button once or twice.XTo show the menu: press W the COMAND
controller.XSelect Position in the navigation system
menu bar by sliding VÆ and turning cVd
the COMAND controller and press W to
confirm.XSelect Compass and press W to confirm.XTo exit the display: confirm Back by
pressing W or press the % button.
Installing new map software
Digital map data
The maps generated by the map software
become outdated in the same way as
conventional road maps. Optimal route
guidance can only be provided by
the navigation system in conjunction with the
most up-to-date map software.
192NavigationCOMAND
Page 267 of 536
Vehicle
Vehicle functions
General information
In this menu, you can set the following vehicle
functions:
R ECO
R multicontour seat settings
R rear window blind
R EASY-ENTRY/EXIT feature
R exterior lighting delayed switch-off
R interior lighting delayed switch-off
R ambient lighting
R automatic folding mirror function
R locator lighting
R automatic locking feature
R trunk lid opening height restriction
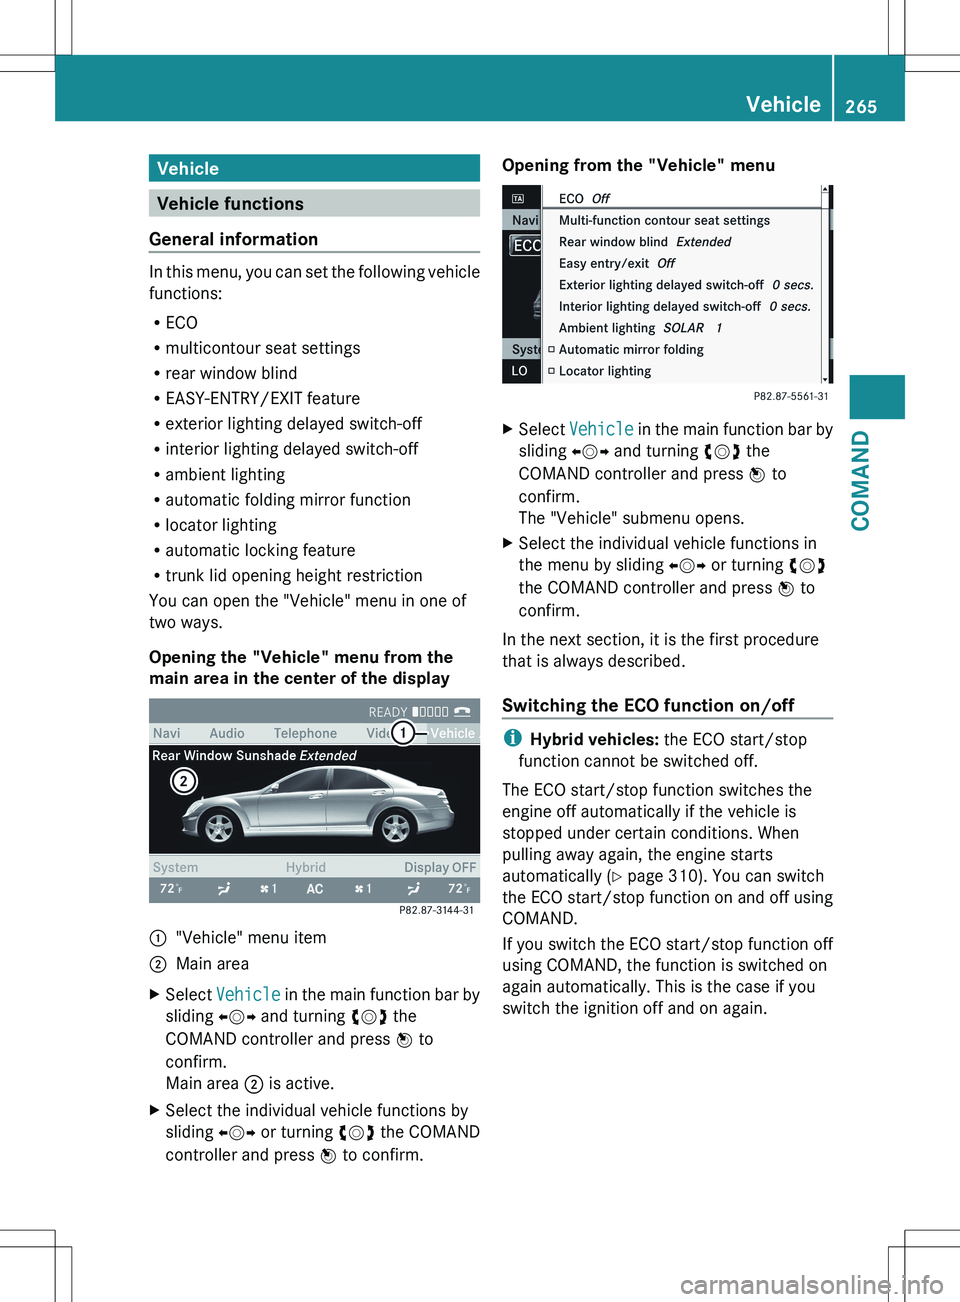
You can open the "Vehicle" menu in one of
two ways.
Opening the "Vehicle" menu from the
main area in the center of the display
:"Vehicle" menu item;Main areaXSelect Vehicle in the main function bar by
sliding XVY and turning cVd the
COMAND controller and press W to
confirm.
Main area ; is active.XSelect the individual vehicle functions by
sliding XVY or turning cVd the COMAND
controller and press W to confirm.Opening from the "Vehicle" menuXSelect Vehicle in the main function bar by
sliding XVY and turning cVd the
COMAND controller and press W to
confirm.
The "Vehicle" submenu opens.XSelect the individual vehicle functions in
the menu by sliding XVY or turning cVd
the COMAND controller and press W to
confirm.
In the next section, it is the first procedure
that is always described.
Switching the ECO function on/off
i Hybrid vehicles: the ECO start/stop
function cannot be switched off.
The ECO start/stop function switches the
engine off automatically if the vehicle is
stopped under certain conditions. When
pulling away again, the engine starts
automatically ( Y page 310). You can switch
the ECO start/stop function on and off using
COMAND.
If you switch the ECO start/stop function off
using COMAND, the function is switched on
again automatically. This is the case if you
switch the ignition off and on again.
Vehicle265COMANDZ