2012 MERCEDES-BENZ S-CLASS SEDAN engine oil
[x] Cancel search: engine oilPage 384 of 536
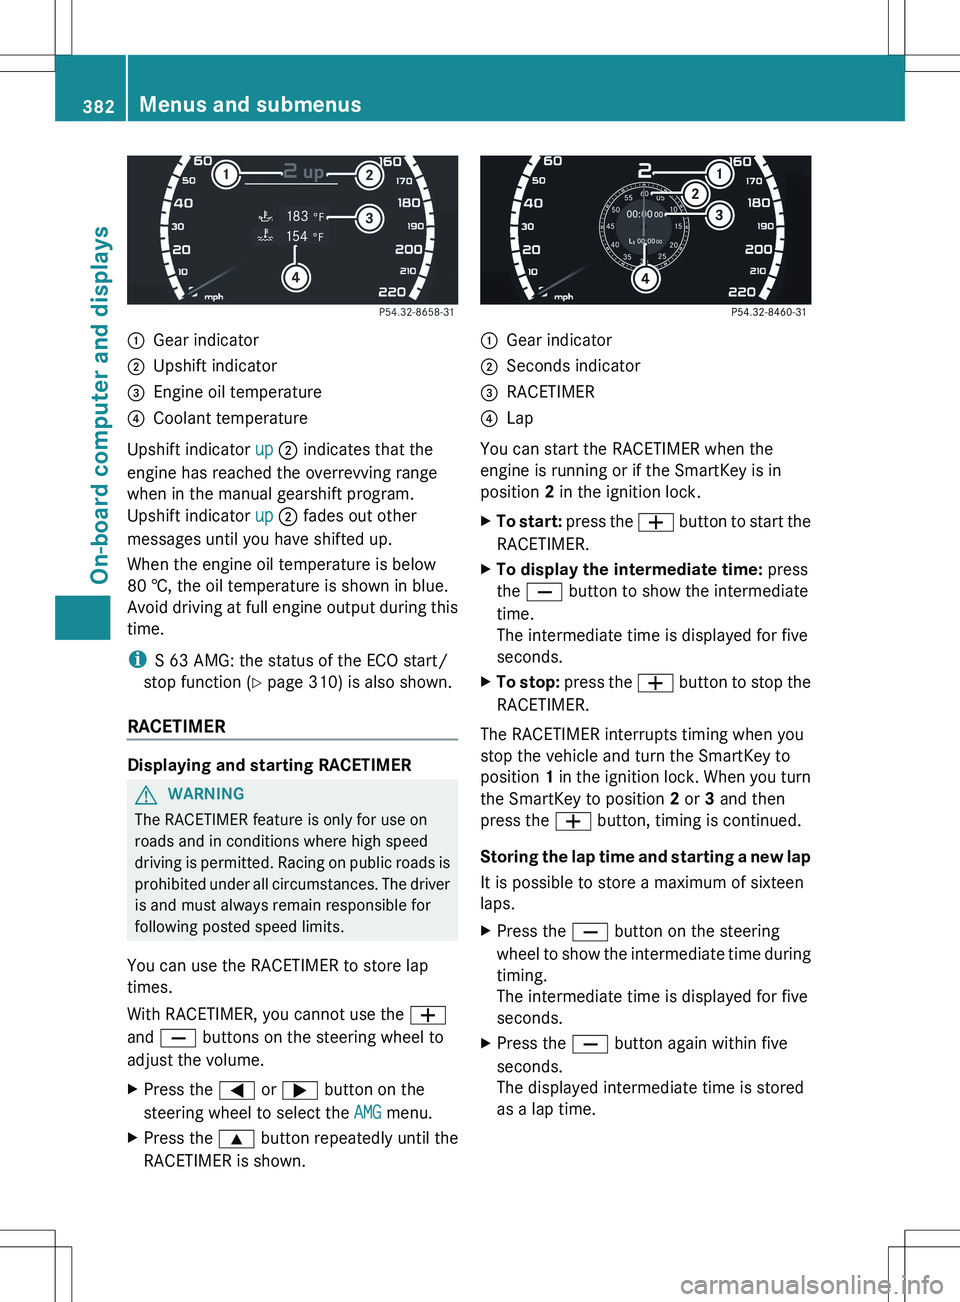
:Gear indicator;Upshift indicator=Engine oil temperature?Coolant temperature
Upshift indicator up ; indicates that the
engine has reached the overrevving range
when in the manual gearshift program.
Upshift indicator up ; fades out other
messages until you have shifted up.
When the engine oil temperature is below
80 †, the oil temperature is shown in blue.
Avoid driving at full engine output during this
time.
i S 63 AMG: the status of the ECO start/
stop function ( Y page 310) is also shown.
RACETIMER
Displaying and starting RACETIMER
GWARNING
The RACETIMER feature is only for use on
roads and in conditions where high speed
driving is permitted. Racing on public roads is
prohibited under all circumstances. The driver
is and must always remain responsible for
following posted speed limits.
You can use the RACETIMER to store lap
times.
With RACETIMER, you cannot use the W
and X buttons on the steering wheel to
adjust the volume.
XPress the = or ; button on the
steering wheel to select the AMG menu.XPress the 9 button repeatedly until the
RACETIMER is shown.:Gear indicator;Seconds indicator=RACETIMER?Lap
You can start the RACETIMER when the
engine is running or if the SmartKey is in
position 2 in the ignition lock.
XTo start: press the W button to start the
RACETIMER.XTo display the intermediate time: press
the X button to show the intermediate
time.
The intermediate time is displayed for five
seconds.XTo stop: press the W button to stop the
RACETIMER.
The RACETIMER interrupts timing when you
stop the vehicle and turn the SmartKey to
position 1 in the ignition lock. When you turn
the SmartKey to position 2 or 3 and then
press the W button, timing is continued.
Storing the lap time and starting a new lap
It is possible to store a maximum of sixteen
laps.
XPress the X button on the steering
wheel to show the intermediate time during
timing.
The intermediate time is displayed for five
seconds.XPress the X button again within five
seconds.
The displayed intermediate time is stored
as a lap time.382Menus and submenusOn-board computer and displays
Page 389 of 536
activating/deactivating Blind Spot
Assist
You can use the Blind Spot Assist
function to activate or deactivate Blind Spot
Assist ( Y page 363) or Active Blind Spot
Assist ( Y page 367).
XPress the = or ; button on the
steering wheel to select the DriveAssist
menu.XPress 9 or : to select Blind Spot
Assist .XPress the a button.
The current selection is displayed.XTo activate/deactivate: press the a
button again.
activating/deactivating Lane Keeping
Assist
You can use the Lane Keeping Assist
function to activate/deactivate Lane Keeping
Assist ( Y page 365) or Active Lane Keeping
Assist ( Y page 369).
XPress the = or ; button on the
steering wheel to select the DriveAssist
menu.XPress 9 or : to select Lane
Keeping Assist .XPress the a button.
The current selection is displayed.XTo activate/deactivate: press the a
button again.
When Lane Keeping Assist or Active Lane
Keeping Assist is activated, the à symbol
appears in the multifunction display when the
ignition is on.
Service menu
In the Service menu, you have the following
options:
R call up display messages ( Y page 390)
R check the tire pressure electronically
( Y page 499)
R
call up the service due date ( Y page 465)
R check the oil level ( Y page 459)
Settings menu
Introduction
The Settings menu can be used for:
R Switching the daytime running lamps on/
off
R switching Adaptive Highbeam Assist on/
off
R showing or hiding the additional
speedometer
R selecting the units for speed and distance
R switching the belt adjustment on/off
R activating/deactivating the radar sensor
system
Switching the daytime running lamps
on/off
This function is not available in Canada.
If you have activated the Daytime running
lights function and the light switch is in the
$ or c position, the daytime running
lamps are automatically switched on when
the engine is running.
Depending on the ambient light, the following
will additionally light up:
R parking lamps
R tail lamps
R license plate lamp
R side marker lamps
If you turn the light switch to a different
position, the corresponding lights are
switched on. If you switch off the daytime
running lamps at night, make sure that the
light switch is set to L or c .
The factory setting is On.
Menus and submenus387On-board computer and displaysZ
Page 410 of 536
Display messagesPossible causes/consequences and M Solutions4
Check Engine Oil
At Next RefuelingVehicles with an oil dipstick: the oil level has dropped to the
minimum level.XCheck the oil level when next refueling, at the latest
( Y page 459).XIf necessary, add engine oil ( Y page 462).XHave the engine checked at a qualified specialist workshop if
engine oil needs to be added more often than usual.4
Check Engine Oil
Level (Add 1 quart)
(USA only) Check
Engine Oil Level
(Add 1 Liter)
(Canada only)Vehicles without an oil dipstick: the engine oil level is too low.XCheck the oil level ( Y page 459).XIf necessary, add engine oil ( Y page 459).XHave the engine checked at a qualified specialist workshop if
engine oil needs to be added more often than usual.
Information on approved engine oils can be obtained from any qualified specialist workshop
or on the Internet at http://www.mbusa.com (USA only).
! The oil level is too low. Avoid long journeys with too little engine oil. There is a risk of
engine damage.
The display messages and the corresponding symbol that indicate that the oil level is too
low must not be ignored.
Display messagesPossible causes/consequences and M Solutions4
Engine Oil Level
Low Stop Vehicle
Turn Engine OffVehicles without an oil dipstick: the engine oil level is too low.
There is a risk of engine damage.XPull over and stop the vehicle safely and switch off the engine,
paying attention to road and traffic conditions.XApply the parking brake.XAdd engine oil ( Y page 462) and check the oil level
( Y page 459).4
Engine Oil Level
Too HighVehicles without an oil dipstick: you have added too much engine
oil. There is a risk of damage to the engine or to the catalytic
converter.XHave the excess oil siphoned off at a qualified specialist
workshop. Observe the legal requirements.4
Engine Oil Level
Cannot Be MeasuredVehicles without an oil dipstick: the measuring system is
defective.XVisit a qualified specialist workshop.408Display messagesOn-board computer and displays
Page 460 of 536

Useful information
i This Operator's Manual describes all
models and all standard and optional
equipment of your vehicle available at the
time of publication of the Operator's
Manual. Country-specific differences are
possible. Please note that your vehicle may
not be equipped with all features
described. This also applies to safety-
related systems and functions.
i Please read the information on qualified
specialist workshops ( Y page 31).
Engine compartment
Hood
Opening the hood
GWARNING
Do not pull the release lever while the vehicle
is in motion. Otherwise, the hood could be
forced open by passing air flow.
This could cause the hood to come loose and
injure you and/or others.
GWARNING
Hybrid vehicles: be sure to read the "HYBRID"
supplement. Otherwise, you could fail to
recognize dangers.
GWARNING
Do not open the hood when the engine is
overheated. You could be seriously injured.
Observe the coolant temperature gauge to
determine whether the engine may be
overheated. If you see flames or smoke
coming from the engine compartment, move
away from the vehicle. Wait until the engine
has cooled. If necessary, call the fire
department.
GWARNING
There is a risk of injury if the hood is open,
even if the engine is not running.
Some engine components can become very
hot.
To avoid the risk of burns, only touch those
components described in the Operator's
Manual and observe the relevant safety notes.GWARNING
To avoid injury, stay clear of moving parts
when the hood is open and the engine is
running.
The radiator fan may continue to run for
approximately 30seconds or may even restart
after the engine has been switched off. For
this reason, you must not reach into the fan
rotation area.
GWARNING
Vehicles with gasoline engine:
The engine is equipped with a transistorized
ignition system. Because of the high voltage
it is dangerous to touch any components
(ignition coils, spark plug sockets, diagnostic
socket) of the ignition system
R with the engine running
R while starting the engine
R when the ignition is switched on and the
engine is turned manually
GWARNING
Vehicles with diesel engine:
The engine is equipped with a high-voltage
electronic control unit for the injection
system. Because of the high voltage it is
dangerous to touch any components of the
injection system (injectors, electrical wires)
R with the engine running
R while starting the engine
R when the ignition is switched on
XMake sure that the windshield wipers are
switched off.GWARNING
The windshield wipers and wiper linkage
could be set in motion.
458Engine compartmentMaintenance and care
Page 461 of 536

When the hood is open, you or others could
be injured by the wiper linkage.
Make sure that the windshield wipers are
switched off. Remove the SmartKey or make
sure that no ignition position has been
selected with KEYLESS-GO. All indicator
lamps must be off in the instrument panel.XPull release lever : for the hood.
The hood is released.
! Make sure that the windshield wipers are
not folded away from the windshield. You
could otherwise damage the windshield
wipers or the hood.
XPull hood catch handle ; outwards from
the radiator grill as far as it will go and lift
the hood from underneath by the radiator
grill.
Once you have lifted the hood about
15 inches (40cm), it is automatically
opened the rest of the way and held open
by the gas-filled struts.! Do not lift the hood by hood catch
handle ;. The handle may otherwise be
damaged.
Closing the hoodGWARNING
When closing the hood, use extreme caution
not to catch hands or fingers. Be careful that
you do not close the hood on anyone.
Make sure the hood is securely engaged
before driving off. Do not continue driving if
the hood can no longer engage after an
accident, for example. The hood could
otherwise come loose while the vehicle is in
motion and injure you and/or others.
XLower the hood and let it fall from a height
of approximately 8 inches (20cm).XCheck that the hood has engaged properly.
If the hood can be raised slightly, it is not
properly engaged. Open it again and close
it with a little more force.
Radiator
i Vehicles with a diesel engine: do not
cover the radiator, for example with a
winter front or bug cover. The readings of
the on-board-diagnostic system may
otherwise be inaccurate. Some of these
readings are required by law and must be
accurate at all times.
Engine oil
Notes on the oil level
GWARNING
Hybrid vehicles: be sure to read the "HYBRID"
supplement. Otherwise, you could fail to
recognize dangers.
Depending on the driving style, the vehicle
consumes up to 0.9 US qts (0.8 l) of oil over
a distance of 600 miles (1,000 km). The oil
Engine compartment459Maintenance and careZ
Page 462 of 536
consumption may be higher than this when
the vehicle is new or if you frequently drive at
high engine speeds.
On vehicles with a 12-cylinder engine, the oil
level can be checked using the on-board
computer. On all other models, the oil
dipstick must be used to check the engine oil
level.
Depending on the engine, the oil dipstick may
be in a different location.
When checking the oil level:
R park the vehicle on a level surface.
R the engine should be switched off for
approximately five minutes if the engine is
at normal operating temperature.
R if the engine is not at normal operating
temperature, e.g. if the engine was only
started briefly: wait about 30 minutes
before carrying out the measurement.Checking the oil level using the oil
dipstick
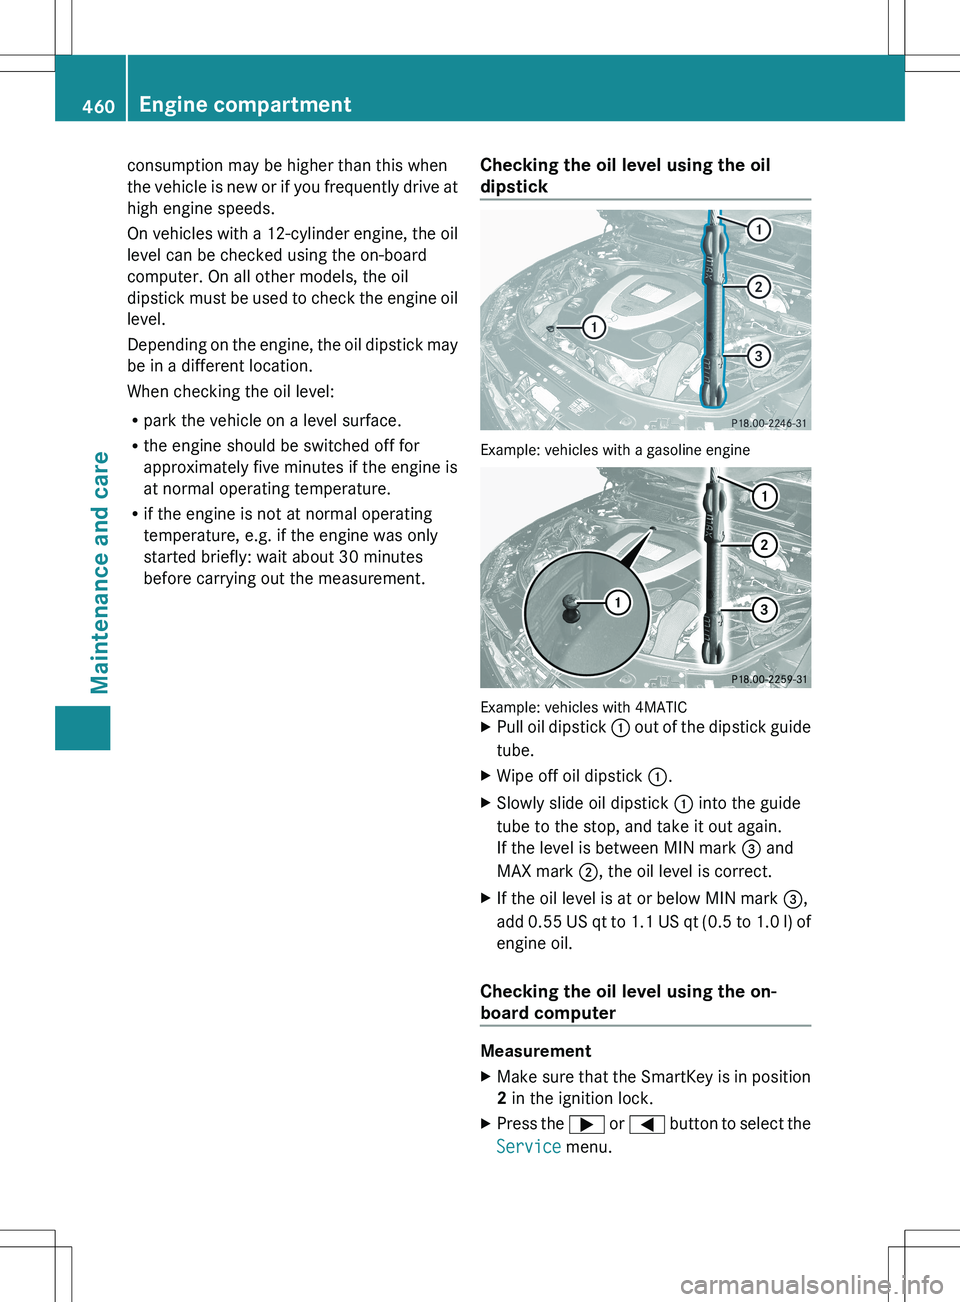
Example: vehicles with a gasoline engine
Example: vehicles with 4MATIC
XPull oil dipstick : out of the dipstick guide
tube.XWipe off oil dipstick :.XSlowly slide oil dipstick : into the guide
tube to the stop, and take it out again.
If the level is between MIN mark = and
MAX mark ;, the oil level is correct.XIf the oil level is at or below MIN mark =,
add 0.55 US qt to 1.1 US qt ( 0.5 to 1.0 l) of
engine oil.
Checking the oil level using the on-
board computer
Measurement
XMake sure that the SmartKey is in position
2 in the ignition lock.XPress the ; or = button to select the
Service menu.460Engine compartmentMaintenance and care
Page 463 of 536

XPress the : or 9 button to select
Engine Oil Level .XPress the a button.
The multifunction display shows the
following message: Measuring Engine
Oil Level Accurate Only When
Vehicle Is Level
i If you wish to cancel the measurement,
press the % button on the multifunction
steering wheel.
Engine compartment461Maintenance and careZ
Page 464 of 536

Display messages
The measurement takes a few seconds. You will see one of the following messages in the
multifunction display:ProblemPossible causes/consequences and M SolutionsEngine Oil Level OKThe oil level is correct.Add 1.0 l Engine
Oil At Next
Refueling .The oil level is too low.Xadd 1.0 l of engine oil.Add 1.5 l Engine
Oil At Next
Refueling .The oil level is too low.Xadd 1.5 l of engine oil.Add 2.0 l Engine
Oil At Next
Refueling .The oil level is too low.Xadd 2.0 l of engine oil.Engine Oil Level
Reduce Oil LevelThe engine oil level is too high.XHave excess engine oil siphoned off.For Engine Oil
Level Ignition
Must be OnThe ignition is switched off.XTurn the SmartKey to position 2 in the ignition lock.Need More Time to
Check Engine Oil
LevelThe required waiting period was not observed.XIf the engine is at normal operating temperature: repeat the
measurement after about five minutes.
If the engine is not at normal operating temperature (e.g. if the
engine was only started briefly): repeat the measurement after
about 30 minutes.Engine Oil Level
Not When Engine OnThe engine is running; oil level measurement is not possible.XSwitch off the engine.XIf the engine is at normal operating temperature: wait about five
minutes before carrying out the measurement.
If the engine is not at normal operating temperature, e.g. if the
engine was only started briefly: wait approximately
30 minutes before carrying out the measurement.Adding engine oilGWARNING
If engine oil comes into contact with hot
engine parts, it may ignite and you could burn
yourself. Do not spill any engine oil on hot
engine parts.462Engine compartmentMaintenance and care