2012 MERCEDES-BENZ S-CLASS SEDAN clock
[x] Cancel search: clockPage 305 of 536
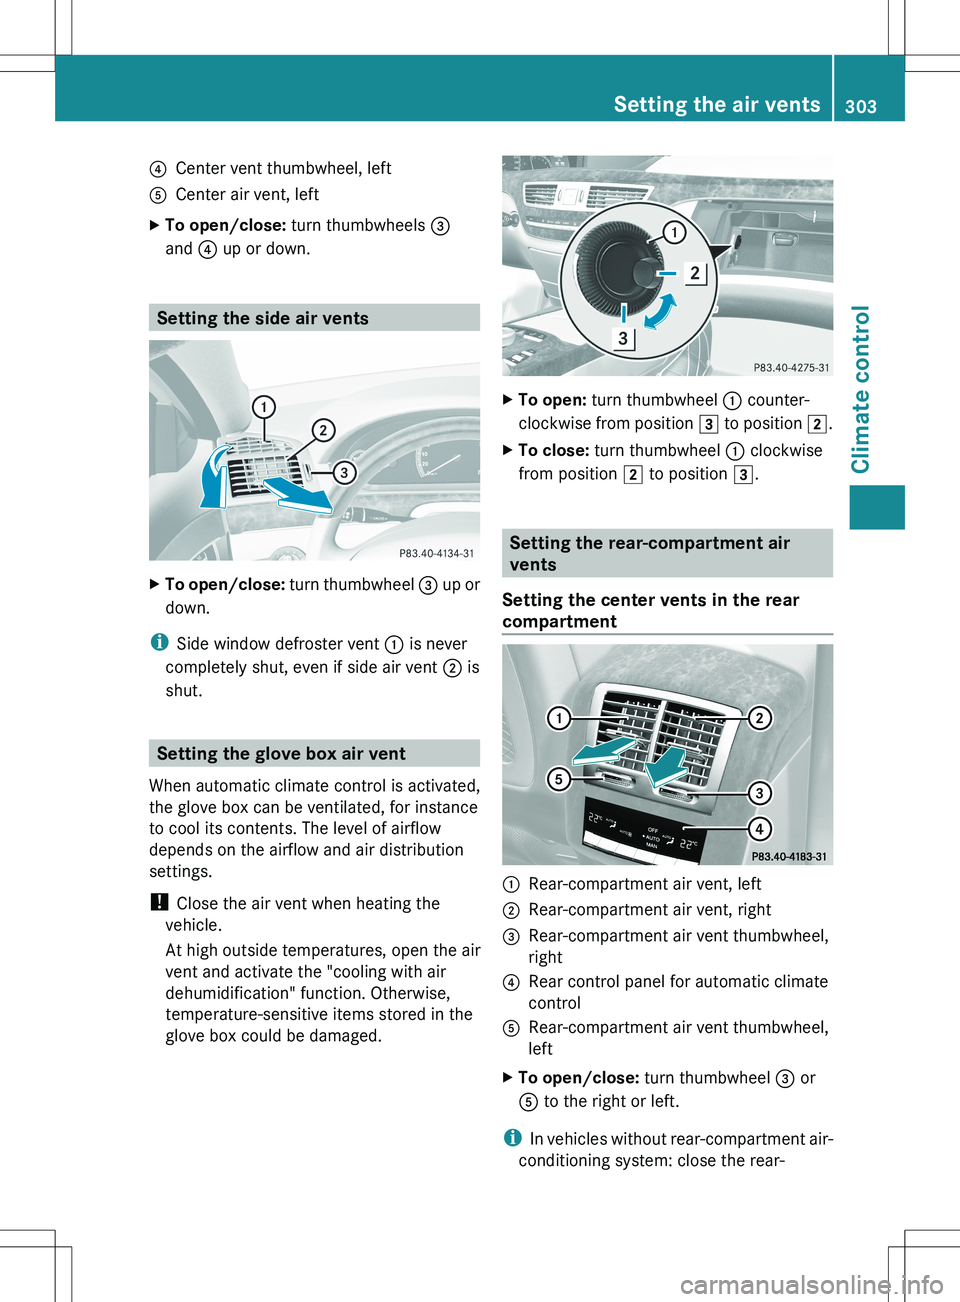
?Center vent thumbwheel, leftACenter air vent, leftXTo open/close: turn thumbwheels =
and ? up or down.
Setting the side air vents
XTo open/close: turn thumbwheel = up or
down.
i Side window defroster vent : is never
completely shut, even if side air vent ; is
shut.
Setting the glove box air vent
When automatic climate control is activated,
the glove box can be ventilated, for instance
to cool its contents. The level of airflow
depends on the airflow and air distribution
settings.
! Close the air vent when heating the
vehicle.
At high outside temperatures, open the air
vent and activate the "cooling with air
dehumidification" function. Otherwise,
temperature-sensitive items stored in the
glove box could be damaged.
XTo open: turn thumbwheel : counter-
clockwise from position 3 to position 2.XTo close: turn thumbwheel : clockwise
from position 2 to position 3.
Setting the rear-compartment air
vents
Setting the center vents in the rear
compartment
:Rear-compartment air vent, left;Rear-compartment air vent, right=Rear-compartment air vent thumbwheel,
right?Rear control panel for automatic climate
controlARear-compartment air vent thumbwheel,
leftXTo open/close: turn thumbwheel = or
A to the right or left.
i
In vehicles without rear-compartment air-
conditioning system: close the rear-
Setting the air vents303Climate controlZ
Page 324 of 536
pump nozzle, which could cause personal
injury.GWARNING
Hybrid vehicles: be sure to read the "HYBRID"
supplement. Otherwise, you could fail to
recognize dangers.
GWARNING
Do not fill diesel tanks with gasoline. Do not
mix diesel fuel with gasoline. Otherwise the
fuel system and engine could be damaged. In
addition, the vehicle could catch fire.
! Do not use gasoline to refuel vehicles with
a diesel engine. Do not use diesel to refuel
vehicles with a gasoline engine. Even a
small quantity of the wrong fuel will
damage the fuel system and engine.
! Do not switch on the ignition if you
accidentally refuel with the wrong fuel.
Otherwise, the fuel will enter the fuel lines.
Notify a qualified specialist workshop and
have the fuel tank and fuel lines drained
completely.
! Overfilling the fuel tank could damage the
fuel system.
! Take care not to spill any fuel on painted
surfaces. You could otherwise damage the
paintwork.
! Use a filter when refueling from a fuel can.
Otherwise, the fuel lines and/or injection
system could be blocked by particles from
the fuel can.
Further information on fuel and on fuel grades
can be found in the "Fuel" section
( Y page 525).
Refueling
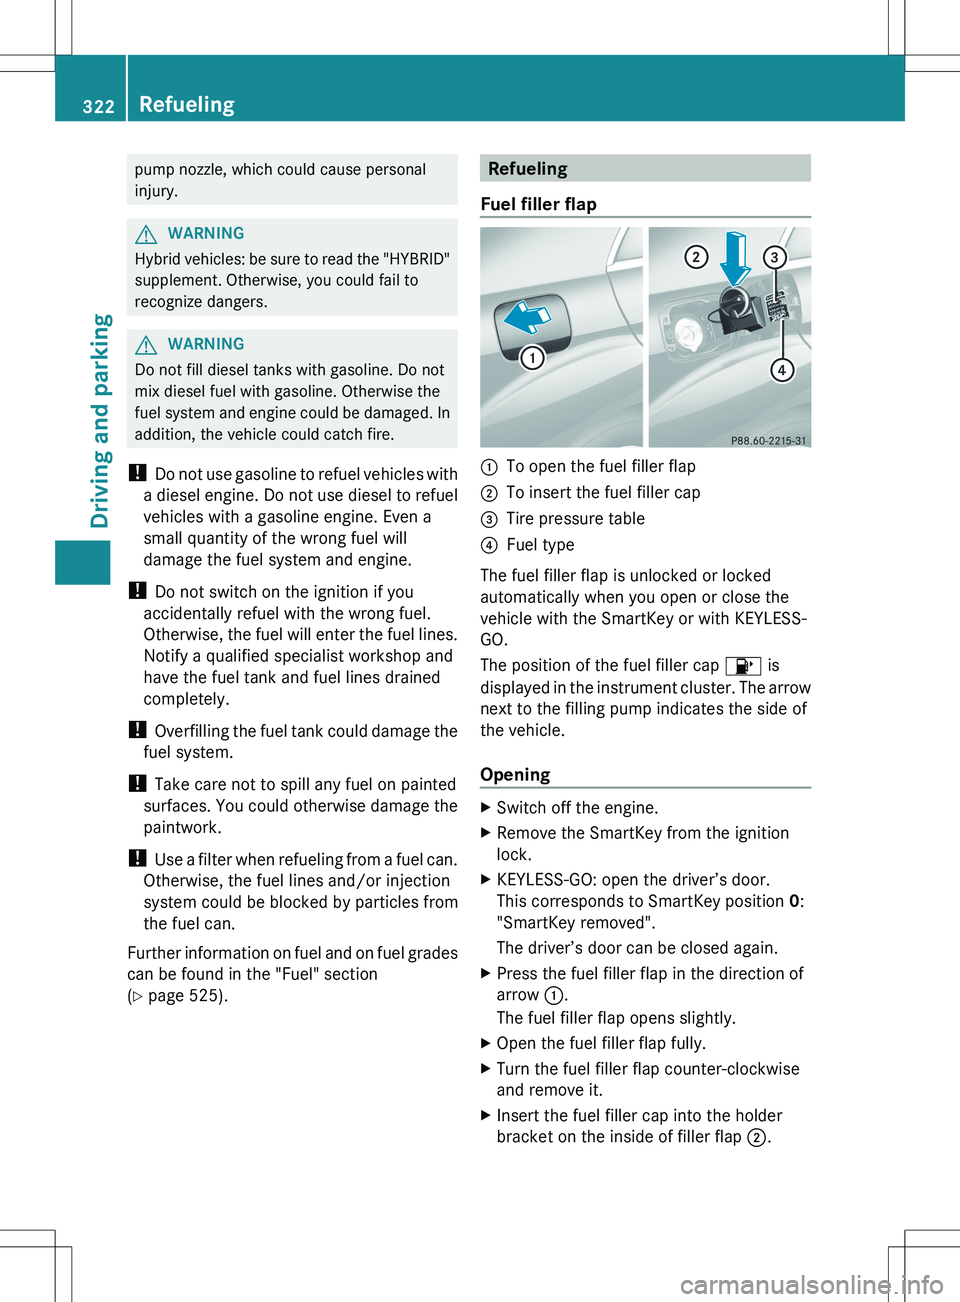
Fuel filler flap:To open the fuel filler flap;To insert the fuel filler cap=Tire pressure table?Fuel type
The fuel filler flap is unlocked or locked
automatically when you open or close the
vehicle with the SmartKey or with KEYLESS-
GO.
The position of the fuel filler cap 8 is
displayed in the instrument cluster. The arrow
next to the filling pump indicates the side of
the vehicle.
Opening
XSwitch off the engine.XRemove the SmartKey from the ignition
lock.XKEYLESS-GO: open the driver’s door.
This corresponds to SmartKey position 0:
"SmartKey removed".
The driver’s door can be closed again.XPress the fuel filler flap in the direction of
arrow :.
The fuel filler flap opens slightly.XOpen the fuel filler flap fully.XTurn the fuel filler flap counter-clockwise
and remove it.XInsert the fuel filler cap into the holder
bracket on the inside of filler flap ;.322RefuelingDriving and parking
Page 325 of 536
XCompletely insert the filler neck of the fuel
pump nozzle into the tank and refuel.XOnly fill the tank until the pump nozzle
switches off.
i Do not add any more fuel after the pump
stops filling for the first time. Otherwise,
fuel may leak out.
Closing
XReplace the cap on the filler neck and turn
clockwise until it engages audibly.XClose the fuel filler flap.
i If you drive with the fuel filler cap open,
the reserve fuel warning lamp flashes. In
addition, the ; Check Engine warning
lamp may light up. A message appears in
the multifunction display ( Y page 409).
For further information on warning and
indicator lamps in the instrument cluster,
see ( Y page 429).
i Close the fuel filler flap before locking the
vehicle. Otherwise, the locking pin of the
central locking prevents the fuel filler flap
from closing.
Refueling323Driving and parkingZ
Page 328 of 536
residues crystallize after time and
contaminate the affected surfaces.
! DEF is not a fuel additive and must not be
added to the fuel tank. If DEF is added to
the fuel tank, this can lead to engine
damage.
! Only screw on the DEF refill bottle hand-
tight. It could otherwise be damaged.
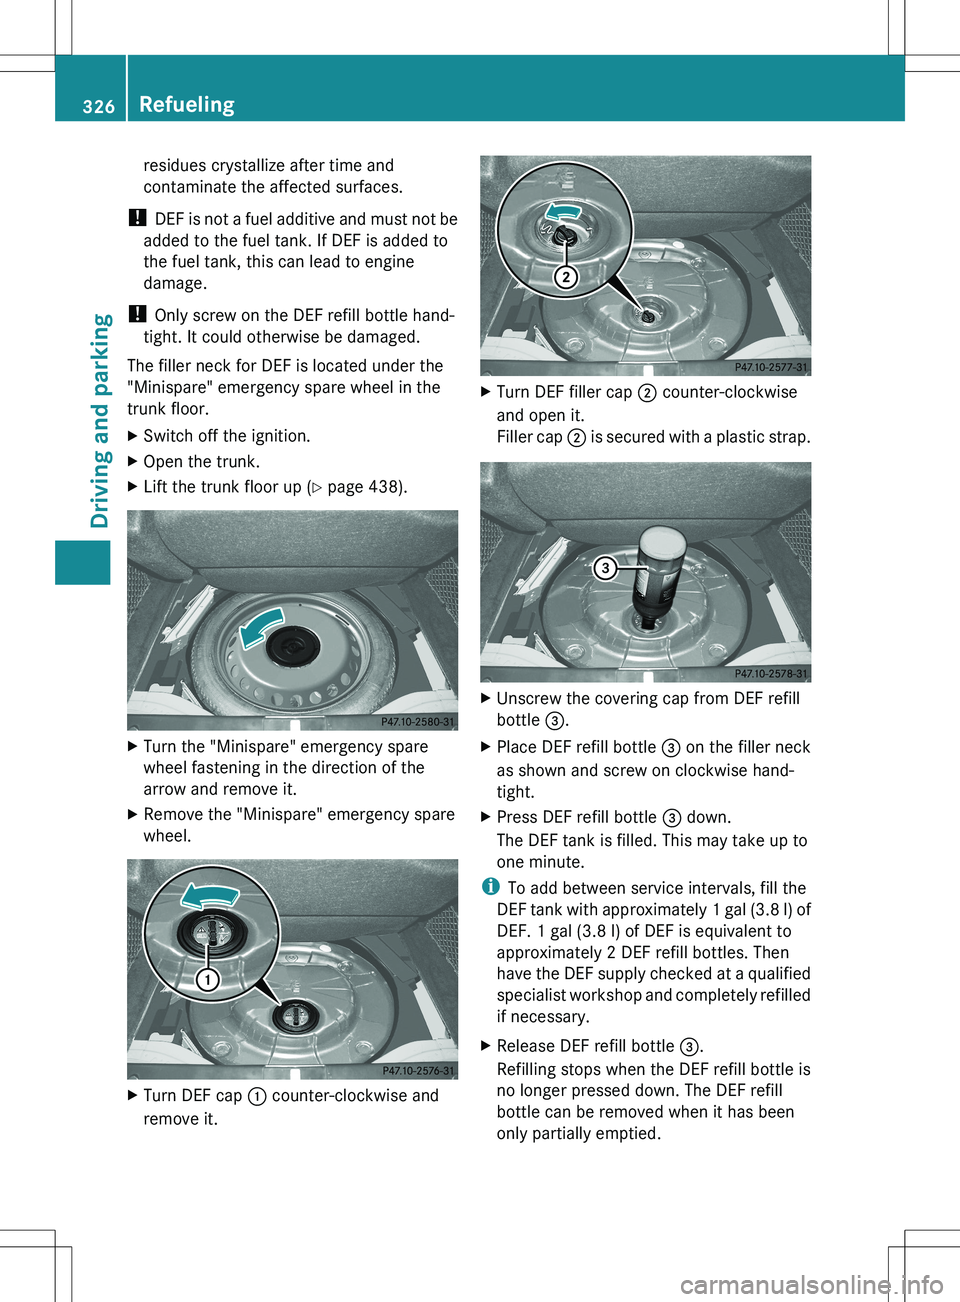
The filler neck for DEF is located under the
"Minispare" emergency spare wheel in the
trunk floor.XSwitch off the ignition.XOpen the trunk.XLift the trunk floor up ( Y page 438).XTurn the "Minispare" emergency spare
wheel fastening in the direction of the
arrow and remove it.XRemove the "Minispare" emergency spare
wheel.XTurn DEF cap : counter-clockwise and
remove it.XTurn DEF filler cap ; counter-clockwise
and open it.
Filler cap ; is secured with a plastic strap.XUnscrew the covering cap from DEF refill
bottle =.XPlace DEF refill bottle = on the filler neck
as shown and screw on clockwise hand-
tight.XPress DEF refill bottle = down.
The DEF tank is filled. This may take up to
one minute.
i To add between service intervals, fill the
DEF tank with approximately 1 gal (3.8 l) of
DEF. 1 gal (3.8 l) of DEF is equivalent to
approximately 2 DEF refill bottles. Then
have the DEF supply checked at a qualified
specialist workshop and completely refilled
if necessary.
XRelease DEF refill bottle =.
Refilling stops when the DEF refill bottle is
no longer pressed down. The DEF refill
bottle can be removed when it has been
only partially emptied.326RefuelingDriving and parking
Page 329 of 536

XTurn DEF refill bottle = counter-clockwise
and remove it.XPlace DEF filler cap ; on the filler neck and
turn it clockwise.XInsert DEF cap : as shown and turn it
clockwise as far as it will go.XPlace the "Minispare" emergency spare
wheel in the emergency spare wheel well
above the DEF tank.XInsert the "Minispare" emergency spare
wheel fastening and tighten clockwise.XFold the trunk floor down.XClose the trunk lid.XDrive faster than 10 mph (16 km/h).
The Check Additive See Operator's
Manual message goes out after
approximately one minute.
i If the Check Additive See
Operator's Manual message remains
shown in the multifunction display, add an
additional bottle of DEF.
Further information on DEF ( Y page 527).
Parking
Important safety notes
GWARNING
Do not park this vehicle in areas where
combustible materials can come into contact
with the hot exhaust system. Combustible
materials, such as grass, hay or leaves could
be ignited by the hot exhaust system and
cause a vehicle fire. Do not park the vehicle
on dry grassland or harvested grain fields.
Unintended vehicle movement can cause
serious personal injury or damage to the
vehicle or the vehicle drivetrain. To reduce
such risks, always do the following before
turning off the engine and leaving the vehicle:
R keep your right foot on the brake pedal.
R engage the electric parking brake.
R shift the automatic transmission into park
position P.
R slowly release the brake pedal.
R when parked on an incline, always turn the
front wheels towards the road curb.
R turn the SmartKey in the ignition lock to
position 0 and remove the SmartKey from
the ignition lock, or press the KEYLESS-GO
Start/Stop button.
R take the SmartKey with you and lock the
vehicle when leaving.
Switching off the engine
Important safety notes
GWARNING
Do not turn off the engine before the vehicle
has come to a complete stop. With the engine
not running, there is no power assistance for
the brake and steering systems. In this case,
it is important to keep in mind that a
considerably higher degree of effort is
necessary to brake and steer the vehicle.
GWARNING
Keep in mind that turning off the engine alone
only will shift the automatic transmission into
neutral position N automatically.
Always shift the automatic transmission into
park position P before turning off the engine.
Otherwise the vehicle could roll away which
could result in an accident and/or serious
personal injury.
Parking327Driving and parkingZ
Page 364 of 536
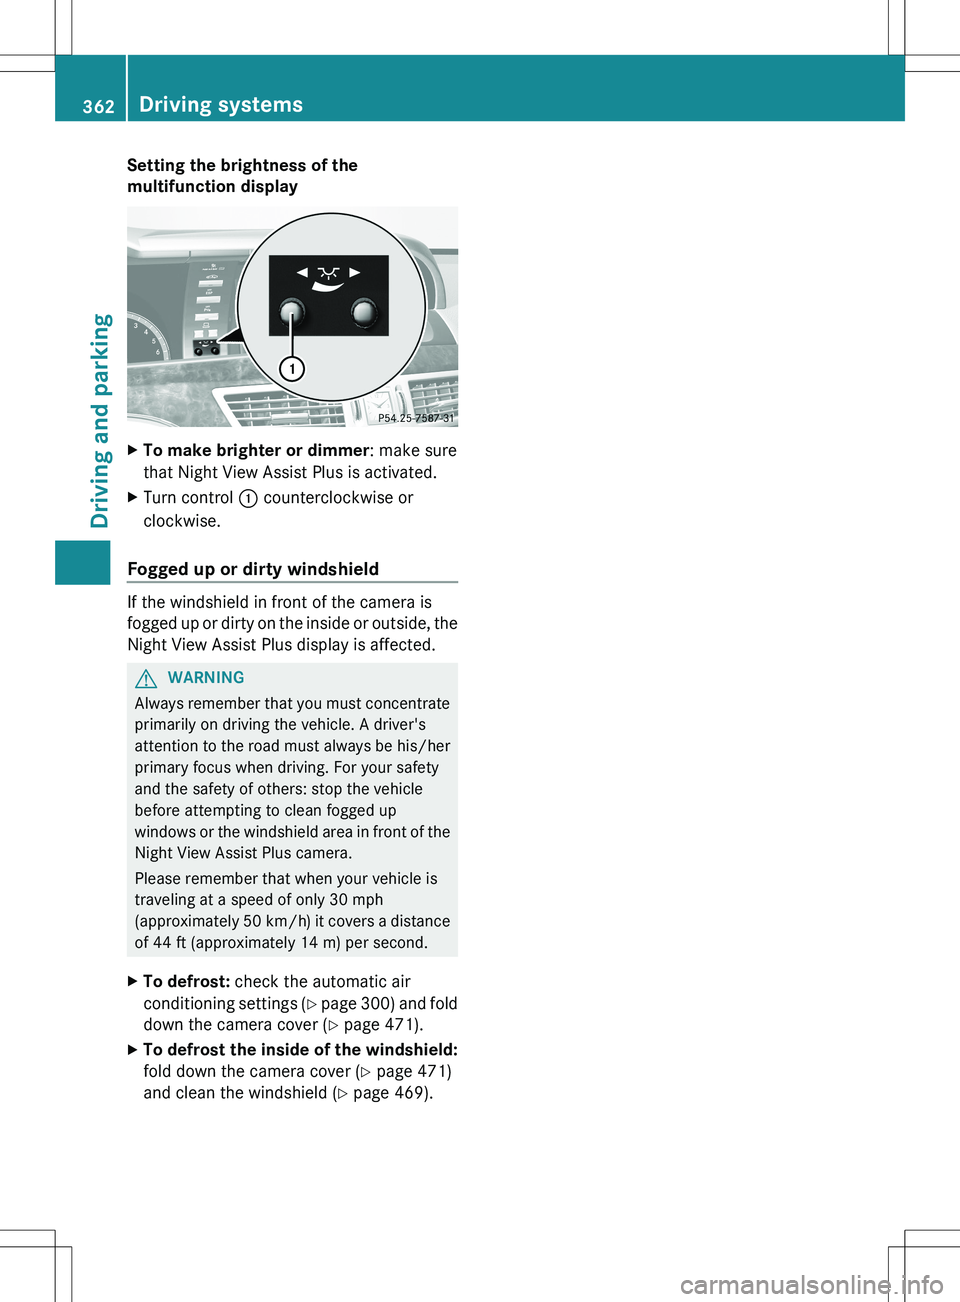
Setting the brightness of the
multifunction displayXTo make brighter or dimmer : make sure
that Night View Assist Plus is activated.XTurn control : counterclockwise or
clockwise.
Fogged up or dirty windshield
If the windshield in front of the camera is
fogged up or dirty on the inside or outside, the
Night View Assist Plus display is affected.
GWARNING
Always remember that you must concentrate
primarily on driving the vehicle. A driver's
attention to the road must always be his/her
primary focus when driving. For your safety
and the safety of others: stop the vehicle
before attempting to clean fogged up
windows or the windshield area in front of the
Night View Assist Plus camera.
Please remember that when your vehicle is
traveling at a speed of only 30 mph
(approximately 50 km/h ) it covers a distance
of 44 ft (approximately 14 m) per second.
XTo defrost: check the automatic air
conditioning settings (Y page 300) and fold
down the camera cover ( Y page 471).XTo defrost the inside of the windshield:
fold down the camera cover ( Y page 471)
and clean the windshield ( Y page 469).362Driving systemsDriving and parking
Page 465 of 536
HEnvironmental note
When adding oil, take care not to spill any. If
oil enters the soil or waterways, it is harmful
to the environment.
! Only use engine oils and oil filters that
have been approved for vehicles with a
service system. You can obtain a list of the
engine oils and oil filters tested and
approved in accordance with the
Mercedes-Benz Specifications for Service
Products at any Mercedes-Benz Service
center.
Damage to the engine or exhaust system is
caused by the following:
R using engine oils and oil filters that have
not been specifically approved for the
service system
R replacing engine oil and oil filters after
the interval for replacement specified by
the service system has been exceeded
R using engine oil additives.
! Do not add too much oil. adding too much
engine oil can result in damage to the
engine or to the catalytic converter. Have
excess engine oil siphoned off.
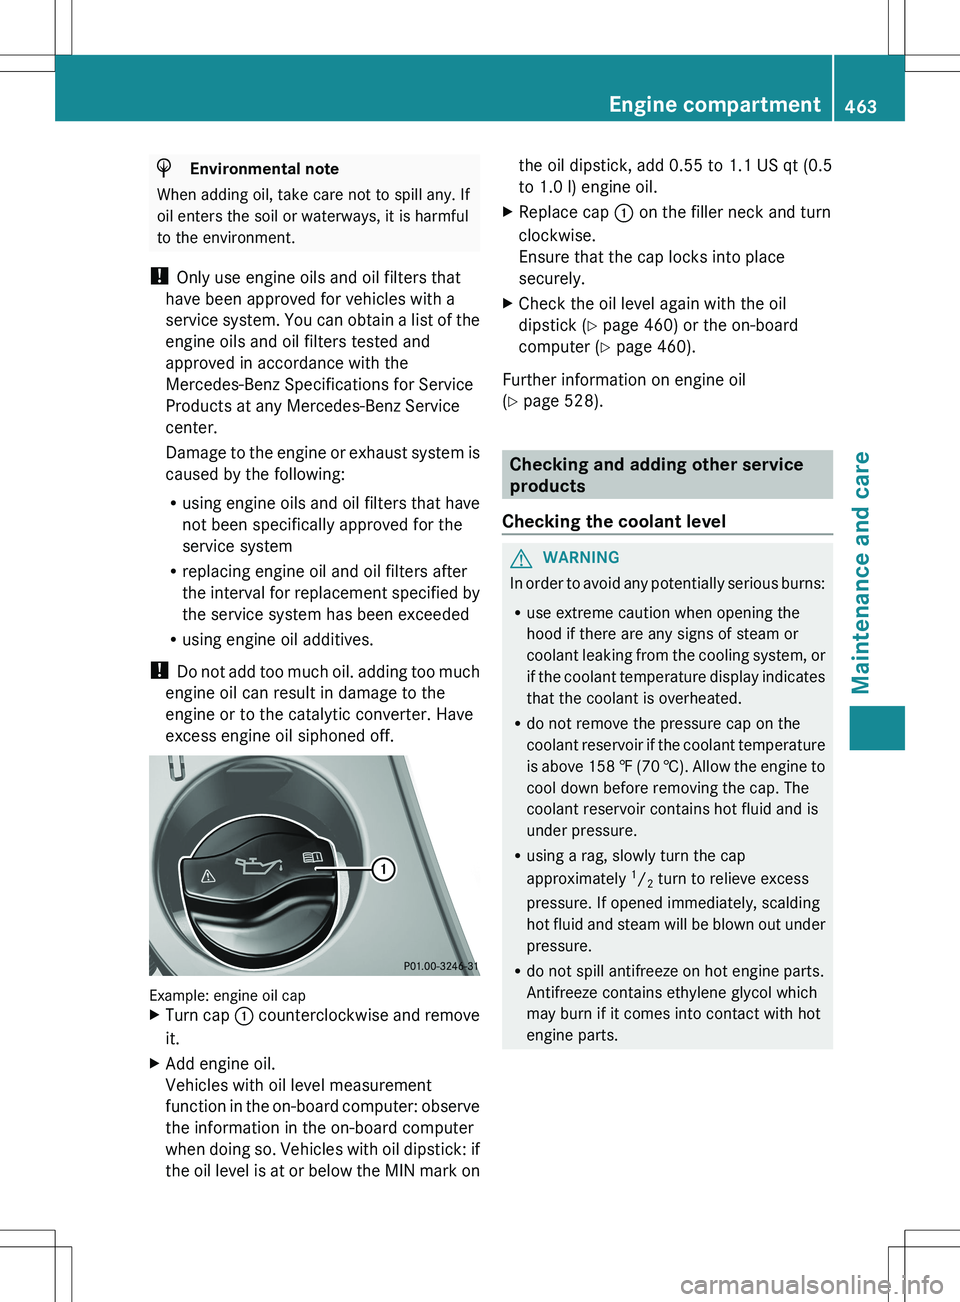
Example: engine oil cap
XTurn cap : counterclockwise and remove
it.XAdd engine oil.
Vehicles with oil level measurement
function in the on-board computer: observe
the information in the on-board computer
when doing so. Vehicles with oil dipstick: if
the oil level is at or below the MIN mark onthe oil dipstick, add 0.55 to 1.1 US qt (0.5
to 1.0 l) engine oil.XReplace cap : on the filler neck and turn
clockwise.
Ensure that the cap locks into place
securely.XCheck the oil level again with the oil
dipstick ( Y page 460) or the on-board
computer ( Y page 460).
Further information on engine oil
( Y page 528).
Checking and adding other service
products
Checking the coolant level
GWARNING
In order to avoid any potentially serious burns:
R use extreme caution when opening the
hood if there are any signs of steam or
coolant leaking from the cooling system, or
if the coolant temperature display indicates
that the coolant is overheated.
R do not remove the pressure cap on the
coolant reservoir if the coolant temperature
is above 158 ‡ (70 †). Allow the engine to
cool down before removing the cap. The
coolant reservoir contains hot fluid and is
under pressure.
R using a rag, slowly turn the cap
approximately 1
/ 2 turn to relieve excess
pressure. If opened immediately, scalding
hot fluid and steam will be blown out under
pressure.
R do not spill antifreeze on hot engine parts.
Antifreeze contains ethylene glycol which
may burn if it comes into contact with hot
engine parts.
Engine compartment463Maintenance and careZ
Page 466 of 536
XPark the vehicle on a level surface.
Only check the coolant level when the
vehicle is on a level surface and the engine
has cooled down.XTurn the SmartKey to position 2 in the
ignition lock ( Y page 307).
On vehicles with KEYLESS-GO, press the
Start/Stop button twice ( Y page 307).XCheck the coolant temperature display in
the instrument cluster.
The coolant temperature must be below
158 ‡ (70 †).XTurn the SmartKey to position
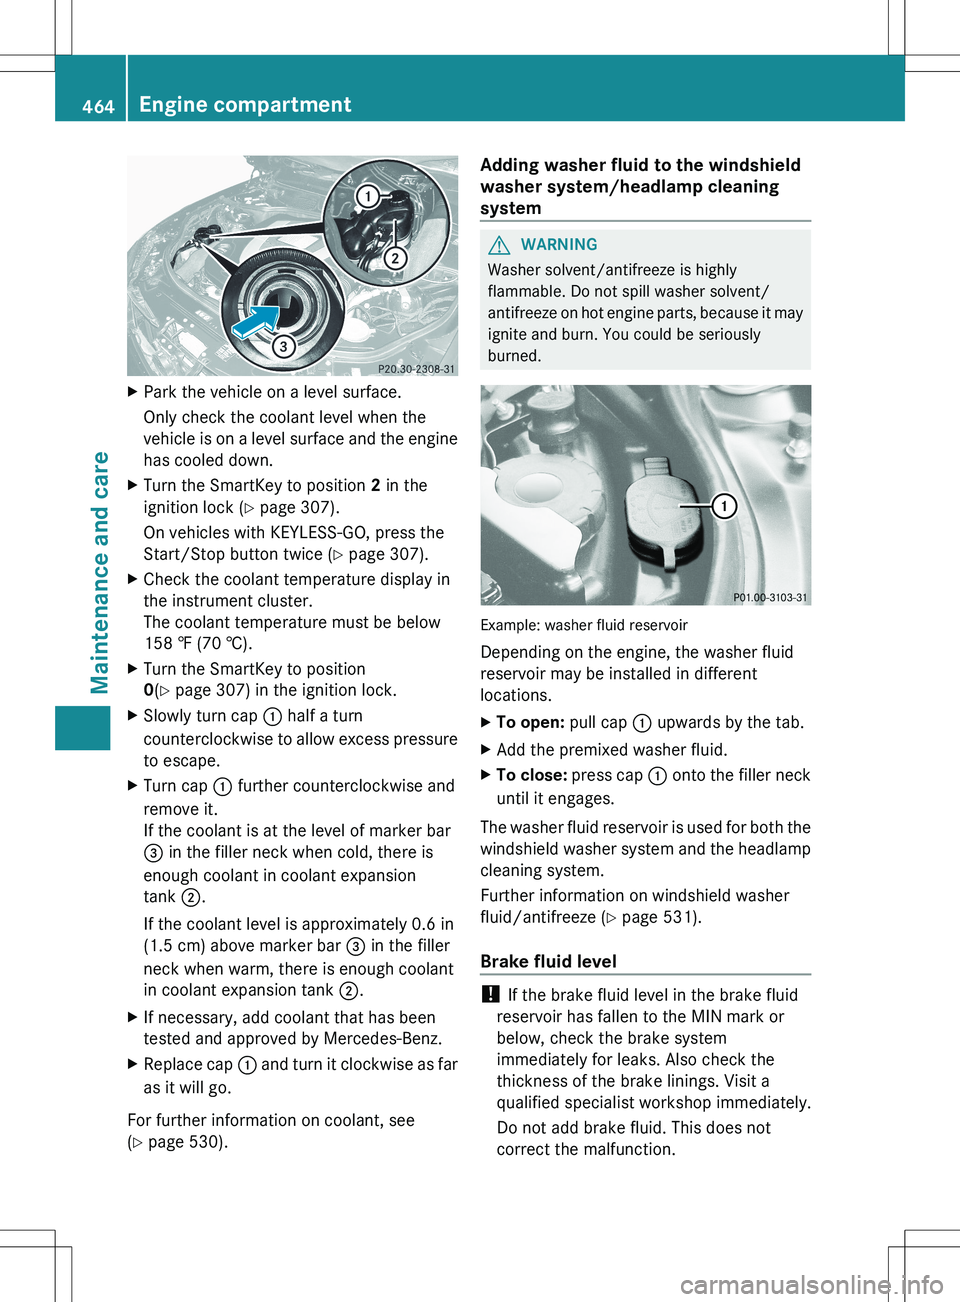
0 (Y page 307) in the ignition lock.XSlowly turn cap : half a turn
counterclockwise to allow excess pressure
to escape.XTurn cap : further counterclockwise and
remove it.
If the coolant is at the level of marker bar
= in the filler neck when cold, there is
enough coolant in coolant expansion
tank ;.
If the coolant level is approximately 0.6 in
(1.5 cm) above marker bar = in the filler
neck when warm, there is enough coolant
in coolant expansion tank ;.XIf necessary, add coolant that has been
tested and approved by Mercedes-Benz.XReplace cap : and turn it clockwise as far
as it will go.
For further information on coolant, see
( Y page 530).
Adding washer fluid to the windshield
washer system/headlamp cleaning
systemGWARNING
Washer solvent/antifreeze is highly
flammable. Do not spill washer solvent/
antifreeze on hot engine parts, because it may
ignite and burn. You could be seriously
burned.
Example: washer fluid reservoir
Depending on the engine, the washer fluid
reservoir may be installed in different
locations.
XTo open: pull cap : upwards by the tab.XAdd the premixed washer fluid.XTo close: press cap : onto the filler neck
until it engages.
The washer fluid reservoir is used for both the
windshield washer system and the headlamp
cleaning system.
Further information on windshield washer
fluid/antifreeze ( Y page 531).
Brake fluid level
! If the brake fluid level in the brake fluid
reservoir has fallen to the MIN mark or
below, check the brake system
immediately for leaks. Also check the
thickness of the brake linings. Visit a
qualified specialist workshop immediately.
Do not add brake fluid. This does not
correct the malfunction.
464Engine compartmentMaintenance and care