2012 MERCEDES-BENZ S-CLASS SEDAN fuses
[x] Cancel search: fusesPage 13 of 536

Inserting/loading (Rear Seat
Entertainment System) ..................255
Notes on discs ............................... 234
Removing/ejecting (Rear Seat
Entertainment System) ..................256
Selecting a media type ..................228
Selecting a track ............................ 229
Sound settings (balance, bass,
fader, treble) .................................. 139
DVD audio
Operating (on-board computer) .....381
DVD video
Operating (on-board computer) .....381
E
EASY-ENTRY feature Activating (COMAND) ....................266
Function/notes ............................. 115
EASY-EXIT feature
Activating (COMAND) ....................266
Crash-responsive ........................... 115
Function/notes ............................. 115
EBD (electronic brake force
distribution) Display message ............................ 394
Function/notes ................................ 77
ECO function ...................................... 265
ECO start/stop function Deactivating/activating .................311
General information .......................310
Electrical fuses
see Fuses
Electronic brake force distribution
see EBD (electronic brake force
distribution)
Electronic Stability Program
see ESP ®
(Electronic Stability Program)
Electronic Traction System
see ETS/4ETS (Electronic
Traction System)
Emergency release
Driver's door .................................... 90
Trunk ......................................... 94, 95
Vehicle ............................................. 90
Emergency spare wheel
Storage location ............................ 474
Emergency Tensioning Devices
Function ........................................... 65
Safety guidelines ............................. 49
Emissions control
Service and warranty information ....28
Engine
Check Engine warning lamp ........... 429
Display message ............................ 406
ECO start/stop function ................310
Engine number ............................... 524
Irregular running ............................ 313
Jump-starting ................................. 483
Starting problems ..........................313
Starting the engine with the key ....309
Starting with KEYLESS-GO .............309
Switching off .................................. 327
Tow-starting (vehicle) ..................... 487
Engine electronics
Problem (malfunction) ...................313
Engine emergency stop .................... 490
Engine oil Adding ........................................... 462
Additives ........................................ 529
Checking the oil level ..................... 459
Checking the oil level using the
dipstick .......................................... 460
Checking the oil level using the
on-board computer ........................460
Display message ............................ 408
Filling capacity ............................... 529
Notes about oil grades ................... 528
Notes on oil level/consumption ....459
Temperature (on-board computer) . 381
Viscosity ........................................ 529
Entering the frequency ..................... 217
Entry Deleting ......................................... 135
Saving ............................................ 137
ESP ®
(Electronic Stability
Program) Deactivating/activating .................386
Deactivating/activating (notes) .......76
Display message ............................ 391
ETS/4ETS ........................................ 76
Function/notes ................................ 75
Important safety information ...........75
Warning lamp ................................. 426Index11
Page 14 of 536

ETS/4ETS (Electronic Traction
System) ................................................ 76
Exhaust check ................................... 331
Exhaust tail pipe (cleaning
instructions) ...................................... 470
Exterior lighting see Exterior lighting
Exterior mirror parking position
Adjusting (COMAND) .....................266
Exterior mirrors
Adjusting ....................................... 116
Dipping (automatic) .......................117
Folding in/out (automatically) .......116
Folding in/out (electrically) ...........116
Out of position (troubleshooting) ...116
Storing settings (memory
function) ........................................ 118
Storing the parking position ..........117
Eyeglasses compartment ................. 435
F
Factory setting (reset function) ....... 154
Fader, setting .................................... 139
Fast forward Audio mode (CD, DVD, MP3) .........230
Rear Seat Entertainment System ...260
Video DVD ..................................... 247
Fast rewind
Audio mode (CD, DVD, MP3) .........230
Rear Seat Entertainment System ...260
Video DVD ..................................... 247
Favorites (COMAND) ......................... 124
Filler cap see Fuel filler flap
First-aid kit ......................................... 474
Flat tire Changing a wheel/mounting the
spare wheel ................................... 475
MOExtended run-flat system .........480
Preparing the vehicle .....................475
Raising the vehicle .........................476
Floormat ............................................. 455
Freeway information ......................... 191
Front fog lamps ................................. 282
Display message ............................ 404
Switching on/off ........................... 282
Front-passenger seat
Adjusting from the driver's seat ..... 109
Adjusting from the rear
compartment ................................. 109
Front windshield
see Windshield
Fuel
Additives ........................................ 526
Displaying the current
consumption .................................. 378
Displaying the range ......................378
Driving tips .................................... 330
Fuel gauge ....................................... 37
Grade (gasoline) ............................ 525
Important safety notes ..................525
Premium-grade unleaded gasoline . 525
Problem (malfunction) ...................324
Quality (diesel) ............................... 526
Refueling ........................................ 321
Tank content/reserve fuel .............525
Fuel filler flap, opening/closing ....... 322
Fuel filter (display message) ............ 409
Fuel level Calling up the range (on-board
computer) ...................................... 378
Fuel tank
Capacity ........................................ 525
Problem (malfunction) ...................324
Function buttons (COMAND) ............ 123
Fuses Allocation chart ............................. 488
Before changing ............................. 488
Dashboard fuse box .......................488
Engine emergency stop .................490
Fuse box in the engine
compartment ................................. 489
Fuse box in the rear compartment . 488
Important safety notes ..................487
G
Garage door opener Clearing the memory .....................455
Notes ............................................. 452
12Index
Page 343 of 536

If these conditions are fulfilled, your vehicle
is accelerated. Acceleration will be
interrupted if changing lanes takes too long
or if the distance between your vehicle and
the vehicle in front becomes too small.
i When changing lanes, DISTRONIC PLUS
monitors the left lane on left-hand drive
vehicles and the right lane on right-hand
drive vehicles.GWARNING
DISTRONIC PLUS and Active Blind Spot Assist
are only aids designed to assist driving.
They do not relieve you of the responsibility
of paying attention. The driver remains fully
responsible for the vehicle's distance from
other vehicles, the vehicle's speed and for
braking in good time. Always pay attention to
traffic conditions and your surroundings.
Otherwise, you may fail to recognize dangers
in time, cause an accident and injure yourself
and others.
Stopping
GWARNING
Never get out of the vehicle when DISTRONIC
PLUS is activated.
DISTRONIC PLUS must also never be
operated, activated or deactivated by a
passenger or from outside the vehicle.
DISTRONIC PLUS does not replace the
electric parking brake and must not be used
for parking.
The DISTRONIC PLUS braking effect is
canceled and the vehicle can start moving if:
R DISTRONIC PLUS is deactivated using the
cruise control lever.
R you accelerate.
R there is a malfunction in the system or an
interruption in the power supply, e.g.
battery failure.
R the electrical system in the engine
compartment, the battery or the fuses are
tampered with.
R the battery is disconnected.
If you wish to leave the vehicle or park it,
deactivate DISTRONIC PLUS and secure the
vehicle against rolling away.
If DISTRONIC PLUS detects that the vehicle
in front is stopping, it brakes your vehicle until
it is stationary.
Once your vehicle is stationary, it remains
stationary and you do not need to depress the
brake.
i After a time, the electric parking brake
secures the vehicle and relieves the service
brake.
i Depending on the specified minimum
distance, your vehicle will come to a
standstill at a sufficient distance behind the
vehicle in front. The specified minimum
distance is set using the control on the
cruise control lever.
Setting a speedGWARNING
Keep in mind that it may take a brief moment
until the vehicle has made the necessary
adjustments.
Increase or decrease the set vehicle speed to
a value that the prevailing road conditions and
legal speed limits permit. Otherwise, sudden
and unexpected acceleration or deceleration
of the vehicle could cause an accident and/
or serious injury to you and others.
XPress the cruise control lever up : for a
higher speed or down ; for a lower speed.XTo adjust the speed in 1 mph
increments (1 km/h increments): briefly
press the cruise control lever up : or
down ; to the pressure point.
The last speed stored is increased or
decreased every time the cruise control
lever is pushed up : or down ;.XTo adjust the speed in 5 mph
increments (10 km/h increments):
briefly press the cruise control leverDriving systems341Driving and parkingZ
Page 349 of 536

Rthe electrical system in the engine
compartment, the battery or the fuses are
tampered with.
R the battery is disconnected.
If you leave the vehicle or park it, deactivate
the HOLD function and secure the vehicle
against rolling away.
AIRMATIC
Vehicle level
Important safety notes
Your vehicle regulates its height
automatically. All-round level control ensures
the best possible suspension and constant
ground clearance, even with a laden vehicle.
When you drive fast, the vehicle is lowered
automatically to improve driving safety and to
reduce fuel consumption.
The following vehicle levels are possible on
vehicles without 4MATIC:
R Normal
R raised: the vehicle is raised by about 1 in
(25 mm) when compared with the normal
level
R lowered: the vehicle is lowered by about
0.60 in (15 mm) when compared with the
normal level
The following vehicle levels are possible on
vehicles with 4MATIC:
R normal: in Comfort mode, the vehicle is
raised by about 0.40 in (10 mm) when
compared with Sport mode
R raised: in Comfort mode, the vehicle is
raised by about 0.60 in (15 mm) and in
Sport mode by about 1 in (25 mm) when
compared with normal level
R lowered: the vehicle is lowered by about
0.40 in (10mm) when compared with the
normal level
The "Normal" and "Raised" vehicle levels can
be set manually.
The "Lowered” vehicle level is set
automatically:
R in vehicles without 4MATIC at speeds
above 60 mph (100 km/h)
R in vehicles with 4MATIC at speeds above
50 mph (80 km/h).
Setting the vehicle level
Select the "Normal" setting for normal road
surfaces and "Raised" for driving with snow
chains or on particularly poor road surfaces.
Your selection remains stored even if you
remove the SmartKey from the ignition lock.GWARNING
To help avoid personal injury, keep hands and
feet away from wheel housing area, and stay
away from under the vehicle when lowering
the vehicle chassis.
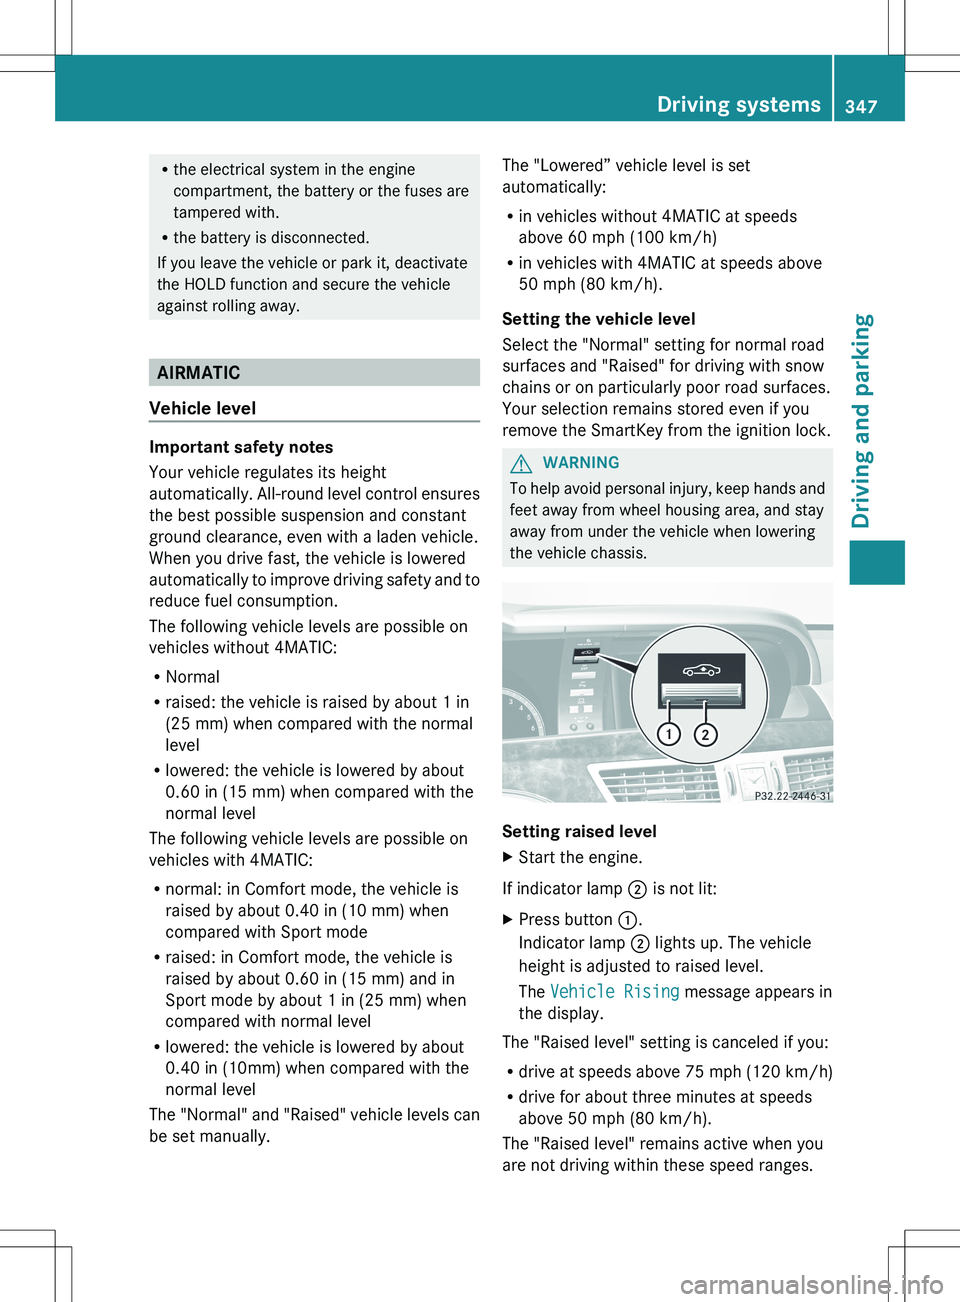
Setting raised level
XStart the engine.
If indicator lamp ; is not lit:
XPress button :.
Indicator lamp ; lights up. The vehicle
height is adjusted to raised level.
The Vehicle Rising message appears in
the display.
The "Raised level" setting is canceled if you:
R drive at speeds above 75 mph (120 km/h)
R drive for about three minutes at speeds
above 50 mph (80 km/h).
The "Raised level" remains active when you
are not driving within these speed ranges.
Driving systems347Driving and parkingZ
Page 475 of 536

Useful information ............................474
Where will I find...? ...........................474
Flat tire .............................................. 475
Battery ............................................... 480
Jump-starting .................................... 483
Towing and tow-starting ..................485
Fuses .................................................. 487473Breakdown assistance
Page 489 of 536

XSwitch on the hazard warning lamps
( Y page 283).XLeave the SmartKey in position 2 in the
ignition lock.
i When towing with the hazard warning
lamps switched on, use the combination
switch as usual to signal a change of
direction. In this case, only the turn signals
for the desired direction flash. When the
combination switch is reset, the hazard
warning lamps start flashing again.
Transporting the vehicle
The towing eye can be used to pull the vehicle
onto a trailer or transporter for transporting
purposes.
XTurn the SmartKey to position 2 in the
ignition lock.XShift the automatic transmission to
position N.
As soon as the vehicle is loaded:
XPrevent the vehicle from rolling away by
applying the electric parking brake.XShift the automatic transmission to
position P.XTurn the SmartKey to position 0 in the
ignition lock and remove the SmartKey
from the ignition lock.XSecure the vehicle.
! Only lash the vehicle down by the wheels
or wheel rims, not by parts of the vehicle
such as axle or steering components.
Otherwise, the vehicle could be damaged.
Notes for 4MATIC vehicles
! Vehicles with 4MATIC must not be towed
with either the front or the rear axle raised,
as doing so will damage the transmission.
If the vehicle has transmission damage or
damage to the front or rear axle, have it
transported on a transporter or trailer.
In the event of damage to the electrical
system
If the battery is defective, the automatic
transmission will be locked in position P. To
shift the automatic transmission to position
N , you must provide power to the vehicle's
electrical system in the same way as when
jump-starting ( Y page 483).
Have the vehicle transported on a transporter
or trailer.
Tow-starting (emergency starting)
! Vehicles with automatic transmission
must not be started by tow-starting. This
could otherwise damage the transmission.
For further information on "Jump-starting"
see ( Y page 483).
Fuses
Important safety notes
GWARNING
Only use fuses that have been approved for
Mercedes-Benz vehicles and that have the
correct fuse rating for the systems
concerned. Do not attempt to repair or bridge
faulty fuses. Using fuses that have not been
approved or attempting to repair or bridge
faulty fuses could cause the fuse to be
overloaded and result in a fire. Have the cause
traced and rectified at a qualified specialist
workshop.
The fuses in your vehicle serve to close down
faulty circuits. If a fuse blows, all the
components on the circuit and their functions
stop operating.
Blown fuses must be replaced with fuses of
the same rating, which you can recognize by
the color and value. The fuse ratings are listed
in the fuse allocation chart.
If a newly inserted fuse also blows, have the
cause traced and rectified at a qualified
Fuses487Breakdown assistanceZ
Page 490 of 536

specialist workshop, e.g. an authorized
Mercedes-Benz Center.
! Only use fuses that have been approved
for Mercedes-Benz vehicles and which
have the correct fuse rating for the system
concerned. Otherwise, components or
systems could be damaged.
Before changing a fuse
XPark the vehicle and apply the electric
parking brake.XSwitch off all electrical consumers.XRemove the SmartKey from the ignition
lock.
The fuses are located in various fuse boxes:
R fuse box on the right and left-hand sides of
the dashboard
R fuse box in the rear
R fuse box in the engine compartment on the
left-hand side of the vehicle, when viewed
in the direction of travel
R fuse box in the engine compartment on the
right-hand side of the vehicle, when viewed
in the direction of travel
The fuse allocation chart is in the vehicle
document wallet.
Dashboard fuse box
There is a fuse box located on both the
driver's side and the front-passenger side.
! Do not use a pointed object such as a
screwdriver to open the cover in the
dashboard. You could damage the
dashboard or the cover.
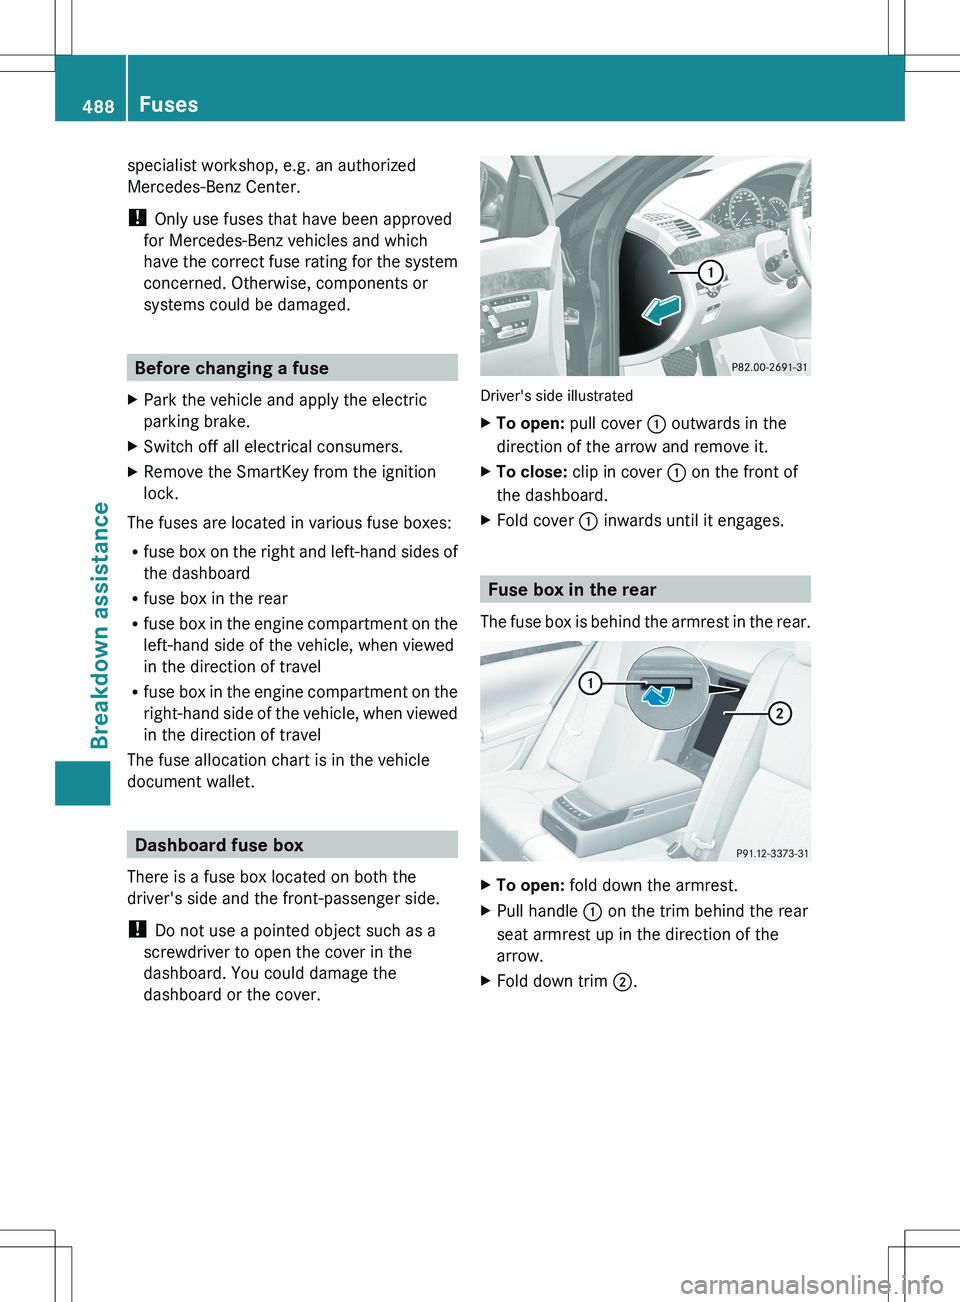
Driver's side illustrated
XTo open: pull cover : outwards in the
direction of the arrow and remove it.XTo close: clip in cover : on the front of
the dashboard.XFold cover : inwards until it engages.
Fuse box in the rear
The fuse box is behind the armrest in the rear.
XTo open: fold down the armrest.XPull handle : on the trim behind the rear
seat armrest up in the direction of the
arrow.XFold down trim ;.488FusesBreakdown assistance
Page 491 of 536

XLoosen cover ? with a suitable object =.XRemove cover ? upwards in the direction
of the arrow.
! The cover must be seated properly,
otherwise moisture or dirt could impair the
function of the fuses.
Fuse box in the engine compartment
Fuse box on the left in the direction of
travel
XOpen the hood ( Y page 458).XRemove any existing moisture from the
fuse box using a dry cloth.XAMG vehicles: remove the control unit
above the fuse box.X To open: undo screws : with an Allen
key.XRemove bracket =.XRemove cover ;.XTo close: check whether the rubber seal is
lying correctly in cover ;.XPut cover ; back in position.XReplace bracket =.XTighten screws : using an Allen key.
!
The cover must be seated properly,
otherwise moisture or dirt could impair the
function of the fuses.
XClose the hood ( Y page 459).
Fuse box on the right in the direction of
travel
XOpen the hood ( Y page 458).XRemove any existing moisture from the
fuse box using a dry cloth.XTo open: open clamps ;.XRemove cover ; upwards.XTo close: check whether the rubber seal is
lying correctly in cover ;.XPut cover ; back in position.XFold down cover : and close clamps ;.
!
The cover must be seated properly,
otherwise moisture or dirt could impair the
function of the fuses.
XClose the hood ( Y page 459).Fuses489Breakdown assistanceZ