2012 MERCEDES-BENZ S-Class fold seats
[x] Cancel search: fold seatsPage 67 of 536

LATCH-type (ISOFIX) child seat anchors
in the rearGWARNING
Children that are too large for a child restraint
must travel in seats using normal seat belts.
Position shoulder belt across the chest and
shoulder, not face or neck.
In order to attain the correct seating position
for children weighing over 41 lb (18 kg), it may
be necessary to use a booster seat until they
reach a height where a normal lap/shoulder
seat belt lies properly across their bodies
without the need for a booster seat.
Install the child restraint system according to
the manufacturer's instructions.
The child restraint system must be installed
firmly on both brackets.
An incorrectly installed child restraint system
can come loose in the event of an accident,
causing the child to be severely or fatally
injured.
Child restraint systems/child restraint
retaining brackets that are damaged or have
suffered damage due to an impact must be
replaced.
LATCH-type (ISOFIX) is a standardized
securing system for specially designed child
restraint systems on the rear seats. Securing
rings for two LATCH-type (ISOFIX) child
restraint systems are installed on the left and
right of the rear seats.
Secure non LATCH-type (ISOFIX) child
restraint systems using the vehicle's seat belt
system. Always install child restraint systems
according to the manufacturer's instructions.
! Vehicles with a center seat in the rear:
when installing the LATCH-type (ISOFIX)
child restraint system, make sure that the
seat belt for the center seat does not get
trapped. Otherwise, the seat belt could be
damaged.
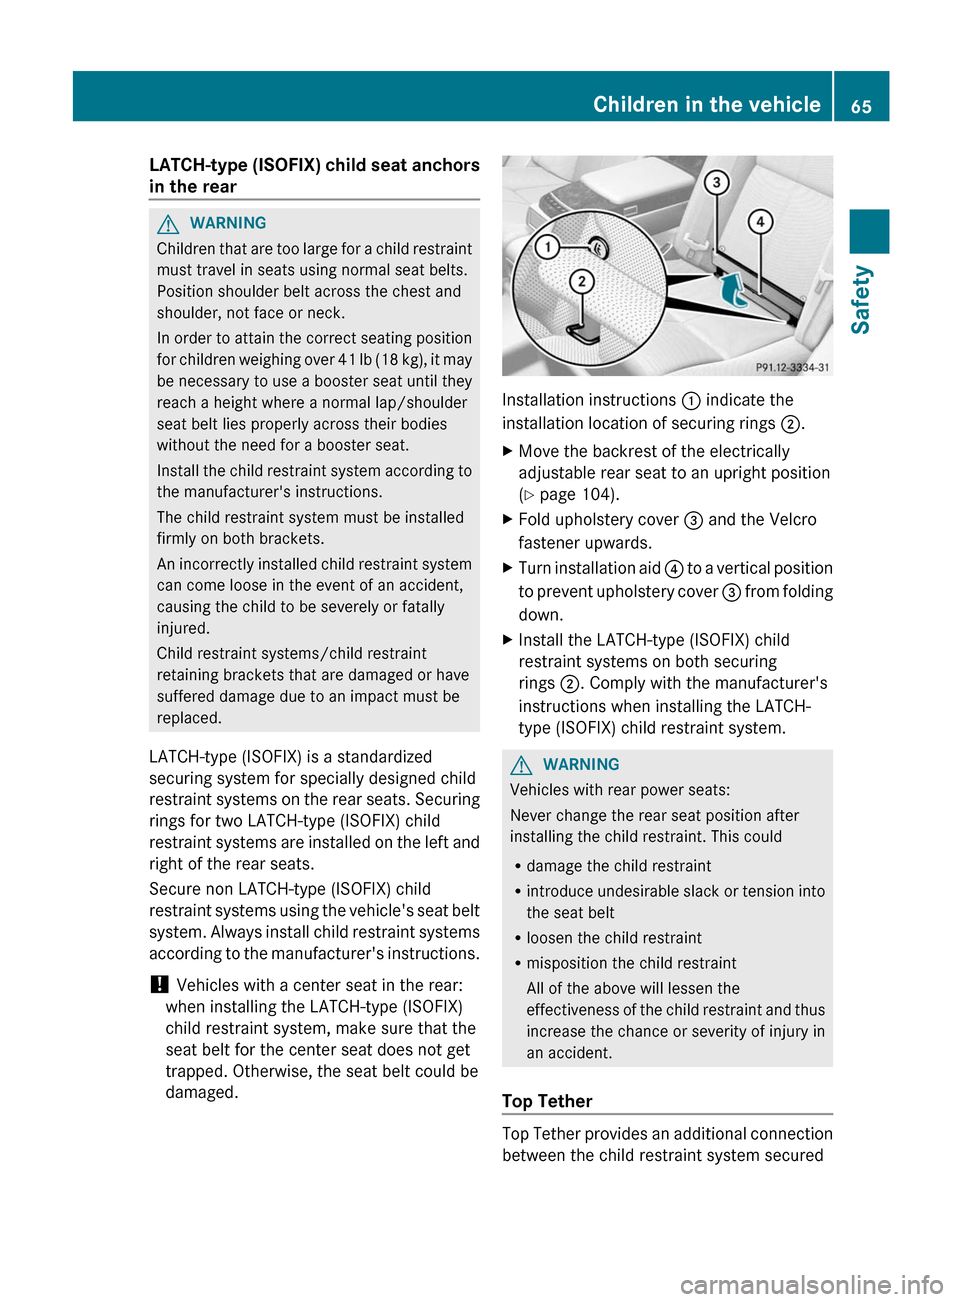
Installation instructions : indicate the
installation location of securing rings 2.
XMove the backrest of the electrically
adjustable rear seat to an upright position
( Y page 104).XFold upholstery cover = and the Velcro
fastener upwards.XTurn installation aid ? to a vertical position
to prevent upholstery cover = from folding
down.XInstall the LATCH-type (ISOFIX) child
restraint systems on both securing
rings ;. Comply with the manufacturer's
instructions when installing the LATCH-
type (ISOFIX) child restraint system.GWARNING
Vehicles with rear power seats:
Never change the rear seat position after
installing the child restraint. This could
R damage the child restraint
R introduce undesirable slack or tension into
the seat belt
R loosen the child restraint
R misposition the child restraint
All of the above will lessen the
effectiveness of the child restraint and thus
increase the chance or severity of injury in
an accident.
Top Tether
Top Tether provides an additional connection
between the child restraint system secured
Children in the vehicle65SafetyZ
Page 107 of 536

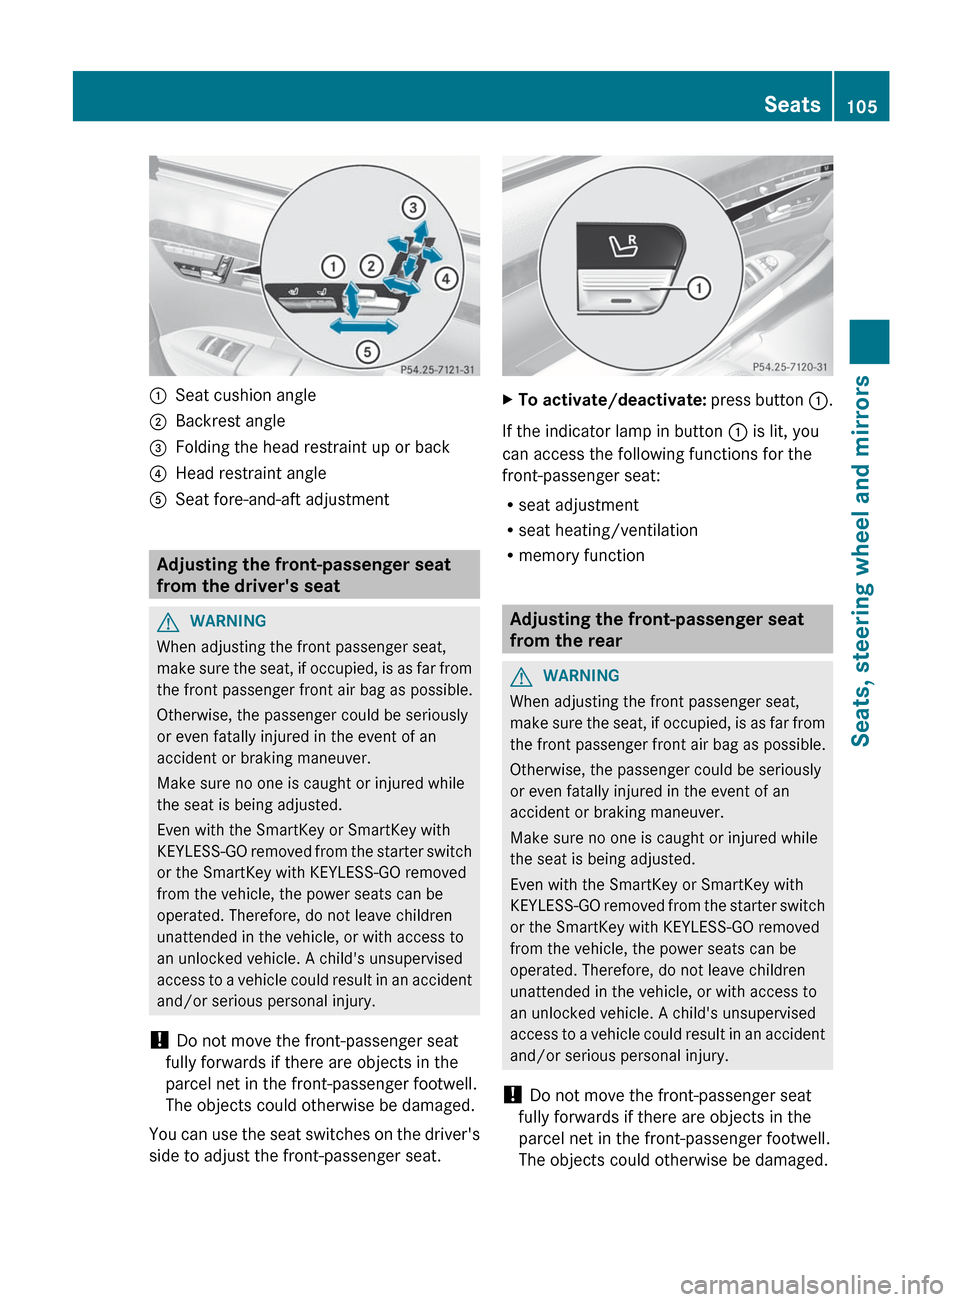
:Seat cushion angle;Backrest angle=Folding the head restraint up or back?Head restraint angleASeat fore-and-aft adjustment
Adjusting the front-passenger seat
from the driver's seat
GWARNING
When adjusting the front passenger seat,
make sure the seat, if occupied, is as far from
the front passenger front air bag as possible.
Otherwise, the passenger could be seriously
or even fatally injured in the event of an
accident or braking maneuver.
Make sure no one is caught or injured while
the seat is being adjusted.
Even with the SmartKey or SmartKey with
KEYLESS-GO removed from the starter switch
or the SmartKey with KEYLESS-GO removed
from the vehicle, the power seats can be
operated. Therefore, do not leave children
unattended in the vehicle, or with access to
an unlocked vehicle. A child's unsupervised
access to a vehicle could result in an accident
and/or serious personal injury.
! Do not move the front-passenger seat
fully forwards if there are objects in the
parcel net in the front-passenger footwell.
The objects could otherwise be damaged.
You can use the seat switches on the driver's
side to adjust the front-passenger seat.
XTo activate/deactivate: press button :.
If the indicator lamp in button : is lit, you
can access the following functions for the
front-passenger seat:
R seat adjustment
R seat heating/ventilation
R memory function
Adjusting the front-passenger seat
from the rear
GWARNING
When adjusting the front passenger seat,
make sure the seat, if occupied, is as far from
the front passenger front air bag as possible.
Otherwise, the passenger could be seriously
or even fatally injured in the event of an
accident or braking maneuver.
Make sure no one is caught or injured while
the seat is being adjusted.
Even with the SmartKey or SmartKey with
KEYLESS-GO removed from the starter switch
or the SmartKey with KEYLESS-GO removed
from the vehicle, the power seats can be
operated. Therefore, do not leave children
unattended in the vehicle, or with access to
an unlocked vehicle. A child's unsupervised
access to a vehicle could result in an accident
and/or serious personal injury.
! Do not move the front-passenger seat
fully forwards if there are objects in the
parcel net in the front-passenger footwell.
The objects could otherwise be damaged.
Seats105Seats, steering wheel and mirrorsZ
Page 108 of 536

You can use the override button to disable
this function ( Y page 67).
The button is located in the rear door on the
front-passenger side.:To select the front-passenger seat or rear-
compartment seat;Seat height=Head restraint height?Backrest angleASeat fore-and-aft adjustmentXTo select the front-passenger seat:
press button :.
The front-passenger seat is selected if the
indicator lamp in the button lights up.XAdjust the front-passenger seat with
buttons ;, = , ? and A.XTo select the rear-compartment seat:
press button :.
The rear-compartment seat is selected
again.
Adjusting the head restraints
Adjusting the head restraint height
electrically
XTo adjust the head restraint height: slide
the switch for head restraint adjustment
( Y page 104) up or down in the direction of
the arrow.Adjusting the NECK-PRO head
restraints
Adjusting
XPull or push the bottom of NECK-PRO head
restraint :.
Resetting
The NECK-PRO head restraints are moved
forwards in the event of a rear collision in the
direction of travel and have to be reset
afterwards ( Y page 56).
Adjusting NECK-PRO luxury head
restraints
Adjusting
GWARNING
When folding back the side cushions, do not
hold the area between the side cushion and
the cushion holder. There is a danger of
becoming trapped.
You can adjust side bolsters : of the NECK-
PRO luxury head restraints individually.
106SeatsSeats, steering wheel and mirrors
Page 109 of 536

XTo adjust the side bolsters of the head
restraint: push or pull side bolsters : into
the desired position.XTo move forwards and backwards: pull
or push the NECK-PRO luxury head
restraints in the direction of arrow ;.
Resetting
The NECK-PRO luxury head restraints are
moved forwards in the event of a rear collision
in the direction of travel and have to be reset
afterwards ( Y page 56).
Rear seat head restraints
GWARNING
For safety reasons, always drive with the rear
head restraints in the upright position when
the rear seats are occupied.
Keep the area around head restraints clear of
articles (e.g. clothing) to not obstruct the
folding operation of the head restraints.
GWARNING
Make sure the rear seat head restraints
engage when placing them upright manually.
Otherwise their protective function cannot be
ensured.
The back of the head will not be supported in
the event of a collision. That could cause
serious or even fatal injuries. Rear seat
occupants can be seriously injured or killed.
Folding back the rear seat head restraints
from the front
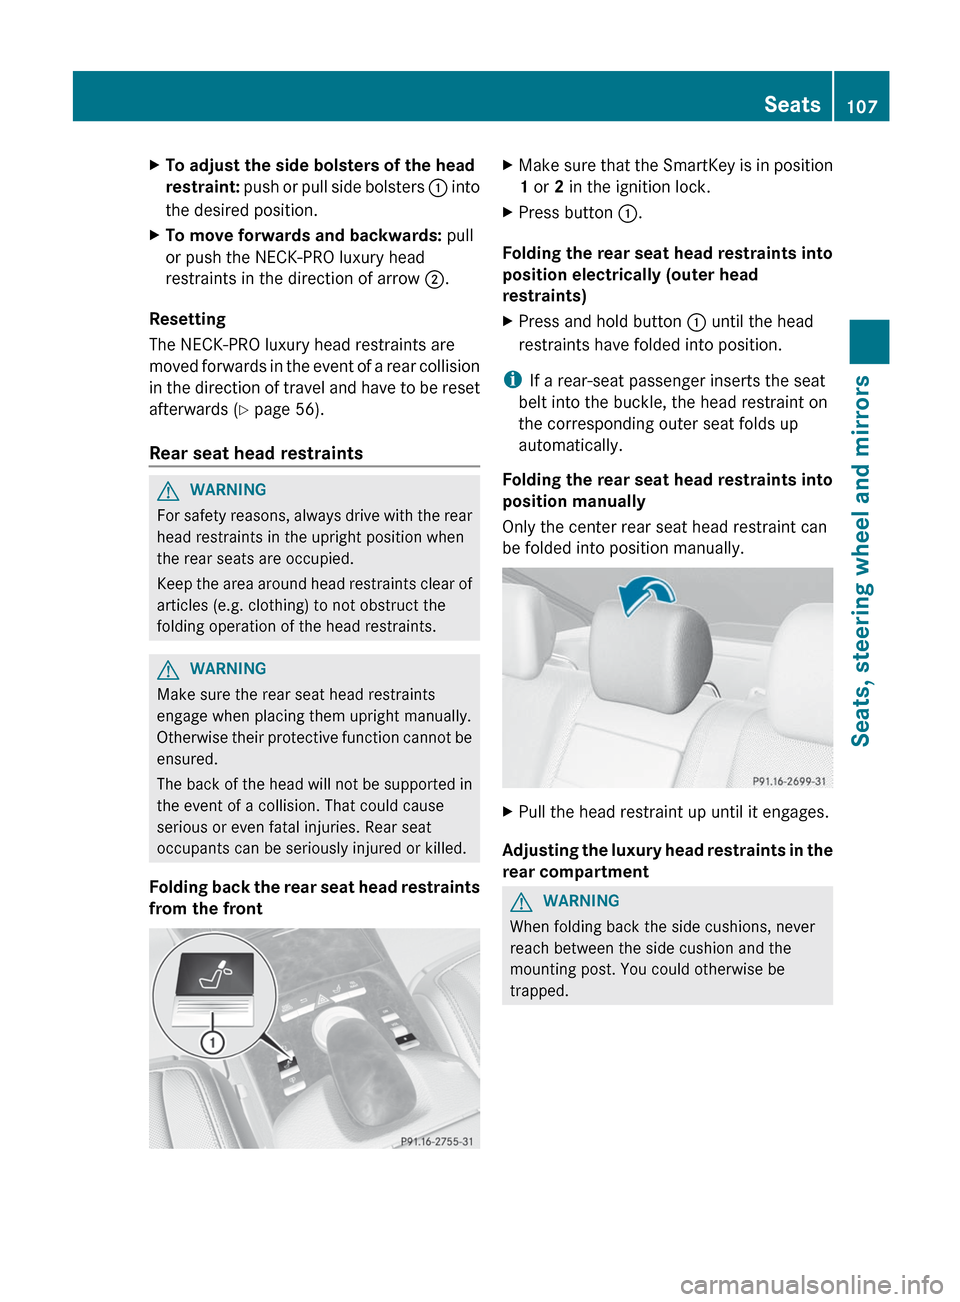
XMake sure that the SmartKey is in position
1 or 2 in the ignition lock.XPress button :.
Folding the rear seat head restraints into
position electrically (outer head
restraints)
XPress and hold button : until the head
restraints have folded into position.
i If a rear-seat passenger inserts the seat
belt into the buckle, the head restraint on
the corresponding outer seat folds up
automatically.
Folding the rear seat head restraints into
position manually
Only the center rear seat head restraint can
be folded into position manually.
XPull the head restraint up until it engages.
Adjusting the luxury head restraints in the
rear compartment
GWARNING
When folding back the side cushions, never
reach between the side cushion and the
mounting post. You could otherwise be
trapped.
Seats107Seats, steering wheel and mirrorsZ
Page 114 of 536

XMake sure that the SmartKey is in position
1 or 2 in the ignition lock.XPress button ; for the right-hand exterior
mirror or button = for the left-hand
exterior mirror.
The indicator lamp lights up in the button
that has been pressed.XPress adjustment button : up, down, to
the right or to the left until the exterior
mirror is set to a position that provides you
with a good overview of traffic conditions.
Folding the exterior mirrors in or out
electrically
XMake sure that the SmartKey is in position
1 or 2 in the ignition lock.XBriefly press button :.
Both exterior mirrors fold in or out.
i Make sure that the exterior mirrors are
always folded out fully while the vehicle is
in motion, as they may otherwise vibrate.
Folding the exterior mirrors in or out
automatically
When the "Automatic mirror folding" function
is activated in COMAND ( Y page 262):
R the exterior mirrors fold in automatically as
soon as you lock the vehicle from the
outside.
R the exterior mirrors fold out again
automatically as soon as you unlock the
vehicle and then open the driver's or front-
passenger door.
i The mirrors do not fold out if they have
been folded in manually.
Exterior mirror out of position
If an exterior mirror has been pushed out of
position, proceed as follows:
XPress the mirror-folding button
( Y page 112) repeatedly until you hear the
mirrors engage in position.
The mirror housing is engaged again and
you can adjust the exterior mirrors as usual
( Y page 111).
Automatic anti-glare mirrors
GWARNING
If incident light from headlamps is prevented
from striking the sensor in the rear-view
mirror, for instance, by luggage piled too high
in the vehicle, the mirror's automatic anti-
glare function will not operate.
Incident light could then blind you. This may
distract you from the traffic conditions and,
as a result, you may cause an accident.
The rear-view mirror and the exterior mirror
on the driver's side automatically go into anti-
glare mode if the ignition is switched on and
incident light from headlamps strikes the
sensor in the rear-view mirror.
The mirrors do not go into anti-glare mode if
reverse gear is engaged or the interior lighting
is switched on.
112MirrorsSeats, steering wheel and mirrors
Page 122 of 536

Assigning the programmable button
(favorites):Programmable button
You can assign the following predefined
functions to the h programmable button:
R ECO : you can activate or deactivate the ECO
start/stop function.
R Massage, Driver's Seat : you can switch
the massage function for the driver's seat
on and off.
R Massage, Front Passenger's Seat :
you can switch the massage function for
the front-passenger seat on and off.
R Massage, Driver's and Front
Passenger's Seat : you can switch the
massage function for the driver's and front-
passenger seats on and off.
R Display OFF : you can switch the
COMAND display off or on.
R Tow-away Alarm : you can arm or
deactivate the tow-away alarm.
R Interior Motion Sensor : you can arm or
deactivate the interior motion sensor.
R Tow-away Alarm and Interior Motion
Sensor : you can arm or deactivate the tow-
away alarm and the interior motion sensor.
R Repeat Navigation Command : you can
have the most recent recommendation by
the navigation system repeated.
XTo assign the programmable button:
select Vehicle by sliding VÆ and turningcVd the COMAND controller and press
W to confirm.XSelect System and press W to confirm.XSelect Favorites Button and press W to
confirm.
The list of predefined functions appears.
The # dot in front of the list entry indicates
the current setting.XTo change the setting: turn cVd the
COMAND controller and select the desired
function.XTo store the setting and exit the menu:
press W the COMAND controller.
Telephone keypad
:Telephone keypad;Folding cover120At a glanceCOMAND
Page 253 of 536

Inserting a CD/DVD
The CD/DVD drive is located in the center
behind the front seats.
:Disc slot;Eject button
The CD/DVD drive is a single disc drive. If
there is already a disc inserted, this must be
ejected before another is inserted.
XInsert a disc into the disc slot.
The printed side of the disc must face
upwards. If neither side of the disc is
printed, the side you wish to play must face
downwards.
The CD/DVD drive draws in the disc.
The CD/DVD drive plays the disc:
R if it has been inserted correctly and is a
permissible disc, and
R after you have switched on disc mode
(audio CD/audio DVD/MP3 mode)
Data on an MP3 CD first needs to be loaded
by the drive. Loading may take some time,
depending on the number of folders and
tracks.
Removing a CD/DVDXPress the þ eject button.
The drive ejects the disc.XTake the disc out of the slot.
If you do not take the disc out of the slot,
the drive will draw it in again automatically
after a short while.
Switching to audio CD, audio DVD or
MP3 mode
XInsert a CD/DVD ( Y page 251).
The Rear Seat Entertainment System loads
the inserted disc.XSelect Disc in the menu using the
9=; buttons on the remote
control and press the 9 button to confirm.
The corresponding mode is switched on.
The Rear Seat Entertainment System plays
the disc.
i Variable bit rates in MP3 tracks can result
in the elapsed time shown being different
to the actual elapsed time.
Selects a track
Selecting by skipping to a track
XTo skip forwards or backwards to a
track: press the = or ; button on
the remote control.
or
XPress the E or F button.
The skip forward function skips to the next
track.
Skipping backwards restarts the current
track (if it has been playing for more than
eight seconds) or starts the previous track
(if the current track has only been playing
for a shorter time).
If you have selected the Track List Mix
or Random Folder playback options, the
track order is random.Rear Seat Entertainment System251COMANDZ
Page 436 of 536

Coat hook
The coat hooks are located on the left and
right in the headliner in the rear
compartment.
! Only hang light loads on the coat hooks.
Do not place a load of more than 6.6 lbs
(3 kg) on the coat hooks.XTo open: press coat hook :.
The coat hooks fold out.XTo close: press coat hook : until it
engages.
Stowage compartments in the rear
Stowage compartment in the rear seat
armrest
! Do not sit or lean your bodyweight on the
armrests when they are folded out as you
could damage them.
! Close the cover of the stowage
compartment before folding the rear seat
armrest back into the seat backrest.
Vehicles without a control panel in the rear seat
armrest
XTo open: fold down the seat armrest.XPull handle : and fold the armrests
upwards.
Vehicles with a control panel in the rear seat
armrest
XTo open: press button : and fold up the
armrest.
Stowage box between the rear seats
XTo open: pull handle : backwards in the
direction of the arrow.
Stowage box in the rear seat backrest
! Do not sit or lean your bodyweight on the
armrests when they are folded out as you
could damage them.
434Stowage areasStowing and features