2012 MERCEDES-BENZ S-Class reset
[x] Cancel search: resetPage 108 of 536

You can use the override button to disable
this function ( Y page 67).
The button is located in the rear door on the
front-passenger side.:To select the front-passenger seat or rear-
compartment seat;Seat height=Head restraint height?Backrest angleASeat fore-and-aft adjustmentXTo select the front-passenger seat:
press button :.
The front-passenger seat is selected if the
indicator lamp in the button lights up.XAdjust the front-passenger seat with
buttons ;, = , ? and A.XTo select the rear-compartment seat:
press button :.
The rear-compartment seat is selected
again.
Adjusting the head restraints
Adjusting the head restraint height
electrically
XTo adjust the head restraint height: slide
the switch for head restraint adjustment
( Y page 104) up or down in the direction of
the arrow.Adjusting the NECK-PRO head
restraints
Adjusting
XPull or push the bottom of NECK-PRO head
restraint :.
Resetting
The NECK-PRO head restraints are moved
forwards in the event of a rear collision in the
direction of travel and have to be reset
afterwards ( Y page 56).
Adjusting NECK-PRO luxury head
restraints
Adjusting
GWARNING
When folding back the side cushions, do not
hold the area between the side cushion and
the cushion holder. There is a danger of
becoming trapped.
You can adjust side bolsters : of the NECK-
PRO luxury head restraints individually.
106SeatsSeats, steering wheel and mirrors
Page 109 of 536

XTo adjust the side bolsters of the head
restraint: push or pull side bolsters : into
the desired position.XTo move forwards and backwards: pull
or push the NECK-PRO luxury head
restraints in the direction of arrow ;.
Resetting
The NECK-PRO luxury head restraints are
moved forwards in the event of a rear collision
in the direction of travel and have to be reset
afterwards ( Y page 56).
Rear seat head restraints
GWARNING
For safety reasons, always drive with the rear
head restraints in the upright position when
the rear seats are occupied.
Keep the area around head restraints clear of
articles (e.g. clothing) to not obstruct the
folding operation of the head restraints.
GWARNING
Make sure the rear seat head restraints
engage when placing them upright manually.
Otherwise their protective function cannot be
ensured.
The back of the head will not be supported in
the event of a collision. That could cause
serious or even fatal injuries. Rear seat
occupants can be seriously injured or killed.
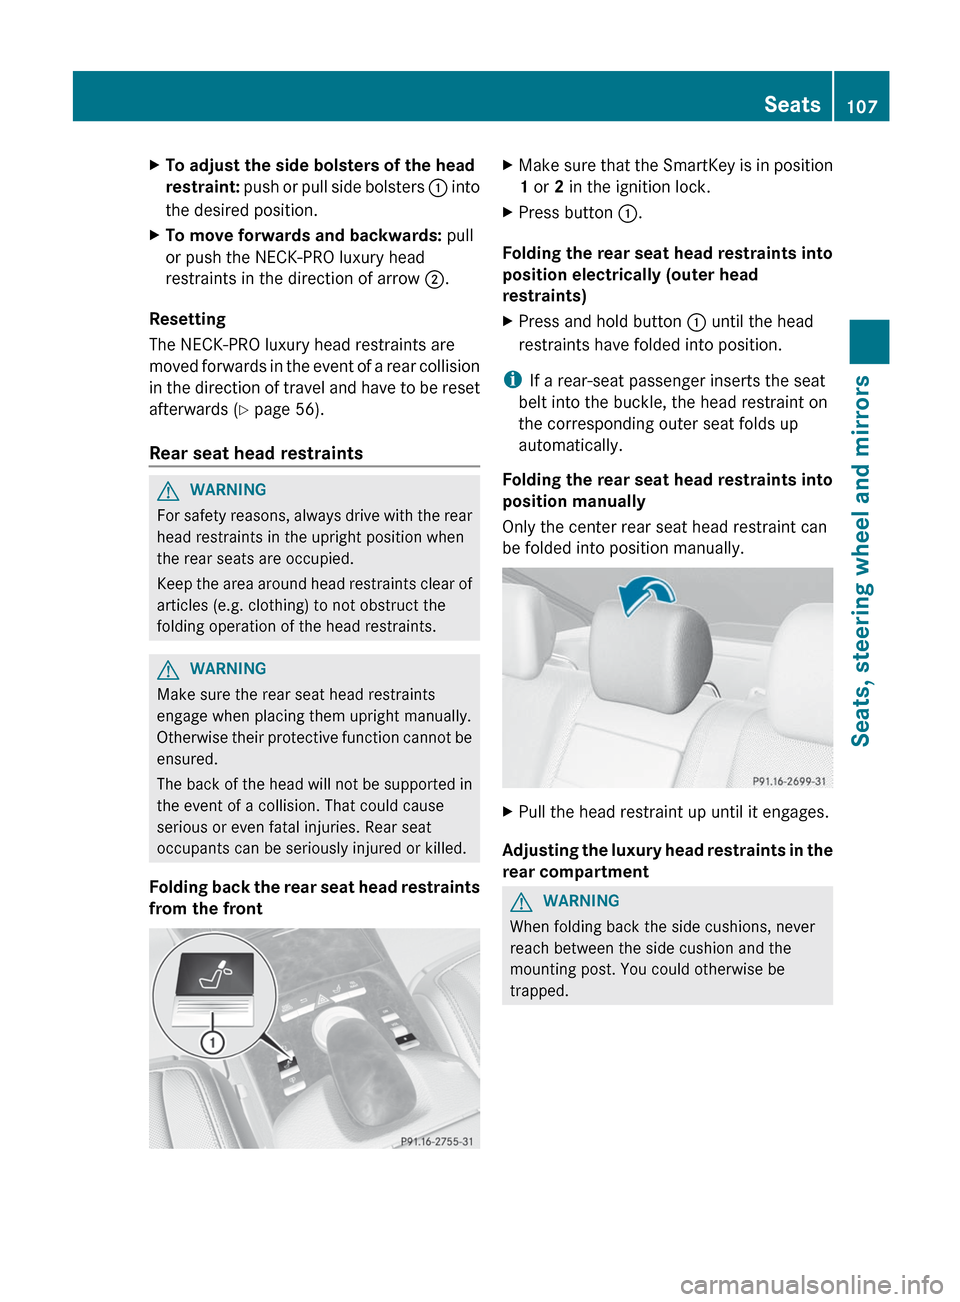
Folding back the rear seat head restraints
from the front
XMake sure that the SmartKey is in position
1 or 2 in the ignition lock.XPress button :.
Folding the rear seat head restraints into
position electrically (outer head
restraints)
XPress and hold button : until the head
restraints have folded into position.
i If a rear-seat passenger inserts the seat
belt into the buckle, the head restraint on
the corresponding outer seat folds up
automatically.
Folding the rear seat head restraints into
position manually
Only the center rear seat head restraint can
be folded into position manually.
XPull the head restraint up until it engages.
Adjusting the luxury head restraints in the
rear compartment
GWARNING
When folding back the side cushions, never
reach between the side cushion and the
mounting post. You could otherwise be
trapped.
Seats107Seats, steering wheel and mirrorsZ
Page 115 of 536

Parking position for the exterior
mirror on the front-passenger side
Setting and storing the parking position
You can position the front-passenger side
exterior mirror in such a way that you can see
the rear wheel on that side as soon as you
engage reverse gear. You can store this
position.
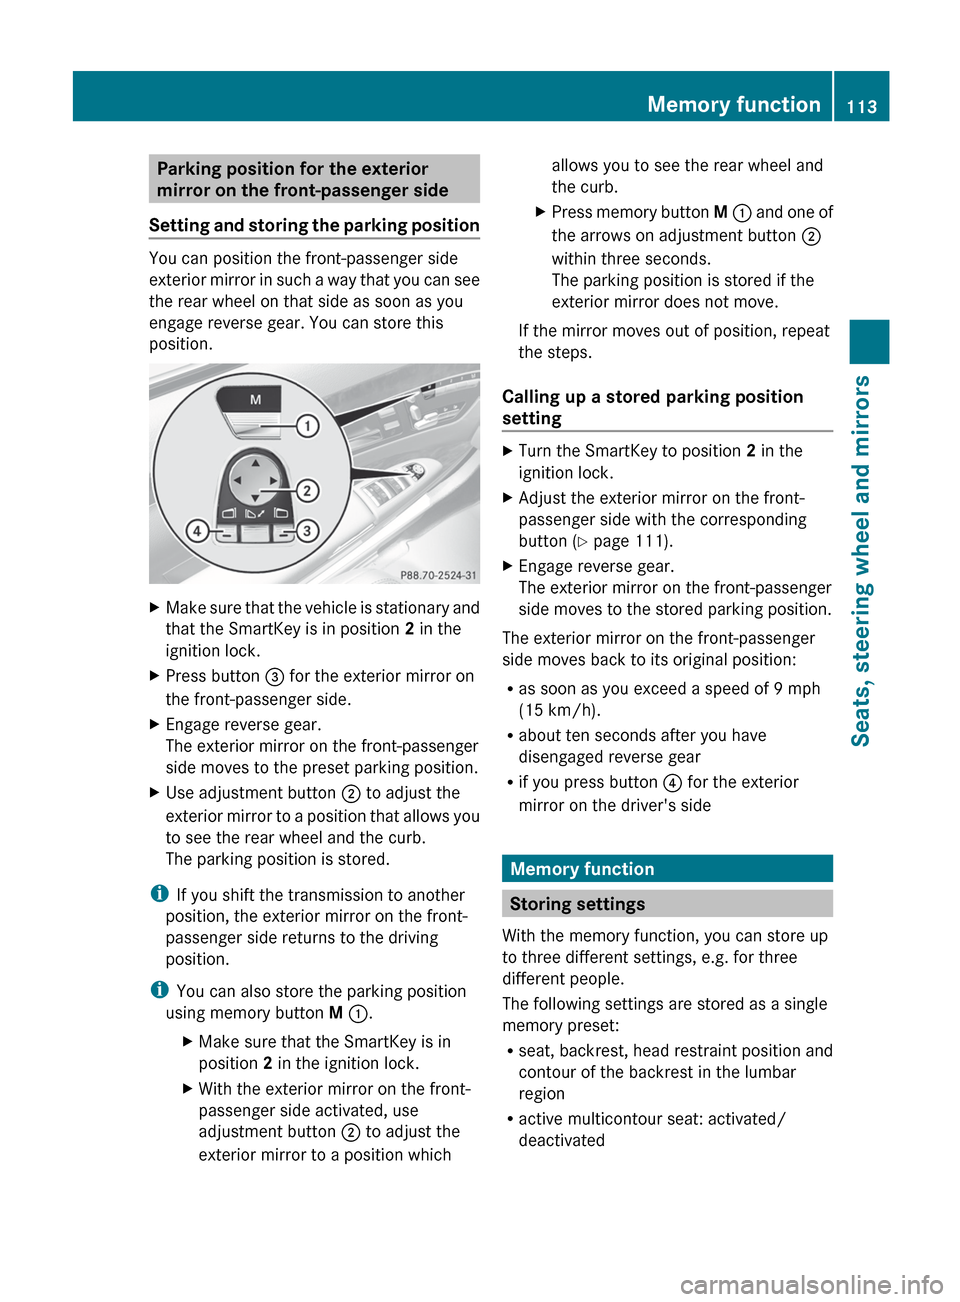
XMake sure that the vehicle is stationary and
that the SmartKey is in position 2 in the
ignition lock.XPress button = for the exterior mirror on
the front-passenger side.XEngage reverse gear.
The exterior mirror on the front-passenger
side moves to the preset parking position.XUse adjustment button ; to adjust the
exterior mirror to a position that allows you
to see the rear wheel and the curb.
The parking position is stored.
i If you shift the transmission to another
position, the exterior mirror on the front-
passenger side returns to the driving
position.
i You can also store the parking position
using memory button M : .
XMake sure that the SmartKey is in
position 2 in the ignition lock.XWith the exterior mirror on the front-
passenger side activated, use
adjustment button ; to adjust the
exterior mirror to a position whichallows you to see the rear wheel and
the curb.XPress memory button M : and one of
the arrows on adjustment button ;
within three seconds.
The parking position is stored if the
exterior mirror does not move.
If the mirror moves out of position, repeat
the steps.
Calling up a stored parking position
setting
XTurn the SmartKey to position 2 in the
ignition lock.XAdjust the exterior mirror on the front-
passenger side with the corresponding
button ( Y page 111).XEngage reverse gear.
The exterior mirror on the front-passenger
side moves to the stored parking position.
The exterior mirror on the front-passenger
side moves back to its original position:
R as soon as you exceed a speed of 9 mph
(15 km/h).
R about ten seconds after you have
disengaged reverse gear
R if you press button ? for the exterior
mirror on the driver's side
Memory function
Storing settings
With the memory function, you can store up
to three different settings, e.g. for three
different people.
The following settings are stored as a single
memory preset:
R seat, backrest, head restraint position and
contour of the backrest in the lumbar
region
R active multicontour seat: activated/
deactivated
Memory function113Seats, steering wheel and mirrorsZ
Page 128 of 536

ECOMAND: to select a station from
presets, select a track, enter directly,
enter a phone number, for example. Rear
Seat Entertainment System: to select a
track, enter directlyFTo exit a menu (back)XPoint the remote control at the
corresponding screen and execute the
functions by pressing the corresponding
buttons.
i The remote control's function may be
restricted depending on the angle at which
it is pointed at the respective screen.
Selecting the screen for the remote
control
XTurn thumbwheel = until the desired
display is highlighted in the window.
Switching the screen on/off (Rear Seat
Entertainment System only)
If the SmartKey is in the ignition lock in
position 0 or 1 or if the SmartKey is not in the
ignition lock, the rear screens will switch off
after 30 minutes. Before the screens switch
off, they show a message to this effect.
You can switch the screens back on.
However, this will discharge the starter
battery.
XPoint the remote control at the rear-
compartment screen which has been
selected for remote operation.XPress button : on the remote control.
The respective rear screen switches on or
off.
i You can only switch the screens on using
the remote control if the ignition is
switched on.
Switching the button lighting on/off
XPress button ; on the remote control.
Depending on the previous status, the
button lighting is switched on or off.i If you do not use the remote control for
about 15 seconds, the button lighting
switches off automatically.
MuteXPress button B on the remote control.
The sound is switched on/off.
Adjusting the volume
This function is available for SPLITVIEW and
for the Rear Seat Entertainment System in
conjunction with corded headphones.
XPress one of buttons C on the remote
control.
The volume of the currently selected audio
or video source changes.
For COMAND, you can also adjust the
volume for phone calls and navigation
messages.
Selecting a menu/menu item and
confirming your selection
XPress the =;9: buttons to
select the menu/menu item and press the
9 button to confirm.126At a glanceCOMAND
Page 129 of 536

Functions with the E and F button
You can use the remote control to execute the same functions as the COMAND control panel.
ModeFunctionAudio modeSelects a station using the station search function ( Y page 212)Selects a track by skipping to a track ( Y page 224)Fast forward/rewind ( Y page 225)Video modeSelects a scene or chapter (video DVD mode) ( Y page 243)Fast-forward/rewind (video DVD mode) ( Y page 242)
Functions of the number keypad
You can use the remote control to execute the same functions as the COMAND control panel.
ModeFunctionAudio modeSelects stations via the station presets ( Y page 212)Sets stations by entering the frequency manually ( Y page 212)Stores stations manually ( Y page 213)Selects a track ( Y page 224)Selects a data medium via the media list ( Y page 224)Telephone modeTelephone number entry ( Y page 200)Character entryEnters characters (direct entry) ( Y page 130)Operating COMAND
Selecting a main function
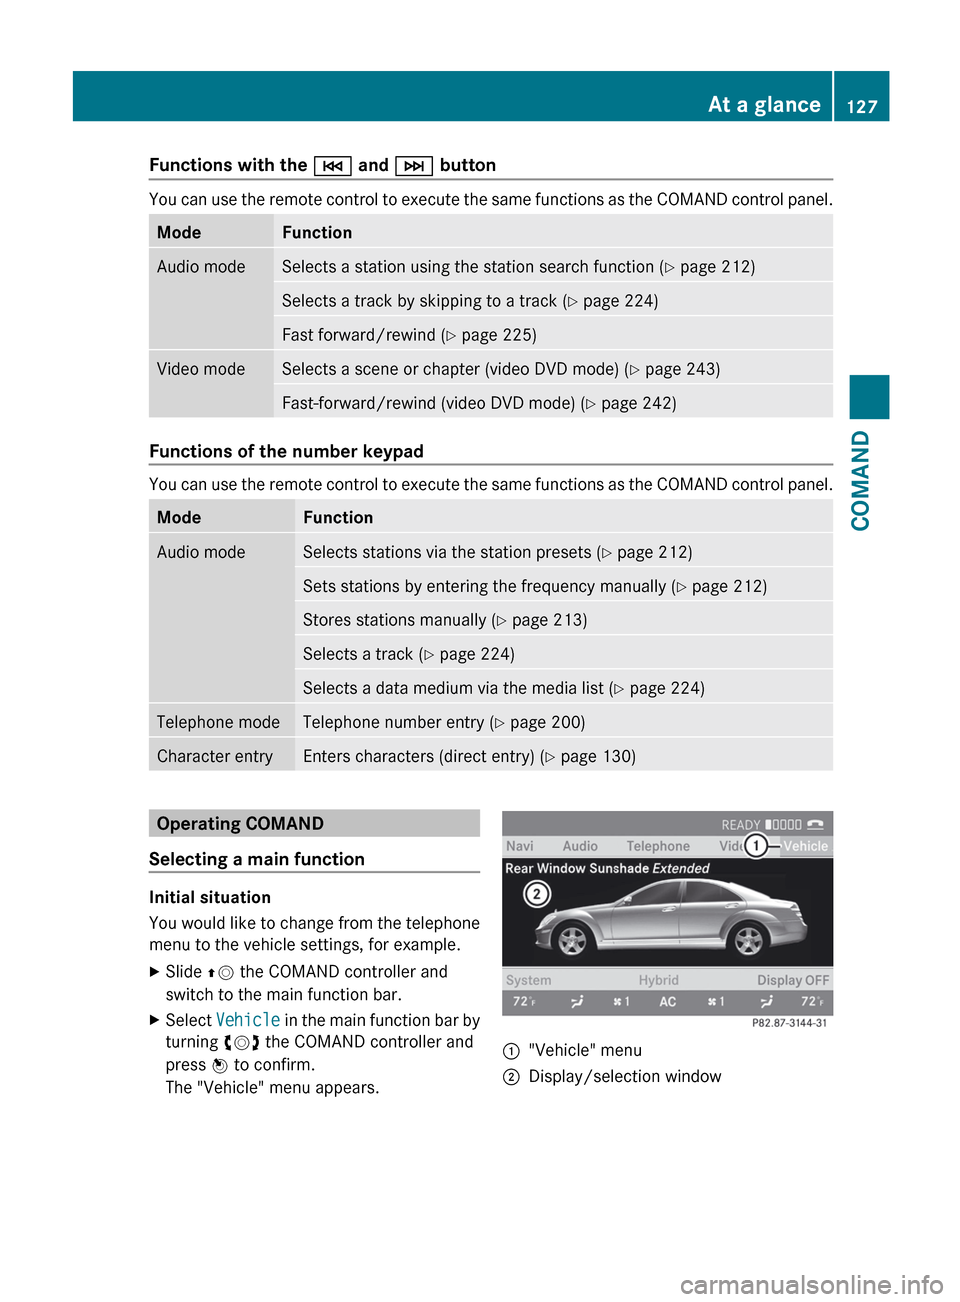
Initial situation
You would like to change from the telephone
menu to the vehicle settings, for example.
XSlide ZV the COMAND controller and
switch to the main function bar.XSelect Vehicle in the main function bar by
turning cVd the COMAND controller and
press W to confirm.
The "Vehicle" menu appears.:"Vehicle" menu;Display/selection windowAt a glance127COMANDZ
Page 130 of 536

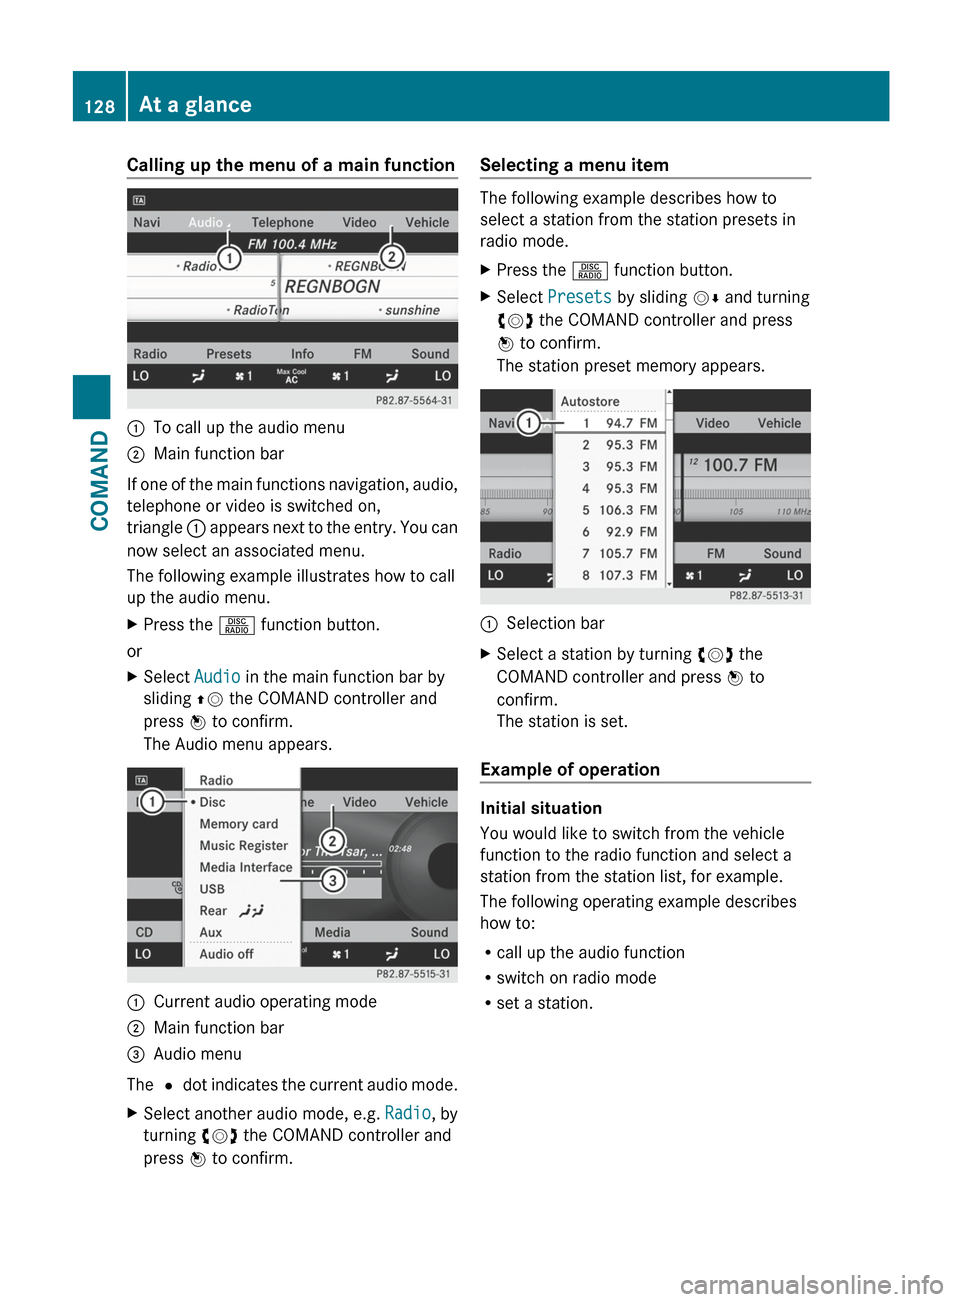
Calling up the menu of a main function:To call up the audio menu;Main function bar
If one of the main functions navigation, audio,
telephone or video is switched on,
triangle : appears next to the entry. You can
now select an associated menu.
The following example illustrates how to call
up the audio menu.
XPress the R function button.
or
XSelect Audio in the main function bar by
sliding ZV the COMAND controller and
press W to confirm.
The Audio menu appears.:Current audio operating mode;Main function bar=Audio menu
The # dot indicates the current audio mode.
XSelect another audio mode, e.g. Radio, by
turning cVd the COMAND controller and
press W to confirm.Selecting a menu item
The following example describes how to
select a station from the station presets in
radio mode.
XPress the R function button.XSelect Presets by sliding VÆ and turning
cVd the COMAND controller and press
W to confirm.
The station preset memory appears.:Selection barXSelect a station by turning cVd the
COMAND controller and press W to
confirm.
The station is set.
Example of operation
Initial situation
You would like to switch from the vehicle
function to the radio function and select a
station from the station list, for example.
The following operating example describes
how to:
R call up the audio function
R switch on radio mode
R set a station.
128At a glanceCOMAND
Page 152 of 536

change accordingly. If the selected language
is not supported by the Voice Control System,
"English" will be selected.XSelect Vehicle by turning cVd the
COMAND controller and press W to
confirm.XSelect System and press W to confirm.XSelect Language and press W to confirm.
The list of languages appears. The # dot
indicates the current setting.XSelect the language by turning cVd the
COMAND controller and press W to
confirm.
COMAND loads the selected language and
sets it.
Reset function
You can reset COMAND to the factory
settings. Amongst other things, this will
delete all personal data (e.g. station presets,
address book entries, entries in the
destination memory and in the list of previous
destinations in the navigation system).
Resetting is recommended before selling or
transferring ownership of your vehicle, for
example.
XSelect Vehicle in the main function bar by
turning cVd the COMAND controller and
press W to confirm.XSelect System by turning cVd the
COMAND controller and press W to
confirm.XSelect Reset and press W to confirm.
A prompt appears asking whether you wish
to reset.XSelect Yes or No and press W to confirm.
If you select No, the process will be aborted.
If you select Yes, another prompt appears
asking whether you really wish to reset.XSelect Yes or No and press W to confirm.
If you select Yes, a message will be shown.
COMAND is reset and restarted.If you select No, the process will be aborted.
Navigation
Introduction
Safety notes
GWARNING
For safety reasons, only enter a destination
when the vehicle is stationary. When the
vehicle is in motion, a passenger should enter
the destination. Study manual and select
route before driving.
Bear in mind that at a speed of just 30 mph
(approximately 50 km/h), your vehicle is
covering a distance of 44 feet (approximately
14 m) every second.
COMAND calculates the route to the
destination without taking account of the
following:
R Traffic lights
R Stop and right-of-way-signs
R Lane merging
R Parking or stopping prohibited areas
R Other road and traffic rules and regulations
R Narrow bridges
GWARNING
COMAND may give incorrect navigation
commands if the data in the digital map does
not correspond with the actual road/traffic
situation. Digital maps do not cover all areas
nor all routes within an area. For example, if
the traffic routing has been changed or the
direction of a one-way road has been
reversed.
For this reason, you must always observe
applicable road and traffic rules and
regulations during your journey. Road and
traffic rules and regulations always have
priority over the navigation commands
generated by the system.
150NavigationCOMAND
Page 203 of 536

iThe redialing function is also available
using the on-board computer
( Y page 383).
Calling voicemail
This function is only available if it is supported
by the mobile phone network provider.
You can only call voicemail if the voicemail
number is stored as preset 1 on the SIM card.XPress and hold the 4 button on the
telephone keypad.
or
XUse the COMAND controller to select 1 and
confirm until dialing commences.
Connecting a call to an entry in a call list
or in the COMAND phone book
XOpen a call list and select an entry
( Y page 209).
or
XCall up the COMAND phone book and
select an entry ( Y page 205).
Functions available during a call
Overview
Telephone operation with a single call
:Person you are calling;Icon for active telephone connection=NEW to call other parties 8?To switch hands-free microphone on/offATo send DTMF tones (not possible with all
mobile phones)BTo end a call
Switching the hands-free microphone on/
off
This function is also available during an active
phone call.
XTo call up the telephone basic menu
( Y page 198).XTo switch off: select Mike OFF and press
W to confirm.
or
XPress the 8 button on the multifunction
steering wheel.
If the microphone is switched off, the
display shows the Q symbol and the The
microphone is turned OFF message
appears for a short period.XTo switch on: select Mike ON and press
W to confirm.
or
XPress the 8 button on the multifunction
steering wheel.
The Q symbol disappears. You will briefly
see the The microphone is ON message.
Ending an active call
XSelect ~ in the telephone basic menu
and press W to confirm.
or
XPress the ~ button on the telephone
keypad or on the multifunction steering
wheel.
Call waiting, toggling and conference
connections with several people
These functions are only available if they are
supported by the mobile phone network
provider. Furthermore, they are only available
if the mobile phone supports HFP 1.5 or
higher.
8 This function is only available if the telephone supports HFP1.5 and above.Telephone201COMANDZ