2012 MERCEDES-BENZ R-Class phone
[x] Cancel search: phonePage 110 of 210

i
Save entry is
shown ingray ifthe
selected listentry hasalrea dybeen saved.
X Select Add and
press the9button to
confirm.
X Select acategory forthe number, e.g.
Home ,
and press the9toconfirm.
X Select acategory forthe phone, e.g.
Mobile ,
and press the9toconfirm.
X Select Save .
The search menuforaddress bookentries
appea rs.
X Search forthe desired entry(Ypage 103).
X Press the9button whenyouhave finished
searching.
COMAND storesthedata ifthere arefewer
than fivenumbers assigned tothe entry you
are searching forinthe selected number
category.
You willsee amessage tothis effect.
If five numbers arestored forthe entry you
are searching for,aprompt willappea r
asking whether youwish tooverwrite one
of the existing numbers.
X Select Yes or
No and
press the9button
to confirm.
If you select Yes ,
a selection listwith the
five existing numbers isdispla yed.
If you select No ,
the process willbeaborted.
X Select thenumber tobe overwritten from
the listusing the9: buttonsand
press the9button toconfirm.
COMAND overwrites theselected number
with thenew data. Del
eting calllists
i The stored calllists remain inCOMAND,
even ifyou useCOMAND withanother
mobile phone. Forthis reason, youshould
delete anycalllists before handing overor
selli ngthe vehicle. X
Select Calllists in
the telephone basic
menu usingthe:=; buttons
and press the9button toconfirm.
X Select Delete calllists and
press the
9 button toconfirm.
Ap rompt appears asking whethe ryou wish
to delete allcall lists.
X Select Yes or
No and
press the9button
to conf irm.
If you select Yes ,
the call lists aredeleted.
If you select No ,
the process willbeaborted. Using
theaddress book Introdu
ction G
WARNIN
G
Please devote youratten tionfirst and
foremost tothe traffic situation youarein.
Before yourjourney, pleasefamiliarize
yourself withtheaddress bookfunctions.
Only usetheCOMAND whenroadandtraffic
condit ionspermit youtodo so. Otherwise you
could beinvolved inan accident inwhich you
or others couldbeinjured.
The address bookorganizes andstores
entr ieswhich areenter edfrom different
sources (mobilephone,SDmemory card,
COMAND telephone book,navigation
system).
You canusethese entriestomake telephone
calls andfornavigation.
i Each address bookentryconsist sof a
surname, firstname andcompany, andcan
cont ainuptofive telephone numbers,one
home address andone business address.
The address bookcanstore around 900
entr ies.
i Address bookentriesremain storedwhen
the mobile phoneisdisconn ected.
Therefore, youshould deleteyourpersonal
data using thereset functionbefore selling
your vehicle, forexample (Ypage 43). 108
Using
theaddress bookTelephone
Page 111 of 210

Callin
gup thead dress book
X Pre ssthe% function button.
You seethete lepho nebasic menuor the
addre ssbook ifit was open previously.
X Ifth ete lepho nebasic menuis sho wn, pres s
th e9=; buttons toselec t
Pho ne and
pres sth e9 buttonto confirm .
X Sel ect Addres sBoo k fr
om themen uand
pres sth e9 buttonto confirm . Add
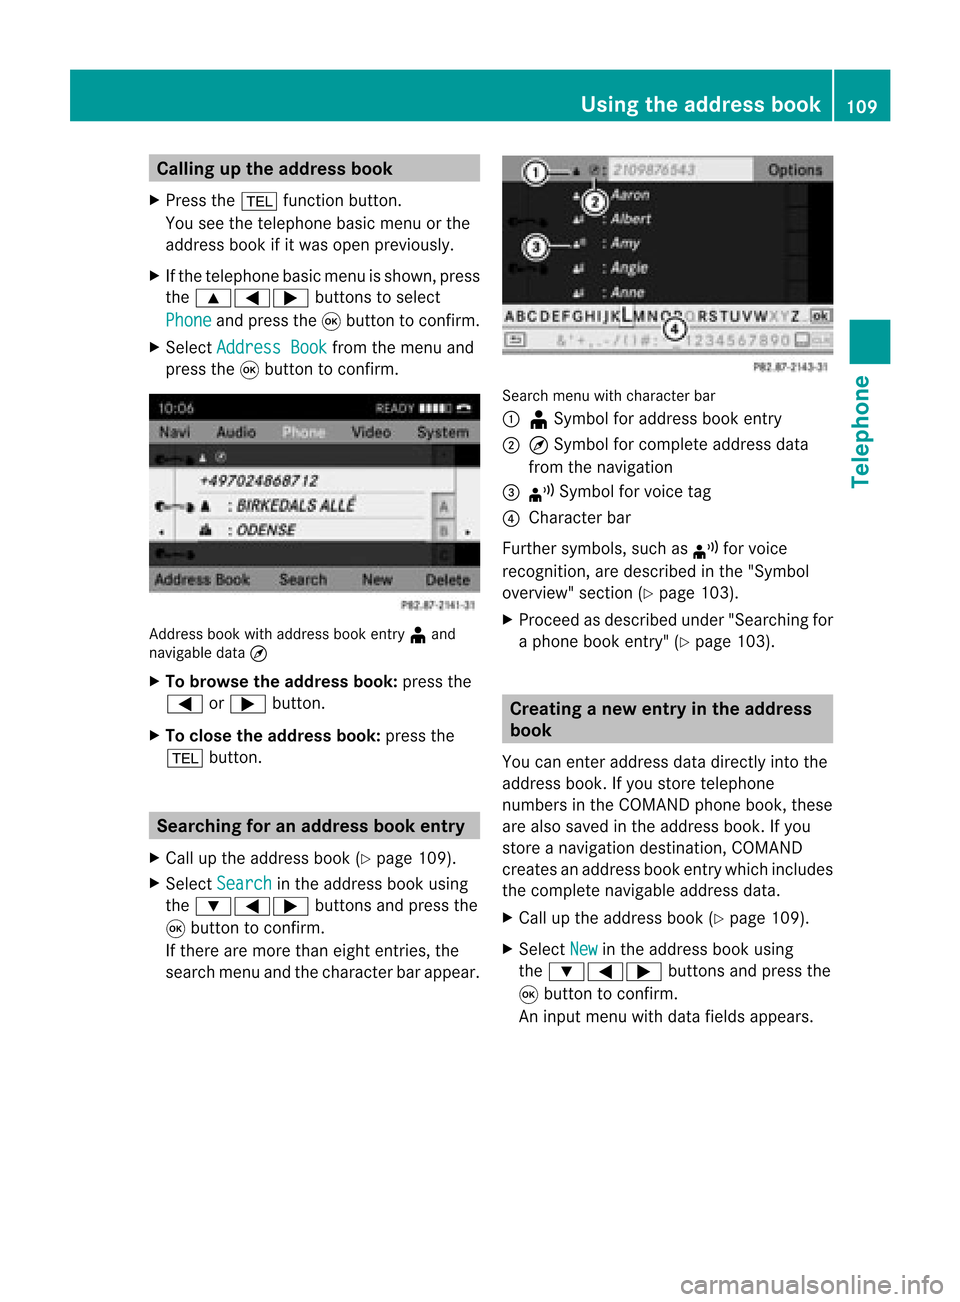
ressbook withaddr essbook entry ¥ and
nav igable data¤
X To browse thead dress book: pressth e
= or; button.
X To close thead dress book: pressth e
% button. Sear
ching foranaddress book entry
X Call uptheaddre ssbook (Ypage 109).
X Sel ect Search in
theaddre ssbook using
th e:=; buttons and pres sth e
9 buttonto confirm .
If th ere aremor eth an eight entries, the
sear chmen uand thech arac terb arappear . Sea
rchmen uwit hch arac terbar
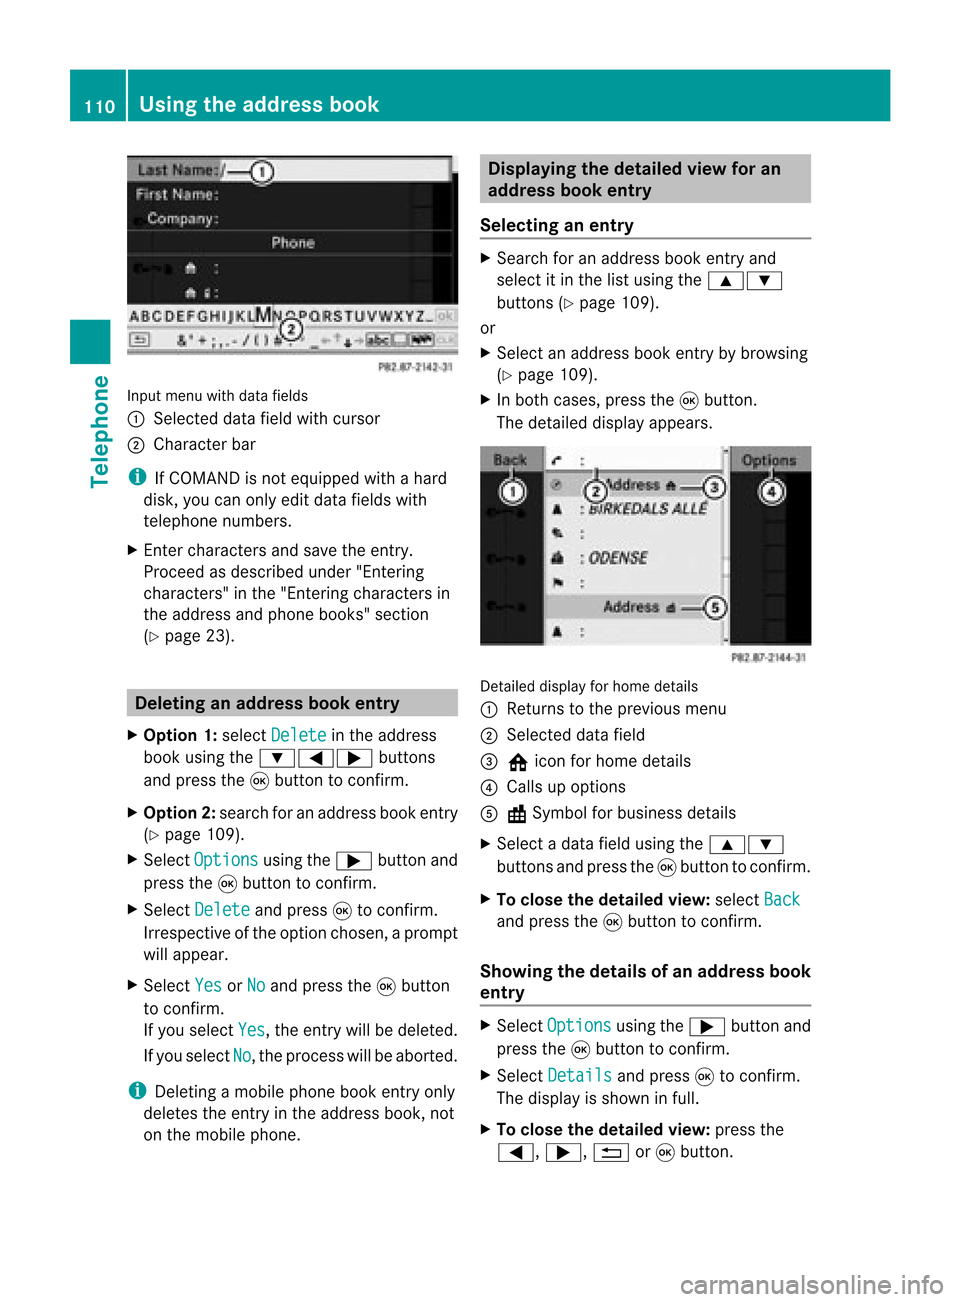
: ¥Sym bolforaddre ssbook entry
; ¤Sym bolforcomple teaddre ssdat a
fr om thenav igat ion
= ¦ Sym bolforvoic etag
? Charac terb ar
Fur ther symb ols,suchas ¦ forvoic e
rec ogn ition ,are desc ribedin the"Sym bol
ove rview" section(Ypage 103).
X Procee das descr ibedunder "Search ingfor
a phone bookentry" (Ypage 103). Creat
inganew entryin the address
book
You canenteraddress datadirect lyint othe
address book.Ifyou storetelephon e
numbers inthe COMAND phonebook,these
are also saved inthe address book.Ifyou
stor eanavigat iondestin ation, COMAND
creat esan address bookentrywhich includes
the complet enavigable addressdata.
X Call upthe address book(Ypage 109).
X Select New in
the address bookusing
the :=; buttons and press the
9 butt ontocon firm.
An input menu withdata fields appears. Using
thead dress book
109Telephone Z
Page 112 of 210

Input
menu withdata fields
: Selected datafieldwithcursor
; Cha racter bar
i IfCOMAND isnot equi pped withahard
disk, youcan only editdata fieldswith
telepho nenumbers.
X Ent ercharacters andsave theentry.
Proceed asdescribe dunder "Entering
characters" inthe "Entering characters in
the addre ssand phone books" section
(Y page 23). De
leting anaddr essbookentry
X Opt ion 1:select Delete in
the address
book using the:=; buttons
and press the9button tocon firm.
X Opt ion2:search foranaddress bookentry
(Y page 109).
X Select Options using
the; button and
press the9button tocon firm.
X Select Delete and
press 9tocon firm.
Irrespec tiveofthe option chosen ,a prompt
will appear.
X Select Yes or
No and
press the9button
to con firm.
If you select Yes ,
the entrywill bedeleted.
If you select No ,
the process willbeaborted.
i Delet ingamobile phonebookentryonly
deletes theentryinthe address book,not
on the mobile phone. Displaying
thedeta iledview foran
add ress book entry
Selecting anentry X
Search foranaddress bookentryand
select itin the listusing the9:
button s(Y page 109).
or
X Select anaddress bookentryby browsing
(Y page 109).
X In both cases, pressthe9button .
The detailed displayappears. Det
ailed display forhome details
: Returns tothe previous menu
; Select eddata field
= @ icon forhome details
? Calls upoption s
A \Symbol forbusiness details
X Select adata fieldusing the9:
button sand press the9button tocon firm.
X To close thedeta iledview: select Back and
press the9button tocon firm.
Showing thedeta ilsofan add ress book
entry X
Select Options using
the; button and
press the9button tocon firm.
X Select Details and
press 9tocon firm.
The display isshown infull.
X To close thedeta iledview: pressthe
=, ;,%or9 button . 110
Using
theadd ress bookTelephone
Page 113 of 210

Cha
nging anaddress book entry
Cha nging anent ry X
Opt ion1:sear chfor anaddre ssbook entry
and selec titf rom thelistu sing the
9: buttons(Ypage 109).
X Select Options using
the; button and
press the9button toconfirm.
X Select Change and
press the9button to
confirm.
X Option 2:call upthe detailed viewforan
address bookentry (Ypage 110).
X Select Options using
the; button and
press the9button toconfirm.
X Select Change Entry and
press the9
button toconfirm.
Irrespective ofthe option, theinput menu
cont aining datafields appea rs.
X Proceed asdescribed under"Enterin g
characters" inthe "Enterin gcharacters in
the address andphone books" section
(Y page 23).
Changing thecategory ofatelephone
number datafield X
Display thedetailed viewforanaddress
book entry (Ypage 110)andhighlig htthe
telephone numberdatafield.
X Select Options using
the; button and
press the9button toconfirm.
X Select Change Category and
press the
9 button toconfirm.
X Select anumber category, e.g.Home .
X Select atelephone category,e.g.Mobile Phone .
X Select Preferred if
desired andpress the
9 button toconfirm.
Depending onthe previous state,switch
the option onO oroff ª.T hephone
number isdispla yedasthe first number inthe
phone bookandcanbediale d
immediately.
X Select Save and
press 9toconfirm .
The new category isstored. Calling
anumber storedinan entry
Co nditio ns The
mobi lephone mustbeconnected viathe
Blue tooth ®
interface .
Option 1 X
Displ aydetai lsfor anadd ress book entry
(Y pag e110).
X Select thetelep hone numbe rdata field
usin gth e9: buttons and pres sth e
9 buttonto confirm .
The telepho nemak esthecall. Thedispl ay
swit ches totelepho nemod e.
Opt ion 2 X
Dis play details foranaddre ssbook entry.
X Sel ect thete lepho nenum berdatafiel d
usin gth e9: buttons .
X Sel ect Opt ions usin
gth e; buttona nd
pre ssthe 9button toconfi rm.
X Sel ect Call and
pressthe 9button to
confi rm.
The telephone makes thecall.
Opti on3 X
Sel ect anaddre ssbook entry inthe list
us ing the 9: buttons.
X Pre ssthe 6 button.
The telephone makes thecall. Us
ingthe addres sbo ok
111Tel epho ne Z
Page 115 of 210

Imp
orting cont acts
Cond itions You
canimpo rtco ntact stothe address book
from anexter nalBluetooth ®
device oran SD
memory card.
The Bluetooth ®
device needstobe inside the
vehicle andhastobe switched on,activated,
and authorized. Itmust beable totrans mit
cont acts and/or vCardsviaBluetooth ®
.
i Around 900entriescan bestored inthe
address book.When themaximum number
has been reached, youcan delete existing
entr ies(Ypage 110),and then import new
ones.
Import ingcontacts X
Start thedata exchan geon the exter nal
device (seetheexter naldevice's operating
instr uctions).
or
X Insert anSD memory card.
X Select Address Book in
the address book
using the:=; buttonsand
press the9button toconf irm.
X Select Download Contacts and
press the
9 button toconf irm.
Am enu appears. X
Select FromMobile Phone ,
From The Memory
Card or
Receive Business Card(s) and
press 9tocon firm.
The contact sare import ed. Deleting
contacts X
With theaddress bookshown, select
Address Book and
press the9button to
con firm.
Am enu appears.
X Select Delete Contacts and
press the
9 button tocon firm.
X Select oneofthe following options:
R Interna lContact s R
From Mobile Phone R
From TheMemory Card R
Receive dBusines sCards R
Delete All Ap
rompt correspo ndingtoyou rselection
appears.
X Select Yes or
No and
press the9button
to con firm.
If you select Yes ,
the contact sare deleted
accor dingtoyour select ion.
If you select No ,
the process willbeaborted. Opera
tingthetelephone usingthe
mult ifunction steeringwheel Telephone
menu
Introd uction You
canoperate thetelephon eusing the
function sin the "Tele phone" menu,provided
you have connected itto the Mercedes-Benz
hands-free system.
The displa yin the "Tele phone" menudepends
on the status ofthe telephone.
X Switch onthe telephone andCOMAND.
X Press theV orU button toselect the
TEL displa
y.
Telephone isready toreceive calls Bluetooth
®
interface telephony: whetherthe
network provider's nameisdispla yed
depends onthe telephone connected. Operat
ingthe telephone usingthemult ifunction steeringwheel
113Telephone Z
Page 116 of 210

Accept
ingacall
When thetelep hone isrea dyfor use ,you can
accep tacallat any time .When acall is
incoming, youseethename ortelephone
number inthe multifunction display.
X Press the6 button onthe multifunction
steering wheel. Rejecting
orending acall
X Press the~ button onthe multifunctio n
steeri ngwhe el. Cal
linganumbe rfrom theCOM AND
phone book
You may select and diala numbe rfrom the
COMAND phonebookatany time, provid ed
you rmobile phone isready toreceive calls.
i Ifyou have imported contacts
(Y page 113), youcan select thephone
book entriesofthe mobile phonebyusing
the multifunct ionsteerin gwheel.
X Press theV orU button toselect the
TEL display
.
X Press the& or* button toopen the
phone bookinthe multifunct iondisplay .
X Press the& or* button repeatedly
until thedesired entryis highlighted.
The saved names aredisplay ed
alphabetically .
i Ifyou press andhold the& or*
button forlonger thanonesecond, the
multifunct iondisplay willskip from thefifth
entr yto the first entryfound under the
following letter.Release thebutton tostop. :
Mode
; Call er's name
X To mak eacall: press the6 button on
the multifunct ionsteerin gwheel.
i Ifthere areseveral numbers forthis
name, youseealist ofsub-ent ries.
X Press the6 button again.
The Connecting call... message
appears inthe multifunct iondisplay along
with thenumber beingdialed andthe
name, ifit is stored inthe phone book.
The phone number dialedisstored inthe
appropriate calllist.
X To exit without connectingacall: press
the ~ button onthe multifunctio n
steeri ngwhe el. Redial
ing
X Press theV orU button tosel ect the
TEL dis
pla y.
X Press the6 button.
You seethelast call dialed .
X To scroll throug hthe listo fdialed calls:
press the& or* buttonrepeat edly
unt ilthe desire dent ryisshown .
X To ma keacall: press the6 button. 114
Oper
ating thetelep hone using themu ltifunct ionsteer ingwheelTelep hone
Page 124 of 210

i
SIRIUS XMRadio offe rsmore than130
di gital -qu ality rad iocha nnel spro viding
100% comme rcial-fre emus ic,spo rt,new s
and enter tainment.
SIR IUS XMRadio emp loys afle et ofhigh-
pe rfor mance satel lites tobro adcas taround
the clock through outtheUSA andCanada .
The SatRa dioprogra misavail able fora
monthly fee.Details areavail able from the
SIRIUS XMService Centerandat
htt p://www .sirius.com (USA)or
htt p://www .siriuscanada. com
(Ca nada). Registering
Registering SatRadio Switching
toSatRadio mode:
X From another mainfunction: select
Audio using
the9:=;
buttons andpress the9button toconfirm.
X Select Audio and
press the9button to
confirm.
X Select SatRadio and
press the9button
to confirm.
i Ifradio mode wasthelast active mode,
you only need toselect Audio .
X When inaudio mode: selectAudio using
the 9:=; buttonsand
press the9button toconfirm.
X Select SatRadio and
press the9button
to confirm.
The satellite radiomainmenu appears
showing theweather channel. Youcannot
select anyother stations.
X Select SatRadio (in
the submenu) using
the 9:=; buttonsand
press the9button toconfirm.
X Select Service and
press the9button to
confirm.
The service information screenappears. Service
information screen
1 Provider's phonenumber (SIRIUSXM)
2 SIRIUS IDofyour satellite receiver
= SIRIUS IDofyour traffic tuner
X Cal lthe phone number ofyour satellite
radio provider shownonthe screen.
i You canalso have thesatellite service
activated online.Todo so, visit theSIRIUS
XM Radi owebsite at
htt p://www .sirius.com (USA)or
htt p://www .siriuscanada. com
(Canad a).
Once theconn ection hasbeen established :
X Follow theinstruct ionsofthe service staff.
The activation processmaytake uptoten
minutes. Ifthe activation iscompleted
successfully ,the NoService message
appea rsinthe displa y,followed bythe
SatRadio mainmenu.
i Ifregistration isnot included when
purchasing thesystem, yourcredit card
details willberequired toactivate your
account. SatRa
diomode
i You canalso usethemultifunction
steering wheeltotune inchannels orscroll
through lists,e.g.bypressing
the ;=9: buttons.122
Satellite
radioAudio
Page 128 of 210

Disp
laying service informa tion If
you haveany ques tion so rrequire version
infor mation ,you can calltheprovider's
custo merservic ecen teratany time.
X Select SatRadi o using
the
9:=; buttonsand press
the 9button tocon firm.
X Select Service and
press the9button to
con firm.
The provider's detailsappear. 1
Provider's phonenumber (SIRIUSXM)
2 SIRIUS IDofyour satellite receiver
= SIRIUS IDofyour traffictuner
X To retu rntothe SatR adio main displa y:
press ;or=.
Upda tingthechannel list When
receivin ganew chann ellist, thedisplay
shows theUpdatin gChannel s... message.
The stationlast select edismuted untilthe
update hasbeen complet ed.SatRadio mode
is not available duringtheupdate process .
When theupdate hasbeen complet ed,the
SatRadio mainmenu appears. Thestationlast
select edisplayed.
Sound settings Inf
ormation onthe sound settings canbe
found inthe "Ataglance" chapter.
R Volume (Ypage 27)
R Balance andfader (Ypage 28) R
Treble andbass (Ypage 28)
R Surroun dsound (Ypage 28) Audio
CD/DVDand MP3 mode Safet
ynotes G
WARN
ING
COMAND isclassified asaClass 1laser
prod uct.You must notopen thecasing. Ifyou
open thecasing, orifthe casing isfaulty or
damaged, thereisarisk ofexposure to
invisible laserradiation. Thismay damage
your eyes, orthose ofothers.
COMAND doesnotcont ainany parts thatcan
be serviced bythe user. Forsafety reasons,
all mainten ancework must becarried outby
quali fiedaftersales technicians. G
WARNING
Only when thevehicle isstation aryshould
you:
R load adisc
R eject adisc
There isarisk ofbeing distract edfrom the
road andtraffic conditionsifthis isdone while
the vehicle isin motion . <001F000E00130005001200140009000E000700220005000A0005000300140009
000E0007B
CDs/DVDs
Notes G
WARNING
Only insert aCD orDVD when thevehicle is
station ary.There isarisk ofbeing distract ed
from theroad andtraffic conditionsifthis is
done while thevehicle isin motion .
If the CD/D VDhas aprinted side,thismust
face upwards whentheCD/D VDisinsert ed.
If neither sideisprinted, theside tobe playe d
should facedownwards. CDs/DVDswith
copy protec tionmay notbeable tobe playe d
by the system. 126
Audio
CD/DVD andMP3 modeAudio