2012 MERCEDES-BENZ R-Class display
[x] Cancel search: displayPage 79 of 210

COMA
NDread sout therep ortsin seque nce.
i The MessagesOnRoute men
uitem has
no fun ction ifth ere arenorep ortsrelat ing
to therout e.
X To swit choff therea d-alou dfu nct ion:
use the9:= ;buttons to
sele ctCan cel Rea
d-Aloud Fun
ction and
pre ssthe9 buttonto confirm .
COMA NDread sth ecur ren treport aloud
and then exitsthe read-aloud function.
X To cancel theread -aloud function for
the curr entrepor t:press thex button .
COMAND cancelsthe read-aloud function
for the curren treport .Subsequent reports
will still beread out. Destination
memory Home
address (Myaddress)
Entering thehome address viaadd ress
entry X
En ter the home address asadestin ation,
e.g. asacity, street and house number
(Y page 48).Then, savethehome address
without startingroute guidance
(Y page 52).
Adopt inganadd ress book entry asa
home address X
To switch onnavigat ionmode: pressthe
Ø function button .
X To show themenu: pressthe9button .
X Select Destina tion in
the navigation
menu barusing the:=;
button sand press the9button tocon firm.
X Select FromMemory and
press the9
button tocon firm.
You willsee thedestin ationmemory list
either withthecharact erbar (option 1)or
as aselect ionlist(option 2).
Opt ion 1:destina tionmem orylistwith
char acter bar X
Press andhold the9button untilthe
destin ationmemory listappears asa
select ionlist.
Opt ion 2:destina tionmem orylistas
selection list The
MyAddress ent
ryislisted asthe first
ent ryinthe destin ationmemory.
X Select MyAddress using
the9:
button sand press the9button tocon firm.
i Ifyou have notyetentered any
charact ers,theMyAddress ent
ryis
automatic allyhighlighted inthe select ion
list.
If no home address hasbeen storedyet, you
can now assign anaddress bookentry.Ifa
home address alreadyexists,itis displayed
and youcan alter it.
i Ifyou select NewEntry ,
you arealso
offer edthe option ofent ering thehome
address forthe first time. Youcanthen
save thehome address withouthavingto
start route guidance. Destination
memory
77Navigation Z
Page 83 of 210
Route
guidanc eis acti ve X
To sho wthe men u:pre ssthe 9button.
X Sel ect Posi tion in
the navi gation menu
ba ru sing the:=; buttonsand
press the9button toconfirm.
X Select Destination PositionMap and
press the9button toconfirm.
You willsee themap withacrosshair atthe
destination.
X To show themenu: pressthe9button.
X Select Position in
the navigation menu
bar using the:=; buttonsand
press the9button toconfirm.
X Select SaveCrosshair Position and
press the9button toconfirm.
COMAND storesthecrosshair positionas
a destination inthe listofprevious
destinations. Del
eting oneofthe previous
destinations
X To switch onnavigation mode:pressthe
Ø function button.
X To show themenu: pressthe9button.
X Select Position in
the navigation menu
bar using the:=; buttonsand
press the9button toconfirm.
X Select FromLastDestinations and
press the9button toconfirm.
The listofprevious destinations appears.
X Select thedesired destination andpress
the 9button toconfirm.
The destination addressappears.
X Select Delete and
press the9button to
confirm.
Ap rompt appears, asking whethe rthe
entr yshould bedeleted. X
Select Yes or
No and
press the9button
to confirm .
If you select Yes ,
the entr yis deleted.
If you select No ,
the process willbe
canceled. Map
operation andsettings Notes
Company logosdisplayedonthe map are
trademarks ofthe respective companies and
used solely forthe purpose ofindicating the
location ofthese companies. Theuseofsuch
logos forthe map does notindicate approval,
support oradvertisement ofthe navigation
system bythe respective companies. Adjust
ingthe map scale
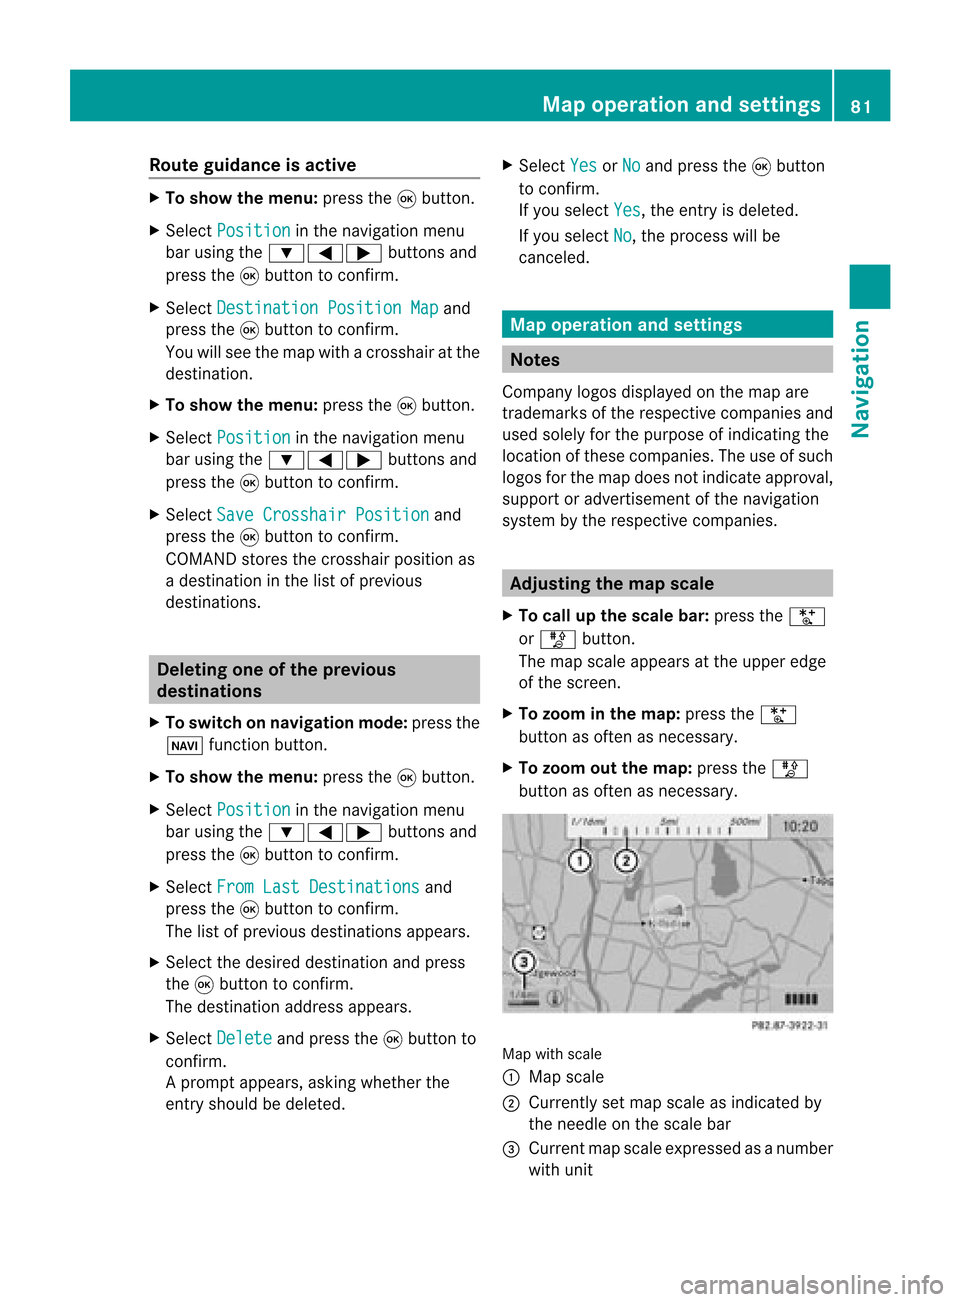
X To call upthe scale bar:press theU
or T button.
The map scale appea rsat the upper edge
of the screen.
X To zoom inthe map :press theU
button asoften asnecessary.
X To zoom outthemap :press theT
button asoften asnecessary. Map
withscale
: Map scale
; Currently setmap scale asindicated by
the needle onthe scale bar
= Current mapscale expressed asanumber
with unit Map
operat ionand settings
81Navigation Z
Page 85 of 210
Map
display
Setting themap orientation Map
orientati on
: Currently setmap orientati on
The followi ngdisp laymodes arepossi ble:
R 0 North orientati on(the map view is
disp layed sothat north isalw aysup)
R ¤ Orientati oninthe dire ction oftravel (the
map isdisp layed sothat theheading is
alw aysup; the orange pointofthe icon
poi nts north)
R ¤ Bird's-e yeview (themap isdisp layed so
that theheading isalw aysup, the map
projection reproducesthecurvatu reofthe
earth andtheorange pointofthe icon
poi nts north)
X To show themenu: pressthe9button.
X Select Navi in
the mainfunction barusing
the 9=; buttonsandpress the
9 button toconfirm.
X Select MapDisplay and
press the9
button toconfirm.
The äicon indica testhe current setting. Map
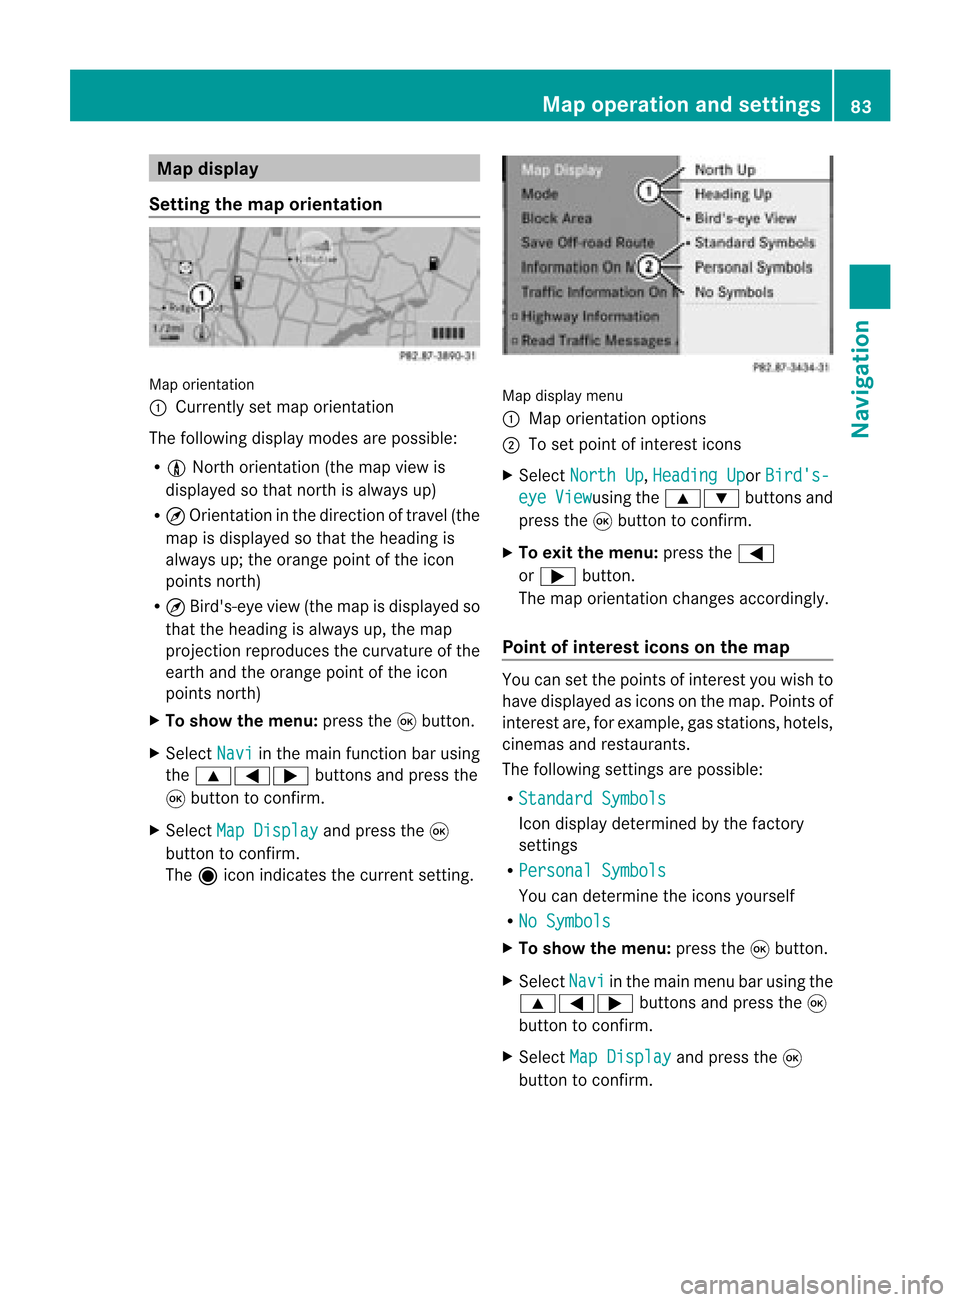
displaymenu
: Map orientati onoptions
; Toset pointofinterest icons
X Select North Up ,
Heading Up or
Bird's- eye View usi
ng the 9: buttonsand
press the9button toconfirm.
X To exitthe menu: pressthe=
or ; button.
The map orientati onchanges accordingly.
Poi ntofintere stico nson the map You
cansetthe points ofinterest youwishto
have displayed asicons onthe map. Points of
interest are,forexampl e,gas stations, hotels,
cinemas andrestau rants.
The followi ngsettings arepossi ble:
R Standar dSymbols Icon
displaydetermi nedbythe factory
settings
R Persona lSymbols You
candetermi nethe icons yourself
R No Symbols X
To show themenu: pressthe9button.
X Select Navi in
the mainmenu barusing the
9=; buttonsand press the9
button tocon firm.
X Select MapDisplay and
press the9
button tocon firm. Map
opera tionandsettings
83Navigation Z
Page 86 of 210
X
Sel ect StandardSymbols ,
Per sonal Sym
bols or
No Sym bols .
If yo usel ect Per sonal Sym
bols ,
the list of
poi nts ofinter estappe ars .
X To switchthe ico ndisplay on/off:select
the pointofinterest using the 9:
buttons andpress the9button toconfirm.
Dependi ngon the previ oussetting, the
icons willbe swi tched onO oroff ª.Y ou
can switch onthe icon display sfor more
than onepoint ofinter est.
i The listshows allicons thatarecont ained
on the digital mapacross allcount ries.
However, notallpoints ofinter estare
availa bleinall count ries.Asaresult, certain
point ofinter esticons maynotbedisplay ed
on the map, evenifthe icon display is
switched on.
X To exit themenu: pressthe=
or ; button . Map
informa tioninthe display
Displaying mapinforma tion During
routeguidance, youcan have map
inform ationdisplay edatthe bottom edgeof
the display .
X To show themenu: pressthe9button .
X Select Navi in
the main menu barusing the
9=; buttonsand press the9
button toconf irm.
X Select Information On Map and
press the
9 button toconf irm.
The äicon indicates thecurrent setting.
X Select Arrival Time/Distance ,
Current Street ,
Geo-coordina tes or
None and
press the9button toconf irm.
X To exit themenu: pressthe=
or ; button . Arrival
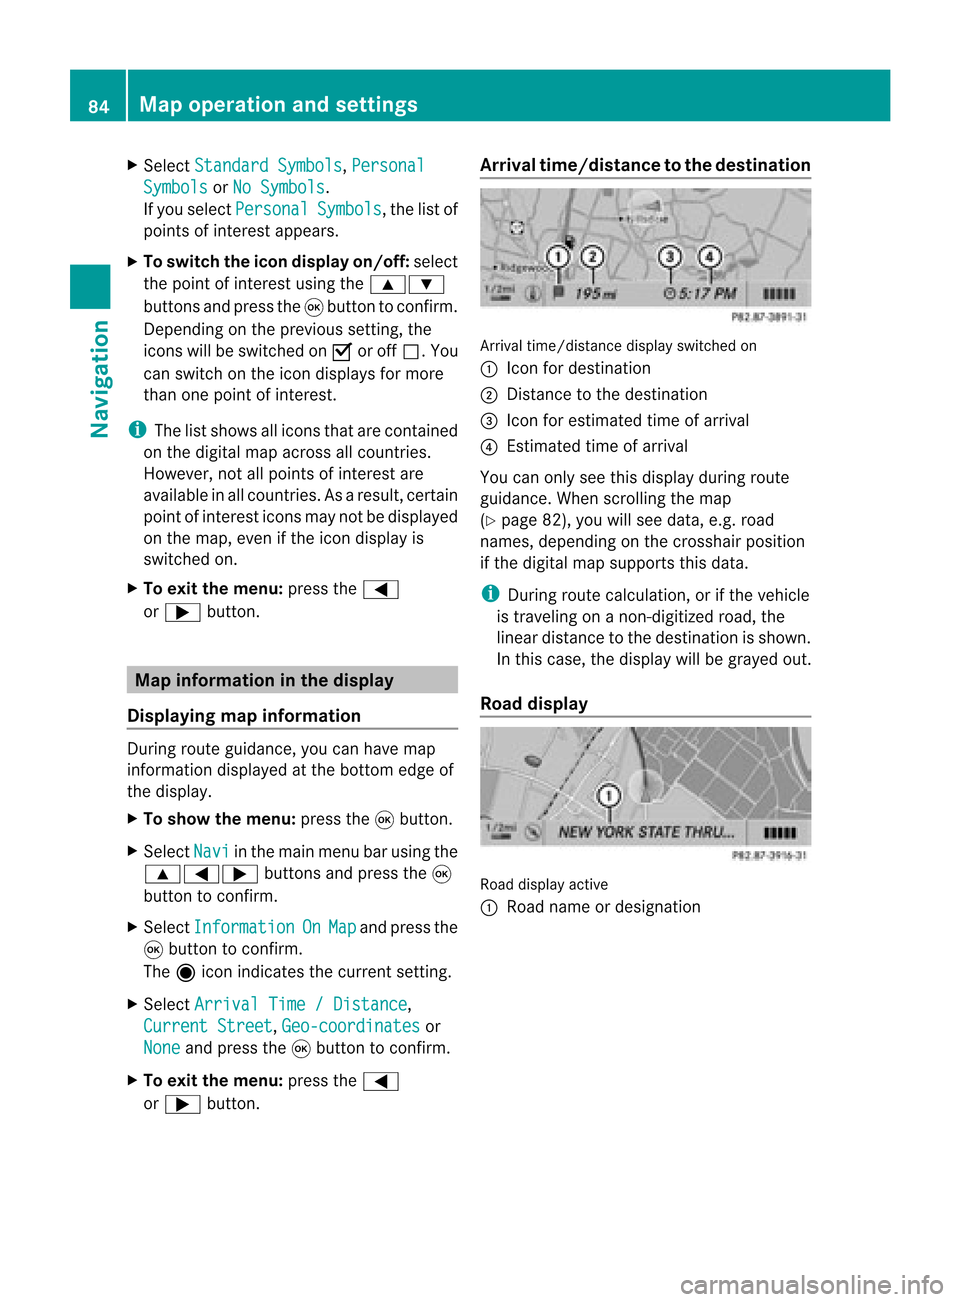
time/dist ancetothe destinat ion Arrival
time/dist ancedisplay switched on
: Icon fordestination
; Distan cetothe destination
= Icon forestimated timeofarrival
? Estimated timeofarrival
You canonly seethis display duringroute
guidance. Whenscrolling themap
(Y page 82),youwillsee data, e.g.road
names, depending onthe crosshair position
if the digital mapsupports thisdata.
i During routecalculation, orifthe vehicle
is traveling onanon- digitized road,the
linear distance tothe destination isshown.
In this case, thedisplay willbegrayed out.
Road display Road
display active
: Road name ordesignation 84
Map
operat ionand settingsNavigation
Page 87 of 210
Geo-c
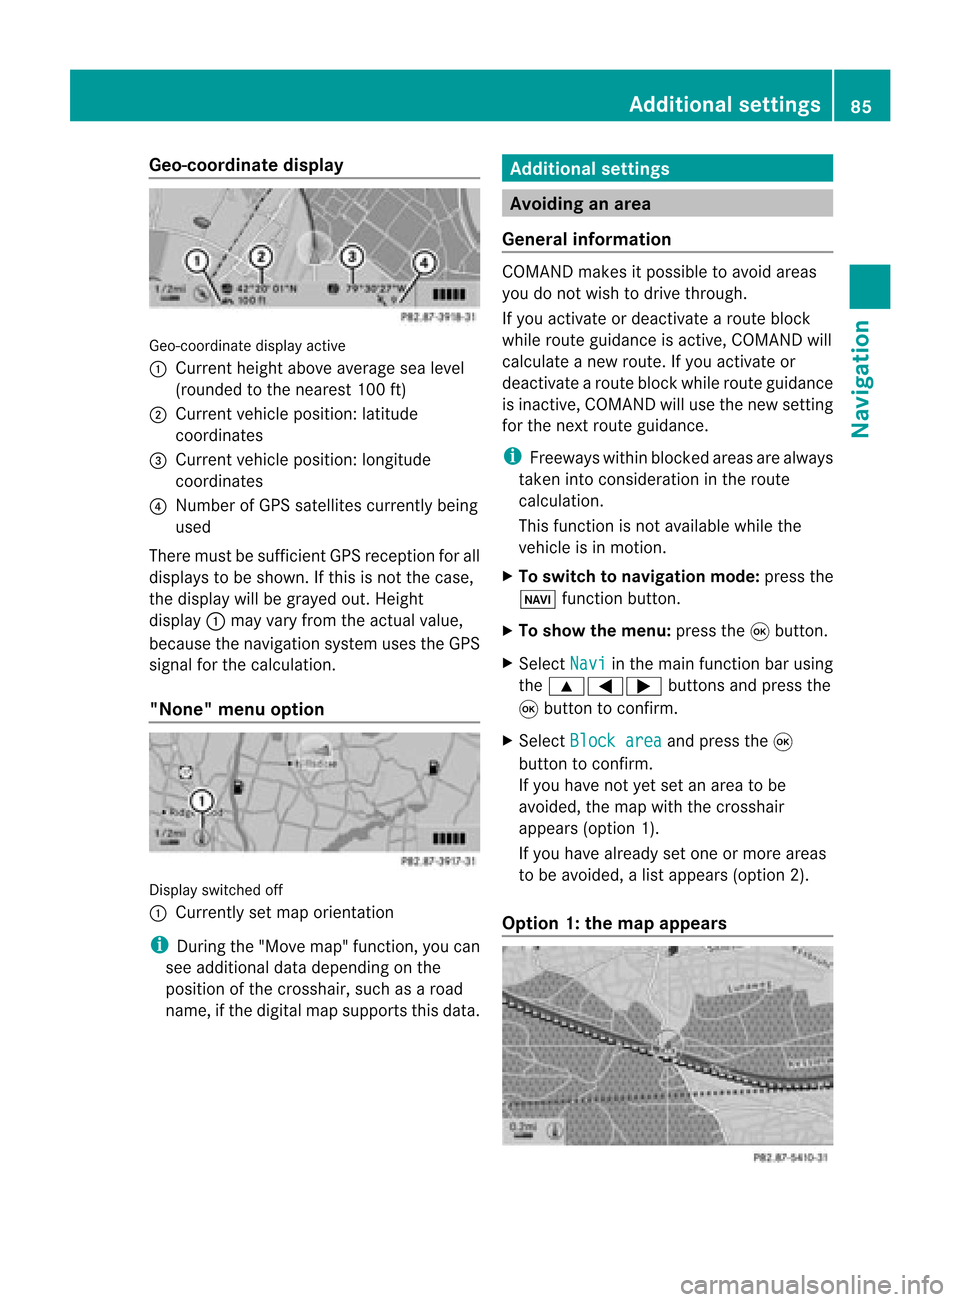
oordinate display Geo-coord
inatedisplayactive
: Current heightabo veavera gesea level
(rou nded tothe nearest 100ft)
; Current vehicle position: latitude
coordina tes
= Current vehicle position: longitu de
coordina tes
? Numbe rofG PS satellites currentlybeing
used
There mustbesufficient GPSrecept ionforall
displays tobe shown. Ifthis isnot thecase,
the display willbegrayed out.Height
display :may varyfrom theactual value,
because thenavigation systemusestheGPS
signal forthe calculation.
"None" menuoption Display
switched off
: Currently setmap orient ation
i During the"Move map"function,youcan
see additional datadepending onthe
position ofthe crosshair, suchasaroad
name, ifthe digital mapsupports thisdata. Additional
settings Avoiding
anarea
General information COMAND
makesitpossible toavoid areas
you donot wish todrive through.
If you activat eor deactivat earoute block
while route guidance isactive, COMAND will
calculate anew route. Ifyou activat eor
deactivat earoute block whileroute guidance
is inact ive,COMAND willuse thenew setting
for the next route guidance.
i Freeways withinblocked areasarealway s
taken intocons ideration inthe route
calculation.
This funct ionisnot availabl ewhile the
vehicle isin motion .
X To switch tonavigation mode:pressthe
Ø functionbutton .
X To show themenu: pressthe9button .
X Select Navi in
the main functionbar using
the 9=; buttonsand press the
9 button toconf irm.
X Select Block area and
press the9
button toconf irm.
If you have notyetsetanarea tobe
avoided, themap withthecrosshair
appears (option1).
If you have already setone ormore areas
to be avoided, alist appears (option2).
Option 1:the map appears Addit
ional settings
85Navigation Z
Page 88 of 210
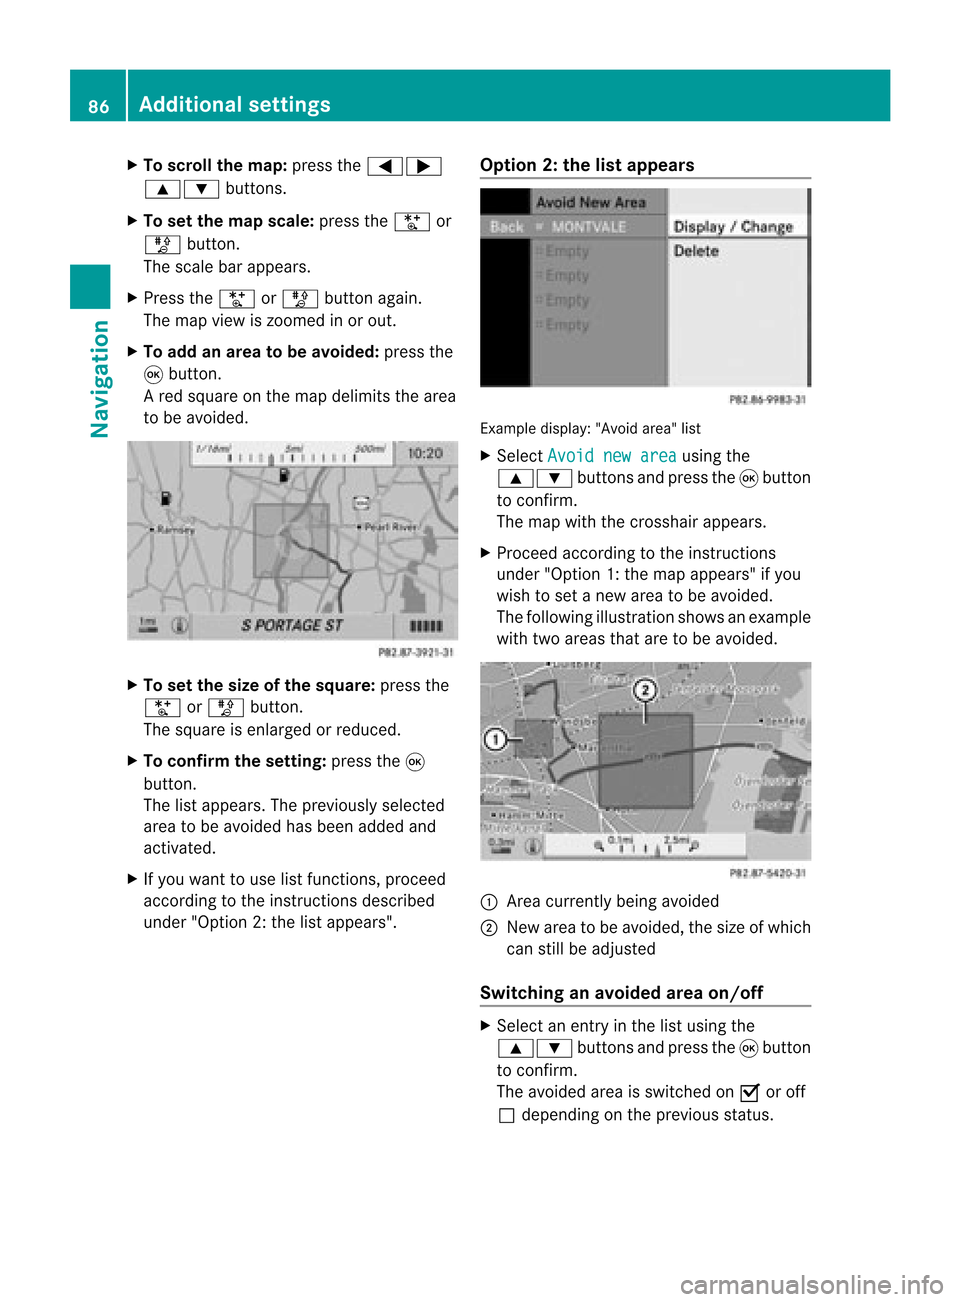
X
To scrol lthe map: pressthe =;
9: buttons.
X To setthe map scale :pre ssthe U or
T button.
The scaleba ra ppears.
X Press theU orT buttonagain.
The map view iszoom edinor out.
X To add anarea tobe avoided :press the
9 butt on.
Ar ed square onthe map delimits thearea
to be avoided. X
To set the size ofthe squa re:press the
U orT button .
The square isenlarged orreduced.
X To confirm thesetting: pressthe9
button .
The listappears. Thepreviously selected
area tobe avoided hasbeen added and
activat ed.
X Ifyou want touse listfunc tions,proceed
accor dingtothe instruct ions described
under "Option 2:the listappears". Opt
ion 2:the listappears Ex
ample display: "Avoidarea"list
X Select Avoid newarea using
the
9: buttonsand press the9button
to con firm.
The map withthecross hairappears.
X Proceed accordingtothe instruct ions
under "Option 1:the map appears" ifyou
wish toset anew area tobe avoided.
The following illustration showsanexample
with twoareas thataretobe avoided. :
Area curren tlybeing avoided
; New areatobe avoided, thesize ofwhich
can stillbeadjusted
Switching anavoided areaon/off X
Select anent ryinthe listusing the
9: buttonsand press the9button
to con firm.
The avoided areaisswitch edon O oroff
ª depending onthe previous status. 86
Addit
ional settingsNavigation
Page 90 of 210

X
Sel ect Off -road rou
te mem
ory and
press
the 9button toconfi rm. Off-ro
adrou tememo rymenu
X Sel ect Off -road rou
te mem
ory use
d and
pre ssthe 9button toconfi rm.
Ab arsho wsthemem oryusage asa
perc entag e.
X To close thedis pla y:pres sth eß
fun ction button.
i When themem oryisco mple tely full, you
can notselec tth eOff -roadroute mem
ory men
uite m.
Deleti ngtherou temem ory X
To swit chtonav igat ionmod e:pres sth e
Ø function button.
X To show themen u:pres sth e9 button.
X Sel ect Navi in
themain function bar usin g
th e9=; buttons and pres sth e
9 buttonto confirm .
X Sel ect Saveoff -roadroute and
pres s
th e9 buttonto confirm .
X Sel ect Off -road rou
te mem
ory and
pres s
th e9 buttonto confirm .
X Sel ect Delete off-roadroutememory and
pres sth e9 buttonto confirm .
Aq uery appear sask ing whet herthe
mem oryshould bedelet ed.
X Se lec tYes or
No .
If you selectYes ,
th emem oryisdelet ed.
If you sele ctNo ,
th epro ces swill beabor ted. Free
way information
When drivingonfreeways, youcan have the
ne ares tgas statio ns,res tareas, etc.,aswel l
as you rcurr entd istanc efrom them, shown
on the right-hand sideofthe disp lay.
X To swi tch tonavig ation mode: pressthe
Ø function button.
X To show themenu: pressthe9button.
X Select Navi in
the main function barusing
the 9=; buttonsandpress the
9 button toconfirm.
X Select freeway information and
press
the 9button toconfirm.
Dependi ngon the previ ousstatus, you
swi tch the option onO oroff ª. Example
displaywith function active
: Icons forfreew ayservice facilities
; Name offreew ayservice
= Distance fromcurrent vehicleposi tion
i Ifthe digitalmap does notsupplyany
data ,only astyli zed road witho utfreew ay
informati onisvisib leon the right-hand side
of the disp lay. Co
mpass function
You canseethecurrent vehicleposi tion and
dire ction oftravel inthe compas sview .
X To swi tch tonavig ation mode: pressthe
Ø function button.
X To show themenu: pressthe9button. 88
Additio
nalsetting sNavigatio n
Page 91 of 210

X
Sel ect Positi on in
the navi gation menu
ba ru sing the:=; buttonsand
press the9button toconfirm.
X Select Compass and
press the9button to
confirm.
Depending onthe previous status,you
switch theoption onO oroff ª. Example
display:compass
: Current direction oftravel
; Current heightaboveaverage sealevel
(rounded tothe nearest 50m)
= Current vehicleposition: longitude
coordinates
? Number ofGPS satellites currentlybeing
used
A Current vehicleposition: latitude
coordinates
B Currently setsteering angleofthe front
wheels
i Todispla ycurrent height;,thesystem
must beable toreceive atleast four
satellites. SteeringangleBcan bea
maximum of35° inboth directions. Updat
ingthe digital map
Introduction The
digital mapsgenerated bythe map
software becomeoutdated inthe same way
as conven tionalroadmaps. Optimal route
guida ncecanonly beprovided by
the navigation systeminconj unction withthe
most up-to-date mapsoftware. Information
aboutnew version sof the digital
map canbeobtained fromanauthoriz ed
Mercedes- BenzCenter .You canhave the
digital mapupdated therewith aDVD ,or you
can update ityourself.
i The update process cantake along time
(over anhour), depending onthe size ofthe
map software. Duringthis time, youwill
only beable toswitch onradio mode and
to accept incomingcalls. Theupdate willbe
complet edmore quickly ifthe vehicle is
stat ionary.
If you carry outtheupdate withtheengin e
switch edoff and thestart erbatter yhas
insuffic ientpower, COMAND may
automatic allyswitch offduring theprocess
in order toprotec tthe batter y.Ifthis
occ urs, restartthe update withtheengin e
runn ing. G
WARN
ING
Never runtheengin ein an enclos edspace.
The exhaust fumescontain poisonous carbon
monox ide.Inhaling exhaustfumesis
hazardous toyour health andcanlead toloss
of con sciousnes sand death.
Upda tingprocess X
Inser tthe DVD (Ypage 127).
The update begins. COMAND checks
whether thedigital maponthe DVD is
compat iblewith thenavigation systemand
system software.
If this isthe case andtheDVD 'smap data
has notalready beeninstalled, COMAND
start supdating thedigital map.
If the map data hasalready beeninstalled,
the display showsversion dataanda
message tothis effec t.
X To confirm themessage: pressthe9
button .
X Eject the DVD .
While theupdate isrunn ing,youwillsee a
message tothis effec tand apro gressbar.The Addi
tional settin gs
89Navigation Z