2012 MERCEDES-BENZ GLK SUV light
[x] Cancel search: lightPage 326 of 381
Cleaning wooden trim and trim ele-
ments !
Do not use solvent-based cleaning agents
such as tar remover, wheel cleaners, pol-
ishes or waxes. There is otherwise a risk of
damaging the surface.
X Wipe the wooden trim and trim elements
with a damp, lint-free cloth, e.g. a microfi-
bre cloth.
X Heavy soiling: use car care and cleaning
products recommended and approved by
Mercedes-Benz.
Cleaning the seat covers !
Do not use microfibre cloths to clean gen-
uine leather, artificial leather or
Alcantara® covers. If used often, these can
damage the cover.
! Observe the following when cleaning:
R clean genuine leather covers carefully
with a damp cloth and then wipe the cov-
ers down with a dry cloth. Make sure that
the leather does not become soaked. It
may otherwise become rough and
cracked. Only use leather care agents
that have been tested and approved by
Mercedes-Benz. You can obtain these
from a qualified specialist workshop.
R clean artificial leather covers with a cloth
moistened with a solution containing 1%
detergent (e.g. washing-up liquid).
R clean cloth covers with a microfibre cloth
moistened with a solution containing 1%
detergent (e.g. washing-up liquid). Rub
carefully and always wipe entire seat sec-
tions to avoid leaving visible lines. Leave
the seat to dry afterwards. Cleaning
results depend on the type of dirt and
how long it has been there.
R clean Alcantara® covers with a damp
cloth. Make sure that you wipe entire
seat sections to avoid leaving visible
lines. i
Note that regular care is essential to
make sure that the appearance and com-
fort of the covers are retained over time.
Cleaning the seat belts !
Do not clean the seat belts using chemical
cleaning agents. Do not dry the seat belts
at temperatures above 80 † or in direct
sunlight.
X Use clean, lukewarm water and soap solu-
tion.
Cleaning the roof lining and carpets X
Roof lining: if it is very dirty, use a soft
brush or a cleaning agent recommended
and approved by Mercedes-Benz.
X Carpets: use the carpet and textile clean-
ing agents recommended and approved by
Mercedes-Benz. Care
323Maintenance and care Z
Page 333 of 381
well underneath the luggage compartment
floor (Y page 327). X
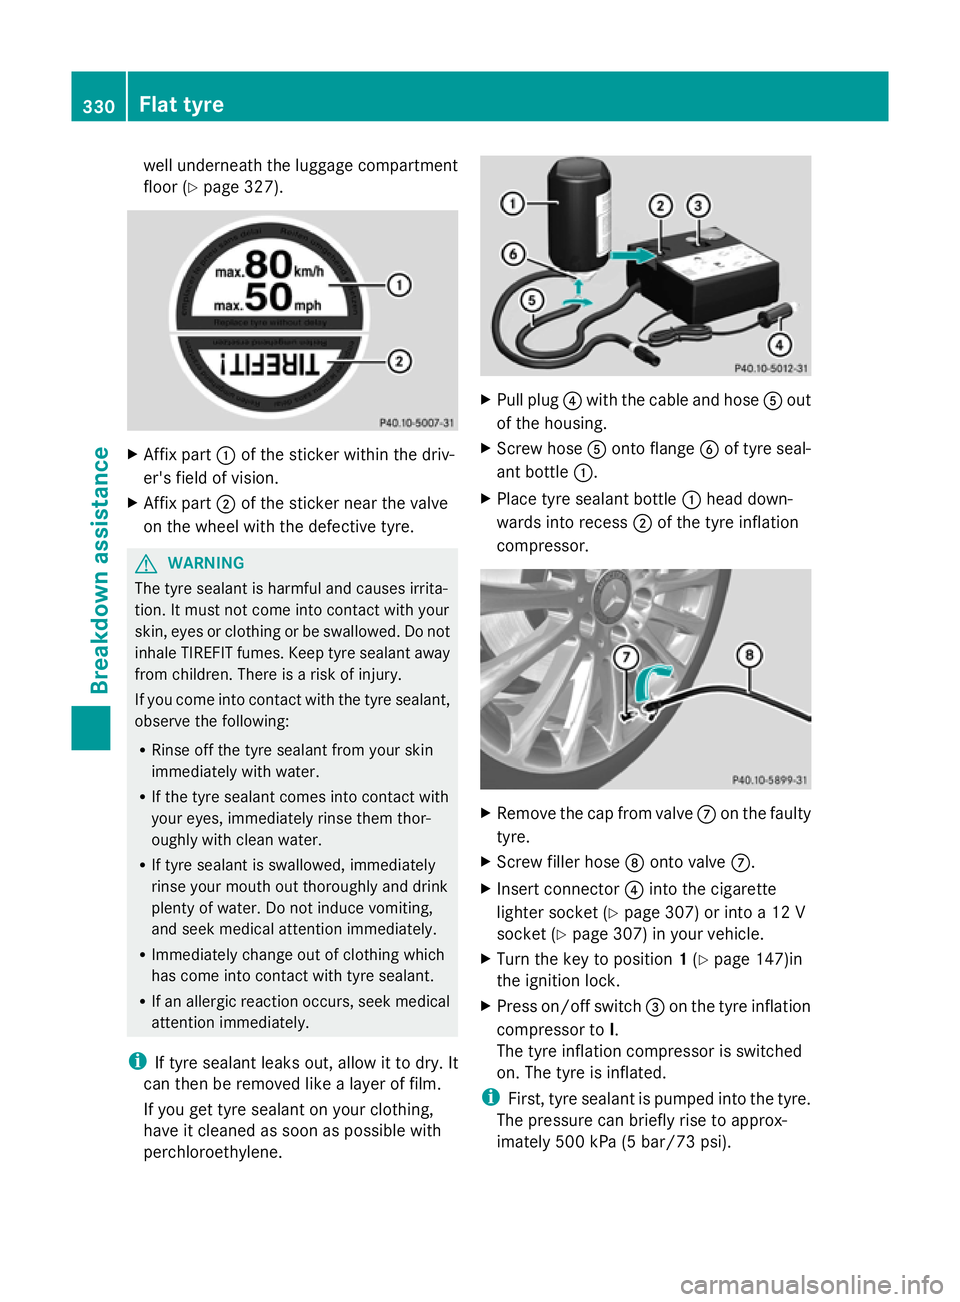
Affix part :of the sticker within the driv-
er's field of vision.
X Affix part ;of the sticker near the valve
on the wheel with the defective tyre. G
WARNING
The tyre sealant is harmful and causes irrita-
tion. It must not come into contact with your
skin, eyes or clothing or be swallowed. Do not
inhale TIREFIT fumes. Keep tyre sealant away
from children. There is a risk of injury.
If you come into contact with the tyre sealant,
observe the following:
R Rinse off the tyre sealant from your skin
immediately with water.
R If the tyre sealant comes into contact with
your eyes, immediately rinse them thor-
oughly with clean water.
R If tyre sealant is swallowed, immediately
rinse your mouth out thoroughly and drink
plenty of water. Do not induce vomiting,
and seek medical attention immediately.
R Immediately change out of clothing which
has come into contact with tyre sealant.
R If an allergic reaction occurs, seek medical
attention immediately.
i If tyre sealant leaks out, allow it to dry. It
can then be removed like a layer of film.
If you get tyre sealant on your clothing,
have it cleaned as soon as possible with
perchloroethylene. X
Pull plug ?with the cable and hose Aout
of the housing.
X Screw hose Aonto flange Bof tyre seal-
ant bottle :.
X Place tyre sealant bottle :head down-
wards into recess ;of the tyre inflation
compressor. X
Remove the cap from valve Con the faulty
tyre.
X Screw filler hose Donto valve C.
X Insert connector ?into the cigarette
lighter socket (Y page 307) or into a 12 V
socket (Y page 307) in your vehicle.
X Turn the key to position 1(Y page 147)in
the ignition lock.
X Press on/off switch =on the tyre inflation
compressor to I.
The tyre inflation compressor is switched
on. The tyre is inflated.
i First, tyre sealant is pumped into the tyre.
The pressure can briefly rise to approx-
imately 500 kPa (5 bar/73 psi). 330
Flat tyreBreakdown assistance
Page 336 of 381
R
the emergency spare wheel
R the wheel bolts for the emergency spare
wheel
R the tyre inflation compressor
R the wheel wrench
R the folding wheel chock
R the jack
R the ratchet ring spanner
X Secure the vehicle to prevent it from rolling
away.
Securing the vehicle against rolling
away If your vehicle is equipped with a wheel chock,
it can be found in the vehicle tool kit
(Y page 327).
The folding wheel chock is an additional
securing measure to prevent the vehicle from
rolling away, for example when changing a
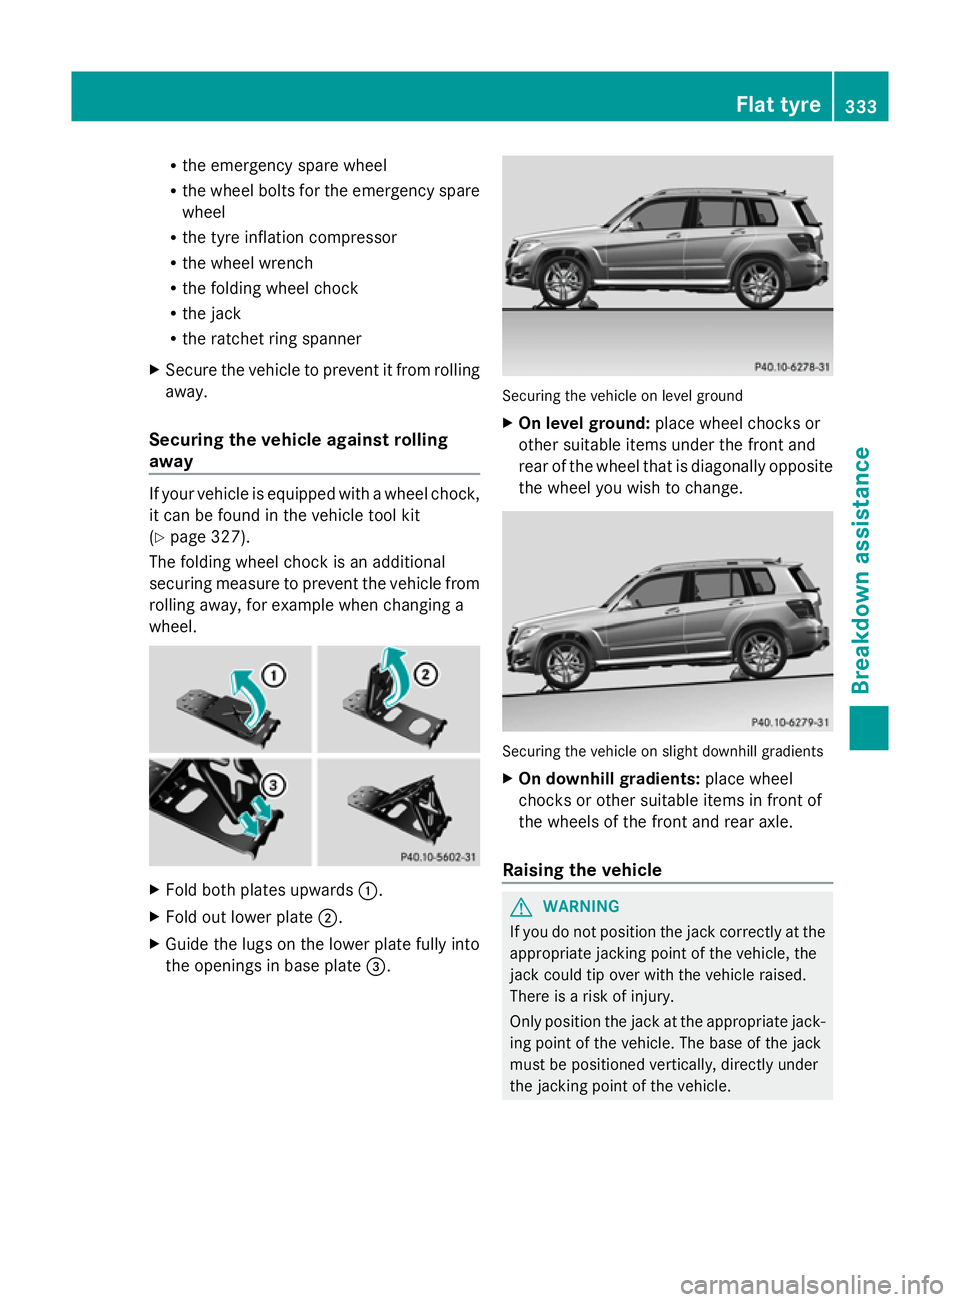
wheel. X
Fold both plates upwards :.
X Fold out lower plate ;.
X Guide the lugs on the lower plate fully into
the openings in base plate =. Securing the vehicle on level ground
X
On level ground: place wheel chocks or
other suitable items under the front and
rear of the wheel that is diagonally opposite
the wheel you wish to change. Securing the vehicle on slight downhill gradients
X
On downhill gradients: place wheel
chocks or other suitable items in front of
the wheels of the front and rear axle.
Raising the vehicle G
WARNING
If you do not position the jack correctly at the
appropriate jacking point of the vehicle, the
jack could tip over with the vehicle raised.
There is a risk of injury.
Only position the jack at the appropriate jack-
ing point of the vehicle. The base of the jack
must be positioned vertically, directly under
the jacking point of the vehicle. Flat tyre
333Breakdown assistance Z
Page 339 of 381
Be sure to use the original-length wheel bolts
when refitting the original wheel after it has
been repaired.
X Clean the wheel and wheel hub contact
surfaces. X
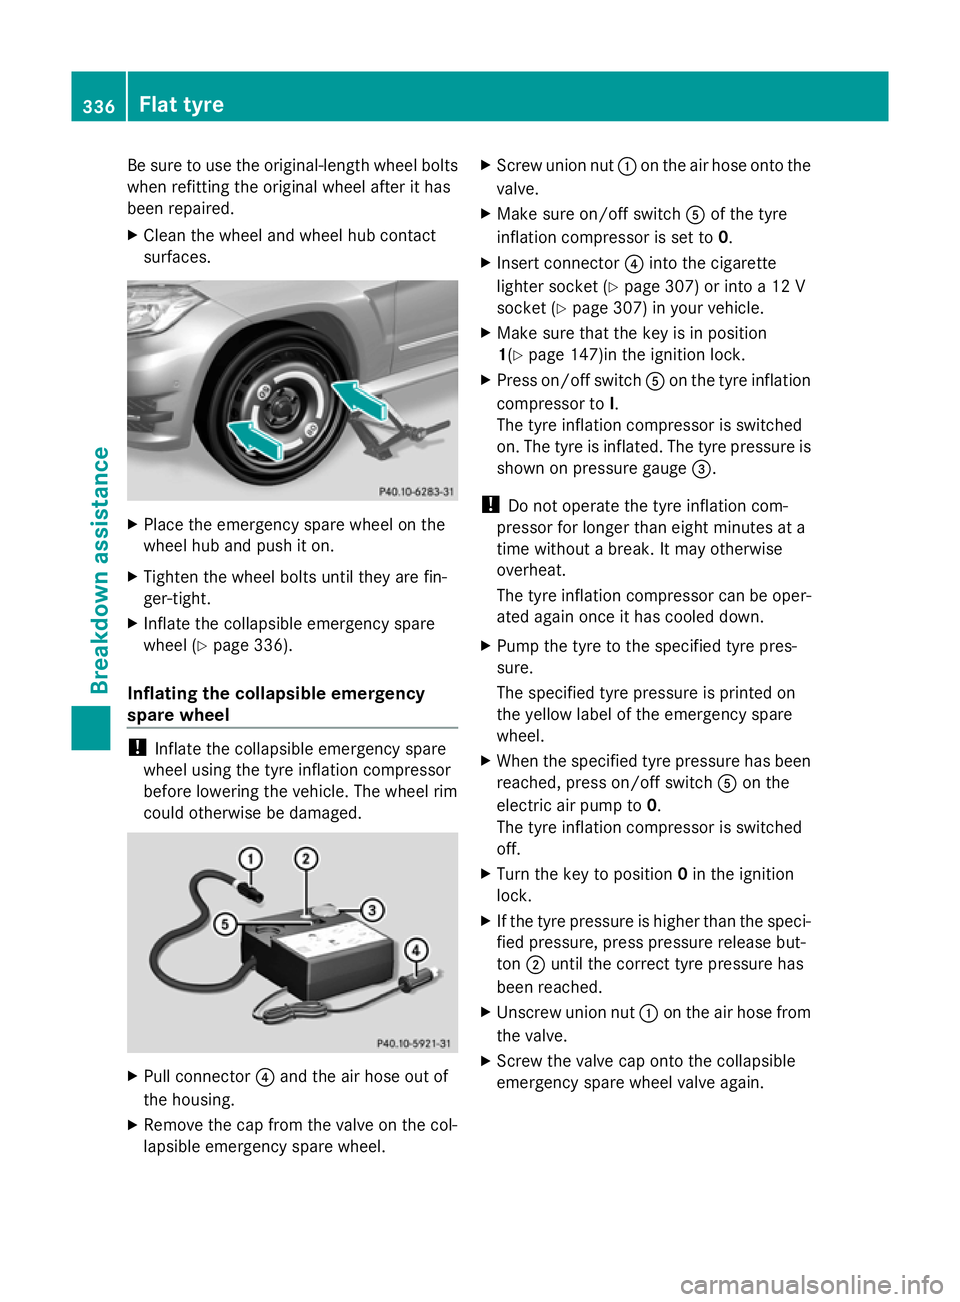
Place the emergency spare wheel on the
wheel hub and push it on.
X Tighten the wheel bolts until they are fin-
ger-tight.
X Inflate the collapsible emergency spare
wheel (Y page 336).
Inflating the collapsible emergency
spare wheel !
Inflate the collapsible emergency spare
wheel using the tyre inflation compressor
before lowering the vehicle. The wheel rim
could otherwise be damaged. X
Pull connector ?and the air hose out of
the housing.
X Remove the cap from the valve on the col-
lapsible emergency spare wheel. X
Screw union nut :on the air hose onto the
valve.
X Make sure on/off switch Aof the tyre
inflation compressor is set to 0.
X Insert connector ?into the cigarette
lighter socket (Y page 307) or into a 12 V
socket ( Ypage 307) in your vehicle.
X Make sure that the key is in position
1(Y page 147)in the ignition lock.
X Press on/off switch Aon the tyre inflation
compressor to I.
The tyre inflation compressor is switched
on. The tyre is inflated. The tyre pressure is
shown on pressure gauge =.
! Do not operate the tyre inflation com-
pressor for longer than eight minutes at a
time without a break. It may otherwise
overheat.
The tyre inflation compressor can be oper-
ated again once it has cooled down.
X Pump the tyre to the specified tyre pres-
sure.
The specified tyre pressure is printed on
the yellow label of the emergency spare
wheel.
X When the specified tyre pressure has been
reached, press on/off switch Aon the
electric air pump to 0.
The tyre inflation compressor is switched
off.
X Turn the key to position 0in the ignition
lock.
X If the tyre pressure is higher than the speci-
fied pressure, press pressure release but-
ton ;until the correct tyre pressure has
been reached.
X Unscrew union nut :on the air hose from
the valve.
X Screw the valve cap onto the collapsible
emergency spare wheel valve again. 336
Flat tyreBreakdown assistance
Page 350 of 381

Dashboard fuse box
! Do not use a pointed object such as a
screwdriver to open the cover in the dash-
board. You could damage the dashboard or
the cover.
! Make sure that no moisture can enter the
fuse box when the cover is open.
! When closing the cover, make sure that it
is lying correctly on the fuse box. Moisture
seeping in or dirt could otherwise impair
the operation of the fuses. X
To open: pull out cover :slightly at the
bottom in the direction of arrow =.
X Pull cover :outwards in the direction of
arrow ;and remove it.
X To close: clip in cover :on the front of
the dashboard.
X Fold cover :inwards until it engages. Fuse box in the engine compartment
G
WARNING
Make sure that the windscreen wipers are
turned off and the key is pulled out of the igni-
tion lock before you open the cover of the fuse
box. Otherwise, the windscreen wipers and
the wiper rods above the cover could be set
in motion. This could lead to you or others
being injured by the wiper rods.
! Make sure that no moisture can enter the
fuse box when the cover is open. !
When closing the cover, make sure that it
is lying correctly on the fuse box. Moisture
seeping in or dirt could otherwise impair
the operation of the fuses.
X Make sure that the windscreen wipers are
switched off.
X Open the bonnet. X
Remove any existing moisture from the
fuse box using a dry cloth.
X To open: take lines ;from the guides.
X Open clamps :.
X Remove the fuse box cover forwards.
X To close: check whether the rubber seal is
lying correctly in the cover.
X Insert the cover at the rear of the fuse box
into the retainer.
X Fold down cover and close clamps :.
X Secure lines ;in the guides.
X Close the bonnet. Fuse box in the luggage compartment
! Make sure that no moisture can enter the
fuse box when the cover is open.
! When closing the cover, make sure that it
is lying correctly on the fuse box. Moisture
seeping in or dirt could otherwise impair
the operation of the fuses.
X Open the tailgate. Elect
rical fuses
347Breakdown assis tance Z
Page 357 of 381
Operation with a trailer:
the applicable
value for the rear tyres is the maximum tyre
pressure value stated in the table inside the
fuel filler flap.
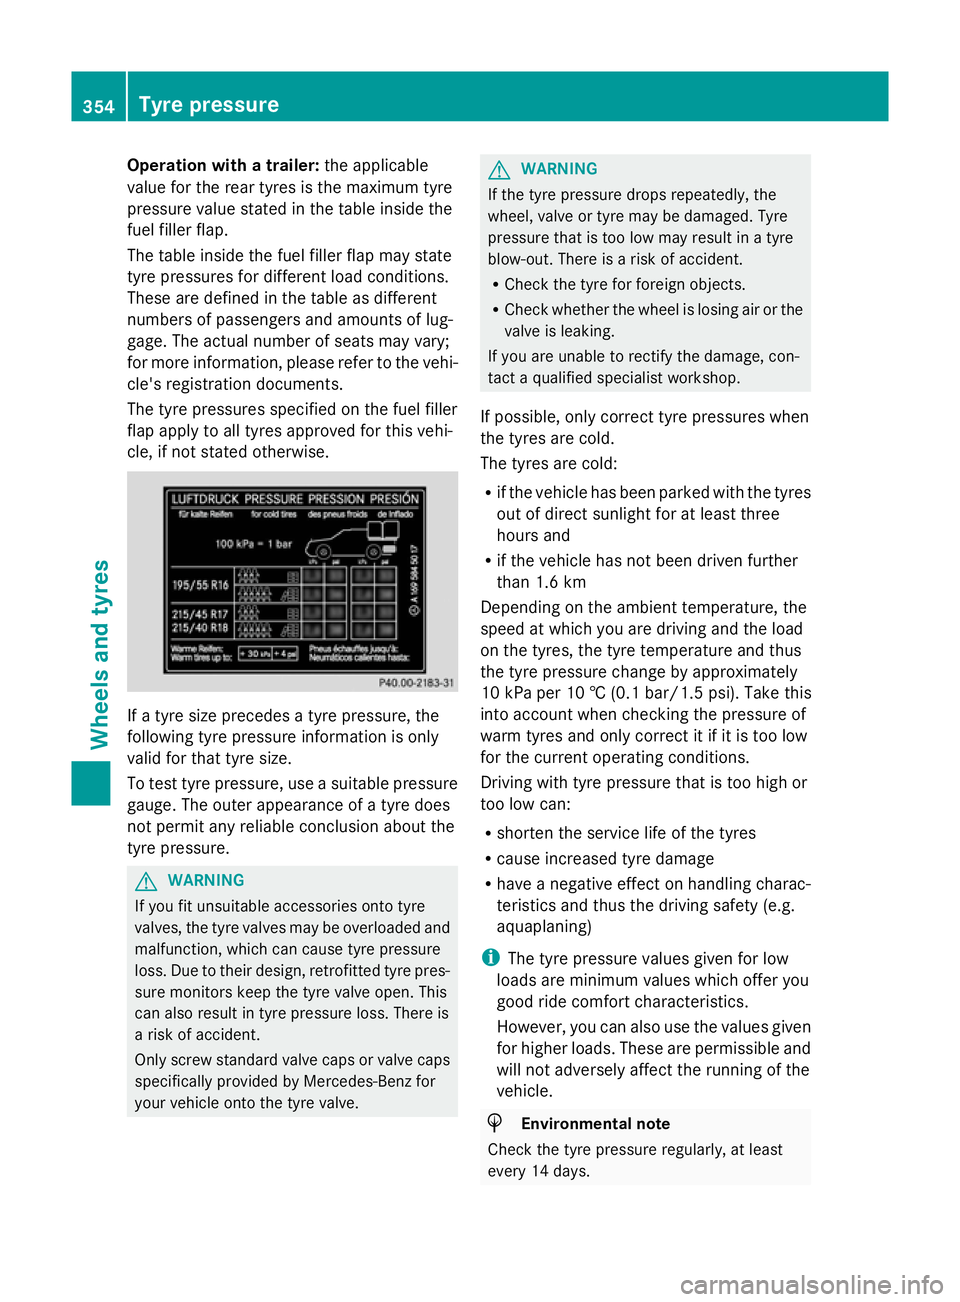
The table inside the fuel filler flap may state
tyre pressures for different load conditions.
These are defined in the table as different
numbers of passengers and amounts of lug-
gage. The actual number of seats may vary;
for more information, please refer to the vehi-
cle's registration documents.
The tyre pressures specified on the fuel filler
flap apply to all tyres approved for this vehi-
cle, if not stated otherwise. If a tyre size precedes a tyre pressure, the
following tyre pressure information is only
valid for that tyre size.
To test tyre pressure, use a suitable pressure
gauge. The outer appearance of a tyre does
not permit any reliable conclusion about the
tyre pressure. G
WARNING
If you fit unsuitable accessories onto tyre
valves, the tyre valves may be overloaded and
malfunction, which can cause tyre pressure
loss. Due to their design, retrofitted tyre pres-
sure monitors keep the tyre valve open. This
can also result in tyre pressure loss. There is
a risk of accident.
Only screw standard valve caps or valve caps
specifically provided by Mercedes-Benz for
your vehicle onto the tyre valve. G
WARNING
If the tyre pressure drops repeatedly, the
wheel, valve or tyre may be damaged. Tyre
pressure that is too low may result in a tyre
blow-out. There is a risk of accident.
R Check the tyre for foreign objects.
R Check whether the wheel is losing air or the
valve is leaking.
If you are unable to rectify the damage, con-
tact a qualified specialist workshop.
If possible, only correct tyre pressures when
the tyres are cold.
The tyres are cold:
R if the vehicle has been parked with the tyres
out of direct sunlight for at least three
hours and
R if the vehicle has not been driven further
than 1.6 km
Depending on the ambient temperature, the
speed at which you are driving and the load
on the tyres, the tyre temperature and thus
the tyre pressure change by approximately
10 kPa per 10 † (0.1 ba r/1.5 psi). Take this
into account when checking the pressure of
warm tyres and only correct it if it is too low
for the current operating conditions.
Driving with tyre pressure that is too high or
too low can:
R shorten the service life of the tyres
R cause increased tyre damage
R have a negative effect on handling charac-
teristics and thus the driving safety (e.g.
aquaplaning)
i The tyre pressure values given for low
loads are minimum values which offer you
good ride comfort characteristics.
However, you can also use the values given
for higher loads. These are permissible and
will not adversely affect the running of the
vehicle. H
Environmental note
Check the tyre pressure regularly, at least
every 14 days. 354
Tyre pressureWheels and tyres
Page 362 of 381
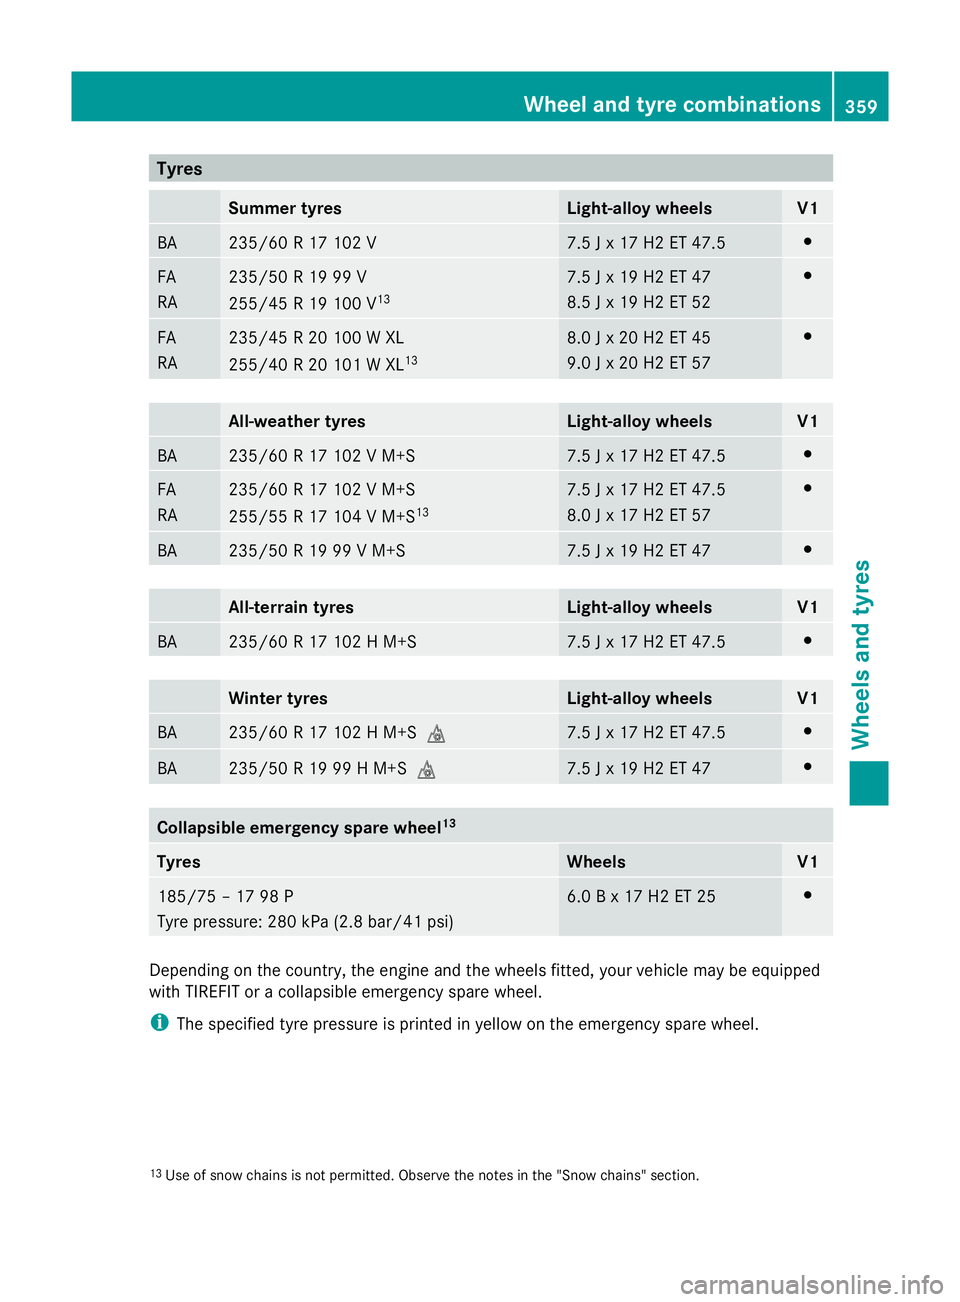
Tyres
Summer tyres Light-alloy wheels V1
BA 235/6
0 R 17 102 V 7.5 J
x 17 H2 ET 47.5 #
FA
RA 235/50 R 19 99 V
255/45 R 19 100 V
13 7.5 J x 19 H2 ET 47
8.5 J x 19 H2 ET 52 #
FA
RA 235/45 R 20 100 W XL
255/40 R 20 101 W XL
13 8.0 J x 20 H2 ET 45
9.0 J x 20 H2 ET 57 #
All-weather tyres Light-alloy wheels V1
BA 235/60 R 17 102 V M+S 7.5 J x 17 H2 ET 47.5 #
FA
RA 235/60 R 17 102 V M+S
255/55 R 17 104 V M+S
13 7.5 J x 17 H2 ET 47.5
8.0 J x 17 H2 ET 57 #
BA 235/50 R 19 99 V M+S 7.5 J x 19 H2 ET 47 #
All-terrain tyres Light-alloy wheels V1
BA 235/60 R 17 102 H M+S 7.5 J x 17 H2 ET 47.5 #
Winter tyres Light-alloy wheels V1
BA 235/60 R 17 102 H M+S
i 7.5 J x 17 H2 ET 47.5 #
BA 235/50 R 19 99 H M+S
i 7.5 J x 19 H2 ET 47 #
Collapsible emergency spare wheel
13Tyres Wheels V1
185/75 – 17 98 P
Tyre pressure: 280 kPa (2.8 bar/41 psi) 6.0 B x 17 H2 ET 25 #
Depending on the country, the engine and the wheels fitted, your vehicle may be equipped
with TIREFIT or a collapsible emergency spare wheel.
i
The specified tyre pressure is printed in yellow on the emergency spare wheel.
13 Use of snow chains is not permitted. Observe the notes in the "Snow chains" section. Wheel and tyre combinations
359Wheels and tyres Z