2012 MERCEDES-BENZ GLK SUV ESP
[x] Cancel search: ESPPage 291 of 381
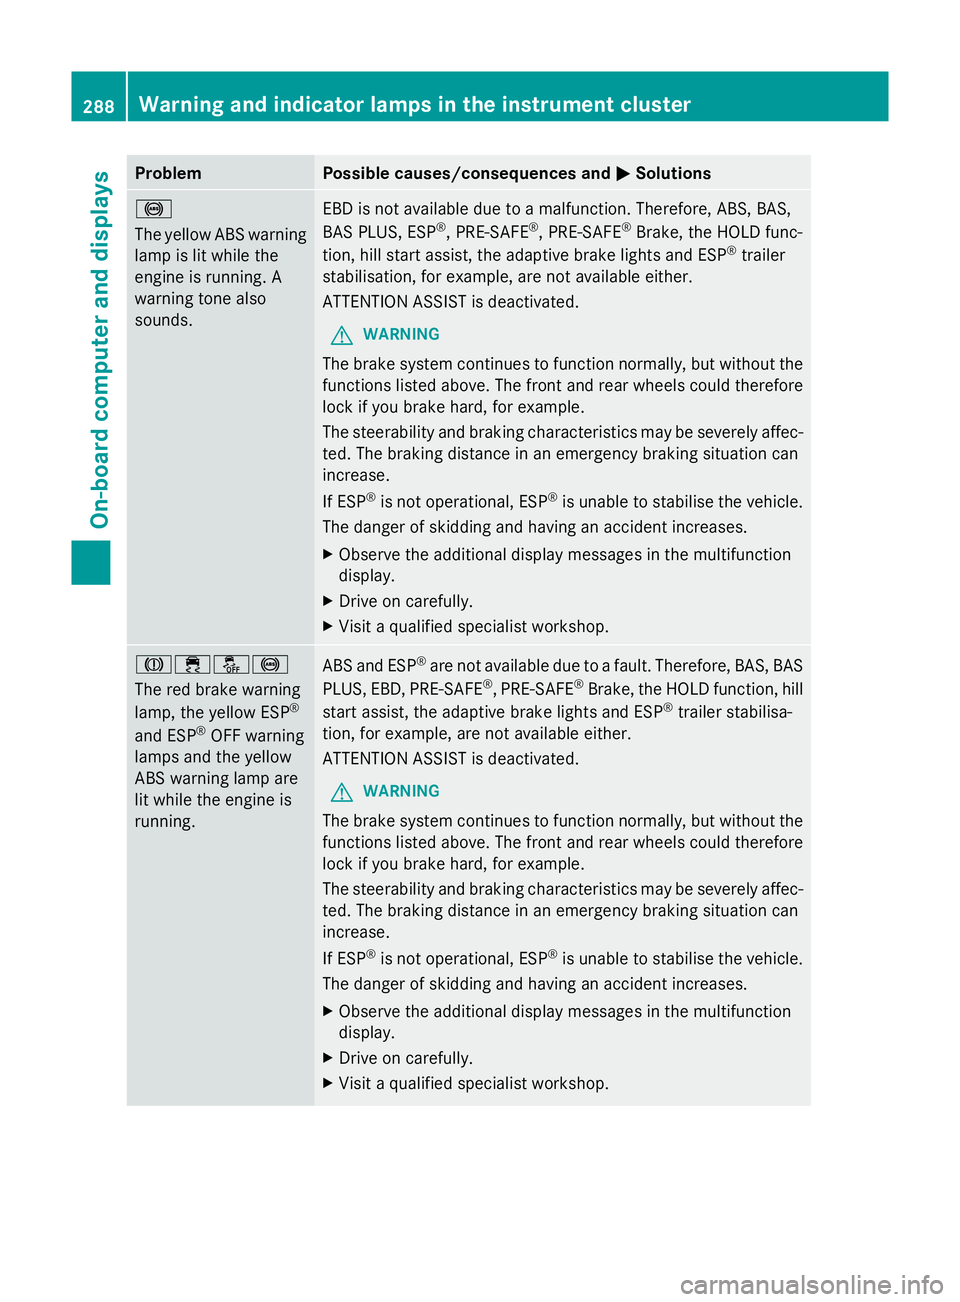
Problem Possible causes/consequences and
M
MSolutions !
The yellow ABS warning
lamp is lit while the
engine is running. A
warning tone also
sounds.
EBD is not available due to a malfunction. Therefore, ABS, BAS,
BAS PLUS, ESP
®
, PRE-SAFE ®
, PRE-SAFE ®
Brake, the HOLD func-
tion, hill start assist, the adaptive brake lights and ESP ®
trailer
stabilisation, for example, are not available either.
ATTENTION ASSIST is deactivated.
G WARNING
The brake system continues to function normally, but without the
functions listed above. The front and rear wheels could therefore
lock if you brake hard, for example.
The steerability and braking characteristics may be severely affec-
ted. The braking distance in an emergency braking situation can
increase.
If ESP ®
is not operational, ESP ®
is unable to stabilise the vehicle.
The danger of skidding and having an accident increases.
X Observe the additional display messages in the multifunction
display.
X Drive on carefully.
X Visit a qualified specialist workshop. J֌!
The red brake warning
lamp, the yellow ESP
®
and ESP ®
OFF warning
lamps and the yellow
ABS warning lamp are
lit while the engine is
running. ABS and ESP
®
are not available due to a fault. Therefore, BAS, BAS
PLUS, EBD, PRE-SAFE ®
, PRE-SAFE ®
Brake, the HOLD function, hill
start assist, the adaptive brake lights and ESP ®
trailer stabilisa-
tion, for example, are not available either.
ATTENTION ASSIST is deactivated.
G WARNING
The brake system continues to function normally, but without the
functions listed above. The front and rear wheels could therefore
lock if you brake hard, for example.
The steerability and braking characteristics may be severely affec-
ted. The braking distance in an emergency braking situation can
increase.
If ESP ®
is not operational, ESP ®
is unable to stabilise the vehicle.
The danger of skidding and having an accident increases.
X Observe the additional display messages in the multifunction
display.
X Drive on carefully.
X Visit a qualified specialist workshop. 288
Warning and indicator lamps in the instrument clusterOn-board computer and displays
Page 292 of 381
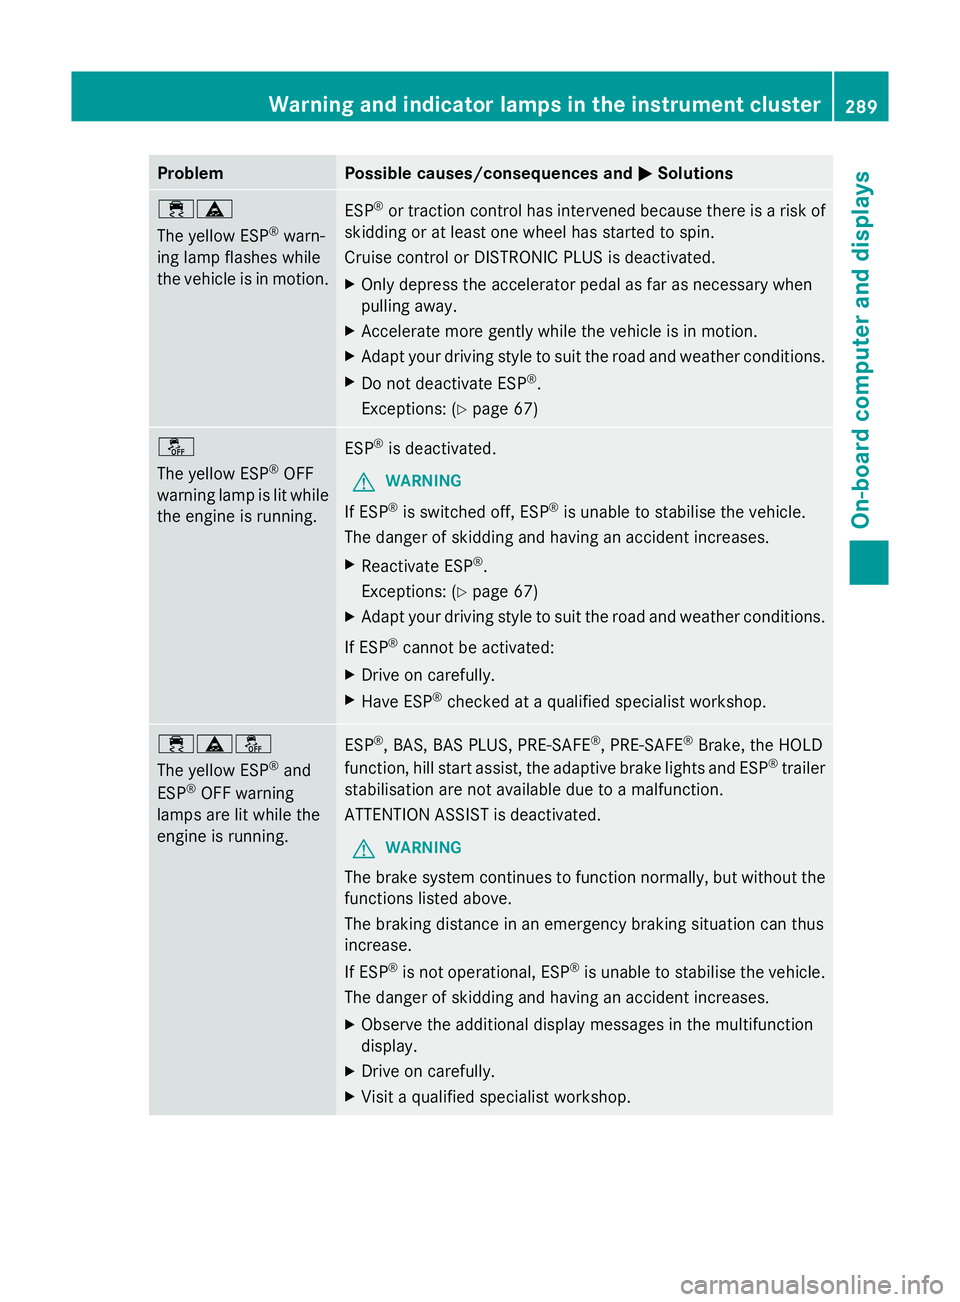
Problem Possible causes/consequences and
M
MSolutions ֊
The yellow ESP
®
warn-
ing lamp flashes while
the vehicle is in motion. ESP
®
or traction control has intervened because there is a risk of
skidding or at least one wheel has started to spin.
Cruise control or DISTRONIC PLUS is deactivated.
X Only depress the accelerator pedal as far as necessary when
pulling away.
X Accelerate more gently while the vehicle is in motion.
X Adapt your driving style to suit the road and weather conditions.
X Do not deactivate ESP ®
.
Exceptions: (Y page 67) å
The yellow ESP
®
OFF
warning lamp is lit while
the engine is running. ESP
®
is deactivated.
G WARNING
If ESP ®
is switched off, ESP ®
is unable to stabilise the vehicle.
The danger of skidding and having an accident increases.
X Reactivate ESP ®
.
Exceptions: (Y page 67)
X Adapt your driving style to suit the road and weather conditions.
If ESP ®
cannot be activated:
X Drive on carefully.
X Have ESP ®
checked at a qualified specialist workshop. ÷äå
The yellow ESP
®
and
ESP ®
OFF warning
lamps are lit while the
engine is running. ESP
®
, BAS, BAS PLUS, PRE-SAFE ®
, PRE-SAFE ®
Brake, the HOLD
function, hill start assist, the adaptive brake lights and ESP ®
trailer
stabilisation are not available due to a malfunction.
ATTENTION ASSIST is deactivated.
G WARNING
The brake system continues to function normally, but without the
functions listed above.
The braking distance in an emergency braking situation can thus
increase.
If ESP ®
is not operational, ESP ®
is unable to stabilise the vehicle.
The danger of skidding and having an accident increases.
X Observe the additional display messages in the multifunction
display.
X Drive on carefully.
X Visit a qualified specialist workshop. Warning and indicator lamps in the instrument cluster
289On-board computer and displays Z
Page 293 of 381
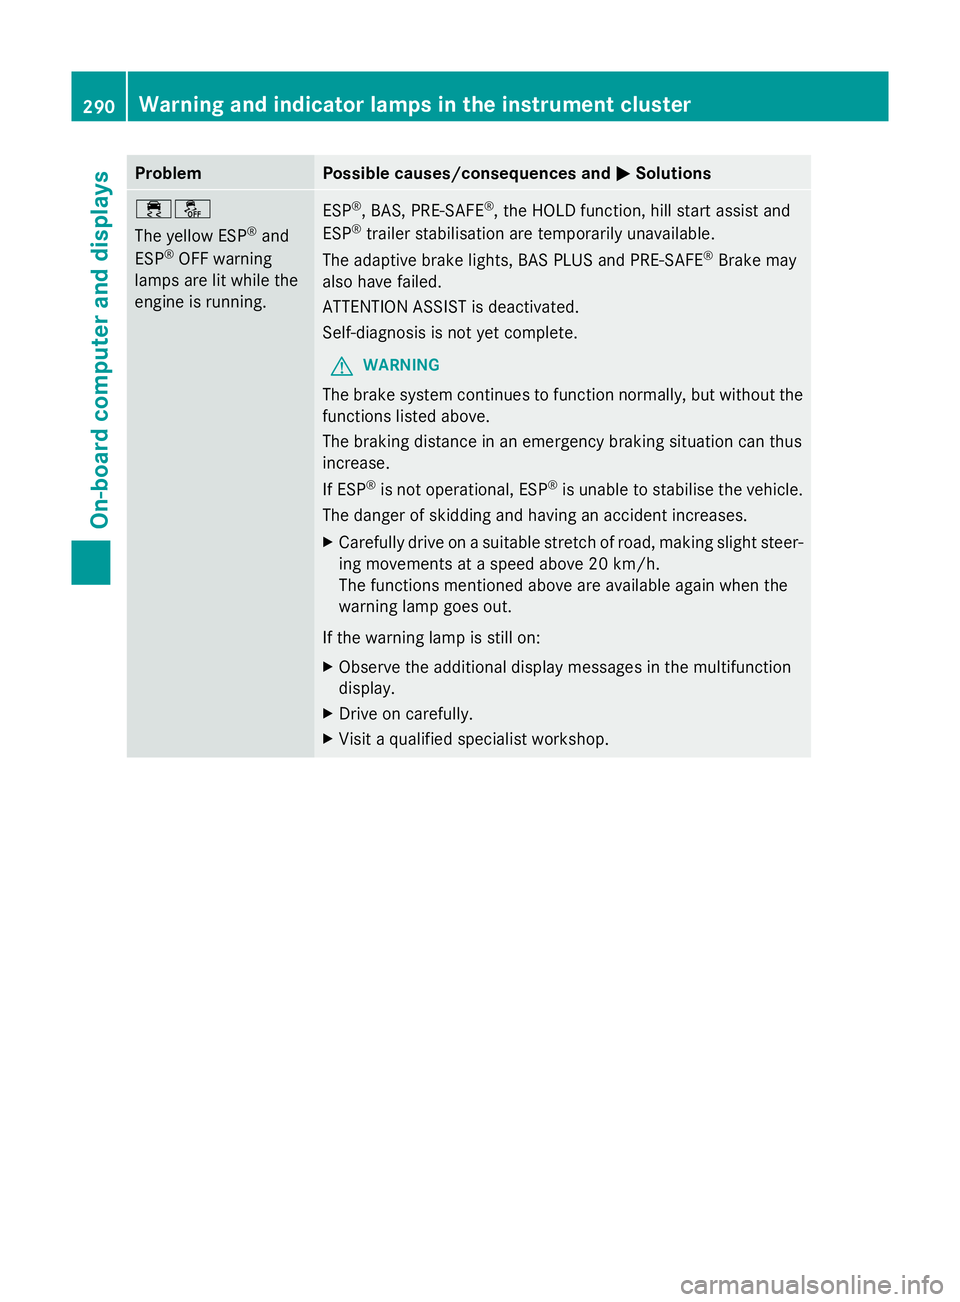
Problem Possible causes/consequences and
M
MSolutions ֌
The yellow ESP
®
and
ESP ®
OFF warning
lamps are lit while the
engine is running. ESP
®
, BAS, PRE-SAFE ®
, the HOLD function, hill start assist and
ESP ®
trailer stabilisation are temporarily unavailable.
The adaptive brake lights, BAS PLUS and PRE-SAFE ®
Brake may
also have failed.
ATTENTION ASSIST is deactivated.
Self-diagnosis is not yet complete.
G WARNING
The brake system continues to function normally, but without the
functions listed above.
The braking distance in an emergency braking situation can thus
increase.
If ESP ®
is not operational, ESP ®
is unable to stabilise the vehicle.
The danger of skidding and having an accident increases.
X Carefully drive on a suitable stretch of road, making slight steer-
ing movements at a speed above 20 km/h.
The functions mentioned above are available again when the
warning lamp goes out.
If the warning lamp is still on:
X Observe the additional display messages in the multifunction
display.
X Drive on carefully.
X Visit a qualified specialist workshop. 290
Warning and indicator lamps in the instrument clusterOn-board computer and displays
Page 302 of 381
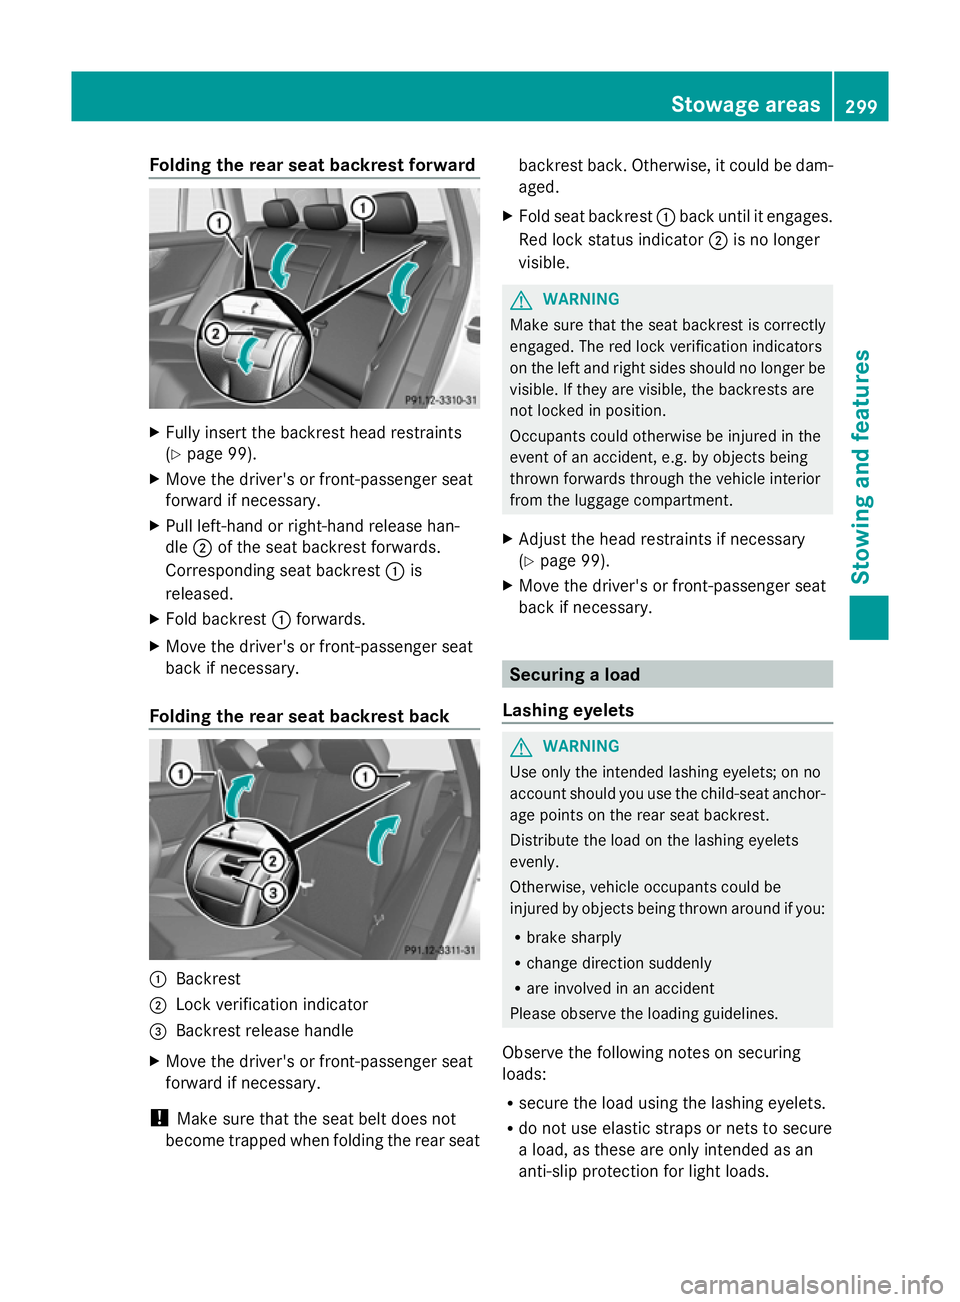
Folding the rear seat backrest forward
X
Fully insert the backrest head restraints
(Y page 99).
X Move the driver's or front-passenger seat
forward if necessary.
X Pull left-hand or right-hand release han-
dle ;of the seat backrest forwards.
Corresponding seat backrest :is
released.
X Fold backrest :forwards.
X Move the driver's or front-passenger seat
back if necessary.
Folding the rear seat backrest back :
Backrest
; Lock verification indicator
= Backrest release handle
X Move the driver's or front-passenger seat
forward if necessary.
! Make sure that the seat belt does not
become trapped when folding the rear seat backrest back. Otherwise, it could be dam-
aged.
X Fold seat backrest :back until it engages.
Red lock status indicator ;is no longer
visible. G
WARNING
Make sure that the seat backrest is correctly
engaged. The red lock verification indicators
on the left and right sides should no longer be
visible. If they are visible, the backrests are
not locked in position.
Occupants could otherwise be injured in the
event of an accident, e.g. by objects being
thrown forwards through the vehicle interior
from the luggage compartment.
X Adjust the head restraints if necessary
(Y page 99).
X Move the driver's or front-passenger seat
back if necessary. Securing a load
Lashing eyelets G
WARNING
Use only the intended lashing eyelets; on no
account should you use the child-seat anchor-
age points on the rear seat backrest.
Distribute the load on the lashing eyelets
evenly.
Otherwise, vehicle occupants could be
injured by objects being thrown around if you:
R brake sharply
R change direction suddenly
R are involved in an accident
Please observe the loading guidelines.
Observe the following notes on securing
loads:
R secure the load using the lashing eyelets.
R do not use elastic straps or nets to secure
a load, as these are only intended as an
anti-slip protection for light loads. Stowage areas
299Stowing and featu res Z
Page 305 of 381
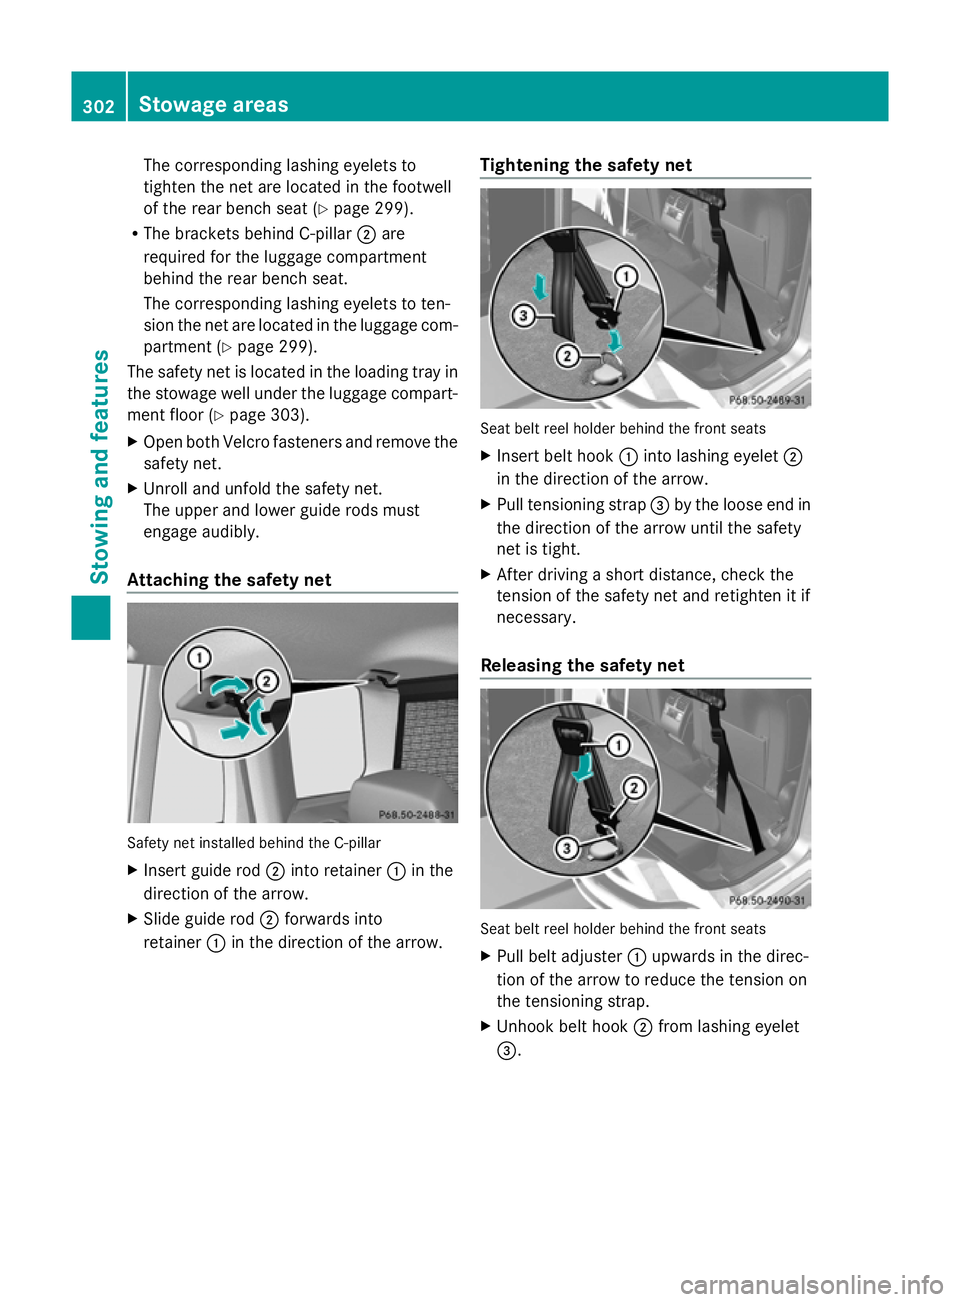
The corresponding lashing eyelets to
tighten the net are located in the footwell
of the rear bench seat (Y page 299).
R The brackets behind C-pillar ;are
required for the luggage compartment
behind the rear bench seat.
The corresponding lashing eyelets to ten-
sion the net are located in the luggage com-
partment (Y page 299).
The safety net is located in the loading tray in
the stowage well under the luggage compart-
ment floor (Y page 303).
X Open both Velcro fasteners and remove the
safety net.
X Unroll and unfold the safety net.
The upper and lower guide rods must
engage audibly.
Attaching the safety net Safety net installed behind the C-pillar
X
Insert guide rod ;into retainer :in the
direction of the arrow.
X Slide guide rod ;forwards into
retainer :in the direction of the arrow. Tightening the safety net Seat belt reel holder behind the front seats
X
Insert belt hook :into lashing eyelet ;
in the direction of the arrow.
X Pull tensioning strap =by the loose end in
the direction of the arrow until the safety
net is tight.
X After driving a short distance, check the
tension of the safety net and retighten it if
necessary.
Releasing the safety net Seat belt reel holder behind the front seats
X
Pull belt adjuster :upwards in the direc-
tion of the arrow to reduce the tension on
the tensioning strap.
X Unhook belt hook ;from lashing eyelet
=. 302
Stowage areasStowing and features
Page 320 of 381
On vehicles with KEYLESS-GO, press the
Start/Stop button twice (Y
page 147).
X Check the coolant temperature display in
the instrument cluster.
The coolant temperature must be below
70 †. X
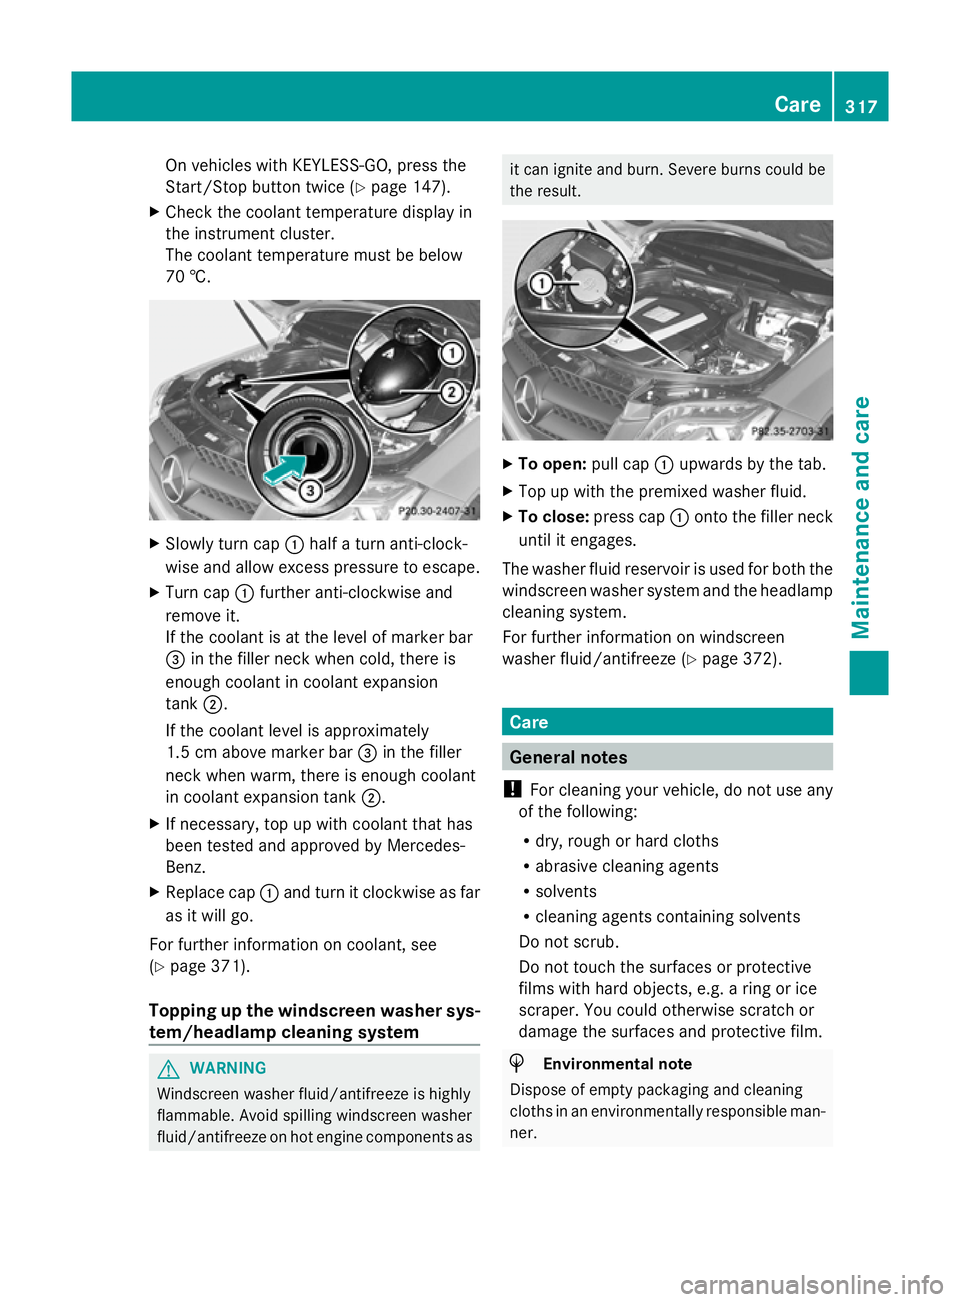
Slowly turn cap :half a turn anti-clock-
wise and allow excess pressure to escape.
X Turn cap :further anti-clockwise and
remove it.
If the coolant is at the level of marker bar
= in the filler neck when cold, there is
enough coolant in coolant expansion
tank ;.
If the coolant level is approximately
1.5 cm above marker bar =in the filler
neck when warm, there is enough coolant
in coolant expansion tank ;.
X If necessary, top up with coolant that has
been tested and approved by Mercedes-
Benz.
X Replace cap :and turn it clockwise as far
as it will go.
For further information on coolant, see
(Y page 371).
Topping up the windscreen washer sys-
tem/headlamp cleaning system G
WARNING
Windscreen washer fluid/antifreeze is highly
flammable. Avoid spilling windscreen washer
fluid/antifreeze on hot engine components as it can ignite and burn. Severe burns could be
the result.
X
To open: pull cap:upwards by the tab.
X Top up with the premixed washer fluid.
X To close: press cap :onto the filler neck
until it engages.
The washer fluid reservoir is used for both the
windscreen washer system and the headlamp
cleaning system.
For further information on windscreen
washer fluid/antifreeze (Y page 372). Care
General notes
! For cleaning your vehicle, do not use any
of the following:
R dry, rough or hard cloths
R abrasive cleaning agents
R solvents
R cleaning agents containing solvents
Do not scrub.
Do not touch the surfaces or protective
films with hard objects, e.g. a ring or ice
scraper. You could otherwise scratch or
damage the surfaces and protective film. H
Environmental note
Dispose of empty packaging and cleaning
cloths in an environmentally responsible man-
ner. Care
317Maintenance and care Z
Page 324 of 381
cloths could scratch or damage the plastic
lenses of the mirror turn signals.
X Clean the plastic lenses of the mirror turn
signals using a wet sponge and a mild
cleaning agent, e.g. Mercedes-Benz car
shampoo. Cleaning cloths may be used as
well.
Cleaning the sensors !
If you clean the sensors with a high-pres-
sure cleaner, make sure that you keep a
distance of at least 30 cm between the
vehicle and the high-pressure cleaner noz-
zle. Information about the correct distance
is available from the equipment manufac-
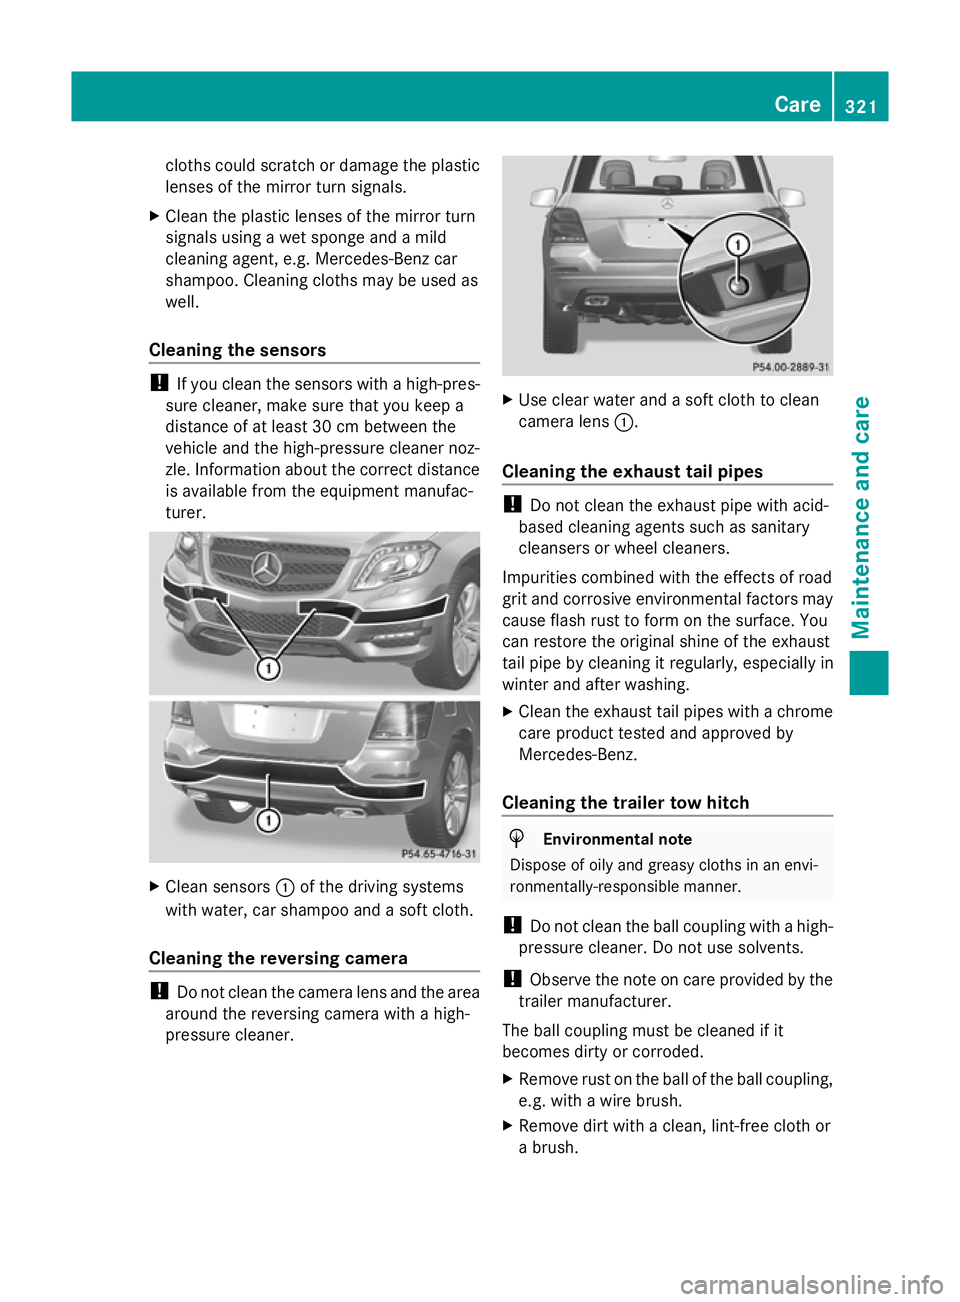
turer. X
Clean sensors :of the driving systems
with water, car shampoo and a soft cloth.
Cleaning the reversing camera !
Do not clean the camera lens and the area
around the reversing camera with a high-
pressure cleaner. X
Use clear water and a soft cloth to clean
camera lens :.
Cleaning the exhaust tail pipes !
Do not clean the exhaust pipe with acid-
based cleaning agents such as sanitary
cleansers or wheel cleaners.
Impurities combined with the effects of road
grit and corrosive environmental factors may
cause flash rust to form on the surface. You
can restore the original shine of the exhaust
tail pipe by cleaning it regularly, especially in
winter and after washing.
X Clean the exhaust tail pipes with a chrome
care product tested and approved by
Mercedes-Benz.
Cleaning the trailer tow hitch H
Environmental note
Dispose of oily and greasy cloths in an envi-
ronmentally-responsible manner.
! Do not clean the ball coupling with a high-
pressure cleaner. Do not use solvents.
! Observe the note on care provided by the
trailer manufacturer.
The ball coupling must be cleaned if it
becomes dirty or corroded.
X Remove rust on the ball of the ball coupling,
e.g. with a wire brush.
X Remove dirt with a clean, lint-free cloth or
a brush. Care
321Maintenance and care Z
Page 335 of 381
number, e.g. on the B-pillar on the driver's
side.
X Correct the tyre pressure if it is still at least
130 kPa (1.3 ba r/19 psi) (see the fuel filler
flap for values).
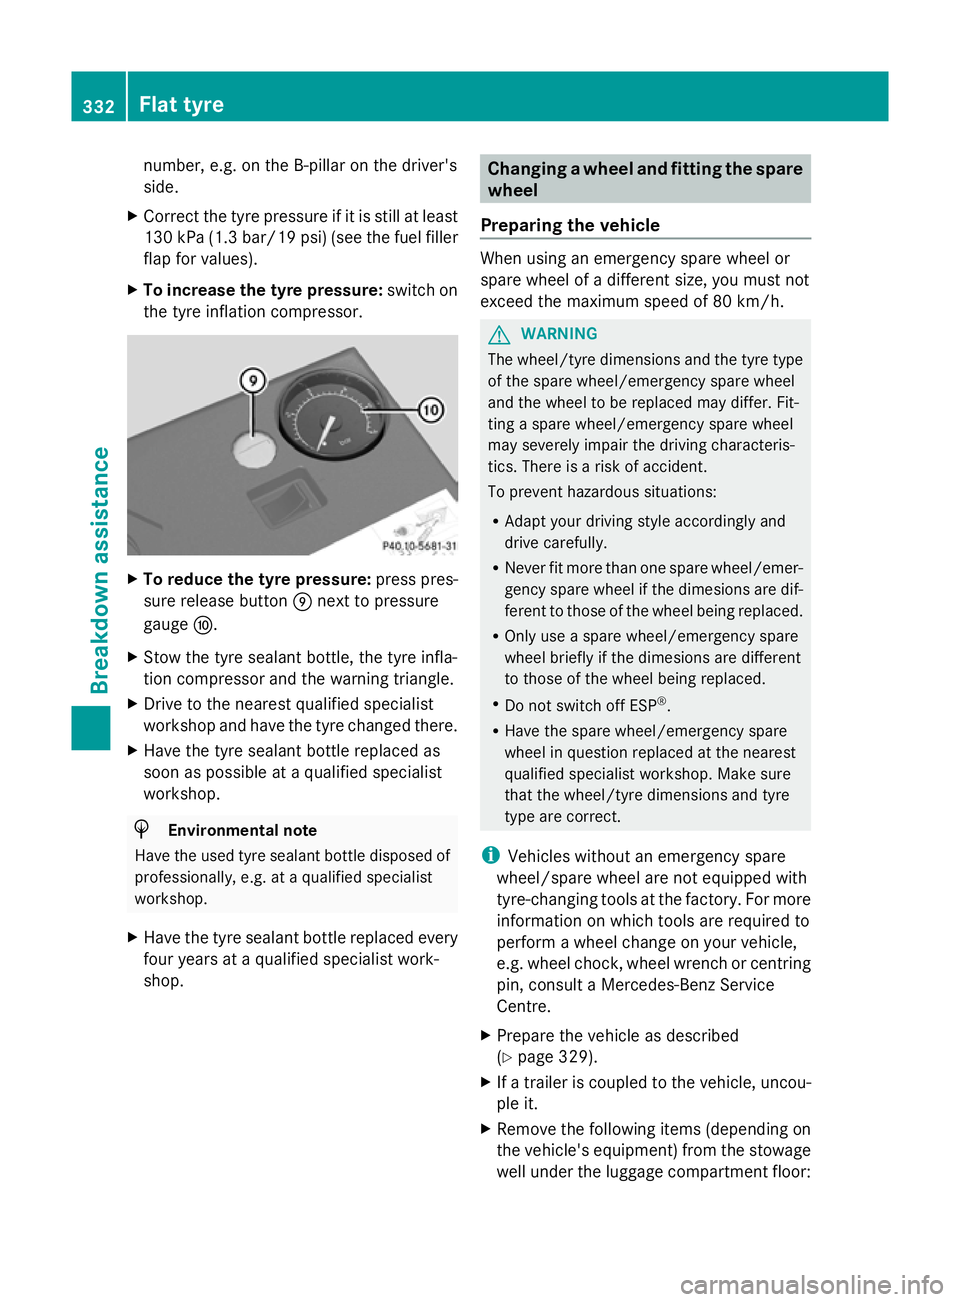
X To increase the tyre pressure: switch on
the tyre inflation compressor. X
To reduce the tyre pressure: press pres-
sure release button Enext to pressure
gauge F.
X Stow the tyre sealant bottle, the tyre infla-
tion compressor and the warning triangle.
X Drive to the nearest qualified specialist
workshop and have the tyre changed there.
X Have the tyre sealant bottle replaced as
soon as possible at a qualified specialist
workshop. H
Environmental note
Have the used tyre sealant bottle disposed of
professionally, e.g. at a qualified specialist
workshop.
X Have the tyre sealant bottle replaced every
four years at a qualified specialist work-
shop. Changing a wheel and fitting the spare
wheel
Preparing the vehicle When using an emergency spare wheel or
spare wheel of a different size, you must not
exceed the maximum speed of 80 km/h.
G
WARNING
The wheel/tyre dimensions and the tyre type
of the spare wheel/emergency spare wheel
and the wheel to be replaced may differ. Fit-
ting a spare wheel/emergency spare wheel
may severely impair the driving characteris-
tics. There is a risk of accident.
To prevent hazardous situations:
R Adapt your driving style accordingly and
drive carefully.
R Never fit more than one spare wheel/emer-
gency spare wheel if the dimesions are dif-
ferent to those of the wheel being replaced.
R Only use a spare wheel/emergency spare
wheel briefly if the dimesions are different
to those of the wheel being replaced.
R Do not switch off ESP ®
.
R Have the spare wheel/emergency spare
wheel in question replaced at the nearest
qualified specialist workshop. Make sure
that the wheel/tyre dimensions and tyre
type are correct.
i Vehicles without an emergency spare
wheel/spare wheel are not equipped with
tyre-changing tools at the factory. For more
information on which tools are required to
perform a wheel change on your vehicle,
e.g. wheel chock, wheel wrench or centring
pin, consult a Mercedes-Benz Service
Centre.
X Prepare the vehicle as described
(Y page 329).
X If a trailer is coupled to the vehicle, uncou-
ple it.
X Remove the following items (depending on
the vehicle's equipment) from the stowage
well under the luggage compartment floor: 332
Flat tyreBreakdown assistance