2012 MERCEDES-BENZ GL tires
[x] Cancel search: tiresPage 256 of 384
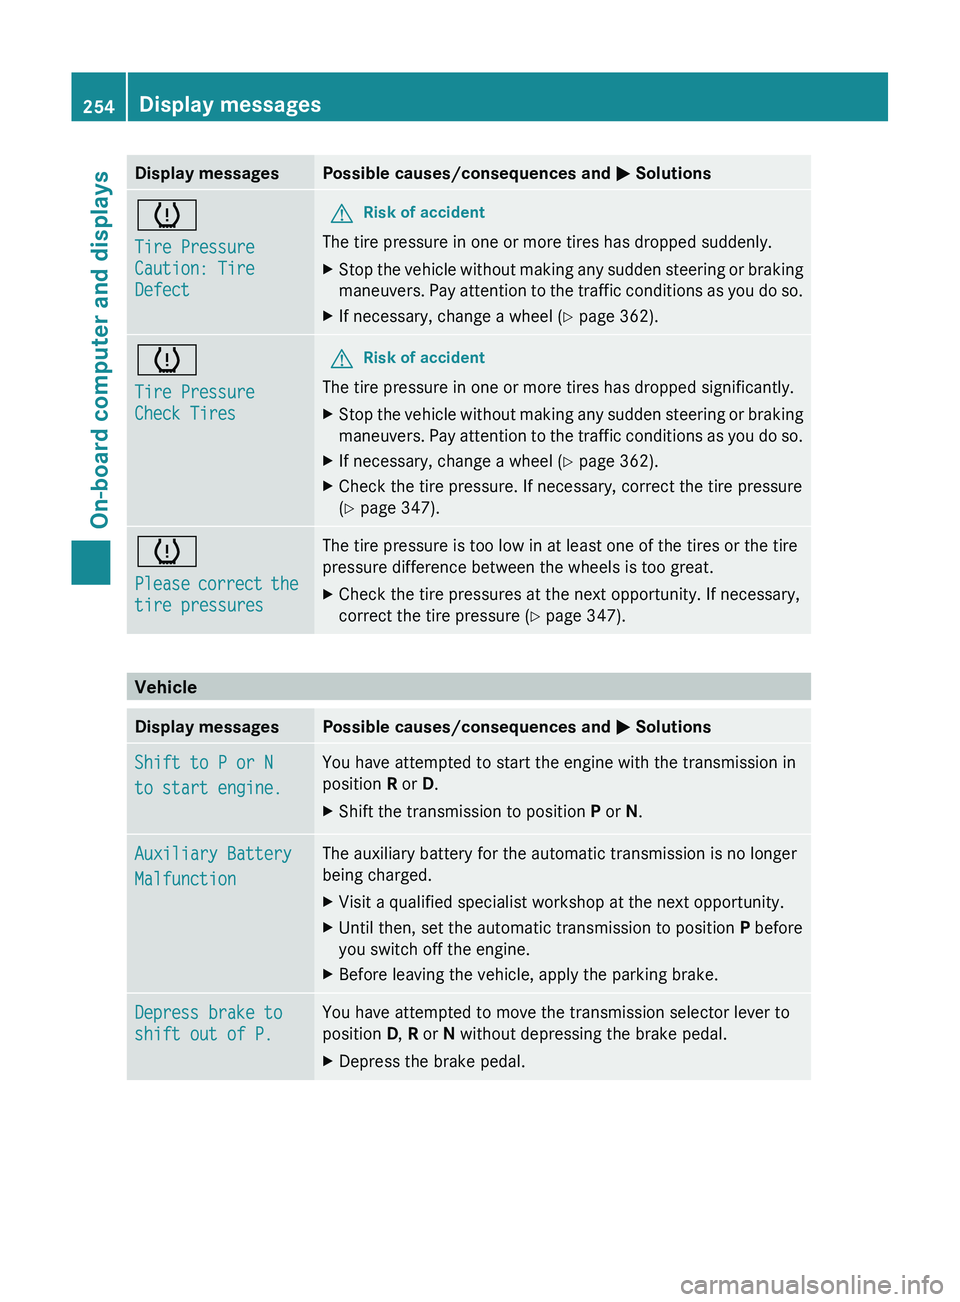
Display messagesPossible causes/consequences and M Solutionsh
Tire Pressure
Caution: Tire
DefectGRisk of accident
The tire pressure in one or more tires has dropped suddenly.
XStop the vehicle without making any sudden steering or braking
maneuvers. Pay attention to the traffic conditions as you do so.XIf necessary, change a wheel ( Y page 362).h
Tire Pressure
Check TiresGRisk of accident
The tire pressure in one or more tires has dropped significantly.
XStop the vehicle without making any sudden steering or braking
maneuvers. Pay attention to the traffic conditions as you do so.XIf necessary, change a wheel ( Y page 362).XCheck the tire pressure. If necessary, correct the tire pressure
( Y page 347).h
Please correct the
tire pressuresThe tire pressure is too low in at least one of the tires or the tire
pressure difference between the wheels is too great.XCheck the tire pressures at the next opportunity. If necessary,
correct the tire pressure ( Y page 347).
Vehicle
Display messagesPossible causes/consequences and M SolutionsShift to P or N
to start engine.You have attempted to start the engine with the transmission in
position R or D.XShift the transmission to position P or N.Auxiliary Battery
MalfunctionThe auxiliary battery for the automatic transmission is no longer
being charged.XVisit a qualified specialist workshop at the next opportunity.XUntil then, set the automatic transmission to position P before
you switch off the engine.XBefore leaving the vehicle, apply the parking brake.Depress brake to
shift out of P.You have attempted to move the transmission selector lever to
position D, R or N without depressing the brake pedal.XDepress the brake pedal.254Display messagesOn-board computer and displays
Page 267 of 384
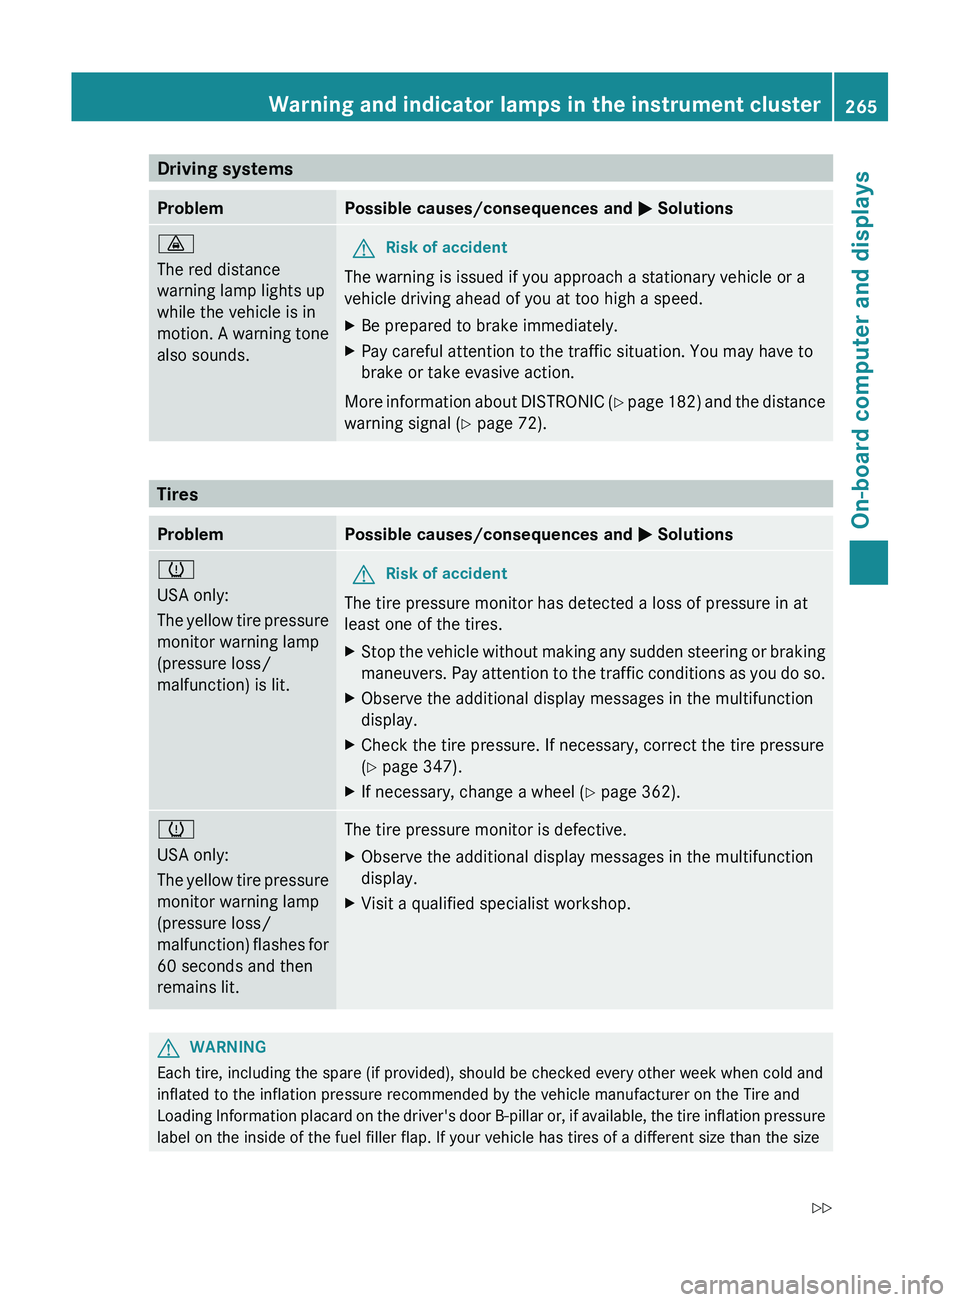
Driving systemsProblemPossible causes/consequences and M Solutions·
The red distance
warning lamp lights up
while the vehicle is in
motion. A warning tone
also sounds.GRisk of accident
The warning is issued if you approach a stationary vehicle or a
vehicle driving ahead of you at too high a speed.
XBe prepared to brake immediately.XPay careful attention to the traffic situation. You may have to
brake or take evasive action.
More information about DISTRONIC (Y page 182) and the distance
warning signal ( Y page 72).
Tires
ProblemPossible causes/consequences and M Solutionsh
USA only:
The yellow tire pressure
monitor warning lamp
(pressure loss/
malfunction) is lit.GRisk of accident
The tire pressure monitor has detected a loss of pressure in at
least one of the tires.
XStop the vehicle without making any sudden steering or braking
maneuvers. Pay attention to the traffic conditions as you do so.XObserve the additional display messages in the multifunction
display.XCheck the tire pressure. If necessary, correct the tire pressure
( Y page 347).XIf necessary, change a wheel ( Y page 362).h
USA only:
The yellow tire pressure
monitor warning lamp
(pressure loss/
malfunction) flashes for
60 seconds and then
remains lit.The tire pressure monitor is defective.XObserve the additional display messages in the multifunction
display.XVisit a qualified specialist workshop.GWARNING
Each tire, including the spare (if provided), should be checked every other week when cold and
inflated to the inflation pressure recommended by the vehicle manufacturer on the Tire and
Loading Information placard on the driver's door B-pillar or, if available, the tire inflation pressure
label on the inside of the fuel filler flap. If your vehicle has tires of a different size than the size
Warning and indicator lamps in the instrument cluster265On-board computer and displaysZ
Page 268 of 384
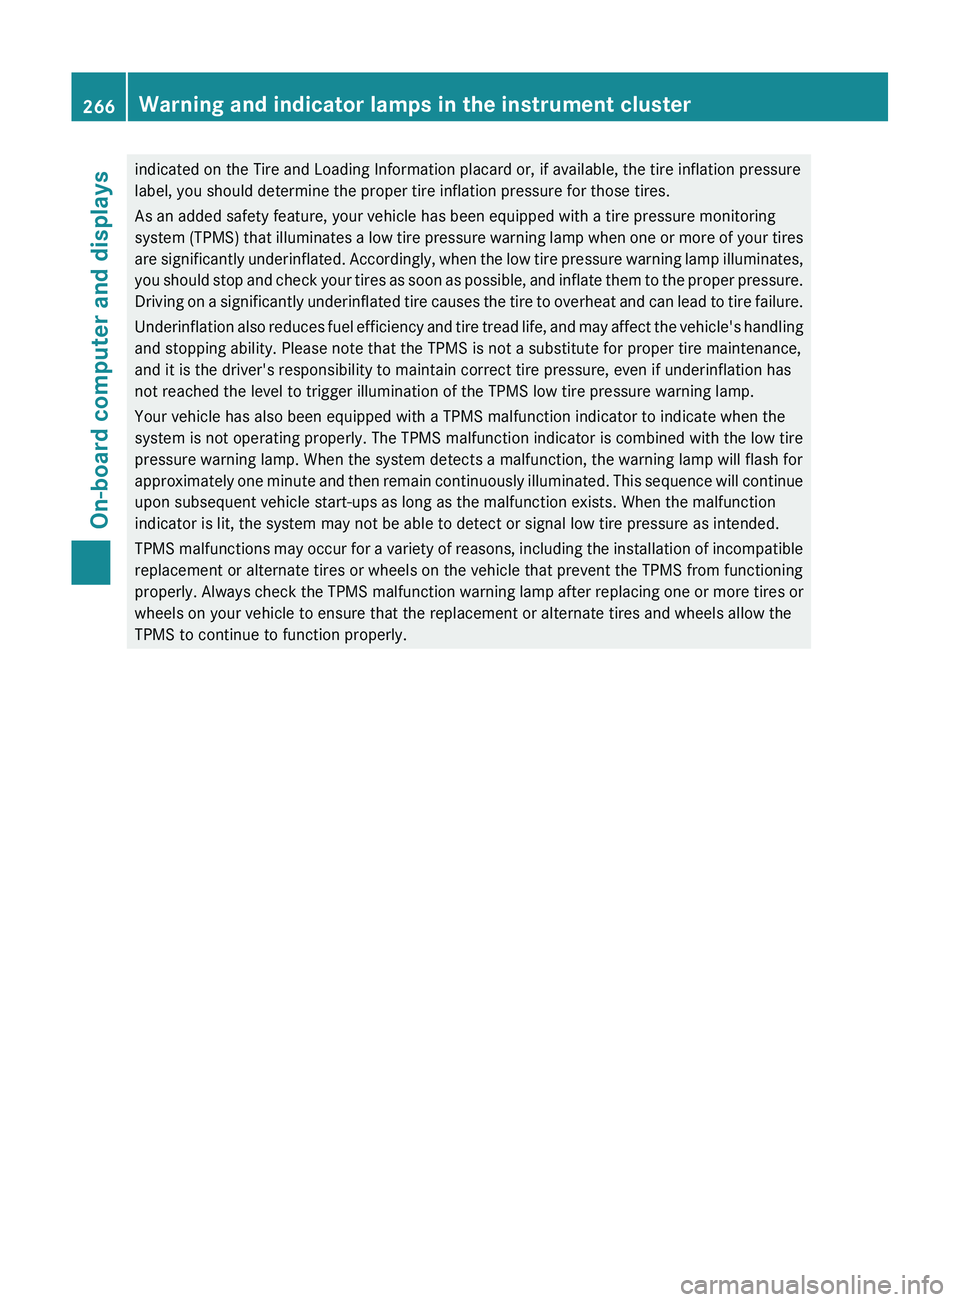
indicated on the Tire and Loading Information placard or, if available, the tire inflation pressure
label, you should determine the proper tire inflation pressure for those tires.
As an added safety feature, your vehicle has been equipped with a tire pressure monitoring
system (TPMS) that illuminates a low tire pressure warning lamp when one or more of your tires
are significantly underinflated. Accordingly, when the low tire pressure warning lamp illuminates,
you should stop and check your tires as soon as possible, and inflate them to the proper pressure.
Driving on a significantly underinflated tire causes the tire to overheat and can lead to tire failure.
Underinflation also reduces fuel efficiency and tire tread life, and may affect the vehicle's handling
and stopping ability. Please note that the TPMS is not a substitute for proper tire maintenance,
and it is the driver's responsibility to maintain correct tire pressure, even if underinflation has
not reached the level to trigger illumination of the TPMS low tire pressure warning lamp.
Your vehicle has also been equipped with a TPMS malfunction indicator to indicate when the
system is not operating properly. The TPMS malfunction indicator is combined with the low tire
pressure warning lamp. When the system detects a malfunction, the warning lamp will flash for
approximately one minute and then remain continuously illuminated. This sequence will continue
upon subsequent vehicle start-ups as long as the malfunction exists. When the malfunction
indicator is lit, the system may not be able to detect or signal low tire pressure as intended.
TPMS malfunctions may occur for a variety of reasons, including the installation of incompatible
replacement or alternate tires or wheels on the vehicle that prevent the TPMS from functioning
properly. Always check the TPMS malfunction warning lamp after replacing one or more tires or
wheels on your vehicle to ensure that the replacement or alternate tires and wheels allow the
TPMS to continue to function properly.266Warning and indicator lamps in the instrument clusterOn-board computer and displays
Page 309 of 384
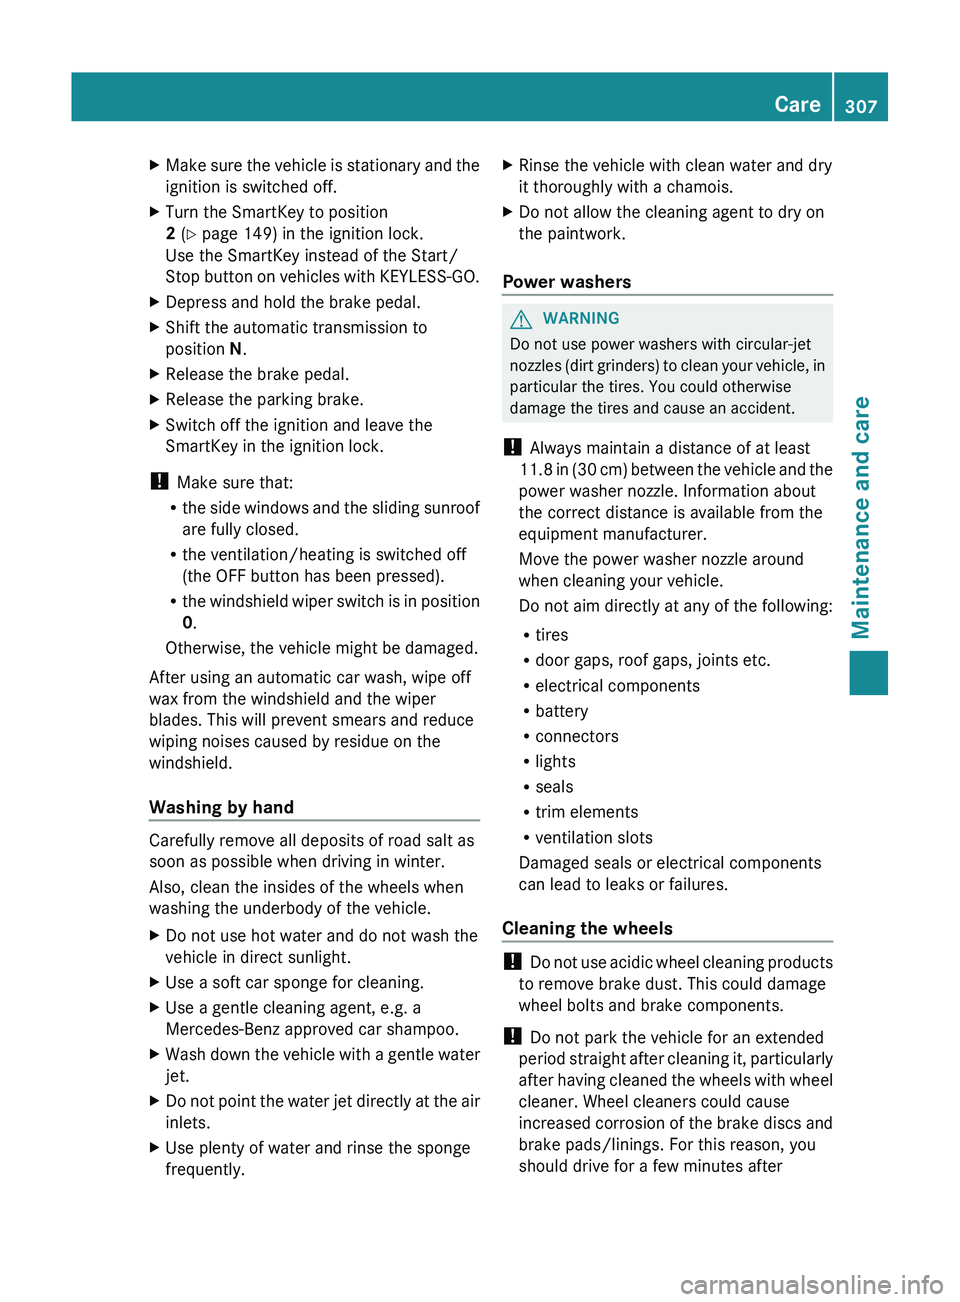
XMake sure the vehicle is stationary and the
ignition is switched off.XTurn the SmartKey to position
2 (Y page 149) in the ignition lock.
Use the SmartKey instead of the Start/
Stop button on vehicles with KEYLESS-GO.XDepress and hold the brake pedal.XShift the automatic transmission to
position N.XRelease the brake pedal.XRelease the parking brake.XSwitch off the ignition and leave the
SmartKey in the ignition lock.
! Make sure that:
R the side windows and the sliding sunroof
are fully closed.
R the ventilation/heating is switched off
(the OFF button has been pressed).
R the windshield wiper switch is in position
0 .
Otherwise, the vehicle might be damaged.
After using an automatic car wash, wipe off
wax from the windshield and the wiper
blades. This will prevent smears and reduce
wiping noises caused by residue on the
windshield.
Washing by hand
Carefully remove all deposits of road salt as
soon as possible when driving in winter.
Also, clean the insides of the wheels when
washing the underbody of the vehicle.
XDo not use hot water and do not wash the
vehicle in direct sunlight.XUse a soft car sponge for cleaning.XUse a gentle cleaning agent, e.g. a
Mercedes-Benz approved car shampoo.XWash down the vehicle with a gentle water
jet.XDo not point the water jet directly at the air
inlets.XUse plenty of water and rinse the sponge
frequently.XRinse the vehicle with clean water and dry
it thoroughly with a chamois.XDo not allow the cleaning agent to dry on
the paintwork.
Power washers
GWARNING
Do not use power washers with circular-jet
nozzles (dirt grinders) to clean your vehicle, in
particular the tires. You could otherwise
damage the tires and cause an accident.
! Always maintain a distance of at least
11.8 in (30 cm) between the vehicle and the
power washer nozzle. Information about
the correct distance is available from the
equipment manufacturer.
Move the power washer nozzle around
when cleaning your vehicle.
Do not aim directly at any of the following:
R tires
R door gaps, roof gaps, joints etc.
R electrical components
R battery
R connectors
R lights
R seals
R trim elements
R ventilation slots
Damaged seals or electrical components
can lead to leaks or failures.
Cleaning the wheels
! Do not use acidic wheel cleaning products
to remove brake dust. This could damage
wheel bolts and brake components.
! Do not park the vehicle for an extended
period straight after cleaning it, particularly
after having cleaned the wheels with wheel
cleaner. Wheel cleaners could cause
increased corrosion of the brake discs and
brake pads/linings. For this reason, you
should drive for a few minutes after
Care307Maintenance and careZ
Page 318 of 384
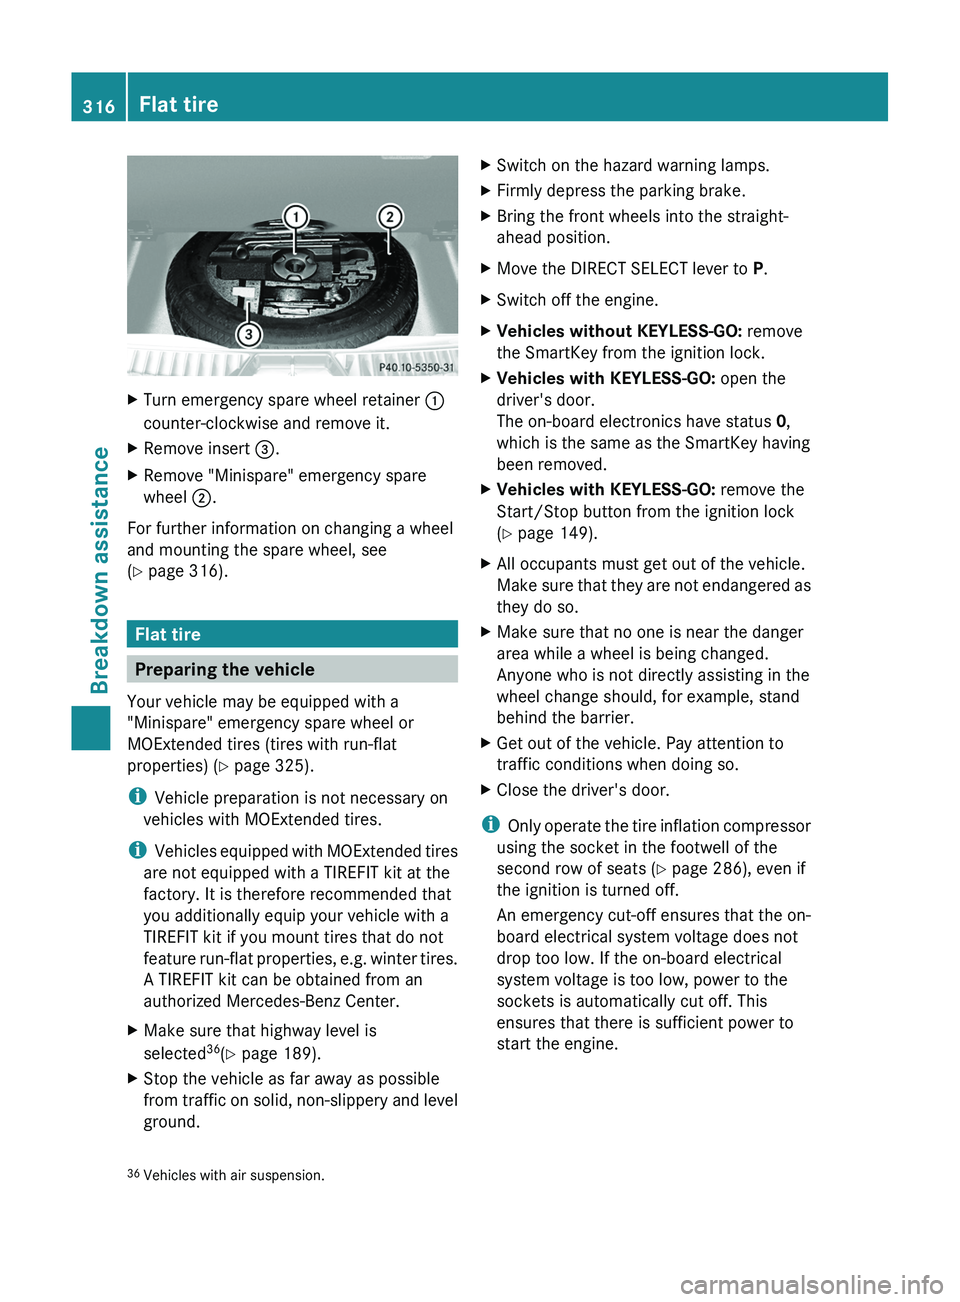
XTurn emergency spare wheel retainer :
counter-clockwise and remove it.XRemove insert =.XRemove "Minispare" emergency spare
wheel ;.
For further information on changing a wheel
and mounting the spare wheel, see
( Y page 316).
Flat tire
Preparing the vehicle
Your vehicle may be equipped with a
"Minispare" emergency spare wheel or
MOExtended tires (tires with run-flat
properties) ( Y page 325).
i Vehicle preparation is not necessary on
vehicles with MOExtended tires.
i Vehicles equipped with MOExtended tires
are not equipped with a TIREFIT kit at the
factory. It is therefore recommended that
you additionally equip your vehicle with a
TIREFIT kit if you mount tires that do not
feature run-flat properties, e.g. winter tires.
A TIREFIT kit can be obtained from an
authorized Mercedes-Benz Center.
XMake sure that highway level is
selected 36
(Y page 189).XStop the vehicle as far away as possible
from traffic on solid, non-slippery and level
ground.XSwitch on the hazard warning lamps.XFirmly depress the parking brake.XBring the front wheels into the straight-
ahead position.XMove the DIRECT SELECT lever to P.XSwitch off the engine.XVehicles without KEYLESS-GO: remove
the SmartKey from the ignition lock.XVehicles with KEYLESS-GO: open the
driver's door.
The on-board electronics have status 0,
which is the same as the SmartKey having
been removed.XVehicles with KEYLESS-GO: remove the
Start/Stop button from the ignition lock
( Y page 149).XAll occupants must get out of the vehicle.
Make sure that they are not endangered as
they do so.XMake sure that no one is near the danger
area while a wheel is being changed.
Anyone who is not directly assisting in the
wheel change should, for example, stand
behind the barrier.XGet out of the vehicle. Pay attention to
traffic conditions when doing so.XClose the driver's door.
i Only operate the tire inflation compressor
using the socket in the footwell of the
second row of seats ( Y page 286), even if
the ignition is turned off.
An emergency cut-off ensures that the on-
board electrical system voltage does not
drop too low. If the on-board electrical
system voltage is too low, power to the
sockets is automatically cut off. This
ensures that there is sufficient power to
start the engine.
36 Vehicles with air suspension.316Flat tireBreakdown assistance
Page 327 of 384
XTighten the wheel bolts until they are
finger-tight.XUnscrew the alignment bolt.XTighten the last wheel bolt until it is finger-
tight.
Lowering the vehicle
XPlace the ratchet wrench onto the hexagon
nut of the jack so that the letters AB are
visible.XTurn the ratchet wrench until the vehicle is
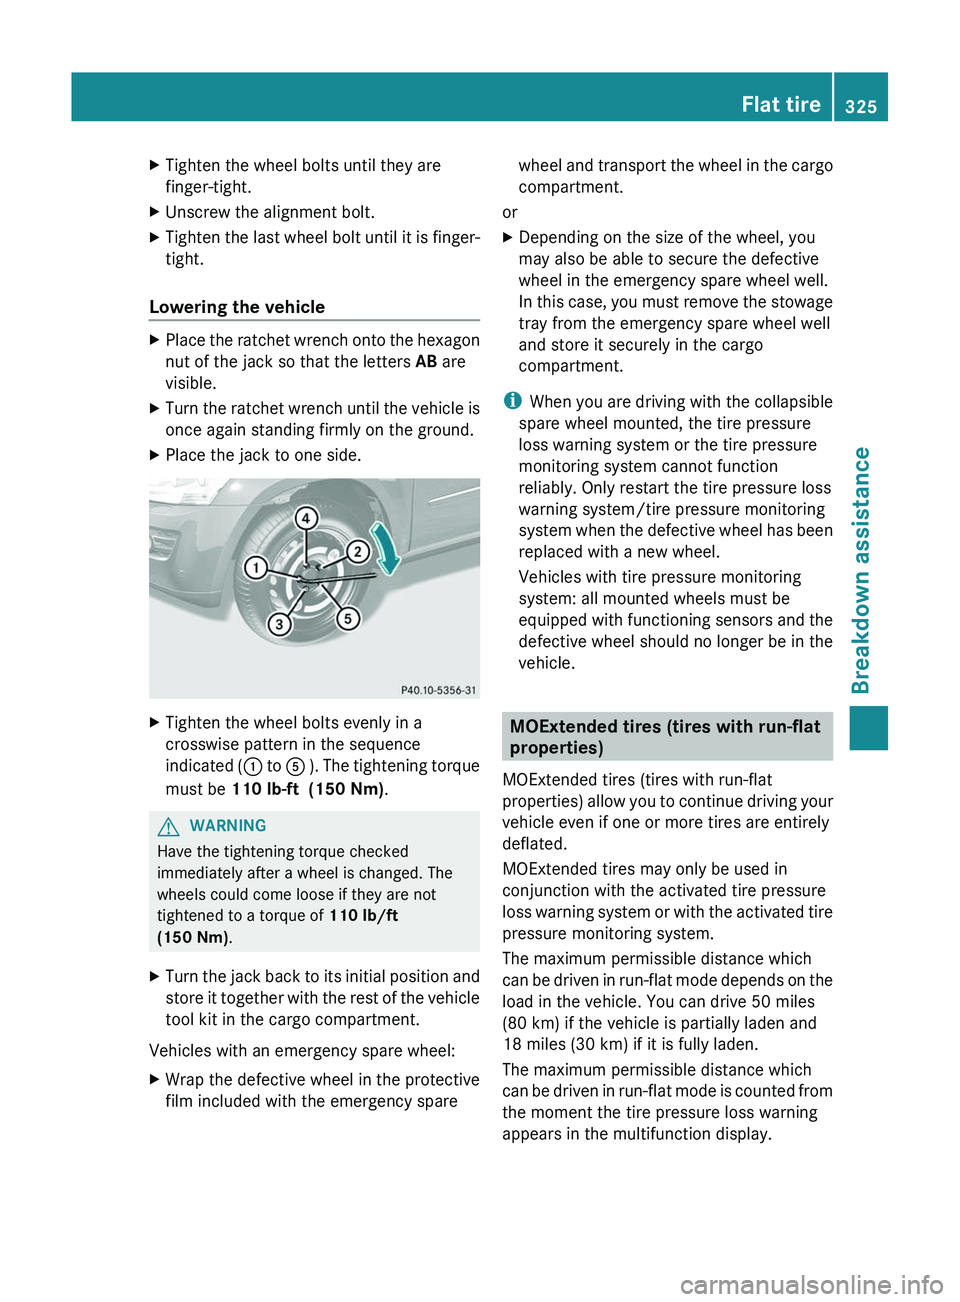
once again standing firmly on the ground.XPlace the jack to one side.XTighten the wheel bolts evenly in a
crosswise pattern in the sequence
indicated ( : to A ). The tightening torque
must be 110 lb-ft (150 Nm) .GWARNING
Have the tightening torque checked
immediately after a wheel is changed. The
wheels could come loose if they are not
tightened to a torque of 110 lb/ft
(150 Nm) .
XTurn the jack back to its initial position and
store it together with the rest of the vehicle
tool kit in the cargo compartment.
Vehicles with an emergency spare wheel:
XWrap the defective wheel in the protective
film included with the emergency sparewheel and transport the wheel in the cargo
compartment.
or
XDepending on the size of the wheel, you
may also be able to secure the defective
wheel in the emergency spare wheel well.
In this case, you must remove the stowage
tray from the emergency spare wheel well
and store it securely in the cargo
compartment.
i When you are driving with the collapsible
spare wheel mounted, the tire pressure
loss warning system or the tire pressure
monitoring system cannot function
reliably. Only restart the tire pressure loss
warning system/tire pressure monitoring
system when the defective wheel has been
replaced with a new wheel.
Vehicles with tire pressure monitoring
system: all mounted wheels must be
equipped with functioning sensors and the
defective wheel should no longer be in the
vehicle.
MOExtended tires (tires with run-flat
properties)
MOExtended tires (tires with run-flat
properties) allow you to continue driving your
vehicle even if one or more tires are entirely
deflated.
MOExtended tires may only be used in
conjunction with the activated tire pressure
loss warning system or with the activated tire
pressure monitoring system.
The maximum permissible distance which
can be driven in run-flat mode depends on the
load in the vehicle. You can drive 50 miles
(80 km) if the vehicle is partially laden and
18 miles (30 km) if it is fully laden.
The maximum permissible distance which
can be driven in run-flat mode is counted from
the moment the tire pressure loss warning
appears in the multifunction display.
Flat tire325Breakdown assistanceZ
Page 328 of 384
You must not exceed a maximum speed of
50 mph (80 km/h).GWARNING
The handling characteristics of your vehicle
deteriorate in run-flat mode, for example:
R when cornering
R when braking
R when accelerating rapidly
Adapt your driving style accordingly and avoid
sudden changes in direction and sudden
acceleration, as well as driving over obstacles
(i.e. curbs, potholes), and driving off-road.
This is particularly the case when the vehicle
is heavily laden.
The maximum permissible distance that can
be driven in run-flat mode depends to a large
extent on the loads placed on the vehicle. It
can be shorter due to high speeds, a heavy
load, sudden changes in direction, the road
surface condition, outside temperature, etc.,
or further if you drive carefully and
conservatively.
Do not continue to drive in run-flat mode if:
R you hear banging noises.
R the vehicle starts to shake.
R you see smoke and smell rubber.
R ESP ®
is intervening constantly.
R there are tears in the sidewalls of the tire.
After driving in run-flat mode, you must have
the wheel(s) checked for damage at a
qualified specialist workshop which has the
necessary specialist knowledge and tools to
carry out the work required. The defective tire
must be replaced in every case.
Mercedes-Benz recommends that you use an
authorized Mercedes-Benz Center for this
purpose. In particular, work relevant to safety
or on safety-related systems must be carried
out at a qualified specialist workshop.
i When replacing one or all tires, make sure
that you only use tires marked
MOExtended and of the specified size for
the vehicle.
i Vehicles equipped with MOExtended tires
are not equipped with a TIREFIT kit at the
factory. It is therefore recommended that
you additionally equip your vehicle with a
TIREFIT kit if you mount tires that do not
feature run-flat properties, e.g. winter tires.
A TIREFIT kit can be obtained from an
authorized Mercedes-Benz Center.
Battery
Important safety notes
In order for the battery to achieve the
maximum possible service life, it must always
be sufficiently charged.
! Have the battery checked regularly at a
qualified specialist workshop, such as an
authorized Mercedes-Benz Center.
Adhere to the service intervals indicated in
the service booklet or ask a qualified
specialist workshop, such as an authorized
Mercedes-Benz Center.
Have the battery charge checked more
frequently if you use the vehicle mainly for
short trips or if you leave it standing idle for
a lengthy period.
Only replace a battery with a battery that has
been recommended by Mercedes-Benz.
Consult an authorized Mercedes-Benz Center
if you wish to leave your vehicle parked for a
long period of time.
GWARNING
Comply with safety precautions and take
protective measures when handling batteries.
Risk of explosionFire, naked flames and
smoking are prohibited
when handling the battery.
Avoid creating sparks.326BatteryBreakdown assistance
Page 339 of 384
Useful information ............................338
Important safety notes ....................338
Operation ........................................... 338
Winter operation ............................... 340
Tire pressure ..................................... 341
Loading the vehicle ..........................349
Maximum load rating .......................353
Uniform Tire Quality Grading
Standards .......................................... 354
Tire labeling ....................................... 355
Definition of terms for tires and
loading ............................................... 359
Changing a wheel ............................. 362
Wheel and tire combinations ...........363337Wheels and tires