2012 MERCEDES-BENZ GL warning
[x] Cancel search: warningPage 268 of 384
indicated on the Tire and Loading Information placard or, if available, the tire inflation pressure
label, you should determine the proper tire inflation pressure for those tires.
As an added safety feature, your vehicle has been equipped with a tire pressure monitoring
system (TPMS) that illuminates a low tire pressure warning lamp when one or more of your tires
are significantly underinflated. Accordingly, when the low tire pressure warning lamp illuminates,
you should stop and check your tires as soon as possible, and inflate them to the proper pressure.
Driving on a significantly underinflated tire causes the tire to overheat and can lead to tire failure.
Underinflation also reduces fuel efficiency and tire tread life, and may affect the vehicle's handling
and stopping ability. Please note that the TPMS is not a substitute for proper tire maintenance,
and it is the driver's responsibility to maintain correct tire pressure, even if underinflation has
not reached the level to trigger illumination of the TPMS low tire pressure warning lamp.
Your vehicle has also been equipped with a TPMS malfunction indicator to indicate when the
system is not operating properly. The TPMS malfunction indicator is combined with the low tire
pressure warning lamp. When the system detects a malfunction, the warning lamp will flash for
approximately one minute and then remain continuously illuminated. This sequence will continue
upon subsequent vehicle start-ups as long as the malfunction exists. When the malfunction
indicator is lit, the system may not be able to detect or signal low tire pressure as intended.
TPMS malfunctions may occur for a variety of reasons, including the installation of incompatible
replacement or alternate tires or wheels on the vehicle that prevent the TPMS from functioning
properly. Always check the TPMS malfunction warning lamp after replacing one or more tires or
wheels on your vehicle to ensure that the replacement or alternate tires and wheels allow the
TPMS to continue to function properly.266Warning and indicator lamps in the instrument clusterOn-board computer and displays
Page 270 of 384
Useful information
i This Operator's Manual describes all
models and all standard and optional
equipment of your vehicle available at the
time of publication of the Operator's
Manual. Country-specific differences are
possible. Please note that your vehicle may
not be equipped with all features
described. This also applies to safety-
related systems and functions.
i Please read the information on qualified
specialist workshops ( Y page 24).
Loading guidelines
GWARNING
Always fasten items being carried as securely
as possible. Use cargo tie-down rings and
fastening materials appropriate for the weight
and size of the load.
In an accident, during hard braking or sudden
maneuvers, loose items will be thrown around
inside the vehicle. This can cause injury to
vehicle occupants unless the items are
securely fastened in the vehicle.
To help avoid personal injury during a collision
or sudden maneuver, exercise care when
transporting cargo. Do not pile luggage or
cargo higher than the seat backrests.
The cargo compartment is the preferred place
to carry objects. Always use cargo tie-down
rings, and if so equipped, always use the cargo
net when transporting cargo.
Never drive a vehicle with the tailgate open.
Deadly carbon monoxide (CO) gases may
enter vehicle interior resulting in
unconsciousness and death.
The gross vehicle weight (GVW) is the vehicle
weight including fuel, vehicle tool kit, spare
wheel, installed accessories, vehicle
occupants and luggage/cargo.
The gross load limit and the gross vehicle
weight rating (GVWR) for your vehicle must
never be exceeded. The gross load limit and
the GVWR are specified on the vehicle
identification plate on the B-pillar of the
driver's door ( Y page 349).
The load must also be distributed so that the
weight on each axle never exceeds the gross
axle weight rating (GAWR) for the front and
rear axles. The specifications for GVWR and
GAWR are on the vehicle identification plate
on the B-pillar of the driver's door
( Y page 349).
Further information can be found in the
"Loading the vehicle" section ( Y page 349).
The handling characteristics of a laden
vehicle are dependent on the distribution of
the load within the vehicle. For this reason,
you should observe the following notes when
transporting a load:
R position heavy loads as far forwards as
possible and as low down in the cargo
compartment as possible.
R the load must not protrude above the upper
edge of the seat backrests.
R always place the load against the rear or
front seat backrests. Make sure that the
seat backrests are securely locked into
place.
R hook in the cargo net when loading.
R always place the load behind unoccupied
seats if possible.
R secure the load with sufficiently strong and
wear-resistant tie down. pad sharp edges
for protection.
Stowage areas
Stowage compartments
Important safety notes
GWARNING
To help avoid personal injury during a collision
or sudden maneuver, exercise care when
storing objects in the vehicle. Put luggage or
cargo in the cargo compartment if possible.
268Stowage areasStowing and features
Page 272 of 384
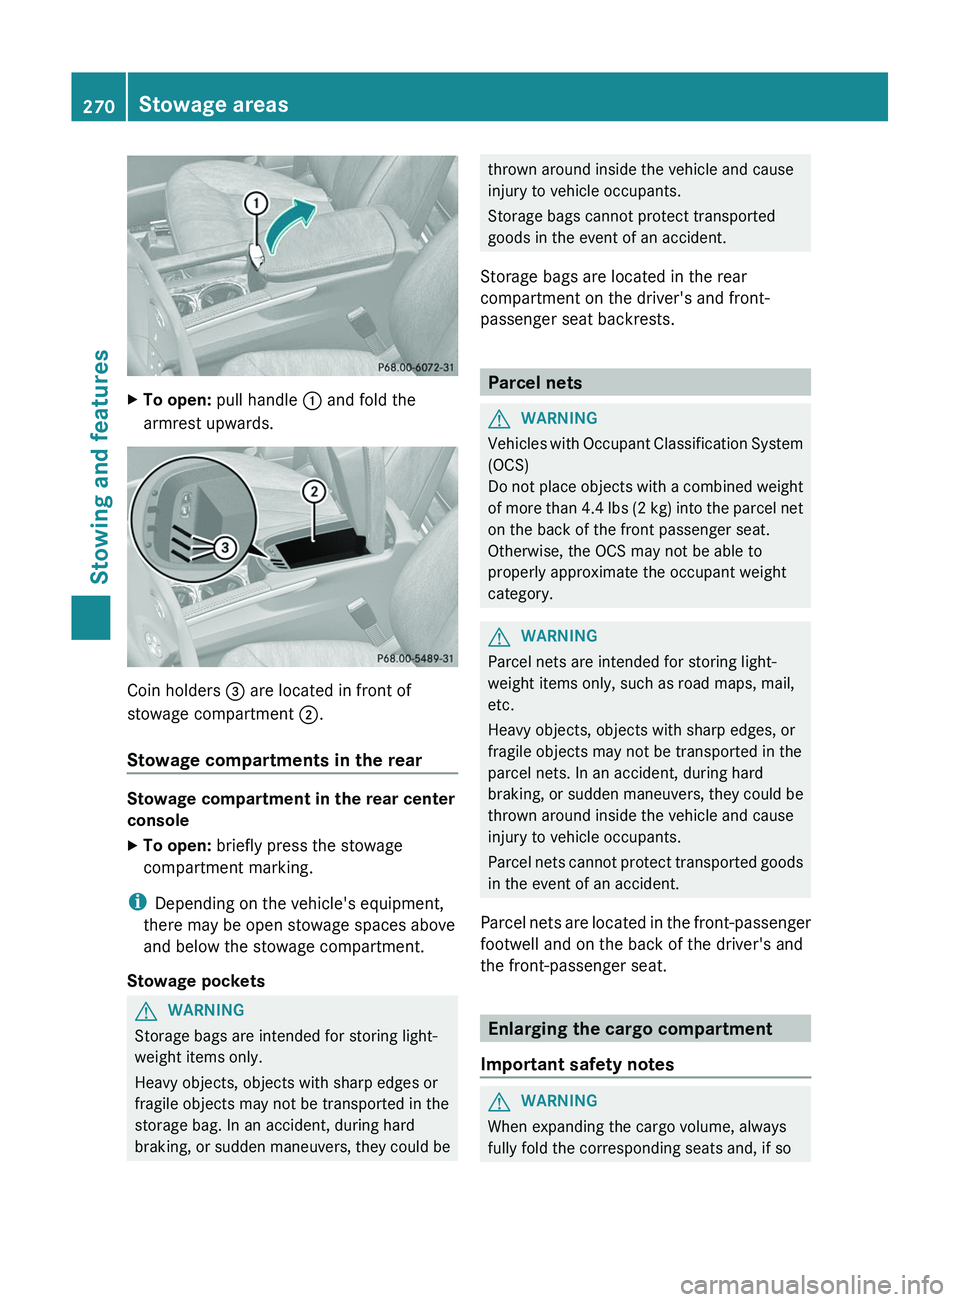
XTo open: pull handle : and fold the
armrest upwards.
Coin holders = are located in front of
stowage compartment ;.
Stowage compartments in the rear
Stowage compartment in the rear center
console
XTo open: briefly press the stowage
compartment marking.
i Depending on the vehicle's equipment,
there may be open stowage spaces above
and below the stowage compartment.
Stowage pockets
GWARNING
Storage bags are intended for storing light-
weight items only.
Heavy objects, objects with sharp edges or
fragile objects may not be transported in the
storage bag. In an accident, during hard
braking, or sudden maneuvers, they could be
thrown around inside the vehicle and cause
injury to vehicle occupants.
Storage bags cannot protect transported
goods in the event of an accident.
Storage bags are located in the rear
compartment on the driver's and front-
passenger seat backrests.
Parcel nets
GWARNING
Vehicles with Occupant Classification System
(OCS)
Do not place objects with a combined weight
of more than 4.4 lbs (2 kg) into the parcel net
on the back of the front passenger seat.
Otherwise, the OCS may not be able to
properly approximate the occupant weight
category.
GWARNING
Parcel nets are intended for storing light-
weight items only, such as road maps, mail,
etc.
Heavy objects, objects with sharp edges, or
fragile objects may not be transported in the
parcel nets. In an accident, during hard
braking, or sudden maneuvers, they could be
thrown around inside the vehicle and cause
injury to vehicle occupants.
Parcel nets cannot protect transported goods
in the event of an accident.
Parcel nets are located in the front-passenger
footwell and on the back of the driver's and
the front-passenger seat.
Enlarging the cargo compartment
Important safety notes
GWARNING
When expanding the cargo volume, always
fully fold the corresponding seats and, if so
270Stowage areasStowing and features
Page 273 of 384
equipped, always use the cargo net when
transporting cargo.
Unless you are transporting cargo, the seat
backrests must remain properly locked in the
upright position.
In an accident, during hard braking or sudden
maneuvers, loose items will be thrown around
inside the vehicle. This can cause injury to
vehicle occupants unless the items are
securely fastened in the vehicle.
Always use the cargo tie-down rings.GWARNING
Never drive a vehicle with the tailgate open.
Deadly carbon monoxide (CO) gases may
enter vehicle interior resulting in
unconsciousness and death.
! Release and fold the seat cushion
upwards before folding the rear bench seat
forward. Otherwise, the backrests may be
damaged.
When the backrest is folded forwards, the
front seats cannot be moved to their
rearmost position. Otherwise, the front
seats and the rear bench seat could be
damaged.
The left-hand and right-hand backrests in the
second row of seats can be folded forwards
separately to increase the cargo
compartment capacity. On vehicles with a
third row of seats, you must fold down the
third row of seats beforehand (Y page 104) to
obtain maximum cargo compartment
enlargement.
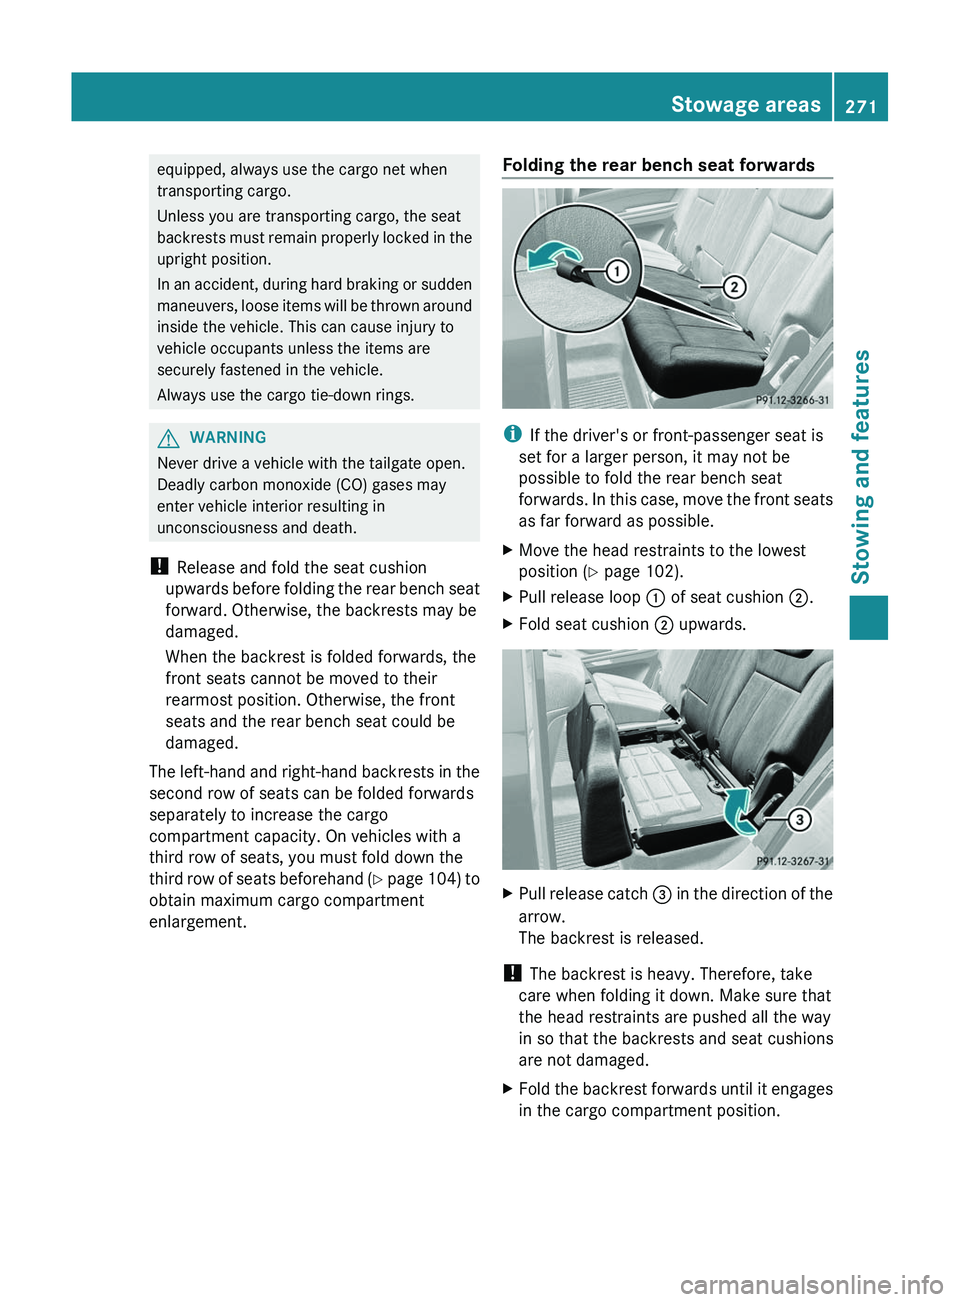
Folding the rear bench seat forwards
i If the driver's or front-passenger seat is
set for a larger person, it may not be
possible to fold the rear bench seat
forwards. In this case, move the front seats
as far forward as possible.
XMove the head restraints to the lowest
position ( Y page 102).XPull release loop : of seat cushion ;.XFold seat cushion ; upwards.XPull release catch = in the direction of the
arrow.
The backrest is released.
! The backrest is heavy. Therefore, take
care when folding it down. Make sure that
the head restraints are pushed all the way
in so that the backrests and seat cushions
are not damaged.
XFold the backrest forwards until it engages
in the cargo compartment position.Stowage areas271Stowing and featuresZ
Page 276 of 384
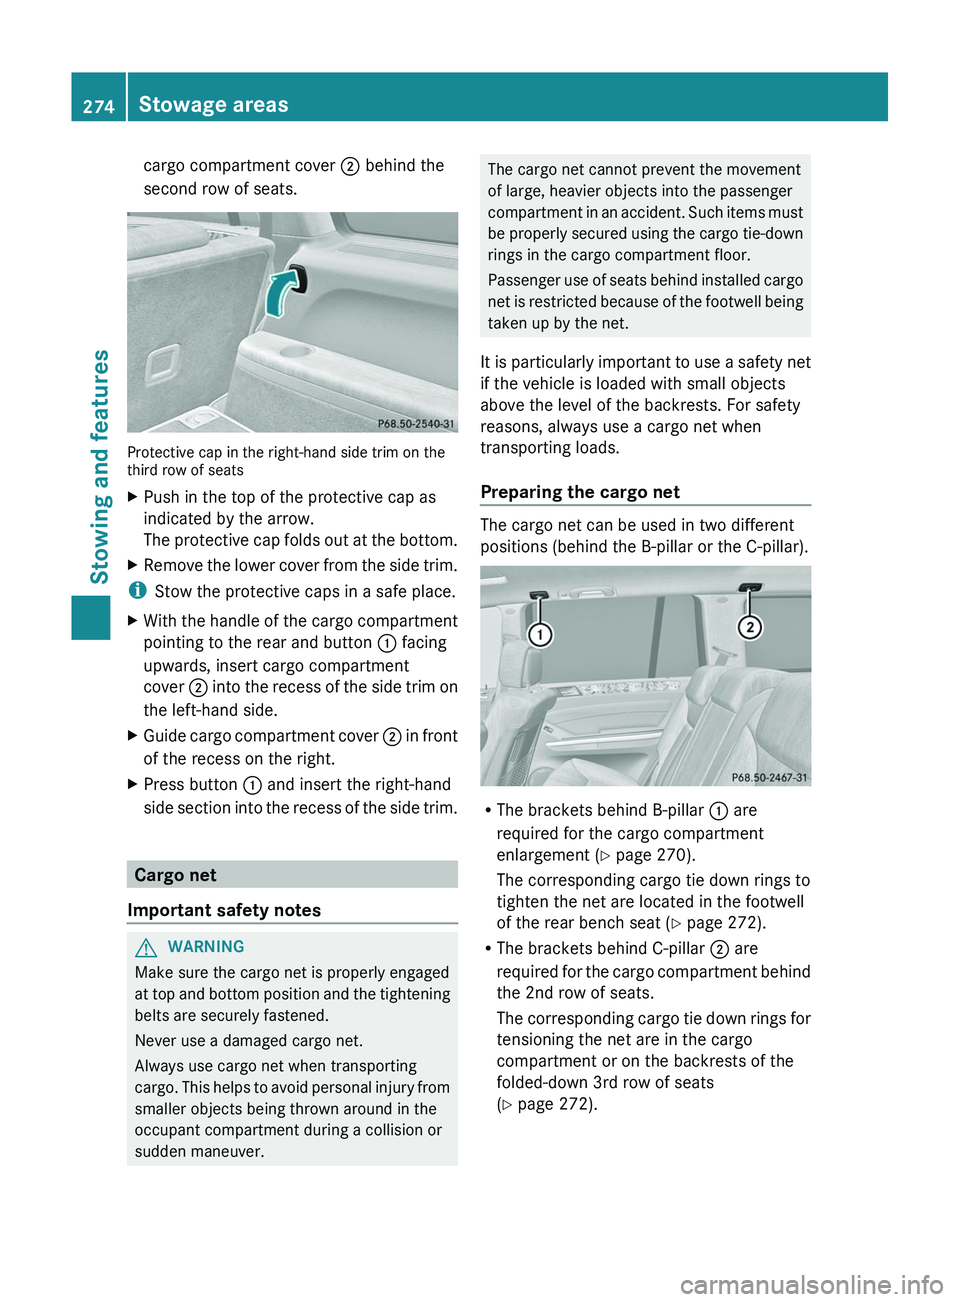
cargo compartment cover ; behind the
second row of seats.
Protective cap in the right-hand side trim on the
third row of seats
XPush in the top of the protective cap as
indicated by the arrow.
The protective cap folds out at the bottom.XRemove the lower cover from the side trim.
i Stow the protective caps in a safe place.
XWith the handle of the cargo compartment
pointing to the rear and button : facing
upwards, insert cargo compartment
cover ; into the recess of the side trim on
the left-hand side.XGuide cargo compartment cover ; in front
of the recess on the right.XPress button : and insert the right-hand
side section into the recess of the side trim.
Cargo net
Important safety notes
GWARNING
Make sure the cargo net is properly engaged
at top and bottom position and the tightening
belts are securely fastened.
Never use a damaged cargo net.
Always use cargo net when transporting
cargo. This helps to avoid personal injury from
smaller objects being thrown around in the
occupant compartment during a collision or
sudden maneuver.
The cargo net cannot prevent the movement
of large, heavier objects into the passenger
compartment in an accident. Such items must
be properly secured using the cargo tie-down
rings in the cargo compartment floor.
Passenger use of seats behind installed cargo
net is restricted because of the footwell being
taken up by the net.
It is particularly important to use a safety net
if the vehicle is loaded with small objects
above the level of the backrests. For safety
reasons, always use a cargo net when
transporting loads.
Preparing the cargo net
The cargo net can be used in two different
positions (behind the B-pillar or the C-pillar).
R The brackets behind B-pillar : are
required for the cargo compartment
enlargement ( Y page 270).
The corresponding cargo tie down rings to
tighten the net are located in the footwell
of the rear bench seat ( Y page 272).
R The brackets behind C-pillar ; are
required for the cargo compartment behind
the 2nd row of seats.
The corresponding cargo tie down rings for
tensioning the net are in the cargo
compartment or on the backrests of the
folded-down 3rd row of seats
( Y page 272).
274Stowage areasStowing and features
Page 278 of 384
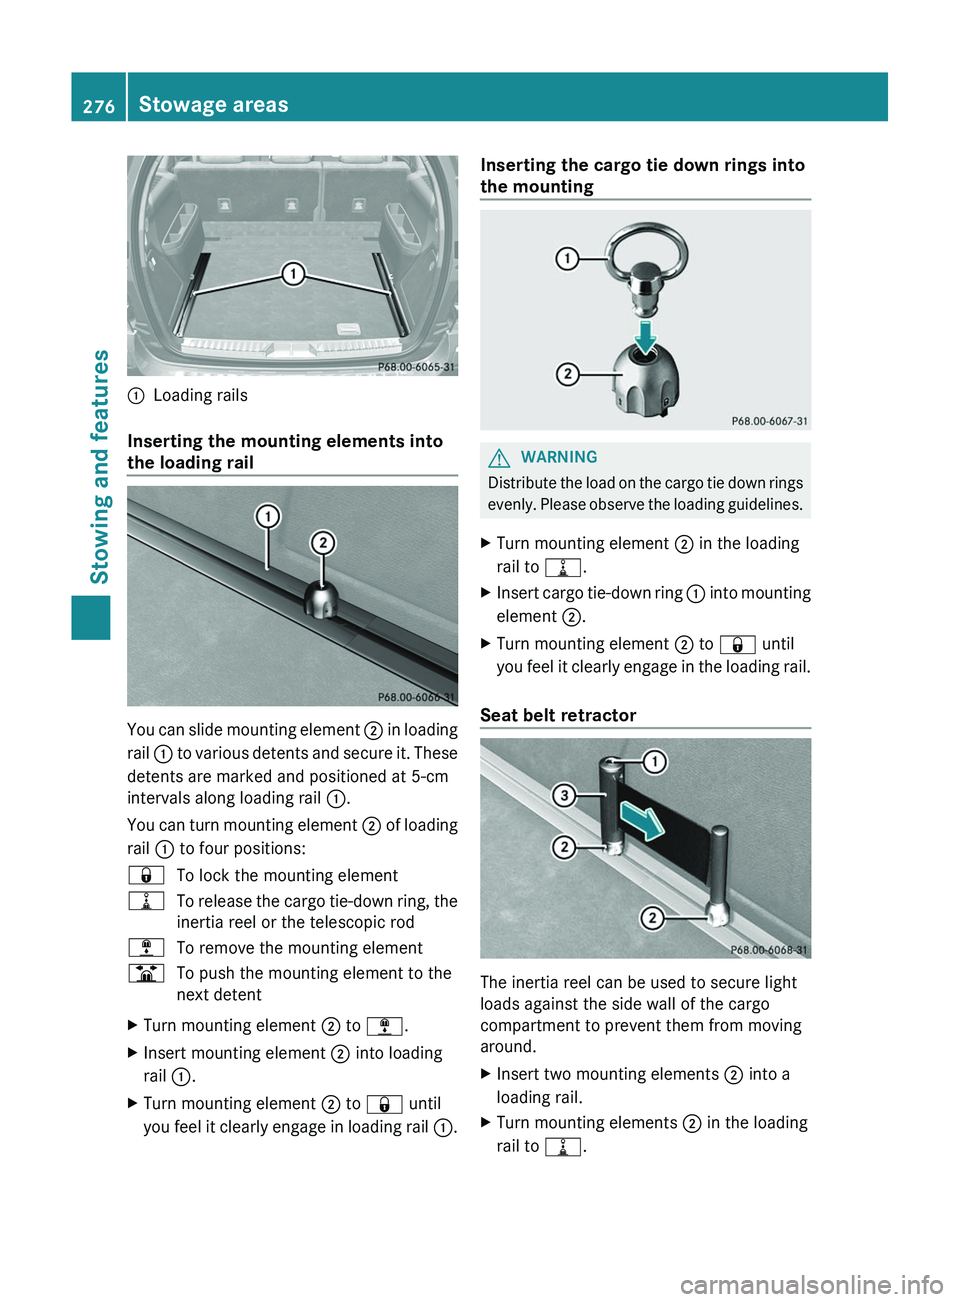
:Loading rails
Inserting the mounting elements into
the loading rail
You can slide mounting element ; in loading
rail : to various detents and secure it. These
detents are marked and positioned at 5-cm
intervals along loading rail :.
You can turn mounting element ; of loading
rail : to four positions:
&To lock the mounting element=To release the cargo tie-down ring, the
inertia reel or the telescopic rod;To remove the mounting elementBTo push the mounting element to the
next detentXTurn mounting element ; to ; .XInsert mounting element ; into loading
rail :.XTurn mounting element ; to & until
you feel it clearly engage in loading rail :.Inserting the cargo tie down rings into
the mountingGWARNING
Distribute the load on the cargo tie down rings
evenly. Please observe the loading guidelines.
XTurn mounting element ; in the loading
rail to =.XInsert cargo tie-down ring : into mounting
element ;.XTurn mounting element ; to & until
you feel it clearly engage in the loading rail.
Seat belt retractor
The inertia reel can be used to secure light
loads against the side wall of the cargo
compartment to prevent them from moving
around.
XInsert two mounting elements ; into a
loading rail.XTurn mounting elements ; in the loading
rail to =.276Stowage areasStowing and features
Page 279 of 384
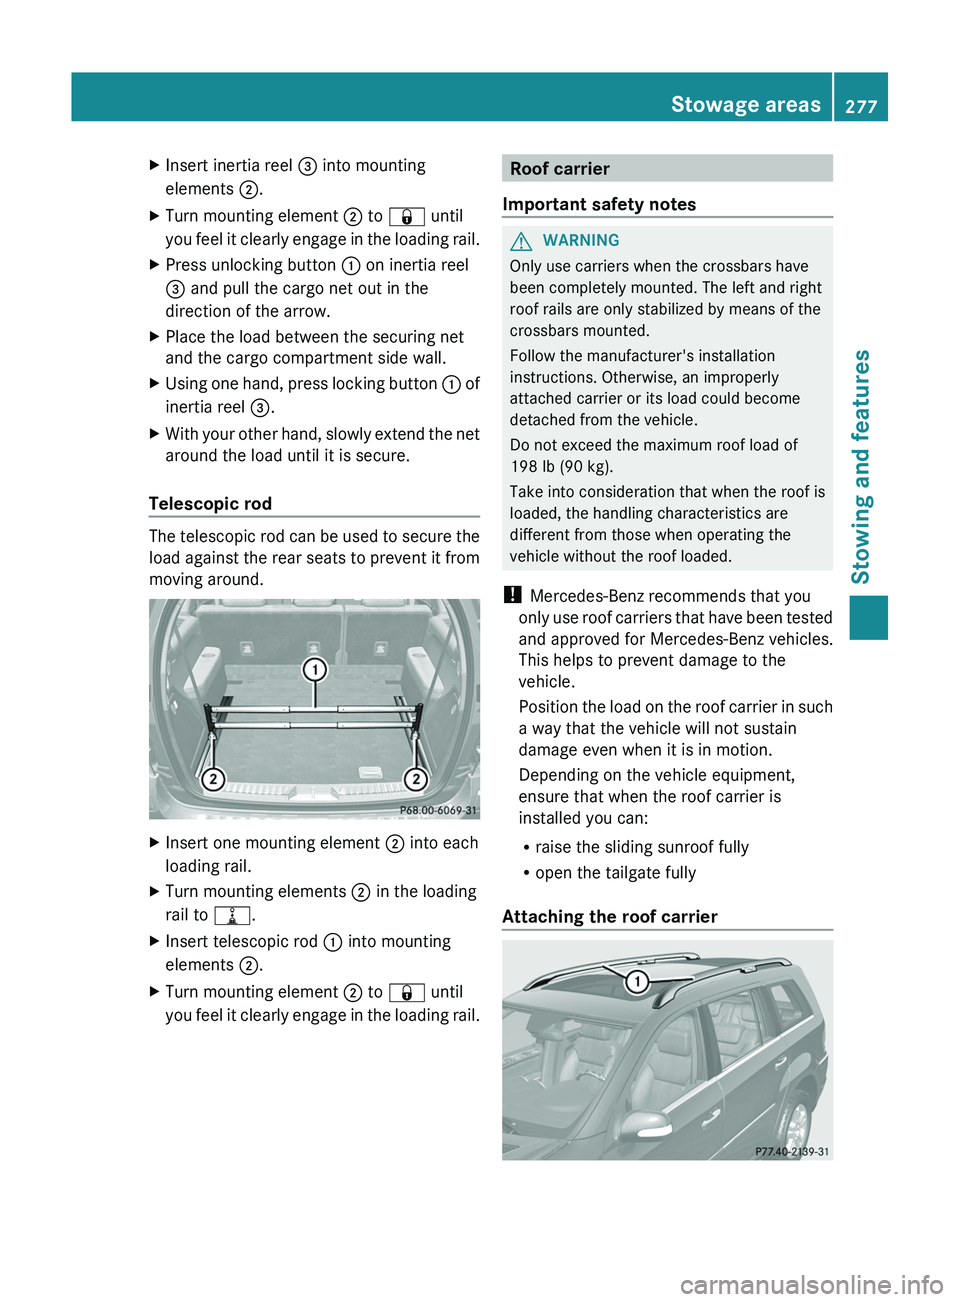
XInsert inertia reel = into mounting
elements ;.XTurn mounting element ; to & until
you feel it clearly engage in the loading rail.XPress unlocking button : on inertia reel
= and pull the cargo net out in the
direction of the arrow.XPlace the load between the securing net
and the cargo compartment side wall.XUsing one hand, press locking button : of
inertia reel =.XWith your other hand, slowly extend the net
around the load until it is secure.
Telescopic rod
The telescopic rod can be used to secure the
load against the rear seats to prevent it from
moving around.
XInsert one mounting element ; into each
loading rail.XTurn mounting elements ; in the loading
rail to =.XInsert telescopic rod : into mounting
elements ;.XTurn mounting element ; to & until
you feel it clearly engage in the loading rail.Roof carrier
Important safety notesGWARNING
Only use carriers when the crossbars have
been completely mounted. The left and right
roof rails are only stabilized by means of the
crossbars mounted.
Follow the manufacturer's installation
instructions. Otherwise, an improperly
attached carrier or its load could become
detached from the vehicle.
Do not exceed the maximum roof load of
198 lb (90 kg).
Take into consideration that when the roof is
loaded, the handling characteristics are
different from those when operating the
vehicle without the roof loaded.
! Mercedes-Benz recommends that you
only use roof carriers that have been tested
and approved for Mercedes-Benz vehicles.
This helps to prevent damage to the
vehicle.
Position the load on the roof carrier in such
a way that the vehicle will not sustain
damage even when it is in motion.
Depending on the vehicle equipment,
ensure that when the roof carrier is
installed you can:
R raise the sliding sunroof fully
R open the tailgate fully
Attaching the roof carrier
Stowage areas277Stowing and featuresZ
Page 280 of 384
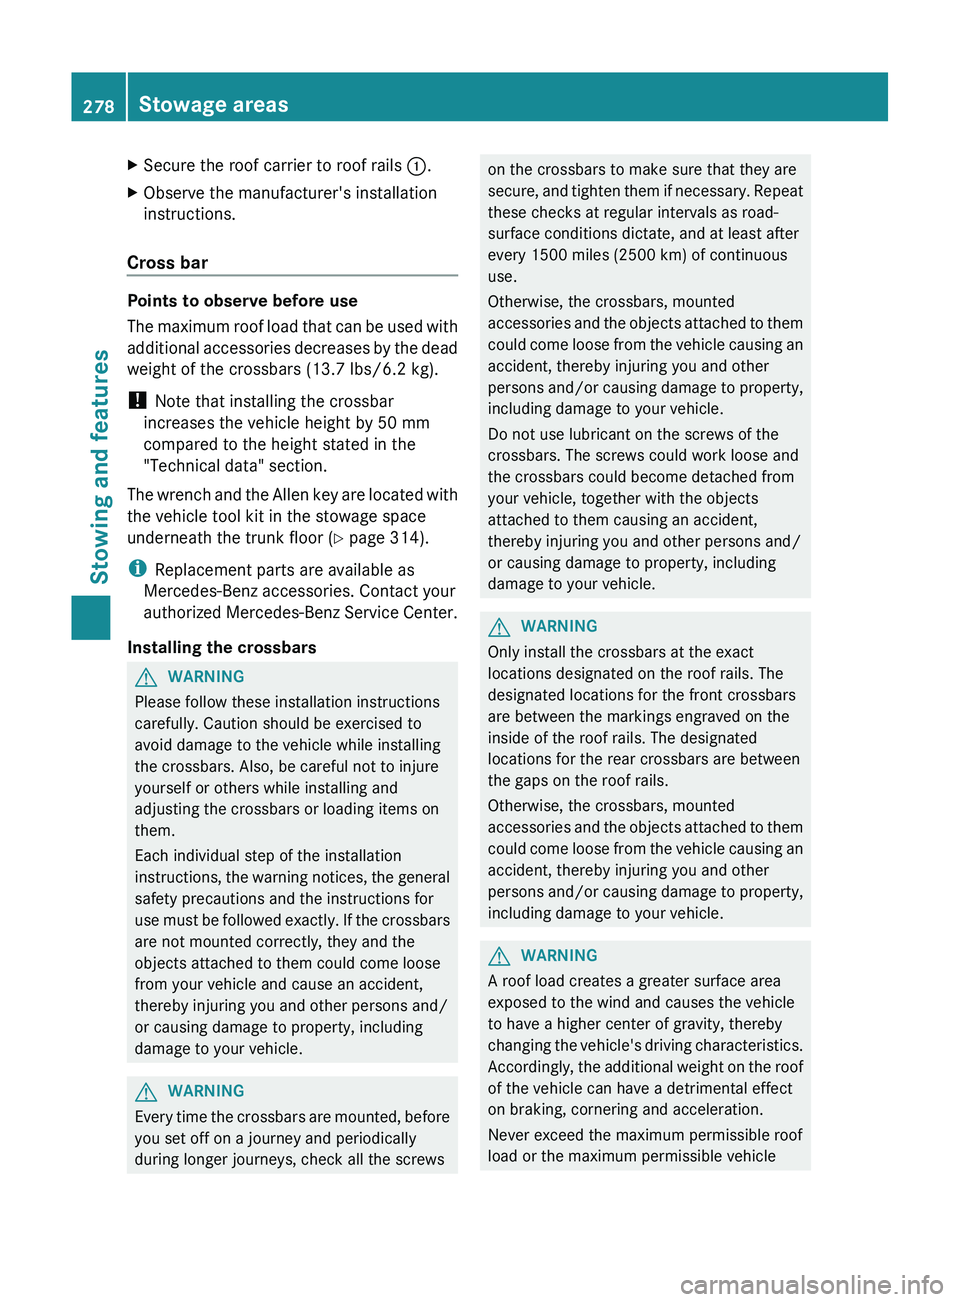
XSecure the roof carrier to roof rails :.XObserve the manufacturer's installation
instructions.
Cross bar
Points to observe before use
The maximum roof load that can be used with
additional accessories decreases by the dead
weight of the crossbars (13.7 lbs/6.2 kg).
! Note that installing the crossbar
increases the vehicle height by 50 mm
compared to the height stated in the
"Technical data" section.
The wrench and the Allen key are located with
the vehicle tool kit in the stowage space
underneath the trunk floor ( Y page 314).
i Replacement parts are available as
Mercedes-Benz accessories. Contact your
authorized Mercedes-Benz Service Center.
Installing the crossbars
GWARNING
Please follow these installation instructions
carefully. Caution should be exercised to
avoid damage to the vehicle while installing
the crossbars. Also, be careful not to injure
yourself or others while installing and
adjusting the crossbars or loading items on
them.
Each individual step of the installation
instructions, the warning notices, the general
safety precautions and the instructions for
use must be followed exactly. If the crossbars
are not mounted correctly, they and the
objects attached to them could come loose
from your vehicle and cause an accident,
thereby injuring you and other persons and/
or causing damage to property, including
damage to your vehicle.
GWARNING
Every time the crossbars are mounted, before
you set off on a journey and periodically
during longer journeys, check all the screws
on the crossbars to make sure that they are
secure, and tighten them if necessary. Repeat
these checks at regular intervals as road-
surface conditions dictate, and at least after
every 1500 miles (2500 km) of continuous
use.
Otherwise, the crossbars, mounted
accessories and the objects attached to them
could come loose from the vehicle causing an
accident, thereby injuring you and other
persons and/or causing damage to property,
including damage to your vehicle.
Do not use lubricant on the screws of the
crossbars. The screws could work loose and
the crossbars could become detached from
your vehicle, together with the objects
attached to them causing an accident,
thereby injuring you and other persons and/
or causing damage to property, including
damage to your vehicle.GWARNING
Only install the crossbars at the exact
locations designated on the roof rails. The
designated locations for the front crossbars
are between the markings engraved on the
inside of the roof rails. The designated
locations for the rear crossbars are between
the gaps on the roof rails.
Otherwise, the crossbars, mounted
accessories and the objects attached to them
could come loose from the vehicle causing an
accident, thereby injuring you and other
persons and/or causing damage to property,
including damage to your vehicle.
GWARNING
A roof load creates a greater surface area
exposed to the wind and causes the vehicle
to have a higher center of gravity, thereby
changing the vehicle's driving characteristics.
Accordingly, the additional weight on the roof
of the vehicle can have a detrimental effect
on braking, cornering and acceleration.
Never exceed the maximum permissible roof
load or the maximum permissible vehicle
278Stowage areasStowing and features