2012 MERCEDES-BENZ GL turn signal
[x] Cancel search: turn signalPage 123 of 384
XTo switch off the rear fog lamp: press the
light switch in as far as it will go.
The yellow R indicator lamp on the light
switch goes out.XTo switch off the rear fog lamp: press the
light switch in as far as it will go.
The yellow R indicator lamp in the
instrument cluster goes out.
Headlamp cleaning system
The headlamps are cleaned automatically if
the "Wipe with washer fluid" function is
operated five times while the lights are on and
the engine is running (Y page 128). When you
switch off the ignition, the automatic
headlamp cleaning system is reset and
counting is resumed from 0.
Combination switch
Turn signals
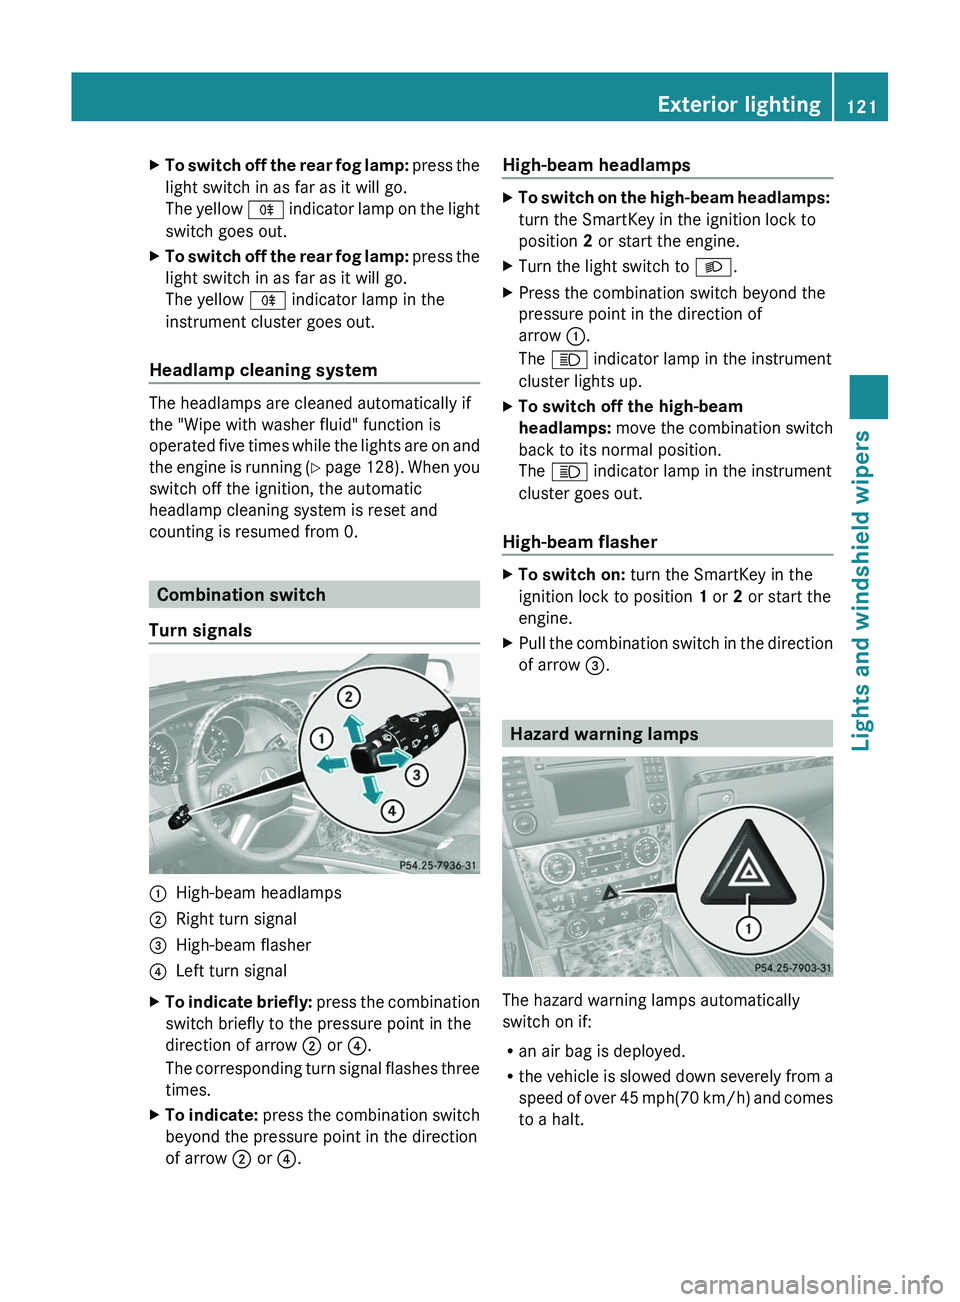
:High-beam headlamps;Right turn signal=High-beam flasher?Left turn signalXTo indicate briefly: press the combination
switch briefly to the pressure point in the
direction of arrow ; or ?.
The corresponding turn signal flashes three
times.XTo indicate: press the combination switch
beyond the pressure point in the direction
of arrow ; or ?.High-beam headlampsXTo switch on the high-beam headlamps:
turn the SmartKey in the ignition lock to
position 2 or start the engine.XTurn the light switch to L.XPress the combination switch beyond the
pressure point in the direction of
arrow :.
The K indicator lamp in the instrument
cluster lights up.XTo switch off the high-beam
headlamps: move the combination switch
back to its normal position.
The K indicator lamp in the instrument
cluster goes out.
High-beam flasher
XTo switch on: turn the SmartKey in the
ignition lock to position 1 or 2 or start the
engine.XPull the combination switch in the direction
of arrow =.
Hazard warning lamps
The hazard warning lamps automatically
switch on if:
R an air bag is deployed.
R the vehicle is slowed down severely from a
speed of over 45 mph (70 km/h) and comes
to a halt.
Exterior lighting121Lights and windshield wipersZ
Page 124 of 384
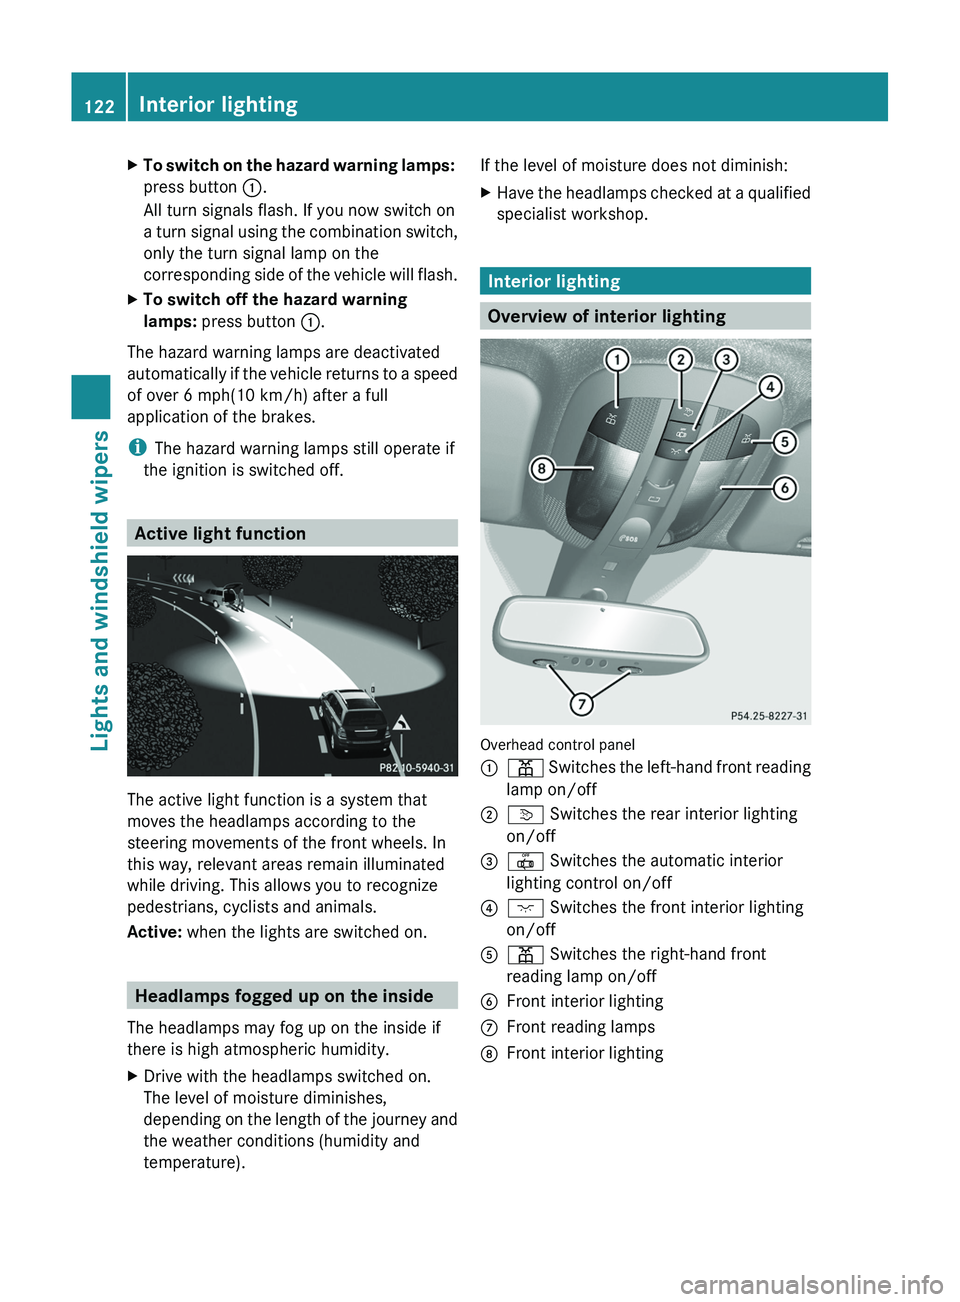
XTo switch on the hazard warning lamps:
press button :.
All turn signals flash. If you now switch on
a turn signal using the combination switch,
only the turn signal lamp on the
corresponding side of the vehicle will flash.XTo switch off the hazard warning
lamps: press button :.
The hazard warning lamps are deactivated
automatically if the vehicle returns to a speed
of over 6 mph(10 km/h) after a full
application of the brakes.
i The hazard warning lamps still operate if
the ignition is switched off.
Active light function
The active light function is a system that
moves the headlamps according to the
steering movements of the front wheels. In
this way, relevant areas remain illuminated
while driving. This allows you to recognize
pedestrians, cyclists and animals.
Active: when the lights are switched on.
Headlamps fogged up on the inside
The headlamps may fog up on the inside if
there is high atmospheric humidity.
XDrive with the headlamps switched on.
The level of moisture diminishes,
depending on the length of the journey and
the weather conditions (humidity and
temperature).If the level of moisture does not diminish:XHave the headlamps checked at a qualified
specialist workshop.
Interior lighting
Overview of interior lighting
Overhead control panel
:p Switches the left-hand front reading
lamp on/off;v Switches the rear interior lighting
on/off=| Switches the automatic interior
lighting control on/off?c Switches the front interior lighting
on/offAp Switches the right-hand front
reading lamp on/offBFront interior lightingCFront reading lampsDFront interior lighting122Interior lightingLights and windshield wipers
Page 126 of 384
GDANGER
Xenon bulbs carry a high voltage. You could
get an electric shock and be seriously or even
fatally injured if you touch the electric
contacts on Xenon bulbs. Therefore, never
remove the cover from Xenon bulbs.
Do not change Xenon bulbs yourself, but have
them replaced at a qualified specialist
workshop which has the necessary specialist
knowledge and tools to carry out the work
required.
Mercedes-Benz recommends that you use an
authorized Mercedes-Benz Center for this
purpose. In particular, work relevant to safety
or on safety-related systems must be carried
out at a qualified specialist workshop.
Bulbs and lamps are an important aspect of
vehicle safety. You must therefore make sure
that these function correctly at all times.
Have the headlamp setting checked regularly.
Other bulbs
There are bulbs other than the Xenon bulbs
that you cannot replace. Replace only the
bulbs listed (Y page 124). Have the bulbs that
you cannot replace yourself changed at a
qualified specialist workshop.
Mercedes-Benz recommends that you use an
authorized Mercedes-Benz Center for this
purpose. In particular, work relevant to safety
or on safety-related systems must be carried
out at a qualified specialist workshop.
If you require assistance changing bulbs,
consult a qualified specialist workshop.
Do not touch the glass tube of new bulbs with
your bare hands. Even minor contamination
can burn into the glass surface and reduce
the service life of the bulbs. Always use a lint-
free cloth or only touch the base of the bulb
when installing.
Only use bulbs of the correct type.
If the new bulb still does not light up, consult
a qualified specialist workshop.
Bulbs and lamps are an important aspect of
vehicle safety. You must therefore make sure
that these function correctly at all times.
Have the headlamp setting checked regularly.GWARNING
Bulbs and lamps can be very hot. You should
therefore allow them to cool down before you
change them. Otherwise, you could be burned
if you touch them.
Keep bulbs out of the reach of children.
Otherwise, they could damage the bulbs, for
example, and injure themselves.
Never use a bulb which has been dropped.
Such a bulb may break or even explode and
injure you.
Halogen bulbs are pressurized and can
explode when you change them, particularly
if they are very hot. You should therefore wear
eye protection and gloves when you are
changing them.
Overview: changing bulbs/bulb types
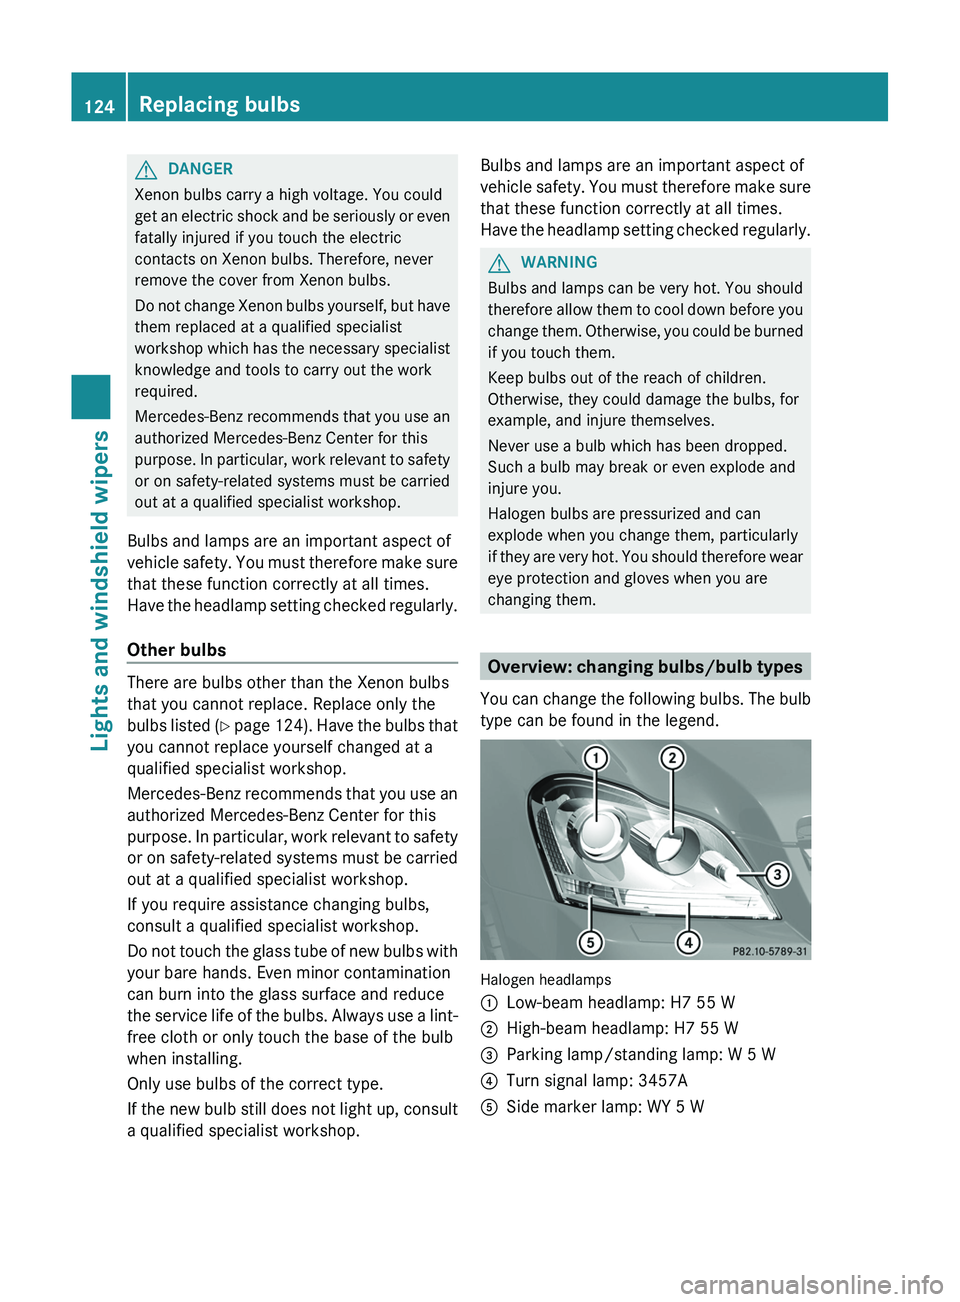
You can change the following bulbs. The bulb
type can be found in the legend.
Halogen headlamps
:Low-beam headlamp: H7 55 W;High-beam headlamp: H7 55 W=Parking lamp/standing lamp: W 5 W?Turn signal lamp: 3457AASide marker lamp: WY 5 W124Replacing bulbsLights and windshield wipers
Page 127 of 384
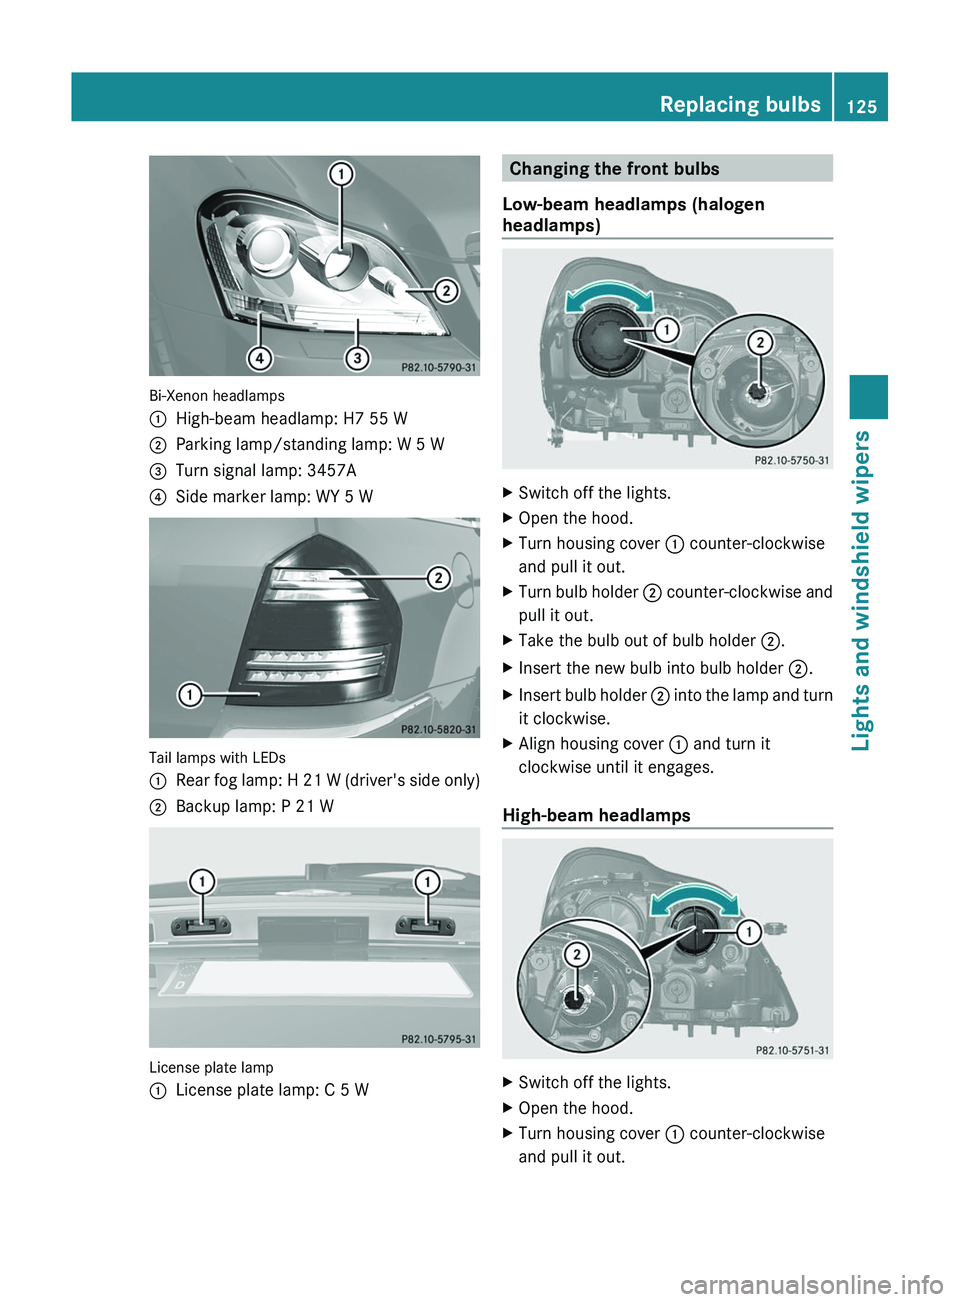
Bi-Xenon headlamps
:High-beam headlamp: H7 55 W;Parking lamp/standing lamp: W 5 W=Turn signal lamp: 3457A?Side marker lamp: WY 5 W
Tail lamps with LEDs
:Rear fog lamp: H 21 W (driver's side only);Backup lamp: P 21 W
License plate lamp
:License plate lamp: C 5 WChanging the front bulbs
Low-beam headlamps (halogen
headlamps)XSwitch off the lights.XOpen the hood.XTurn housing cover : counter-clockwise
and pull it out.XTurn bulb holder ; counter-clockwise and
pull it out.XTake the bulb out of bulb holder ;.XInsert the new bulb into bulb holder ;.XInsert bulb holder ; into the lamp and turn
it clockwise.XAlign housing cover : and turn it
clockwise until it engages.
High-beam headlamps
XSwitch off the lights.XOpen the hood.XTurn housing cover : counter-clockwise
and pull it out.Replacing bulbs125Lights and windshield wipersZ
Page 128 of 384
XTurn bulb holder ; counter-clockwise and
pull it out.XTake the bulb out of bulb holder ;.XInsert the new bulb into bulb holder ;.XInsert bulb holder ; into the lamp and turn
it clockwise.XAlign housing cover : and turn it
clockwise until it engages.
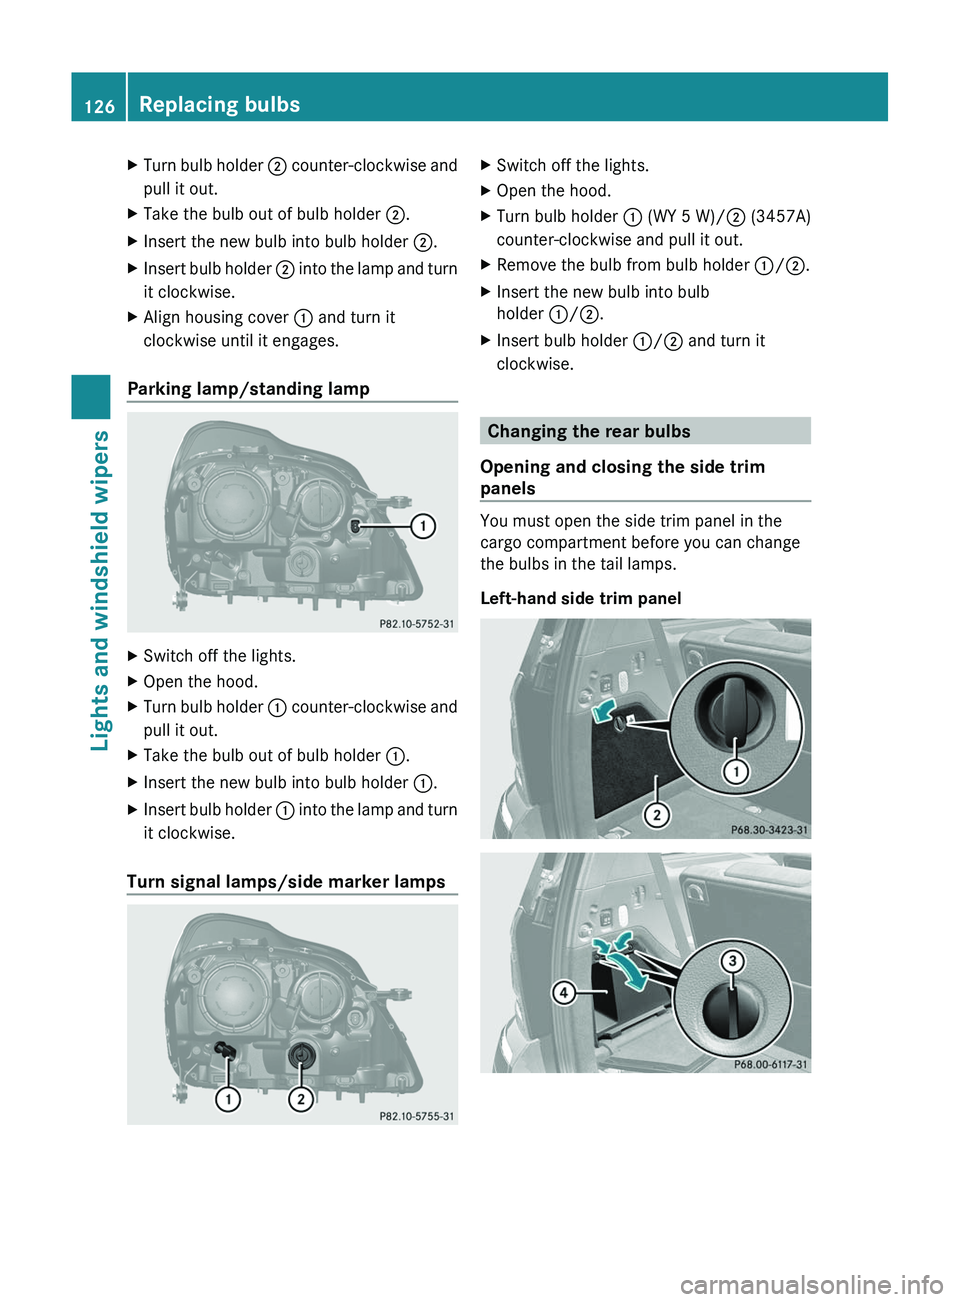
Parking lamp/standing lamp
XSwitch off the lights.XOpen the hood.XTurn bulb holder : counter-clockwise and
pull it out.XTake the bulb out of bulb holder :.XInsert the new bulb into bulb holder :.XInsert bulb holder : into the lamp and turn
it clockwise.
Turn signal lamps/side marker lamps
XSwitch off the lights.XOpen the hood.XTurn bulb holder : (WY 5 W)/ ; (3457A)
counter-clockwise and pull it out.XRemove the bulb from bulb holder :/; .XInsert the new bulb into bulb
holder :/; .XInsert bulb holder :/; and turn it
clockwise.
Changing the rear bulbs
Opening and closing the side trim
panels
You must open the side trim panel in the
cargo compartment before you can change
the bulbs in the tail lamps.
Left-hand side trim panel
126Replacing bulbsLights and windshield wipers
Page 188 of 384
time, or adjusts the vehicle's speed to the
last speed stored.
Setting the specified minimum distance
You can set the specified minimum distance
for DISTRONIC by varying the time span
between one and two seconds. This time span
determines the distance that DISTRONIC
should maintain from the vehicle in front,
depending on the road speed. You can see
this distance in the multifunction display
( Y page 187).
GWARNING
It is up to the driver to exercise discretion to
select the appropriate setting given road
conditions, traffic, driver's preferred driving
style and applicable laws and driving
recommendations for safe following distance.
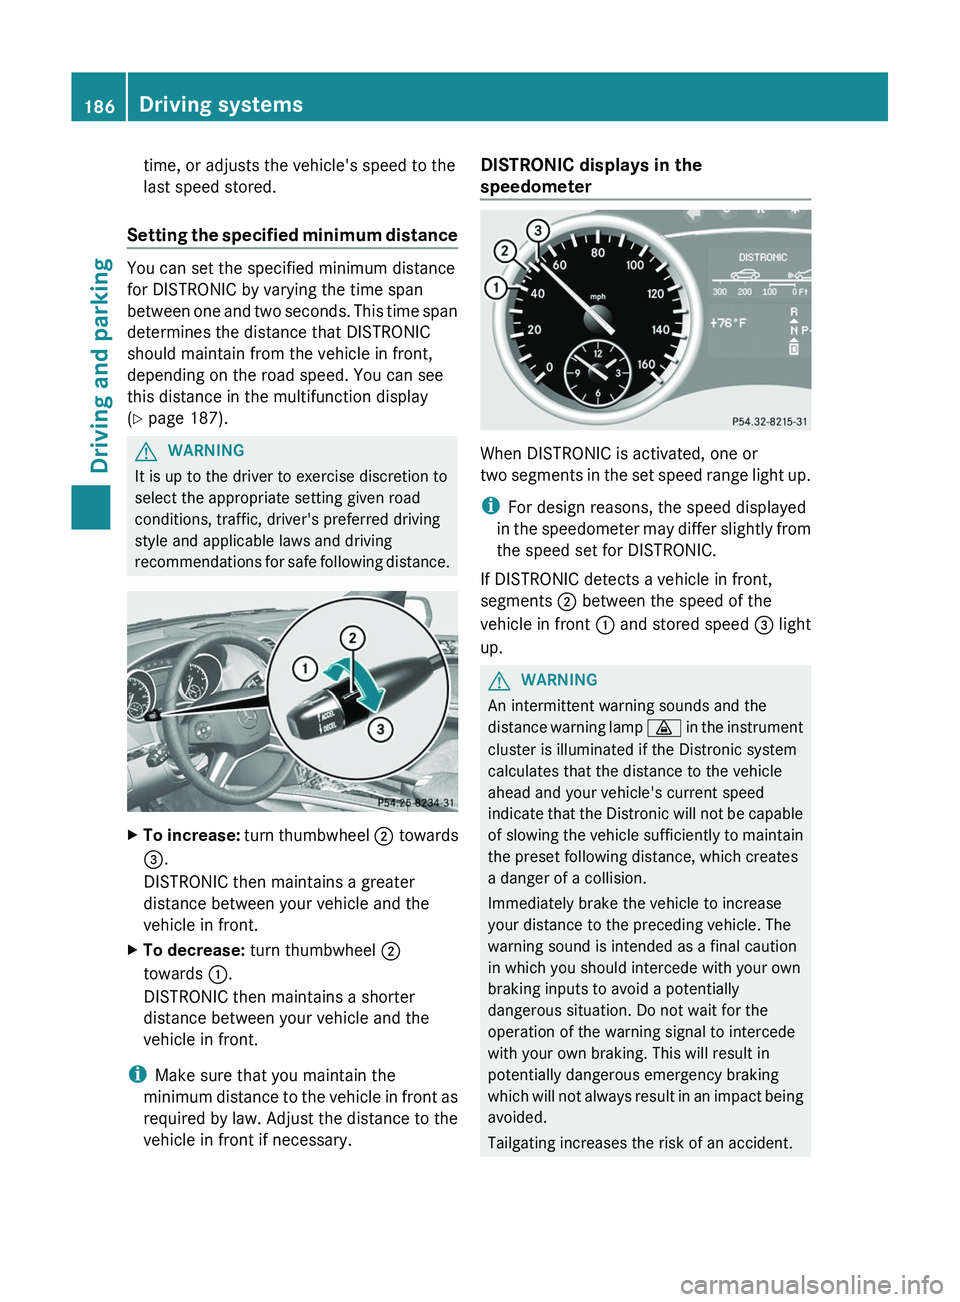
XTo increase: turn thumbwheel ; towards
= .
DISTRONIC then maintains a greater
distance between your vehicle and the
vehicle in front.XTo decrease: turn thumbwheel ;
towards :.
DISTRONIC then maintains a shorter
distance between your vehicle and the
vehicle in front.
i Make sure that you maintain the
minimum distance to the vehicle in front as
required by law. Adjust the distance to the
vehicle in front if necessary.
DISTRONIC displays in the
speedometer
When DISTRONIC is activated, one or
two segments in the set speed range light up.
i For design reasons, the speed displayed
in the speedometer may differ slightly from
the speed set for DISTRONIC.
If DISTRONIC detects a vehicle in front,
segments ; between the speed of the
vehicle in front : and stored speed = light
up.
GWARNING
An intermittent warning sounds and the
distance warning lamp · in the instrument
cluster is illuminated if the Distronic system
calculates that the distance to the vehicle
ahead and your vehicle's current speed
indicate that the Distronic will not be capable
of slowing the vehicle sufficiently to maintain
the preset following distance, which creates
a danger of a collision.
Immediately brake the vehicle to increase
your distance to the preceding vehicle. The
warning sound is intended as a final caution
in which you should intercede with your own
braking inputs to avoid a potentially
dangerous situation. Do not wait for the
operation of the warning signal to intercede
with your own braking. This will result in
potentially dangerous emergency braking
which will not always result in an impact being
avoided.
Tailgating increases the risk of an accident.
186Driving systemsDriving and parking
Page 205 of 384
side. When you are passing another vehicle,
the warning is emitted only if the difference
in speed is less than 7 mph (12 km/h).
The yellow indicator lamp goes out if the
reverse gear is engaged. In this event, Blind
Spot Assist is no longer active.
The brightness of the indicator/warning
lamps is adjusted automatically according to
the ambient light.GWARNING
Blind Spot Assist is not active at speeds under
approximately 20 mph (30 km/h). The
indicator lamps in the exterior mirrors are
yellow. Vehicles in the monitoring range are
then not indicated.
Always pay attention to traffic conditions and
your surroundings. Otherwise, you may fail to
recognize dangers in time, cause an accident
and injure yourself and others.
Collision warning
If a vehicle is detected in the monitoring range
of Blind Spot Assist and you switch on the turn
signal, a double warning tone sounds. Red
warning lamp : flashes. If the turn signal
remains on, detected vehicles are indicated
by the flashing of red warning lamp :. There
are no further warning tones.
Switching on Blind Spot Assist
XMake sure that the radar sensor system
( Y page 227) and Blind Spot Assist
( Y page 228) are activated in the on-board
computer.XTurn the SmartKey to position 2 in the
ignition lock.
Warning lamps : light up red in the
exterior mirrors for approximately 1.5
seconds and then turn yellow.
Trailer towing
When you attach a trailer, make sure you have
correctly established the electrical
connection. This can be accomplished by
checking the trailer lighting. In this event,
Blind Spot Assist is deactivated. The indicator
lamp in the exterior mirrors lights up yellow
and the Blind Spot Assist Currently
Unavailable See Operator's Manual
message appears in the multifunction
display.
i You can deactivate the indicator lamps in
the exterior mirrors.
To do so, switch off Blind Spot Assist when:
R the SmartKey is in position 2 in the
ignition lock.
R the engine is not running.
R the electrical connection to the trailer
has been established.
Off-road driving systems
4MATIC (permanent four-wheel drive)
4MATIC ensures that all four wheels are
permanently driven. Together with ESP ®
and
4ETS , it improves the traction of your vehicle
whenever a drive wheel spins due to
insufficient grip.
GWARNING
If a drive wheel is spinning due to insufficient
traction:
R While driving off, apply as little throttle as
possible.
R While driving, ease up on the accelerator
pedal.
R Adapt your speed and driving style to the
prevailing road conditions.
Failure to observe these guidelines could
cause the vehicle to skid.
The 4MATIC cannot prevent accidents
resulting from excessive speed.
! Never tow the vehicle with one axle
raised. This may damage the transfer case.
Damage of this sort is not covered by the
Mercedes-Benz Limited Warranty. All
wheels must remain either on the ground
Off-road driving systems203Driving and parkingZ
Page 228 of 384
Rthe tail lamps
R the fog lamps 30
R the low-beam headlamps 31
R the side marker lampXPress V or U on the steering wheel
to select the Settings menu.XPress the & button to select submenus.XPress the W or X button to select the
Lighting submenu.XPress the & button to select Headlamp
delayed shut-off .XPress the W or X button to activate
or deactivate the Headlamp delayed
shut-off function.XBefore switching off the engine, turn the
light switch to position Ã.
The exterior lighting delayed switch-off is
activated.XPress the &, V or U button to
select a different display.
Deactivating the delayed switch-off
temporarily:
XBefore leaving the vehicle, turn the
SmartKey to position 0 in the ignition lock.XTurn the SmartKey to position 2 in the
ignition lock and back to position 0.
The delayed switch-off is deactivated.
Delayed switch-off is reactivated the next
time you start the engine.
Activating/deactivating the interior
lighting delayed switch-off
If the Interior lighting Delayed Shut-
off function is activated and you remove the
SmartKey from the ignition lock, the interior
lighting remains on for 10 seconds.
XPress the V or U button on the
steering wheel to select the Settings
menu.XPress the & button to select submenus.XPress the W or X button to select the
Lighting submenu.XPress the & button to select Interior
Lighting Delayed Shut-off .XPress the W or X button to activate
or deactivate the Interior Lighting
Delay function.XPress the &, V or U button to
select a different display.
Vehicle
Activating/deactivating the automatic
door locking feature
If you select the Automatic Door Locking
function, the vehicle is centrally locked above
a speed of around 9 mph (15 km/h).
i For further information on the automatic
locking feature, see ( Y page 84).
XPress the V or U button on the
steering wheel to select the Settings
menu.XPress the & button to call up the
selection of submenus.XPress the W or X button to select the
Vehicle submenu.XPress the & button to select
Automatic Door Locking .XPress the W or X button to switch
Automatic Door Locking on or off.XPress the &, V or U button to
select a different display.
Activating/deactivating the acoustic
locking confirmation
If you activate the Acoustic Lock
Feedback function, an audible signal sounds
when the vehicle is locked or unlocked. When
unlocking, the signal sounds once. When
locking, it sounds three times.
30 Only for vehicles with front fog lamps.
31 Only for vehicles without front fog lamps.226Menus and submenusOn-board computer and displays