2012 MERCEDES-BENZ GL radio
[x] Cancel search: radioPage 253 of 384
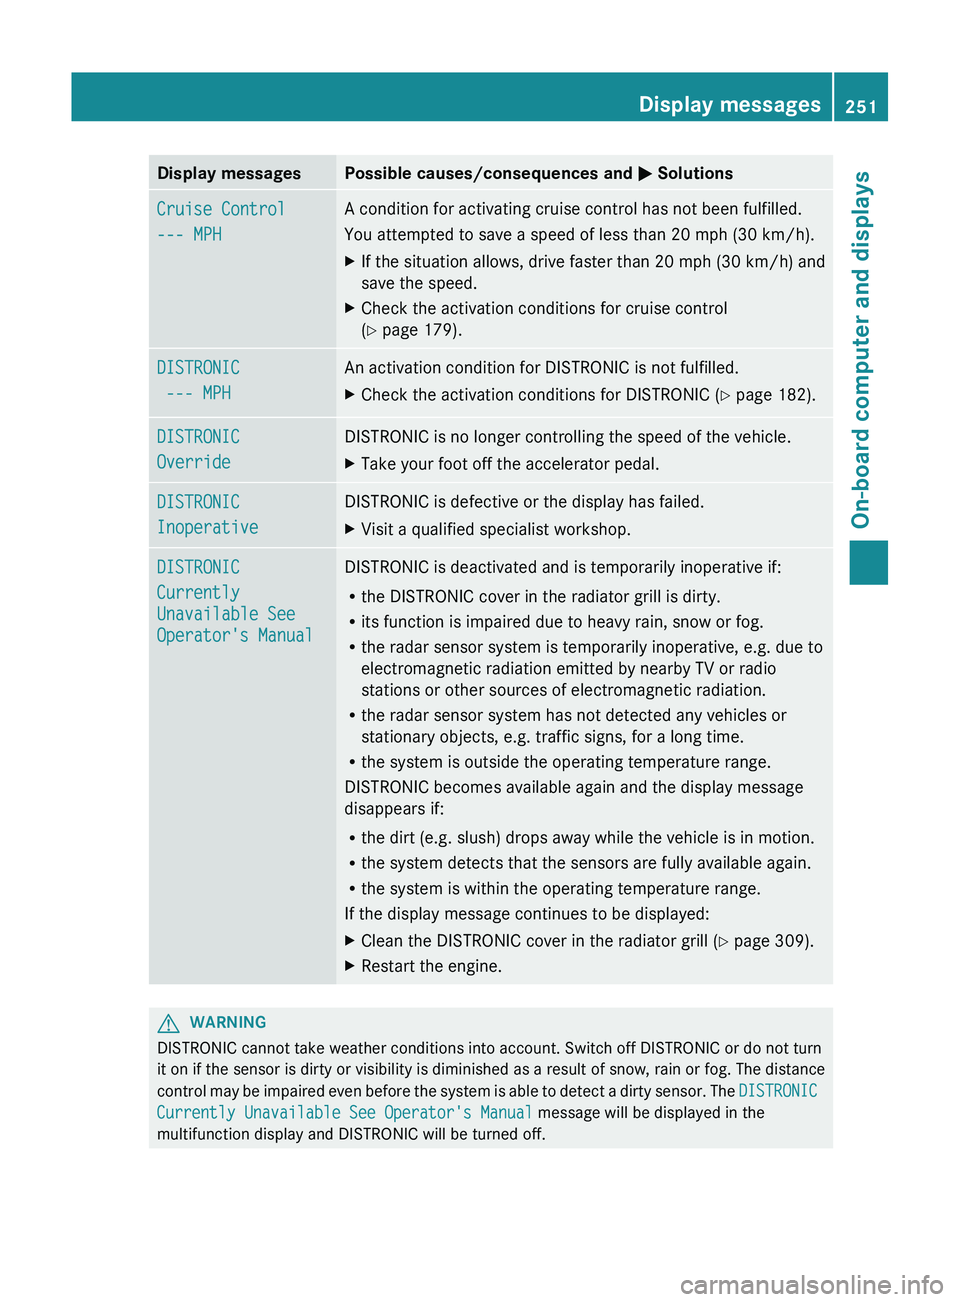
Display messagesPossible causes/consequences and M SolutionsCruise Control
--- MPH A condition for activating cruise control has not been fulfilled.
You attempted to save a speed of less than 20 mph (30 km/h).XIf the situation allows, drive faster than 20 mph ( 30 km/h) and
save the speed.XCheck the activation conditions for cruise control
( Y page 179).DISTRONIC
--- MPH An activation condition for DISTRONIC is not fulfilled.XCheck the activation conditions for DISTRONIC ( Y page 182).DISTRONIC
OverrideDISTRONIC is no longer controlling the speed of the vehicle.XTake your foot off the accelerator pedal.DISTRONIC
InoperativeDISTRONIC is defective or the display has failed.XVisit a qualified specialist workshop.DISTRONIC
Currently
Unavailable See
Operator's ManualDISTRONIC is deactivated and is temporarily inoperative if:
R the DISTRONIC cover in the radiator grill is dirty.
R its function is impaired due to heavy rain, snow or fog.
R the radar sensor system is temporarily inoperative, e.g. due to
electromagnetic radiation emitted by nearby TV or radio
stations or other sources of electromagnetic radiation.
R the radar sensor system has not detected any vehicles or
stationary objects, e.g. traffic signs, for a long time.
R the system is outside the operating temperature range.
DISTRONIC becomes available again and the display message
disappears if:
R the dirt (e.g. slush) drops away while the vehicle is in motion.
R the system detects that the sensors are fully available again.
R the system is within the operating temperature range.
If the display message continues to be displayed:XClean the DISTRONIC cover in the radiator grill ( Y page 309).XRestart the engine.GWARNING
DISTRONIC cannot take weather conditions into account. Switch off DISTRONIC or do not turn
it on if the sensor is dirty or visibility is diminished as a result of snow, rain or fog. The distance
control may be impaired even before the system is able to detect a dirty sensor. The DISTRONIC
Currently Unavailable See Operator's Manual message will be displayed in the
multifunction display and DISTRONIC will be turned off.
Display messages251On-board computer and displaysZ
Page 255 of 384
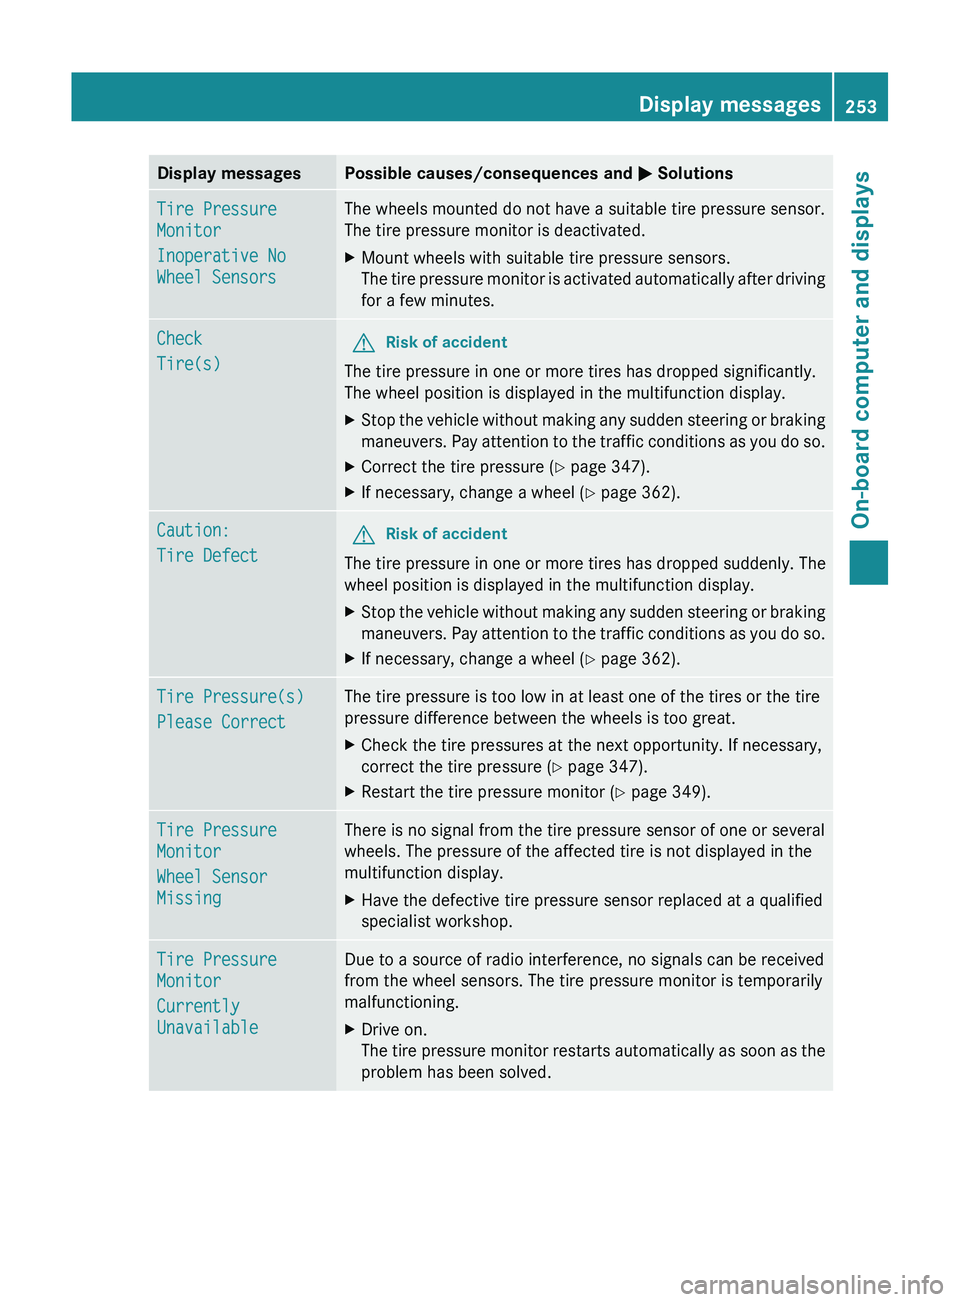
Display messagesPossible causes/consequences and M SolutionsTire Pressure
Monitor
Inoperative No
Wheel SensorsThe wheels mounted do not have a suitable tire pressure sensor.
The tire pressure monitor is deactivated.XMount wheels with suitable tire pressure sensors.
The tire pressure monitor is activated automatically after driving
for a few minutes.Check
Tire(s)GRisk of accident
The tire pressure in one or more tires has dropped significantly.
The wheel position is displayed in the multifunction display.
XStop the vehicle without making any sudden steering or braking
maneuvers. Pay attention to the traffic conditions as you do so.XCorrect the tire pressure ( Y page 347).XIf necessary, change a wheel ( Y page 362).Caution:
Tire DefectGRisk of accident
The tire pressure in one or more tires has dropped suddenly. The
wheel position is displayed in the multifunction display.
XStop the vehicle without making any sudden steering or braking
maneuvers. Pay attention to the traffic conditions as you do so.XIf necessary, change a wheel ( Y page 362).Tire Pressure(s)
Please CorrectThe tire pressure is too low in at least one of the tires or the tire
pressure difference between the wheels is too great.XCheck the tire pressures at the next opportunity. If necessary,
correct the tire pressure ( Y page 347).XRestart the tire pressure monitor ( Y page 349).Tire Pressure
Monitor
Wheel Sensor
MissingThere is no signal from the tire pressure sensor of one or several
wheels. The pressure of the affected tire is not displayed in the
multifunction display.XHave the defective tire pressure sensor replaced at a qualified
specialist workshop.Tire Pressure
Monitor
Currently
UnavailableDue to a source of radio interference, no signals can be received
from the wheel sensors. The tire pressure monitor is temporarily
malfunctioning.XDrive on.
The tire pressure monitor restarts automatically as soon as the
problem has been solved.Display messages253On-board computer and displaysZ
Page 259 of 384
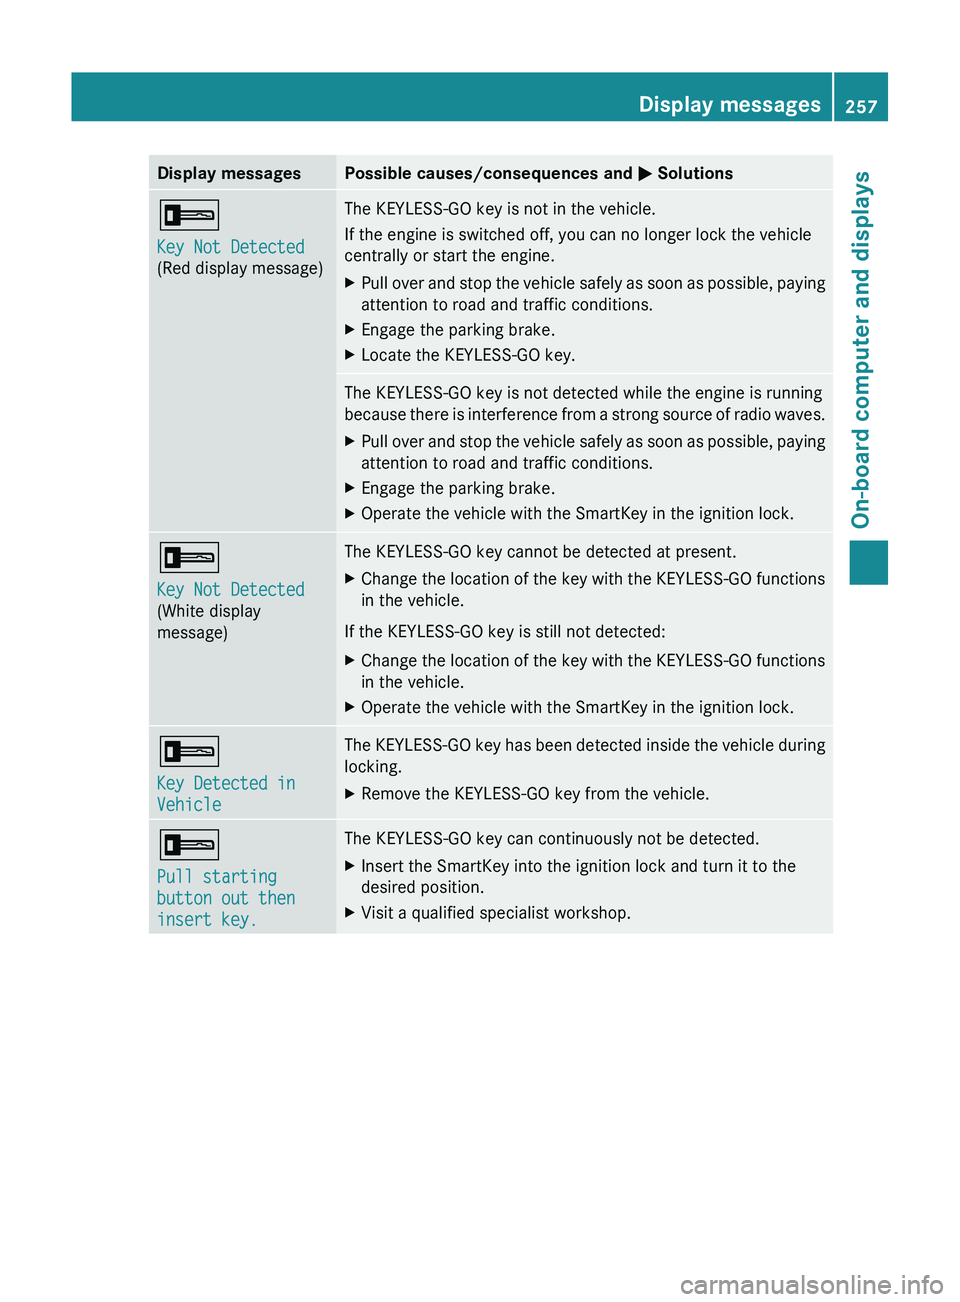
Display messagesPossible causes/consequences and M Solutions+
Key Not Detected
(Red display message)The KEYLESS-GO key is not in the vehicle.
If the engine is switched off, you can no longer lock the vehicle
centrally or start the engine.XPull over and stop the vehicle safely as soon as possible, paying
attention to road and traffic conditions.XEngage the parking brake.XLocate the KEYLESS-GO key.The KEYLESS-GO key is not detected while the engine is running
because there is interference from a strong source of radio waves.XPull over and stop the vehicle safely as soon as possible, paying
attention to road and traffic conditions.XEngage the parking brake.XOperate the vehicle with the SmartKey in the ignition lock.+
Key Not Detected
(White display
message)The KEYLESS-GO key cannot be detected at present.XChange the location of the key with the KEYLESS-GO functions
in the vehicle.
If the KEYLESS-GO key is still not detected:
XChange the location of the key with the KEYLESS-GO functions
in the vehicle.XOperate the vehicle with the SmartKey in the ignition lock.+
Key Detected in
VehicleThe KEYLESS-GO key has been detected inside the vehicle during
locking.XRemove the KEYLESS-GO key from the vehicle.+
Pull starting
button out then
insert key.The KEYLESS-GO key can continuously not be detected.XInsert the SmartKey into the ignition lock and turn it to the
desired position.XVisit a qualified specialist workshop.Display messages257On-board computer and displaysZ
Page 297 of 384

position for at least 25 seconds before
trying another position.XPress and hold transmitter button B on
garage door remote control A until
indicator lamp : lights up green.
Programming is complete if indicator
lamp : lights up or flashes green.XRelease transmitter button ;, = or ? on
the integrated garage door opener and the
transmitter button on garage door remote
control B.
If indicator lamp : lights up red:
XRepeat the programming procedure for the
transmitter button. When doing so, vary the
distance between the garage door remote
control and the rear-view mirror.
i If the indicator lamp flashes green after
successful programming, the garage door
system is operating on a rolling code. After
programming, you must synchronize the
garage door opener integrated in the rear-
view mirror with the receiver of the garage
door system.
Synchronizing the rolling code
Your vehicle must be within range of the
garage or gate opener drive. Make sure that
neither your vehicle nor any persons/objects
are present within the sweep of the door or
gate.
Observe the safety notes when performing
the rolling code synchronization.
XTurn the SmartKey to position 2 in the
ignition lock.XPress the programming button of the door
or gate drive (see the door or gate drive
operating instructions, e.g. under
"Programming of additional remote
controls").
i You now normally have 30 seconds to
initiate the next step.
XPress the previously programmed
transmitter button of the HomeLink ®integrated garage door opener repeatedly
in succession until the door opens.
The rolling code synchronization is then
complete.
Notes on programming the remote
control
Canadian radio frequency laws require a
"break" (or interruption) of the transmission
signals after broadcasting for a few seconds.
These signals may not therefore last long
enough for the integrated garage door opener
to recognize the signal during programming.
Comparable with Canadian law, some U.S.
garage door openers also have a built-in
"interruption".
If you live in Canada or have difficulties
programming the garage door opener
(regardless of where you live) when using the
programming steps (see above), proceed as
follows:
XPress and hold one of transmitter
buttons ; to ? of the integrated garage
door opener.
Indicator lamp : starts to flash yellow
after a short period.XRelease the transmitter button.XPress transmitter button B of the garage
door remote control and hold for two
seconds, then release for two seconds,
then press again and hold for two seconds.XRepeat this sequence on transmitter
button B of the garage door remote
control until indicator lamp : is green.
Repeat the process if indicator lamp :
turns red.XContinue with the other programming
steps (see above).
Problems when programming
If you are experiencing problems
programming the integrated garage door
opener on the rear-view mirror, take note of
the following instructions:
R check the transmission frequency of
garage door remote control A (usually
Features295Stowing and featuresZ
Page 299 of 384
iIf your vehicle does not have an AIRMATIC
package, the multifunction display only
shows the compass.
Floormat on the driver's side
GWARNING
Whenever you are using a floormat, make sure
there is enough clearance and that the
floormat is securely fastened.
The floormat should always be securely
fastened using the fastening equipment.
Before driving off, check that the floormat is
securely in place and adjust it if necessary. A
loose floormat could slip and hinder proper
functioning of the pedals.
Do not place several floormats on top of each
other as this may impair pedal movement.
XSlide the seat backwards.XTo install: place the floormat in the
footwell.XPress studs : onto retainers ;.XTo remove: pull the floormat off
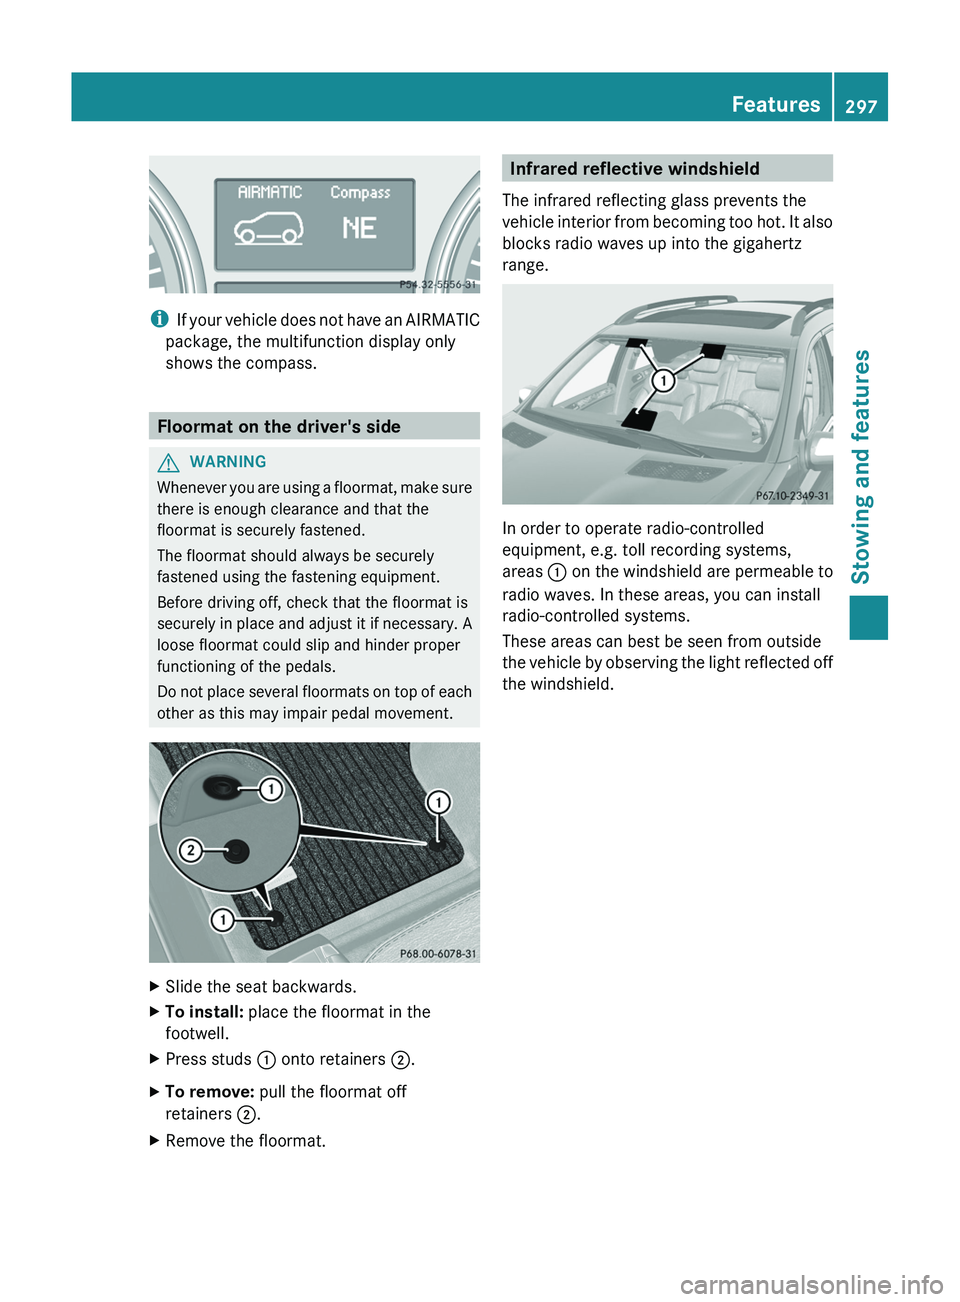
retainers ;.XRemove the floormat.Infrared reflective windshield
The infrared reflecting glass prevents the
vehicle interior from becoming too hot. It also
blocks radio waves up into the gigahertz
range.
In order to operate radio-controlled
equipment, e.g. toll recording systems,
areas : on the windshield are permeable to
radio waves. In these areas, you can install
radio-controlled systems.
These areas can best be seen from outside
the vehicle by observing the light reflected off
the windshield.
Features297Stowing and featuresZ
Page 332 of 384
XSwitch off all electrical consumers (e.g. radio, blower, etc.).XOpen the hood (Y page 300).
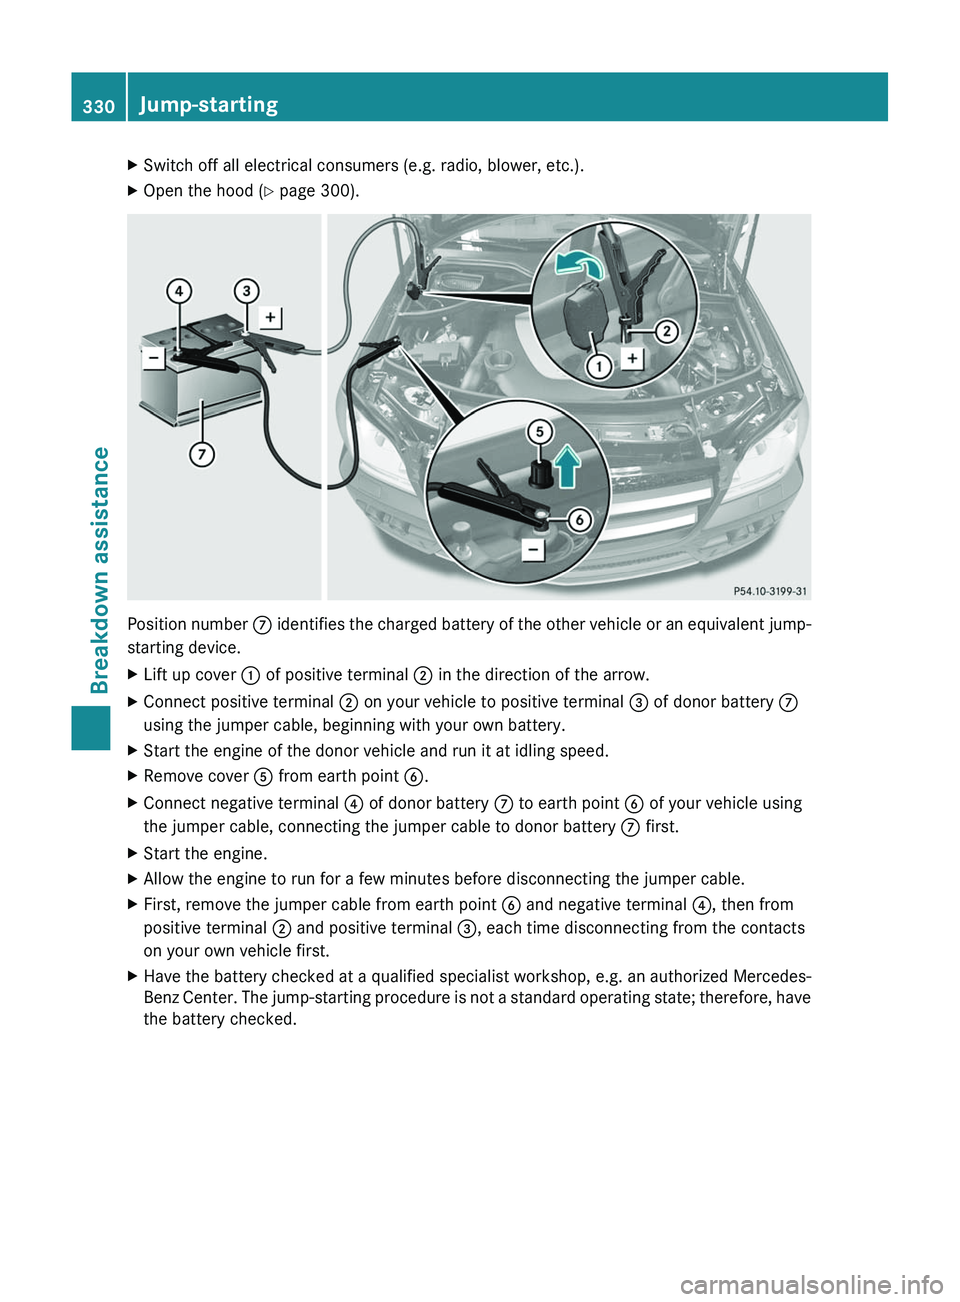
Position number C identifies the charged battery of the other vehicle or an equivalent jump-
starting device.
XLift up cover : of positive terminal ; in the direction of the arrow.XConnect positive terminal ; on your vehicle to positive terminal = of donor battery C
using the jumper cable, beginning with your own battery.XStart the engine of the donor vehicle and run it at idling speed.XRemove cover A from earth point B.XConnect negative terminal ? of donor battery C to earth point B of your vehicle using
the jumper cable, connecting the jumper cable to donor battery C first.XStart the engine.XAllow the engine to run for a few minutes before disconnecting the jumper cable.XFirst, remove the jumper cable from earth point B and negative terminal ?, then from
positive terminal ; and positive terminal =, each time disconnecting from the contacts
on your own vehicle first.XHave the battery checked at a qualified specialist workshop, e.g. an authorized Mercedes-
Benz Center. The jump-starting procedure is not a standard operating state; therefore, have
the battery checked.330Jump-startingBreakdown assistance
Page 350 of 384
iIf the tire pressure monitor is
malfunctioning, it may take more than
10 minutes for the tire pressure warning
lamp to inform you of the malfunction by
flashing for 60 seconds and then remaining
lit.
When the malfunction has been rectified,
the tire pressure warning lamp goes out
after driving for a few minutes.
Information on tire pressures is displayed in
the multifunction display. After a few minutes
of driving, the current tire pressure of each
tire is shown in the multifunction display.
i The tire pressure values indicated by the
on-board computer may differ from those
measured at a gas station with a pressure
gauge. The tire pressures shown by the on-
board computer refer to those measured at
sea level. At high altitudes, the tire pressure
values indicated by a pressure gauge are
higher than those shown by the on-board
computer. In this case, do not reduce the
tire pressures.
i The operation of the tire pressure monitor
can be affected by interference from radio
transmitting equipment (e.g. radio
headphones, two-way radios) that may be
being operated in or near the vehicle.
i This device complies with Part 15 of the
FCC Rules. Operation is subject to the
following two conditions:
1. This device may not cause harmful
interference, and
2. this device must accept any interference
received, including interference that may
cause undesired operation.
Any unauthorized modification to this
device could void the user’s authority to
operate the equipment.Checking tire pressure electronicallyXMake sure that the SmartKey is in position
2 (Y page 149) in the ignition lock.XPress and hold the V or U button on
the multifunction steering wheel until the
standard display appears in the
multifunction display ( Y page 220).XPress and hold the & or * button
until the current tire pressure of each tire
is shown in the multifunction display.
If the vehicle has been parked for longer than
20 minutes, the Tire pressure
displayed after driving for several
minutes message appears in the display.
After a teach-in period, the tire pressure
monitor automatically recognizes new wheels
or new sensors. If a clear allocation of the tire
pressure values to the individual wheels is not
possible, the Tire Pressure Monitor
Active message is shown instead of the tire
pressure display. The tire pressures are
already being monitored.
i If a spare wheel/emergency spare wheel
is mounted, the system may continue to
show the tire pressure of the wheel that has
been removed for a few minutes. If this
occurs, note that the value displayed for
the position where the spare tire is
mounted is not the same as the spare
wheel/emergency spare wheel's current
tire pressure.
Tire pressure monitor warning
messages
If the tire pressure monitor detects a
significant pressure loss on one or more tires,
a warning message is shown in the
multifunction display. A warning tone also
sounds and the tire pressure warning lamp
lights up in the instrument cluster.
Each tire that is affected by a significant loss
of pressure is highlighted with a color.
If the Tire Pressure(s) Please Correct
[bar] message appears in the multifunction
display:
348Tire pressureWheels and tires