2012 MERCEDES-BENZ GL change time
[x] Cancel search: change timePage 171 of 384
Exhaust checkGWARNING
Inhalation of exhaust gas is hazardous to your
health. All exhaust gas contains carbon
monoxide (CO), and inhaling it can cause
unconsciousness and possible death.
Do not run the engine in confined areas (such
as a garage) which are not properly ventilated.
If you think that exhaust gas fumes are
entering the vehicle while driving, have the
cause determined and corrected
immediately. If you must drive under these
conditions, drive only with at least one
window fully open at all times.
Certain engine systems are designed to keep
the level of poisonous components in exhaust
fumes within legal limits.
These systems only work at peak efficiency
when they are maintained exactly in
accordance with the manufacturer's
specifications. For this reason, all work on the
engine must be carried out only by qualified
and authorized Mercedes-Benz technicians.
The engine settings must not be changed in
any circumstances. Furthermore, all specific
service work must be carried out at regular
intervals and in accordance with the
Mercedes-Benz service requirements. Details
can be found in the Service Booklet.
Engine oil
! Vehicles with a diesel particle filter:
If the vehicle is mostly driven for short
distances, it is possible that malfunctions
may occur during the automatic cleaning of
the diesel particle filter. This can lead to
engine damage. Therefore, if you frequently
drive short distances, make sure to drive
on highways or inter-urban roads for 20
minutes at least every 310 miles (500 km).
Brakes
Important safety notesGWARNING
On slippery road surfaces, never downshift in
order to obtain braking action. This could
result in drive wheel slip and reduced vehicle
control. Your vehicle's ABS will not prevent
this type of control loss.
Do not engage the transfer case in position
LOW when driving on ice or packed snow. At
speeds below 18 mph (30 km/h) vehicle
steering is adversely affected by the Off-road
ABS.
GWARNING
Make sure that you do not endanger other
road users when you apply the brakes.
Downhill gradients
! On long and steep gradients, you must
reduce the load on the brakes by shifting
early to a lower gear. This allows you to take
advantage of the engine braking effect and
helps avoid overheating and excessive
wear of the brakes.
When you take advantage of the engine
braking effect, a drive wheel may not turn
for some time, e.g. on a slippery road
surface. This could cause damage to the
drive train. This type of damage is not
covered by the Mercedes-Benz warranty.
Heavy and light loads
GWARNING
Depressing the brake pedal constantly results
in excessive and premature wear to the brake
pads.
It may also cause the brakes to overheat,
seriously impairing their effectiveness. It may
then not be possible to stop the vehicle in
sufficient time to avoid an accident.
If the brakes have been subjected to a heavy
load, do not stop the vehicle immediately, but
Driving tips169Driving and parkingZ
Page 185 of 384
conditions make it advisable to travel at a
constant speed.GWARNING
Use of the Distronic can be dangerous on
slippery roads. Rapid changes in tire traction
can result in wheel spin and loss of control.
The Distronic does not function in adverse
sight and distance conditions. Do not use the
Distronic during conditions of fog, heavy rain,
snow or sleet.
GWARNING
The Distronic cannot take weather conditions
into account. Switch off the Distronic or do
not switch it on if:
R roads are slippery or covered with snow or
ice. The wheels could lose traction while
braking or accelerating, and the vehicle
could skid.
R the Distronic system sensor cover is dirty
or visibility is diminished due to snow, rain
or fog, for example. The distance control
system functionality could be impaired.
Always pay attention to surrounding traffic
conditions even while the Distronic is
switched on. Otherwise, you may not be able
to recognize dangerous situations until it is
too late. This could cause an accident in which
you and/or others could be injured.
GWARNING
The "Resume" function should only be
operated if the driver is fully aware of the
previously set speed and wishes to resume
this particular preset speed.
GWARNING
Close attention to road and traffic conditions
is imperative at all times, regardless of
whether or not the Distronic is activated.
Use of the Distronic can be dangerous on
winding roads or in heavy traffic because
conditions do not allow safe driving at a
constant speed.
The Distronic will not react to stationary
objects in the roadway (e.g. a stopped vehicle
in a traffic jam or a disabled vehicle). The
Distronic will also not respond to oncoming
vehicles.
Switch off the Distronic
R when changing from the left to the right
lane if vehicles are moving more slowly in
the left lane
R when entering a turn lane or highway off
ramp
R in complex driving situations, such as in
highway construction zones
In these situations, the Distronic will continue
to maintain the set speed unless deactivated.
The Distronic is designed and intended only
to maintain a set speed and keep a set
distance from moving objects in front of it.
i USA only:
This device has been approved by the FCC
as a “Vehicular Radar System”. The radar
sensor is intended for use in an automotive
radar system only. Removal, tampering, or
altering of the device will void any
warranties, and is not permitted by the
FCC. Do not tamper with, alter, or use in
any non-approved way.
Any unauthorized modification to this
device could void the user's authority to
operate the equipment.Driving systems183Driving and parkingZ
Page 192 of 384
the speed increases. As the vehicle
decelerates, the vehicle is raised back up to
highway level. In ADS SPORT(Y page 195),
the vehicle skips highway level and is lowered
directly to high-speed level.
Make changes to the vehicle level while the
vehicle is in motion. This enables the vehicle
to adjust to the new level as quickly as
possible.
The vehicle level may change visibly when you
park the vehicle and the outside temperature
changes. When the temperature drops, the
vehicle level is lower; with an increase in
temperature, the vehicle level rises.
When you unlock the vehicle or open a door,
the vehicle begins to balance the load
discrepancies while still parked. However, for
significant level changes, e.g. after the
vehicle has been stationary for a long period,
the engine must be on. For safety reasons,
the vehicle is only lowered when the doors are
closed. Lowering is interrupted if a door is
opened and continues once the door has
been closed.GWARNING
Make sure that nobody is in the vicinity of the
wheel arch or the underbody when changing
the vehicle level. You could otherwise trap
yourself or others.
GWARNING
Always select as low a vehicle level as
possible. If the vehicle level is high, the vehicle
center of gravity shifts upwards. This
increases the risk of the vehicle tipping over.
Adapt your driving style to suit the vehicle
level. ESP ®
cannot reduce the risk of an
accident if you drive too fast. ESP ®
cannot
override the laws of physics.
! When driving on extremely rough terrain,
select a high vehicle level in good time.
Make sure that there is always sufficient
ground clearance to prevent damage to the
vehicle.
! Remove the key from the ignition before
raising one or more wheels with the
appropriate equipment.
For information about driving off-road, see
( Y page 174).
Vehicles without extended Off-Road Pro
engineering package
Basic setting
The extent to which the vehicle is raised or
lowered depends on the basic setting
selected.
Select:
R Raised level, for driving on normal off-road
terrain
R Highway/high-speed level for normal roads
The individual vehicle levels differ from
highway level as follows:
R +2.3 in (+ 60 mm) at the raised level
R +/–0 in (+/–0 mm) at the highway level 23
R –0.6 in (–15 mm) at the high-speed level
Raised level
Only select raised level when this is
appropriate for the road conditions.
Otherwise, fuel consumption increases and
handling performance may be affected.
Your selection remains stored even if you
remove the SmartKey from the ignition lock.
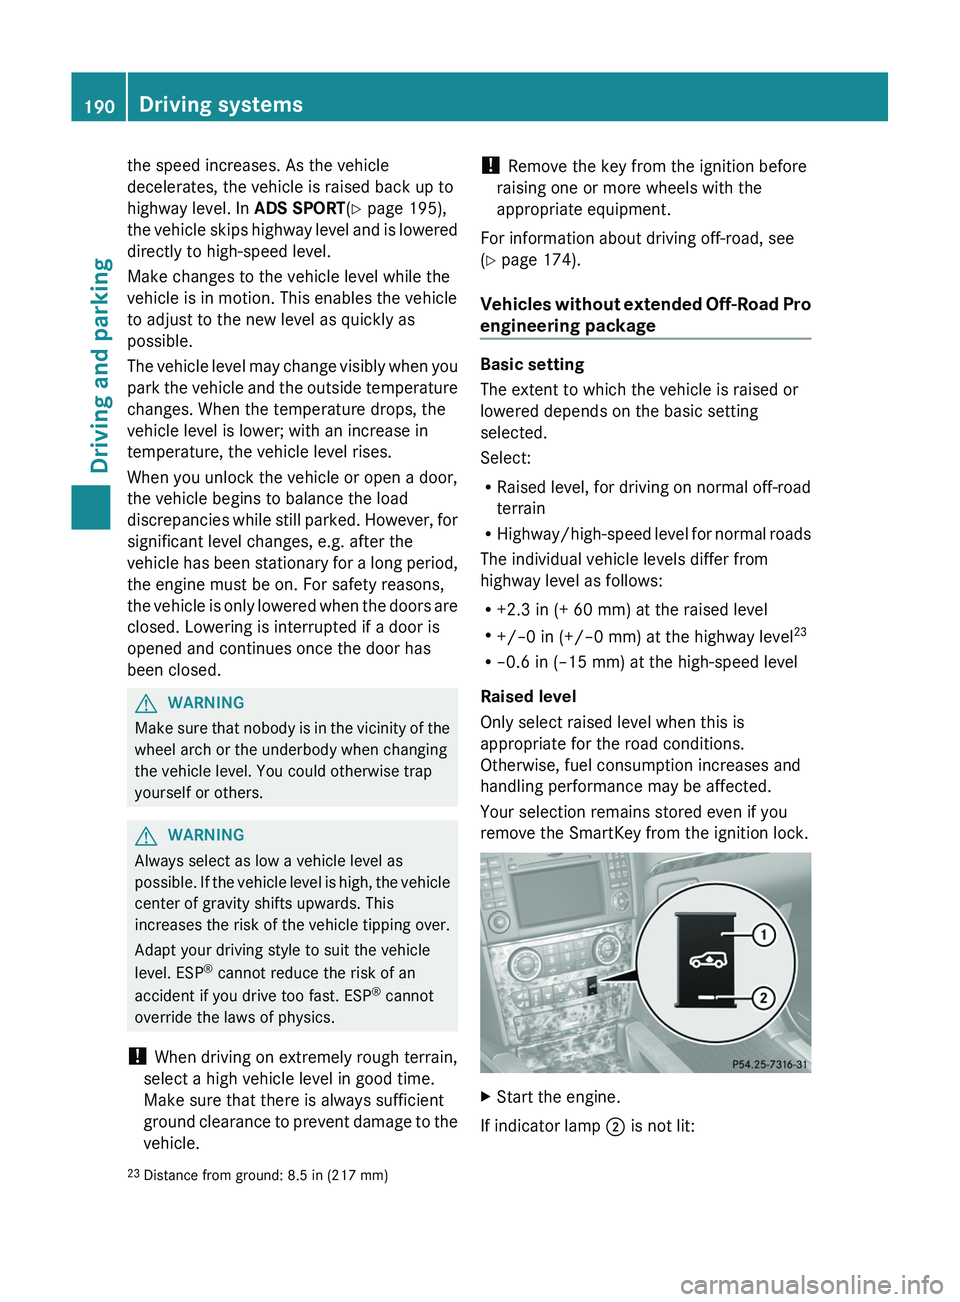
XStart the engine.
If indicator lamp ; is not lit:
23
Distance from ground: 8.5 in (217 mm)190Driving systemsDriving and parking
Page 202 of 384
GWARNING
The rear view camera is only an aid and may
display obstacles
R from a distorted perspective
R inaccurately
R may not display obstacles at all
The rear view camera does not relieve you of
the responsibility to be cautious. Take care
and pay careful attention. The rear view
camera may not show objects which are
R very close to the rear bumper
R under the rear bumper
R above the tailgate handle
You are responsible for safety at all times and
must continue to pay attention to the
immediate surroundings when parking and
maneuvering. This includes the area behind,
in front of, and beside the vehicle. Otherwise
you could endanger yourself and/or others.
GWARNING
The rear view camera will not function or will
not fully function if:
R the tailgate is open
R it is raining or snowing strongly or if it is
foggy
R it is night or if you are parking/
maneuvering your vehicle in a very dark
area
R a very bright white light is affecting the
camera
R the immediate vicinity is illuminated with
fluorescent light (the display can flicker)
R temperature changes abruptly, for example
if you drive out of the cold into a heated
garage (condensation on the lens)
R the camera lens is dirty or covered
R the rear of your vehicle is damaged
In this case, have the position and the
setting of the camera checked at a
specialist workshop. Mercedes-Benz
recommends that you consult a Mercedes-
Benz Center for this purpose.
Do not use the rear view camera in these
situations. You could otherwise injure
yourself and other people and/or cause
damage - including damage to your vehicle -
while parking/maneuvering.
Activating the rear view cameraXMake sure that the SmartKey is in position
2 in the ignition lock.XMake sure that the "rear view camera"
function is selected in COMAND (see the
separate operating instructions for
COMAND).XEngage reverse gear.
The area behind the vehicle is shown in the
COMAND display with guide lines.
Guide lines in the COMAND display
GWARNING
Use of rear view camera can be dangerous if
you are color-blind or have impaired color
vision.
Only use rear view camera if you can see and
distinguish all colored guidelines shown by
rear view camera on the COMAND system
display.
GWARNING
Please note that objects that do not touch the
ground may appear to be further away than
they actually are, for example:
R the bumper of a vehicle parked behind you
R the trailer drawbar
R the ball coupling of a trailer tow hitch
R the rear end of a truck
R a slanted post
In such cases, you should not use the guide
lines to judge the distance. You may misjudge
the distance, which increases the risk of
impacting the objects.
Even if the object you approach is directly on
the ground, do not approach the object any
closer than the red guide line.
200Driving systemsDriving and parking
Page 206 of 384
or be fully raised. Observe the instructions
for towing the vehicle with all wheels in full
contact with the ground.
i In wintry driving conditions, the maximum
effect of 4MATIC can only be achieved if
you use winter tires ( M+S tires), with snow
chains if necessary.
! When testing the parking brake, operate
the vehicle only briefly (for a maximum of
ten seconds) on a brake test dynamometer.
When doing this, turn the key to position
0 or 1 in the ignition. Failure to do this can
cause damage to the drive train or the
brake system.
! Function or performance tests may only
be performed on a 2-axle dynamometer. If
you wish to operate the vehicle on such a
dynamometer, please consult an
authorized Mercedes-Benz Center
beforehand. You could otherwise damage
the drive train or the brake system.
For information about driving off-road, see
( Y page 174).
DSR (Downhill Speed Regulation)
Important safety notes
DSR is an aid to assist you when driving
downhill. It keeps the speed of travel at the
speed selected on the on-board computer.
The steeper the downhill gradient, the greater
the DSR braking effect on the vehicle. When
driving on flat stretches of road or on an uphill
gradient, the DSR braking effect is minimal or
non-existent.
The set speed is set to 4 mph (6 km/h) at the
factory; this can be adjusted using the on-
board computer ( Y page 228).
GWARNING
Downhill Speed Regulation (DSR) is a
convenience system designed to assist the
driver during vehicle operation. The system
setting must be appropriate to the
topographical and weather conditions
encountered, which can change quickly. The
driver is responsible for the vehicle speed and
for safe brake operation at all times.
Depending on the programmed speed, actual
vehicle speed and gradient, switching on DSR
while driving can cause the vehicle to slow
down rapidly, and you may hear a sound,
caused by the activation of the vehicle's brake
system through DSR. Sudden and unexpected
deceleration can result in loss of vehicle
control, causing an accident and/or serious
personal injury to you and others. Do not
switch on DSR in a situation where rapid
deceleration could result in a loss of vehicle
control.
DSR controls the set speed when it is active
and the automatic transmission is in the D,
R or N position. You can drive at a higher or
a lower speed than that set on the on-board
computer at any time by accelerating or
braking.GWARNING
If you depress the accelerator pedal with DSR
activated, the vehicle can drive faster than the
programmed set speed. You should therefore
drive downhill with particular caution as it
could lead to an accident and/or serious
injury to you or others. Keep in mind that as
soon as you remove your foot from the
accelerator pedal with DSR switched on, DSR
will start regulating the vehicle's speed
including use of brakes if required. Depending
on the programmed set speed, actual vehicle
speed and gradient, DSR can cause the
vehicle to slow down rapidly. Sudden and
unexpected deceleration can result in loss of
vehicle control, causing an accident and/or
serious personal injury to you and others.
For information about driving off-road, see
( Y page 174).
204Off-road driving systemsDriving and parking
Page 212 of 384
computer, the message disappears after
about five seconds.
The differential locks are not controlled
automatically. The steerability of the vehicle
is restricted considerably. Drive carefully and
accelerate gently for optimum traction.
! If the differential locks are activated
manually, the wheels scuff on the road
when cornering since the rotation
difference between the wheels is no longer
balanced out.
You can switch back to automatic mode at
any time. For safety reasons, the differential
locks are deactivated automatically at speeds
over 31 mph (50 km/h). If you stop the
vehicle and switch off the ignition for longer
than ten seconds, the differential locks
switch back to automatic mode.
Message in the multifunction display
Diff. lock system overheated.
Wait briefly.
The differential lock system has overheated
and briefly disengaged.XContinue driving.
The differential locks cool off and are soon
available once again.
Trailer towing
Notes on towing a trailer
Important safety notes
GWARNING
When towing a trailer, incorrect equipment
and driving style could cause you to lose
control of the vehicle.
Towing incorrectly or not observing this
Operator's Manual could lead to damage to
the vehicle and/or serious injuries. Observe
the following guidelines to ensure safe trailer
towing.
Contact a Mercedes-Benz Center if you need
further explanation of the information
contained in this Operator's Manual.
General information
R Only install an approved trailer coupling on
your vehicle.
Further information on availability and on
installation is available from any authorized
Mercedes-Benz Center.
R The bumpers of your vehicle are not
suitable for installing detachable trailer
couplings.
R Do not install hired trailer couplings or
other detachable trailer couplings on the
bumpers of your vehicle.
R To reduce the risk of damage to the ball
coupling, remove it from the ball coupling
recess when not in use.
Coupling up a trailer
GWARNING
While you are coupling or decoupling a trailer,
make sure nobody locks or unlocks the
vehicle and/or opens or closes doors or the
tailgate.
The vehicle's level could change and you
could endanger yourself and/or others as a
result.
Make sure that you do not operate the ADS
button or the vehicle level control system
when coupling/decoupling the trailer.
Observe the maximum permissible trailer
dimensions (width and length).
Most federal states and all Canadian
provinces require by law:
R safety chains between the towing vehicle
and the trailer. The chains should be cross-
wound under the trailer drawbar. They must
be fastened to the vehicle's trailer
coupling, not to the bumper or the axle.
210Trailer towingDriving and parking
Page 245 of 384
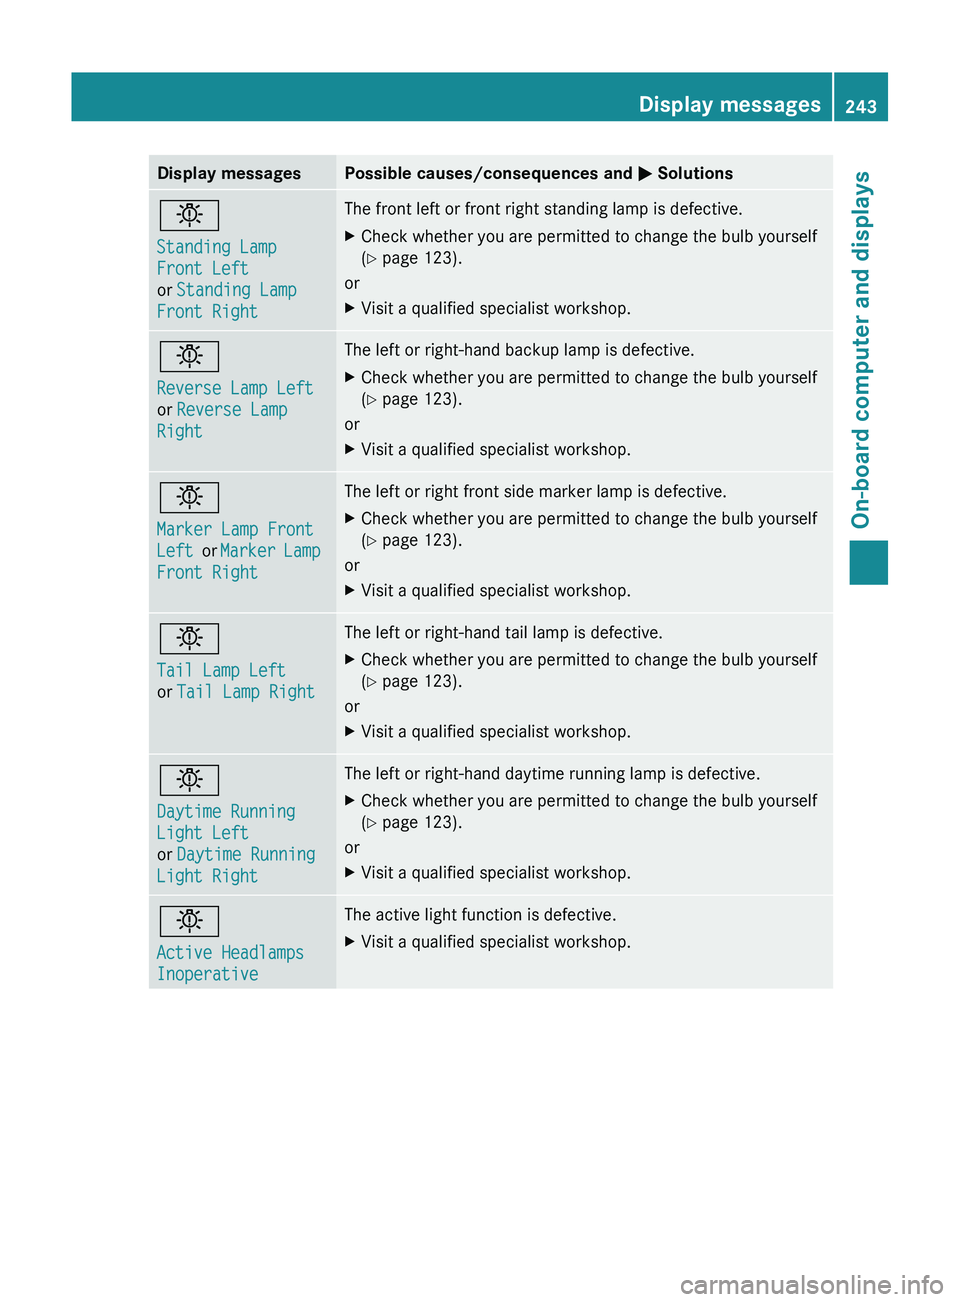
Display messagesPossible causes/consequences and M Solutionsb
Standing Lamp
Front Left
or Standing Lamp
Front RightThe front left or front right standing lamp is defective.XCheck whether you are permitted to change the bulb yourself
( Y page 123).
or
XVisit a qualified specialist workshop.b
Reverse Lamp Left
or Reverse Lamp
RightThe left or right-hand backup lamp is defective.XCheck whether you are permitted to change the bulb yourself
( Y page 123).
or
XVisit a qualified specialist workshop.b
Marker Lamp Front
Left or Marker Lamp
Front RightThe left or right front side marker lamp is defective.XCheck whether you are permitted to change the bulb yourself
( Y page 123).
or
XVisit a qualified specialist workshop.b
Tail Lamp Left
or Tail Lamp RightThe left or right-hand tail lamp is defective.XCheck whether you are permitted to change the bulb yourself
( Y page 123).
or
XVisit a qualified specialist workshop.b
Daytime Running
Light Left
or Daytime Running
Light RightThe left or right-hand daytime running lamp is defective.XCheck whether you are permitted to change the bulb yourself
( Y page 123).
or
XVisit a qualified specialist workshop.b
Active Headlamps
InoperativeThe active light function is defective.XVisit a qualified specialist workshop.Display messages243On-board computer and displaysZ
Page 298 of 384

found on the reverse side of the remote
control).
The integrated garage door opener is
compatible with devices that can be
operated with units in a frequency range of
280 to 390 MHz.
R change the batteries in garage door remote
control A. This increases the probability
that garage door remote control A will
send a strong and precise signal to the
integrated garage door opener on the rear-
view mirror.
R when programming, hold garage door
remote control A at different distances
and angles from the transmitter button that
you are programming. Try different angles
at a distance between 2 and 12 inches (5
to 30 cm) or the same angle at varying
distances.
R if another remote control for the same
garage door drive is available, repeat the
same programming steps with this remote
control. Before you perform the steps of the
operation, make sure that there are new
batteries in the garage door remote
control.
R note that some remote controls only
transmit for a limited amount of time (the
indicator lamp on the remote control goes
out). Press the remote control button again
before it stops transmitting.
R align the antenna cable of the garage door
opener unit. This can improve signal
reception/transmission.
Opening/closing the garage door
Once programmed, the integrated garage
door opener will assume the function of the
garage door system's remote control. Please
also read the operating instructions for the
garage door system.
XTurn the SmartKey to position 2 in the
ignition lock.XPress transmitter button ;, = or ? in the
overhead control panel that you have
programmed to operate the garage door.
Garage door system with a fixed code:
indicator lamp : lights up green.
Garage door system with a rolling code:
indicator lamp : flashes green.
i
The transmitter will transmit a signal for
as long as the transmitter button is being
pressed. After a maximum of ten seconds,
transmission is terminated and indicator
lamp : flashes yellow. Press the
transmitter button again, if necessary.
Clearing the memory of the integrated
garage door opener on the rear-view
mirror
XTurn the SmartKey to position 2 in the
ignition lock.XPress transmitter buttons ; and ?.
The indicator lamp lights up yellow.XPress and hold transmitter buttons ;
and ? until the indicator lamp turns green.
i
Make sure that you clear the memory of
the integrated garage door opener before
selling the vehicle.
Compass
Calling up the compass
XPress the V or U button on the
multifunction steering wheel repeatedly
until the Offroad menu appears in the
multifunction display.
The compass shows which direction the
vehicle is currently traveling in: N, NE , E , SE ,
S , SW , W or NW.296FeaturesStowing and features